Page 127 of 589
441
Features of your vehicle
Heated steering wheel
(if equipped)
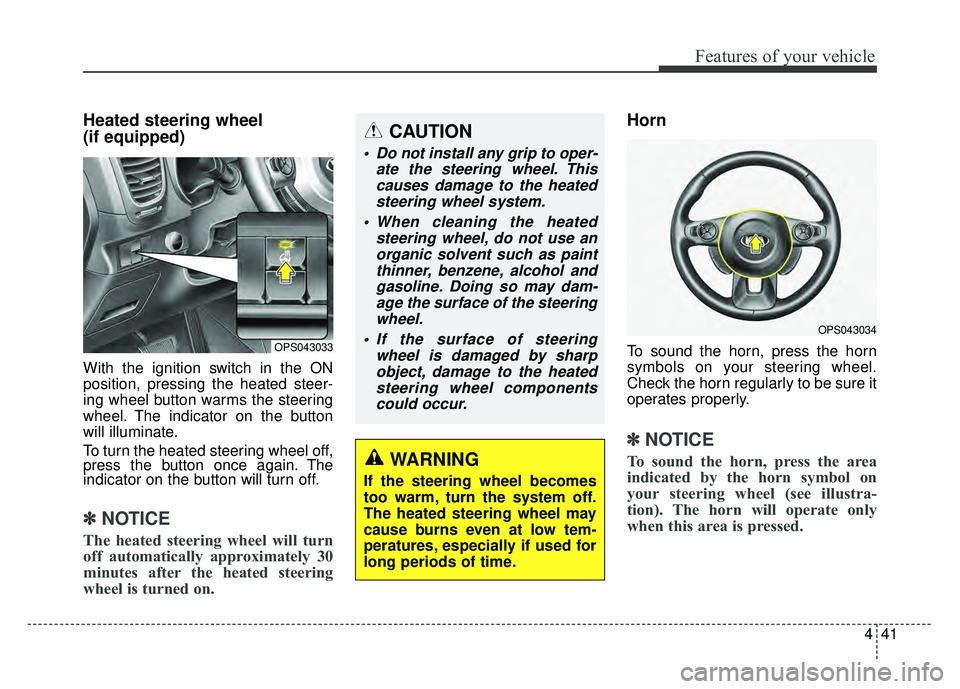
With the ignition switch in the ON
position, pressing the heated steer-
ing wheel button warms the steering
wheel. The indicator on the button
will illuminate.
To turn the heated steering wheel off,
press the button once again. The
indicator on the button will turn off.
✽ ✽NOTICE
The heated steering wheel will turn
off automatically approximately 30
minutes after the heated steering
wheel is turned on.
Horn
To sound the horn, press the horn
symbols on your steering wheel.
Check the horn regularly to be sure it
operates properly.
✽ ✽NOTICE
To sound the horn, press the area
indicated by the horn symbol on
your steering wheel (see illustra-
tion). The horn will operate only
when this area is pressed.
OPS043033
OPS043034
CAUTION
Do not install any grip to oper-
ate the steering wheel. Thiscauses damage to the heatedsteering wheel system.
When cleaning the heated steering wheel, do not use anorganic solvent such as paintthinner, benzene, alcohol andgasoline. Doing so may dam-age the surface of the steeringwheel.
If the surface of steering wheel is damaged by sharpobject, damage to the heatedsteering wheel componentscould occur.
WARNING
If the steering wheel becomes
too warm, turn the system off.
The heated steering wheel may
cause burns even at low tem-
peratures, especially if used for
long periods of time.
Page 132 of 589

Features of your vehicle
46
4
Remote control
Electric type
The electric remote control mirror
switch allows you to adjust the posi-
tion of the left and right outside
rearview mirrors. To adjust the posi-
tion of either mirror the ignition
switch should be in the ACC position.
Move the switch (1) to R or L to
select the right side mirror or the left
side mirror, then press a correspon-
ding point on the mirror adjustment
control to position the selected mirror
up, down, left or right.
After the adjustment, put the switch
into the neutral (center) position to
prevent inadvertent adjustment.
Folding the outside rearview mirror
Manual type
To fold the outside rearview mirror,
grasp the housing of the mirror and
then fold it toward the rear of the
vehicle.
OPS046035L
CAUTION- Outside mirror
The mirrors stop moving when
they reach the maximumadjusting angles, but themotor continues to operatewhile the switch is pressed.
Do not press the switch longerthan necessary, the motormay be damaged.
Do not attempt to adjust the outside rearview mirror byhand. Doing so may damagethe parts.
OPS043037
Page 173 of 589
487
Features of your vehicle
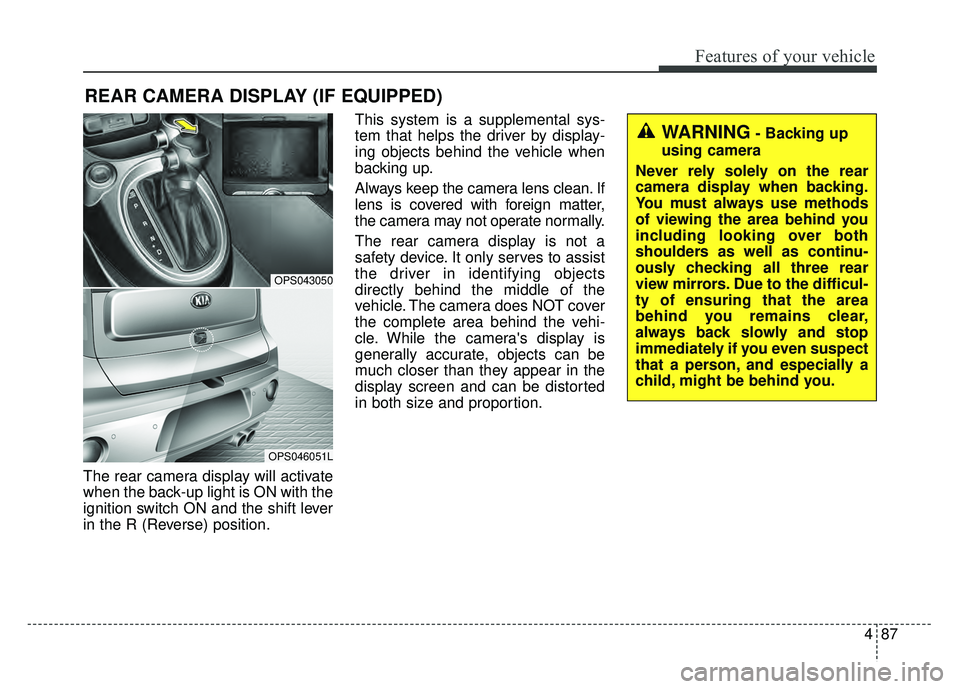
The rear camera display will activate
when the back-up light is ON with the
ignition switch ON and the shift lever
in the R (Reverse) position.This system is a supplemental sys-
tem that helps the driver by display-
ing objects behind the vehicle when
backing up.
Always keep the camera lens clean. If
lens is covered with foreign matter,
the camera may not operate normally.
The rear camera display is not a
safety device. It only serves to assist
the driver in identifying objects
directly behind the middle of the
vehicle. The camera does NOT cover
the complete area behind the vehi-
cle. While the camera's display is
generally accurate, objects can be
much closer than they appear in the
display screen and can be distorted
in both size and proportion.
REAR CAMERA DISPLAY (IF EQUIPPED)
OPS043050
OPS046051L
WARNING- Backing up
using camera
Never rely solely on the rear
camera display when backing.
You must always use methods
of viewing the area behind you
including looking over both
shoulders as well as continu-
ously checking all three rear
view mirrors. Due to the difficul-
ty of ensuring that the area
behind you remains clear,
always back slowly and stop
immediately if you even suspect
that a person, and especially a
child, might be behind you.
Page 174 of 589
Features of your vehicle
88
4
Headlamp escort (if equipped)
If you turn the ignition switch to the
ACC or OFF position with the head-
lights ON, the headlights remain on
for about 5 minutes. However, if the
driver’s door is opened and closed,
the headlights are turned off after 15
seconds.
The headlights can be turned off by
pressing the lock button on the trans-
mitter (or smart key) twice or turning
the light switch to the OFF or Auto
position. However, if you turn the light
switch to the Auto position when it is
dark outside, the headlights will not
be turned off immediately.
Battery saver function
The purpose of this feature is to
prevent the battery from being dis-
charged. The system automatically
turns off the parking lights when
the driver removes the ignition key
and opens the driver-side door (in
that order).
With this feature, the parking lights will turn off automatically if the driv-
er parks on the side of the road at
night.
If necessary, to keep the lights on
when the ignition key is removed,
perform the following:
1) Open the driver-side door.
2) Turn the parking lights OFF and ON again using the light switch
on the steering column.
Daytime running light
(if equipped)
Daytime Running Lights (DRL) may
help make it easier for others to see
the front of your vehicle during the
day. DRL can be helpful in many dif-
ferent driving conditions, and it is
especially helpful after dawn and
before sunset.
The DRL system turns OFF when:
1. The front fog light or headlight (lowbeam) switch is ON.
2. The engine is OFF.
3. The parking brake is applied.
LIGHTING
Page 214 of 589
Features of your vehicle
128
4
For maximum defrosting, set the
temperature control to the extreme
right/hot position and the fan speed
control to the highest speed.
If warm air to the floor is desired while defrosting or defogging, set the
mode to the floor-defrost position.
Before driving, clear all snow and ice from the windshield, rear win-
dow, outside rear view mirrors, and
all side windows.
Clear all snow and ice from the hood and air inlet in the cowl grille
to improve heater and defroster
efficiency and to reduce the proba-
bility of fogging up inside of the
windshield.Manual climate control system
To defog inside windshield
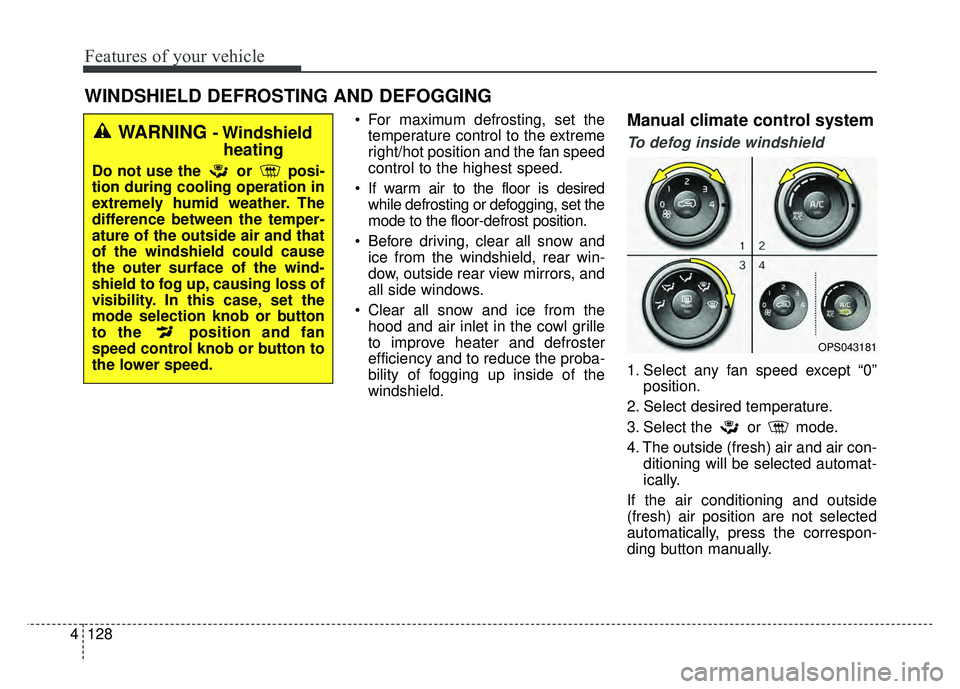
1. Select any fan speed except “0” position.
2. Select desired temperature.
3. Select the or mode.
4. The outside (fresh) air and air con- ditioning will be selected automat-
ically.
If the air conditioning and outside
(fresh) air position are not selected
automatically, press the correspon-
ding button manually.
WINDSHIELD DEFROSTING AND DEFOGGING
OPS043181
WARNING - Windshield heating
Do not use the or posi-
tion during cooling operation in
extremely humid weather. The
difference between the temper-
ature of the outside air and that
of the windshield could cause
the outer surface of the wind-
shield to fog up, causing loss of
visibility. In this case, set the
mode selection knob or button
to the position and fan
speed control knob or button to
the lower speed.
Page 215 of 589
4129
Features of your vehicle
To defrost outside windshield
1. Set the fan speed to the highest(extreme right) position.
2. Set the temperature to the extreme hot position.
3. Select the position.
4. The outside (fresh) air and air con- ditioning will be selected automat-
ically.
Automatic climate control
system
To defog inside windshield
1. Set the fan speed to the desiredposition.
2. Select desired temperature. 3. Press the defrost button ( ).
4. The air-conditioning will be turned
on according to the detected
ambient temperature, outside
(fresh) air position and higher fan
speed will be selected automati-
cally.
If the air-conditioning, outside (fresh)
air position and higher fan speed are
not selected automatically, adjust the
corresponding button or knob manu-
ally.
If the position is selected, with a
low fan speed, a higher fan speed
may be automatically selected.
OPS043182OPS043183
OPS043185
■ Type B
■Type A
Page 234 of 589
Features of your vehicle
148
4
The following specification is the
maximum weight that can be
loaded onto the roof rack.
Distribute the load as evenly as
possible across the crossbars (if
equipped) and roof rack and
secure the load firmly.
Loading cargo or luggage in
excess of the specified weight limit
on the roof rack may damage your
vehicle.
The vehicle center of gravity will be higher when items are loaded onto
the roof rack. Avoid sudden starts,
braking, sharp turns, abrupt
maneuvers or high speeds that
may result in loss of vehicle control
or rollover resulting in an accident. Always drive slowly and turn cor-
ners carefully when carrying items
on the roof rack. Severe wind
updrafts, caused by passing vehi-
cles or natural causes, can cause
sudden upward pressure on items
loaded on the roof rack. This is
especially true when carrying
large, flat items such as wood pan-
els or mattresses. This could cause
the items to fall off the roof rack
and cause damage to your vehicle
or others around you.
To prevent damage or loss of cargo while driving, check frequently
before or while driving to make
sure the items on the roof rack are
securely fastened.Mounting bracket for roof carrier
(if equipped)
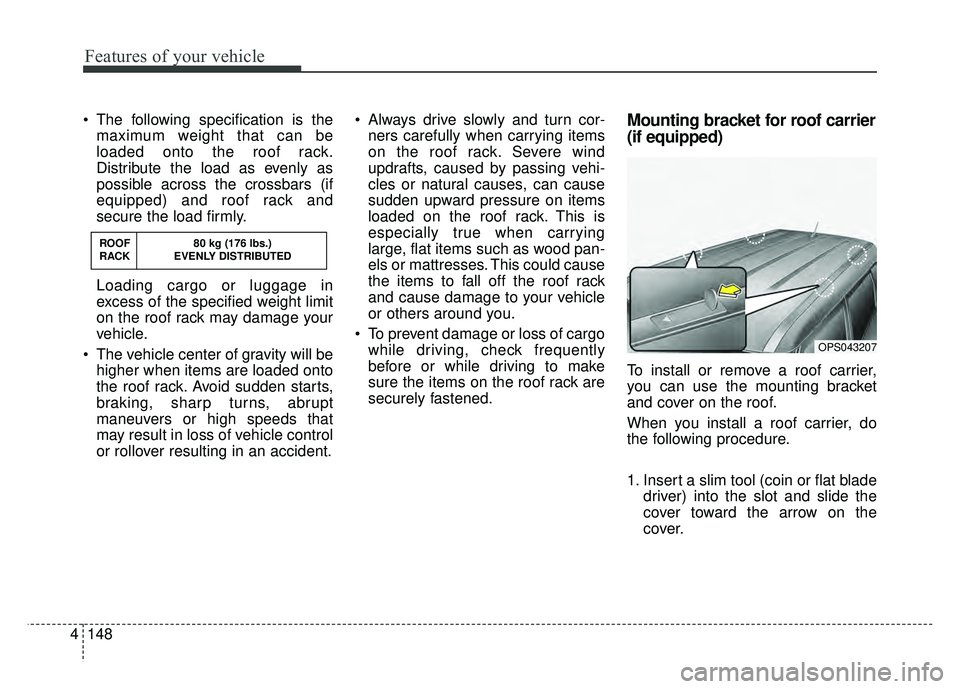
To install or remove a roof carrier,
you can use the mounting bracket
and cover on the roof.
When you install a roof carrier, do
the following procedure.
1. Insert a slim tool (coin or flat blade driver) into the slot and slide the
cover toward the arrow on the
cover.
OPS043207
ROOF 80 kg (176 lbs.)
RACK EVENLY DISTRIBUTED
Page 238 of 589

Audio system
53
Audio remote control
The steering wheel audio remote
control button may be installed.
Do not operate the audio remote
control buttons simultaneously.
VOLUME (VOL+/ VOL-) (1)
Push the VOL + to increase volume.
Push the VOL - to decrease volume.
SEEK/PRESET ( / ) (2)
If the SEEK/PRESET button is
pressed for more than 1 second, it
will work as follows in each mode.RADIO mode
It will function as the AUTO SEEK
select button.
USB mode
It will function as the FF/REW button.
If the SEEK/PRESET button is
pressed for less than 1 second, it will
work as follows in each mode.
RADIO mode
It will function as the PRESET STA-
TION select buttons.
USB mode
It will function as the FILE UP/DOWN
button.
MODE (3)
Press the button to select Radio,
USB or AUX.
Detailed information for audio control
buttons is described in the following
pages in this section.
OPS043190
WARNING- Distracted
Driving
Driving while distracted can
result in a loss of vehicle con-
trol that may lead to an acci-
dent, severe personal injury and
death. The driver’s primary
responsibility is in the safe and
legal operation of a vehicle, and
use of any handheld devices,
other equipment or vehicle sys-
tems which take the driver’s
eyes, attention and focus away
from the safe operation of a
vehicle or that are not permissi-
ble by law should never be used
during operation of the vehicle.