Page 518 of 589
877
Maintenance
Fuse switch
Always, put the fuse switch at the ON
position.
If you move the switch to the OFF
position, some items such as audio
and digital clock must be reset and
transmitter (or smart key) may not
work properly.
✽ ✽NOTICE
If you need to park your vehicle for
prolonged periods more than 1
month, move the transportation fuse
switch to the OFF position to pre-
vent the battery being discharged.
Engine compartment fuse
replacement
1. Turn the ignition switch and all
other switches off.
2. Remove the fuse panel cover by pressing the tab and pulling the
cover up. When the blade type
fuse is disconnected, remove it by
using the clip designed for chang-
ing fuses located in the engine
room fuse box. Upon removal,
securely insert reserve fuse of
equal quantity.
OPS073016
OPS073015
Page 519 of 589

Maintenance
78
8
3. Check the removed fuse; replace it
if it is blown. To remove or insert
the fuse, use the fuse puller in the
engine compartment fuse panel.
4. Push in a new fuse of the same rating, and make sure it fits tightly
in the clips. If it fits loosely, consult
an authorized Kia dealer.Multi fuse
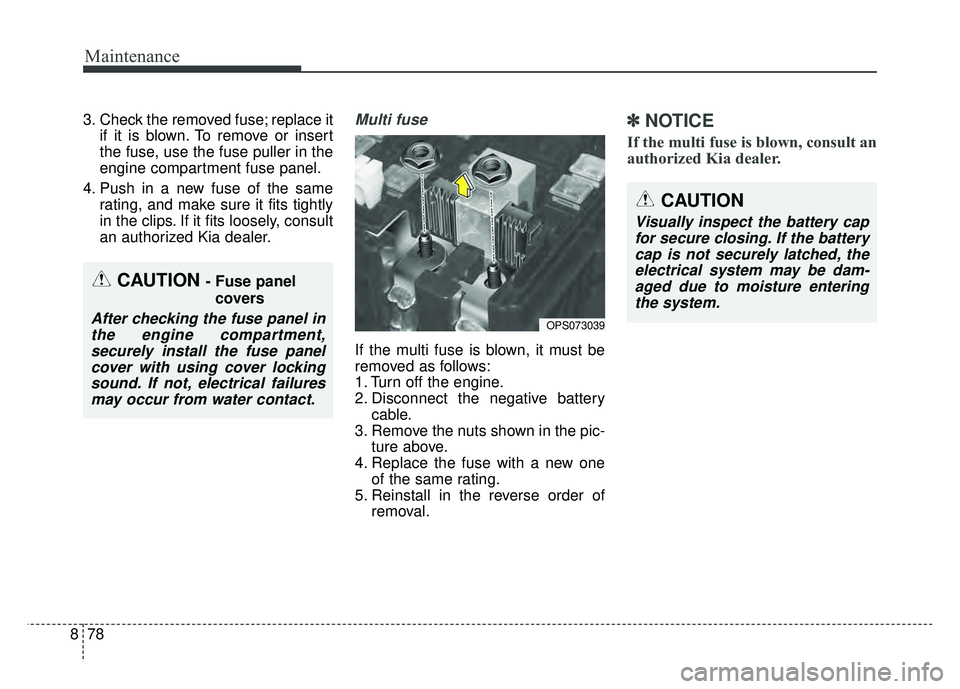
If the multi fuse is blown, it must be
removed as follows:
1. Turn off the engine.
2. Disconnect the negative batterycable.
3. Remove the nuts shown in the pic- ture above.
4. Replace the fuse with a new one of the same rating.
5. Reinstall in the reverse order of removal.
✽ ✽NOTICE
If the multi fuse is blown, consult an
authorized Kia dealer.
OPS073039
CAUTION- Fuse panel
covers
After checking the fuse panel inthe engine compartment,securely install the fuse panelcover with using cover lockingsound. If not, electrical failuresmay occur from water contact.
CAUTION
Visually inspect the battery capfor secure closing. If the batterycap is not securely latched, theelectrical system may be dam-aged due to moisture enteringthe system.
Page 523 of 589

Maintenance
82
8
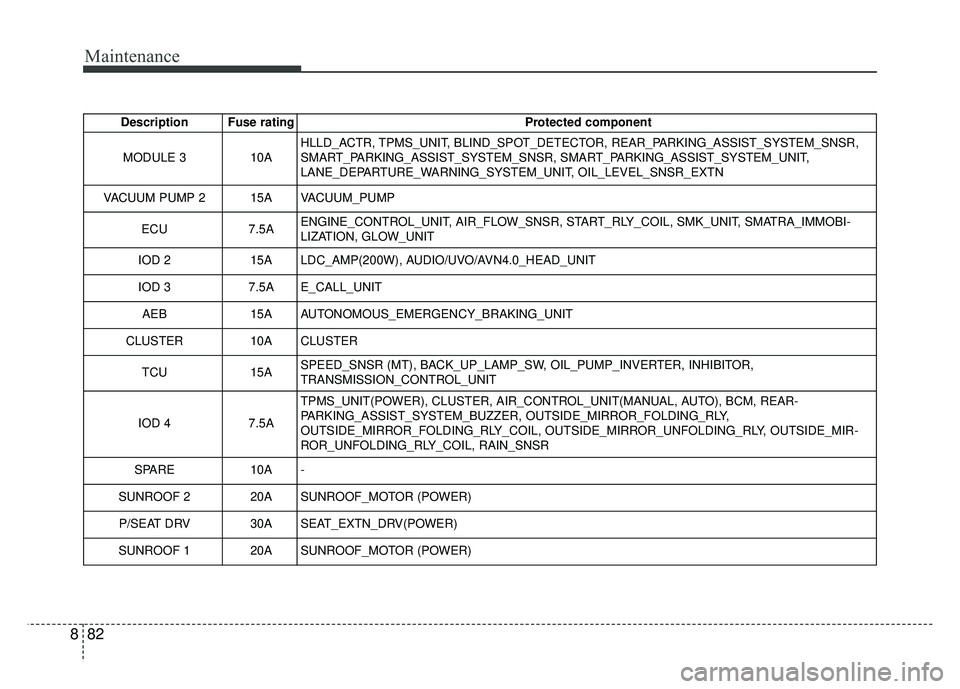
Description Fuse rating Protected component
MODULE 3 10AHLLD_ACTR, TPMS_UNIT, BLIND_SPOT_DETECTOR, REAR_PARKING_ASSIST_SYSTEM_SNSR,
SMART_PARKING_ASSIST_SYSTEM_SNSR, SMART_PARKING_ASSIST_SYSTEM_UNIT,
LANE_DEPARTURE_WARNING_SYSTEM_UNIT, OIL_LEVEL_SNSR_EXTN
VACUUM PUMP 2 15A VACUUM_PUMP
ECU 7.5AENGINE_CONTROL_UNIT, AIR_FLOW_SNSR, START_RLY_COIL, SMK_UNIT, SMATRA_IMMOBI-
LIZATION, GLOW_UNIT
IOD 2 15A LDC_AMP(200W), AUDIO/UVO/AVN4.0_HEAD_UNIT
IOD 3 7.5A E_CALL_UNIT
AEB 15A AUTONOMOUS_EMERGENCY_BRAKING_UNIT
CLUSTER 10A CLUSTER
TCU 15ASPEED_SNSR (MT), BACK_UP_LAMP_SW, OIL_PUMP_INVERTER, INHIBITOR,
TRANSMISSION_CONTROL_UNIT
IOD 4 7.5ATPMS_UNIT(POWER), CLUSTER, AIR_CONTROL_UNIT(MANUAL, AUTO), BCM, REAR-
PARKING_ASSIST_SYSTEM_BUZZER, OUTSIDE_MIRROR_FOLDING_RLY,
OUTSIDE_MIRROR_FOLDING_RLY_COIL, OUTSIDE_MIRROR_UNFOLDING_RLY, OUTSIDE_MIR-
ROR_UNFOLDING_RLY_COIL, RAIN_SNSR
SPARE 10A -
SUNROOF 2 20A SUNROOF_MOTOR (POWER) P/SEAT DRV 30A SEAT_EXTN_DRV(POWER)
SUNROOF 1 20A SUNROOF_MOTOR (POWER)
Page 525 of 589
Maintenance
84
8
Engine compartment fuse panel
✽
✽
NOTICE
The actual fuse/relay panel label
may differ from equipped items.
OPS073013
OPS076106N
Page 526 of 589
885
Maintenance
Engine compartment fuse panel
Description Fuse ratingProtected component
IG1 40A IGN_SW(B1), BUTTON_START_RLY(IG1), BUTTON_START_RLY(ACC)
BLOWER 40A BLOWER_RLY, BLOWER_MOTOR
REAR HEATED 40A REAR_GLASS_HEATED_RLY, REAR_GLASS_HEATED_RLY_COIL ECU 2 30A MAIN_RLY, MAIN_RLY_COIL
ECU 3 15A ECU(AFTER_AIN_RELAY)
IGN COIL 20A IGNITION_COIL(POWER)
ECU 1 20A ECU(AFTER_MAIN_RELAY)
SENSOR 1 10ASTOP_LAMP_SW(NORMAL_CLOSE), O2_SNSR, PURGE_CONTROL_SOLENOID_VALVE, OCV,
PCSV, VIS, CAM_P_SNSR, CAM POSITION SENSOR, VGT_VACCUM
SENSOR 2 10ACMP, COOLING_FAN_LOW_RLY_COIL, AIR_FLAP_SNSR, VIS , EGR_VALVE, O2_SNSR,
LAMBDA_SNSR, WGV, EGR_ACTUATOR
INJECTOR 10A -
B/UP LAMP 10A RR_COMBI_LAMP(BACK_UP_LAMP)
WIPER 10A ECU(WIPER_SWITCH)
FUEL PUMP15AFUEL_PUMP_MOTOR
HORN15AHORN_RLY, HORN_RLY_COIL, HORN
TCU415ATRANSMISSION_CONTROL_UNIT
A/CON10AA/CON_RLY
Page 529 of 589

Maintenance
88
8
LIGHT BULBS
Bulb replacement precaution
Please keep extra bulbs on hand
with appropriate wattage ratings in
case of emergencies.
Refer to “Bulb Wattage” in chapter 9.
When changing lamps, first turn off
the engine at a safe place, firmly
apply the parking brake and detach
the battery’s negative (-) terminal.
Use only bulbs of the specified
wattage.✽ ✽ NOTICE
• If the light bulb or lamp connector
is removed while the lamp is still
on, the fuse box's electronic sys-
tem may log it as a malfunction.
Therefore, a lamp malfunction
incident may be recorded as a
Diagnostic Trouble Code (DTC) in
the fuse box.
• It is normal for an operating lamp to flicker momentarily. This is due
to a stabilization function of the
vehicle’s electronic control device.
If the lamp lights up normally
after momentarily blinking, then
it is functioning as normal.
However, if the lamp continues to
flicker several times or turns off
completely, there may be an error
in the vehicle’s electronic control
device. Please have the vehicle
checked by an authorized Kia
dealer immediately.
WARNING- Working on
the lights
Prior to working on the light,
firmly apply the parking brake,
ensure that the ignition switch
is turned to the LOCK position
and turn off the lights to avoid
sudden movement of the vehi-
cle and burning your fingers or
receiving an electric shock.
CAUTION -Light replace-
ment
Be sure to replace the burned- out bulb with one of the samewattage rating. Otherwise, itmay cause damage to the fuseor electric wiring system.
CAUTION -Headlamp
Lens
To prevent damage, do notclean the headlamp lens withchemical solvents or strongdetergents.
Page 532 of 589
891
Maintenance
Headlamp (Low/High beam)
bulb replacement
1. Turn off the engine and open thehood. Disconnect the negative
battery cable. 2. Disconnect the power connector
front the back of the headlamp
assembly.
3. Loosen the retaining bolts.
4. Pull out the end of the frontbumper.
5. Remove the headlamp assembly from the body of the vehicle.
❈ If you can reach the bulb without
removing the headlamp assembly,
you do not need to do step 3,4 and
5.
OPS073051
OPS076028L
OPS076046L
Page 534 of 589
893
Maintenance
Always handle them carefully, andavoid scratches and abrasions. If
the bulbs are lit, avoid contact with
liquids. Never touch the glass with
bare hands. Residual oil may
cause the bulb to overheat and
burst when lit. A bulb should be
operated only when installed in a
headlamp.
If a bulb becomes damaged or cracked, replace it immediately
and carefully dispose of it.
Wear eye protection when chang- ing a bulb. Allow the bulb to cool
down before handling it.Front turn signal lamp bulb
replacement
1. Turn off the engine and open the hood. Disconnect the negative
battery cable. 2. Disconnect the power connector
front the back of the headlamp
assembly.
3. Loosen the retaining bolts.
OPS073051
OPS076028L