Page 490 of 589
849
Maintenance
2. Wipe the inside of the air cleaner.
3. Replace the air cleaner filter.
4. Lock the cover with the coverattaching clips. Replace the filter according to the
Maintenance Schedule.
If the vehicle is operated in extreme-
ly dusty or sandy areas, replace the
element more often than the usual
recommended intervals. (Refer to
“Maintenance under severe usage
conditions” in this chapter.)
CAUTION- Air filter main-
tenance
Do not drive with the air clean- er removed; this will result inexcessive engine wear.
When removing the air cleaner filter, be careful that dust ordirt does not enter the airintake, or damage may result.
Use a Kia genuine part. Use of non-genuine parts could dam-age the air flow sensor.
OPS076121
Page 494 of 589
853
Maintenance
Front windshield wiper blade
Type A
1. Raise the wiper arm and turn thewiper blade assembly to expose
the plastic locking clip.
2. Compress the clip and slide theblade assembly downward.
3. Lift it off the arm.
4. Install the blade assembly in the reverse order of removal. Type B
1. Raise the wiper arm.
1LDA5023
CAUTION- Wiper arms
Do not allow the wiper arm to
fall against the windshield,since it may chip or crack thewindshield.
CAUTION- Wiper arms
Do not allow the wiper arm tofall against the windshield,since it may chip or crack thewindshield.
1JBA7037
1JBA7038
OHM078059
Page 499 of 589

Maintenance
58
8
When recharging the battery,
observe the following precautions:
The battery must be removed from
the vehicle and placed in an area
with good ventilation.
Do not allow cigarettes, sparks, or flame near the battery.
Watch the battery during charging, and stop or reduce the charging
rate if the battery cells begin
gassing (boiling) violently or if the
temperature of the electrolyte of
any cell exceeds 120°F (49°C).
Wear eye protection when check- ing the battery during charging.
Disconnect the battery charger in the following order. 1.Turn off the battery charger main
switch.
2.Unhook the negative clamp from the negative battery terminal.
3.Unhook the positive clamp from the positive battery terminal.
Before performing maintenance or recharging the battery, turn off all
accessories and stop the engine.
The negative battery cable must be removed first and installed last
when the battery is disconnected.Reset items
Items should be reset after the bat-
tery has been discharged or the bat-
tery has been disconnected.
Auto up/down window (See chapter 4)
Sunroof (See chapter 4)
Trip computer (See chapter 4)
Climate control system (See chapter 4)
Clock (See chapter 4)
Audio (See chapter 5)
Page 504 of 589

863
Maintenance
Tire replacement
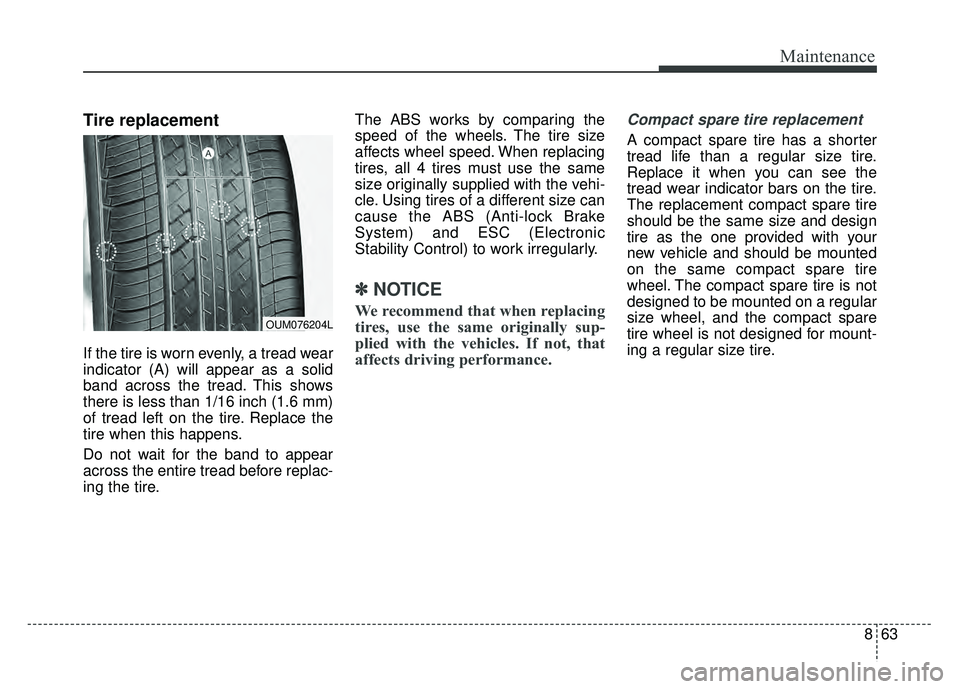
If the tire is worn evenly, a tread wear
indicator (A) will appear as a solid
band across the tread. This shows
there is less than 1/16 inch (1.6 mm)
of tread left on the tire. Replace the
tire when this happens.
Do not wait for the band to appear
across the entire tread before replac-
ing the tire.The ABS works by comparing the
speed of the wheels. The tire size
affects wheel speed. When replacing
tires, all 4 tires must use the same
size originally supplied with the vehi-
cle. Using tires of a different size can
cause the ABS (Anti-lock Brake
System) and ESC (Electronic
Stability Control) to work irregularly.
✽ ✽
NOTICE
We recommend that when replacing
tires, use the same originally sup-
plied with the vehicles. If not, that
affects driving performance.
Compact spare tire replacement
A compact spare tire has a shorter
tread life than a regular size tire.
Replace it when you can see the
tread wear indicator bars on the tire.
The replacement compact spare tire
should be the same size and design
tire as the one provided with your
new vehicle and should be mounted
on the same compact spare tire
wheel. The compact spare tire is not
designed to be mounted on a regular
size wheel, and the compact spare
tire wheel is not designed for mount-
ing a regular size tire.
OUM076204L
Page 518 of 589
877
Maintenance
Fuse switch
Always, put the fuse switch at the ON
position.
If you move the switch to the OFF
position, some items such as audio
and digital clock must be reset and
transmitter (or smart key) may not
work properly.
✽ ✽NOTICE
If you need to park your vehicle for
prolonged periods more than 1
month, move the transportation fuse
switch to the OFF position to pre-
vent the battery being discharged.
Engine compartment fuse
replacement
1. Turn the ignition switch and all
other switches off.
2. Remove the fuse panel cover by pressing the tab and pulling the
cover up. When the blade type
fuse is disconnected, remove it by
using the clip designed for chang-
ing fuses located in the engine
room fuse box. Upon removal,
securely insert reserve fuse of
equal quantity.
OPS073016
OPS073015
Page 519 of 589

Maintenance
78
8
3. Check the removed fuse; replace it
if it is blown. To remove or insert
the fuse, use the fuse puller in the
engine compartment fuse panel.
4. Push in a new fuse of the same rating, and make sure it fits tightly
in the clips. If it fits loosely, consult
an authorized Kia dealer.Multi fuse
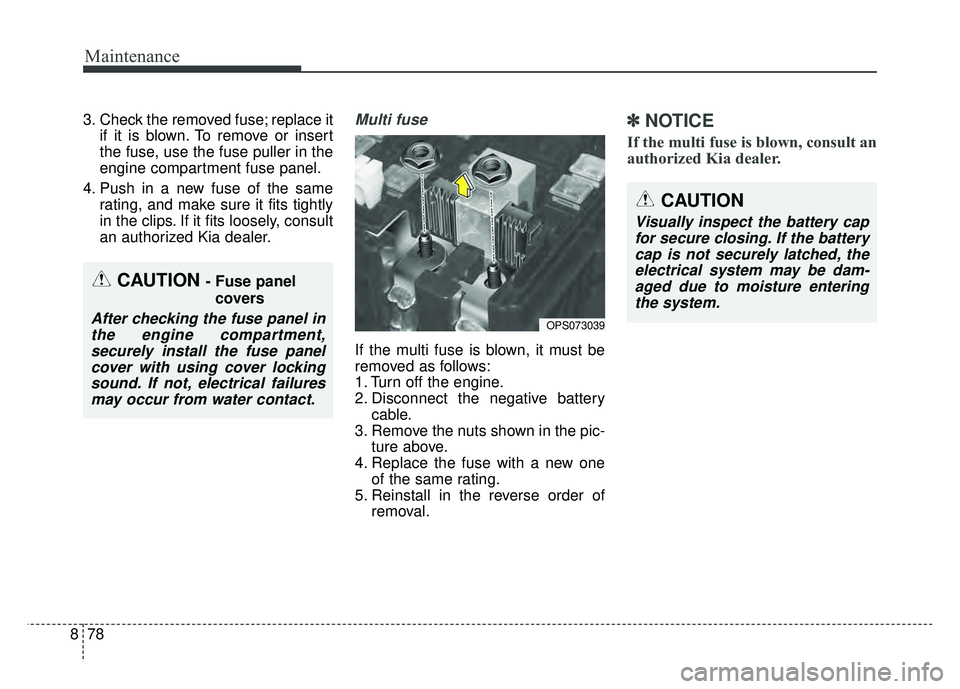
If the multi fuse is blown, it must be
removed as follows:
1. Turn off the engine.
2. Disconnect the negative batterycable.
3. Remove the nuts shown in the pic- ture above.
4. Replace the fuse with a new one of the same rating.
5. Reinstall in the reverse order of removal.
✽ ✽NOTICE
If the multi fuse is blown, consult an
authorized Kia dealer.
OPS073039
CAUTION- Fuse panel
covers
After checking the fuse panel inthe engine compartment,securely install the fuse panelcover with using cover lockingsound. If not, electrical failuresmay occur from water contact.
CAUTION
Visually inspect the battery capfor secure closing. If the batterycap is not securely latched, theelectrical system may be dam-aged due to moisture enteringthe system.
Page 522 of 589

881
Maintenance
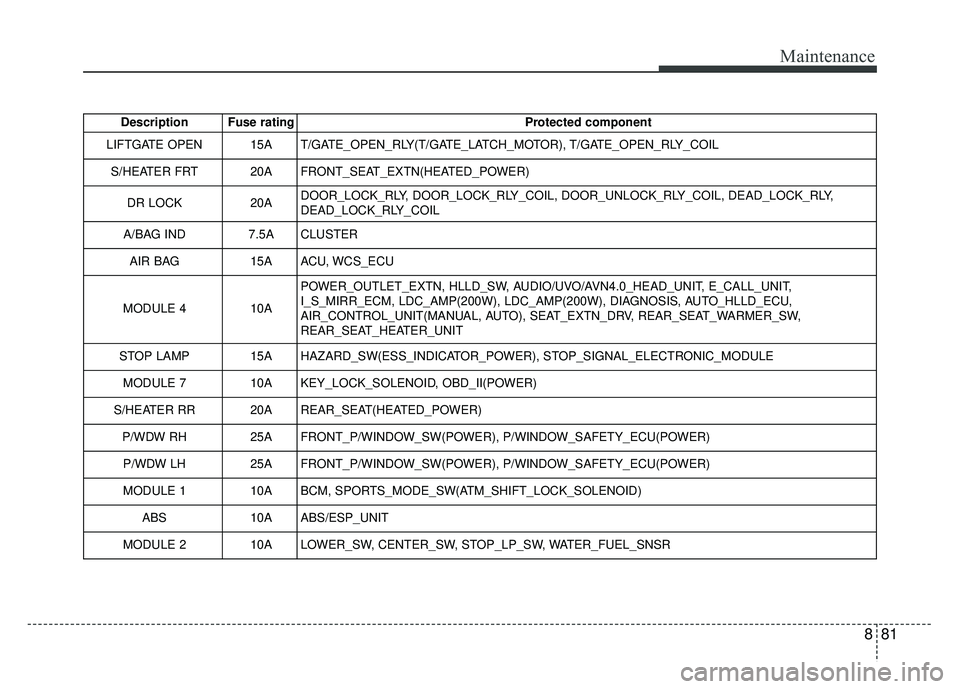
Description Fuse ratingProtected component
LIFTGATE OPEN 15A T/GATE_OPEN_RLY(T/GATE_LATCH_MOTOR), T/GATE_OPEN_RLY_COIL
S/HEATER FRT 20A FRONT_SEAT_EXTN(HEATED_POWER)
DR LOCK 20ADOOR_LOCK_RLY, DOOR_LOCK_RLY_COIL, DOOR_UNLOCK_RLY_COIL, DEAD_LOCK_RLY,
DEAD_LOCK_RLY_COIL
A/BAG IND 7.5A CLUSTER
AIR BAG 15A ACU, WCS_ECU
MODULE 4 10APOWER_OUTLET_EXTN, HLLD_SW, AUDIO/UVO/AVN4.0_HEAD_UNIT, E_CALL_UNIT,
I_S_MIRR_ECM, LDC_AMP(200W), LDC_AMP(200W), DIAGNOSIS, AUTO_HLLD_ECU,
AIR_CONTROL_UNIT(MANUAL, AUTO), SEAT_EXTN_DRV, REAR_SEAT_WARMER_SW,
REAR_SEAT_HEATER_UNIT
STOP LAMP 15A HAZARD_SW(ESS_INDICATOR_POWER), STOP_SIGNAL_ELECTRONIC_MODULE
MODULE 7 10A KEY_LOCK_SOLENOID, OBD_II(POWER)
S/HEATER RR 20A REAR_SEAT(HEATED_POWER) P/WDW RH 25A FRONT_P/WINDOW_SW(POWER), P/WINDOW_SAFETY_ECU(POWER)
P/WDW LH 25A FRONT_P/WINDOW_SW(POWER), P/WINDOW_SAFETY_ECU(POWER)
MODULE 1 10A BCM, SPORTS_MODE_SW(ATM_SHIFT_LOCK_SOLENOID)
ABS10AABS/ESP_UNIT
MODULE 210ALOWER_SW, CENTER_SW, STOP_LP_SW, WATER_FUEL_SNSR
Page 527 of 589
Maintenance
86
8
Description Fuse rating Protected component
H/LAMP WASHER 20A HEAD_LAMP_WASHER_RLY, HEAD_LAMP_WASHER_RLY_COIL, HEAD_LAMP_WASHER_MOTOR
POWER OUTLET 4 20A P_OUTLET B+ 1 50A SMART_JUNCTION_BLOCK(B+1)
B+ 2 50A SMART_JUNCTION_BLOCK(B+2)
TCU 3 30A TRANSMISSION_CONTROL_UNIT
B+ 3 50A SMART_JUNCTION_BLOCK(B+3)
IG2 40A IGN_SW(IG2), BUTTON_START_RLY(IG2), START_RLY
MDPS 80A MDPS_UNIT
ALT (GAMMA) 125A ALTERNATOR
ALT (NU) 180A
TCU 20A TRANSMISSION_CONTROL_UNIT
DEICER 20A DEICER
ECU 4 15A ECU(BATT_DIRECT)
ECU 5 15A ECU(BATT_DIRECT)
POWER OUTLET 3 20A P_OUTLET VACUUM PUMP 1 30A VACUUM_PUMP