Page 25 of 51

*IF EQUIPPED 23ALWAYS CHECK THE OWNER’S MANUAL FOR COMPLETE OPER ATING INFORMATION AND SAFET Y WARNINGS
STEERING WHEEL CONTROLS
Voice Recognition and Phone Contact Tips
The Kia Voice Recognition System may
have difficulty understanding some accents
or uncommon names When using Voice
Recognition to place a call, speak in a
moderate tone, with clear pronunciation
Help your Bluetooth® Wireless Technology
Voice Recognition performance by making
a few simple changes to your phone
contacts:
• Use full names vs short or single
syllable names (“John Smith” vs “Dad”;
“Smith Residence” vs “Home”)
• Avoid using special characters or
hyphens (@, &, #, /, -, *, +, etc )
• Avoid using acronyms (“In Case of
Emergency” vs “ICE”) Spell words completely, no abbreviations (“Doctor Goodman” vs “Dr Goodman”)
Voice Recognition Tips Video To view a video on your mobile device, snap this QR Code or visit the listed website
Refer to page 2 for more information
www.KuTechVideos.com/ps23/2017
QR CODEBluetooth® Wireless Technology (Continued)
Pairing a Phone
For instructions on how to pair a phone, refer to the audio system’s user’s
guide or your vehicle’s Quick Start Guide
During the pairing process, be sure to accept the connection requests on the phone for phonebook download and to allow acceptance of all future Bluetooth® connection requests
QUICK TIP
How to Place a Call
When using the voice command feature, wait for the system BEEP before speaking the command
There are two options for placing a call:
Standard Audio System*
• Option 1: Press the Receive/Place Call button C (system will prompt you through call process)
• Option 2: Press the Talk button B (system will BEEP to indicate it is ready for call placement) Then say the command “Call {name}” or “Dial {number}”
UVO EV Services with Premium Navigation System*
• Option 1: Press the Receive/Place Call button C (displays the phone screen with number keypad)
• Option 2: Press the Talk button B Then say the command “Call {name}” or “Dial {number}”
Page 26 of 51

AUDIO SYSTEMS
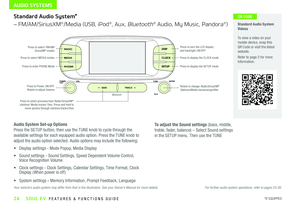
24*IF EQUIPPED SOUL EV FEATURES & FUNCTIONS GUIDE
DISP
CLOCK
SETUP
Press to select FM/AM/SiriusXM® modes
Press to Power ON/OFF Rotate to adjust Volume
Press to enter PHONE ModePress to display the SE TUP mode
Press to display the CLOCK modePress to select MEDIA modes
Rotate to change Radio/SiriusXM® Stations/Media tracks/songs/files
Press to turn the LCD display and backlight ON/OFF
Press to select previous/next Radio/SiriusXM® stations/ Media tracks/ files Press and hold to move quickly through stations/tracks/files
Standard Audio System Videos To view a video on your mobile device, snap this QR Code or visit the listed website
Refer to page 2 for more information
QR CODEStandard Audio System*
– FM/AM/SiriusXM®/Media (USB, iPod®, Aux, Bluetooth® Audio, My Music, Pandora®)
Audio System Set-up Options
Press the SETUP button, then use the TUNE knob to cycle through the
available settings for each equipped audio option Press the TUNE knob to
adjust the audio option selected Audio options may include the following:
• Display settings - Mode Popup, Media Display
• Sound settings - Sound Settings, Speed Dependent Volume Control, Voice Recognition Volume
• Clock settings - Clock Settings, Calendar Settings, Time Format, Clock Display ( When power is off)
• System settings - Memory Information, Prompt Feedback, Language
To adjust the Sound settings (bass, middle,
treble, fader, balance) – Select Sound settings
in the SETUP menu Then use the TUNE
Your vehicle’s audio system may differ from that in the illustration. See your Owner’s Manual for more details.For further audio system operations, refer to pages 25-26.
Page 27 of 51

AUDIO SYSTEMS
*IF EQUIPPED 25ALWAYS CHECK THE OWNER’S MANUAL FOR COMPLETE OPER ATING INFORMATION AND SAFET Y WARNINGS
For further UVO eServices System operations, refer to the Car Multimedia System User's Manual. For other audio system information, refer to pages 24-26.
UVO eServices Setup*
UVO eServices Registration/Activation – To use UVO eServices:
1 On your Smartphone, go to an app store or marketplace to download the free Kia UVO eServices app
2 Open the UVO eServices app and create an account by clicking on REGISTER After entering your information and following the prompts to complete
registration, go to your email and click on the confirmation link ( You can also register an account by logging into MyUVO com)
3 In the app, click CONTINUE, accept the terms and click CONTINUE once again
4 Follow the app’s IN-CAR SETUP instructions to connect your smartphone and complete UVO eServices activation
Apple CarPlay®*
Setting up and starting Apple CarPlay®:
1 Connect the Apple CarPlay® compatible iPhone with the vehicle’s
USB port using the manufacture’s cable provided with your iPhone
2 On the UVO eServices System audio control unit, press the
SETUP key
3 Press the CONNECTIVIT Y button on the screen and select Apple
CarPlay®
4 Select ENABLE APPLE CARPL AY
5 From the vehicle’s home screen, select the Apple CarPlay® button,
where you’ll see all the Apple CarPlay® supported apps
Android Auto™*
Setting up Android Auto™:
1 From an Android Auto™ compatible device, download the Android
Auto™ app from the Google Play™ Store
2 Open the Android Auto™ app and proceed with the on-screen
instructions to complete setup on the mobile device
How to start Android Auto™:
1 Press the SETUP key on your UVO eServices system’s control panel
2 Press the CONNECTIVIT Y button, select Android Auto™ then select
ENABLE ANDROID AUTO
3 Connect the Android™ device with the vehicle’s USB port using the
manufacturer’s cable provided with your phone
4 From the vehicle’s home screen, select the Android Auto™ button,
where you’ll see all the Android Auto™ supported apps
REMINDERS:
•
Android Auto compatibility requirements: Micro-USB cable that came with your phone, OS Android™ 5 0 or higher, compatible Android smartphone and data and wireless plan for applicable feature(s)
•
Apple CarPlay compatibility requirements: Apple Lightning® cable, latest iOS software, iPhone 5 or later and data and wireless plan for applicable feature(s)
Page 28 of 51

AUDIO SYSTEMS
26*IF EQUIPPED SOUL EV FEATURES & FUNCTIONS GUIDE
MAP
UVO
SEEK
TRACK
RADIO
MEDIA
NAVI
PHONE
INFO
SETUP
POWER
VOL TUNE
FILEPUSH
VOICE MAP
Press to Power ON/OFF
Rotate to adjust Volume
Press to enter UVO E V Services mode
Press to select FM/AM SiriusXM® Modes
Press to select MEDIA mode
Rotate to change Radio/SiriusXM® Stations/Media tracks/files
Press to display the Map screen for the current position / VOICE modePress to display the Destination menu screenPress to enter PHONE mode
Press to display the SE TUP mode
Press to display INFO mode Press to change Radio/SiriusXM® Stations/Media tracks/files
Press to select previous/next Radio/SiriusXM® stations/ Media tracks/ files Press and hold to move quickly through stations/tracks/files
EV Services Activation Video To view a video on your mobile device, snap this QR Code or visit the listed website
Refer to page 2 for more information
www.KuTechVideos.com/ps23/2017
QR CODEUVO EV Services with Premium Navigation System*
– FM/AM/SiriusXM®/Media (USB, iPod®, Aux, Bluetooth® Audio, My Music, Pandora®)
REMINDER: The registered MyUVO com account is activated for five years with no charges When it expires, go to MyUVO com and register for the plan of your choice
Your vehicle’s audio system may differ from that in the illustration. For further operational information and using the app, refer to the Car Multimedia System User’s Manual. For other audio system information, refer to pages 24-25.
•
•When using the voice command feature, wait for the system BEEP before speaking the command •Prolonged use of the UVO EV Services with Premium Navigation System* in ACC mode may drain the vehicle’s battery •A warning screen may appear periodically to remind users that the UVO EV Services with Premium Navigation System* should be operated with the engine running to prevent battery discharge
QUICK TIPSSound Settings:
To adjust the UVO eServices System sound settings:
1 Press the SETUP key on the audio control unit or the on-
screen MENU button, when in MEDIA mode
2 Select the on-screen SOUND button, or SOUND SET TINGS
3 Select the menu item (Position, Tone, Priority, Advanced)
4 Use the onscreen buttons to adjust settings
5 Press the return button to save settings
Page 29 of 51

*IF EQUIPPED 27ALWAYS CHECK THE OWNER’S MANUAL FOR COMPLETE OPER ATING INFORMATION AND SAFET Y WARNINGS
CENTER PANEL
Face-Level
Bi-Level
F lo o r- L evel
Floor/Defrost-Level
AUTO
OFF
FRONT
DRIVER
EV
HEAT
REAR
ONLY
A/C MODE
CLIMATE
P
A SSE NGE R
A IR BA G
DRIVER
EV
ONLYPA SSE NGE R
A IR BA G
Fan Speed Control buttons
Mode Selection button
Display CLIMATE control information
Rear Windshield Defroster button
Automatic Climate Control button
Air Conditioning ON/OFF button
Front Windshield Defroster buttonHeat ON/OFF button
Temperature Control knob
System OFF button
DRIVER ONLY Ventilation buttonRecirculated Air buttonReserved Climate Control button
Automatic Climate Control
Air Flow Modes
To select Air Flow Modes,
press the Mode selection
buttons:
Climate Control Auto Function:
1 Press AUTO to select Full Auto Operation - The Auto setting
automatically controls the airflow modes, fan speeds, air intake
and air conditioning according to the temperature setting selected
2 Set desired Temperature
Defrost Outside Windshield:
1 Set Fan Speed to the
highest position
2 Set Temperature to Hot
3 Press the Defrost button
Defog Inside Windshield:
1 Set desired fan Fan Speed
2 Set desired Temperature
3 Press the Defrost button
Your Automatic Climate Control system may differ from those in the illustrations. See your Owner’s Manual for more details.
•
•Keep inside glass as clean as possible to reduce window fogging •Defrost Mode activates A /C and opens Fresh Air Vent •During Auto Operation, the A /C indicator will NOT illuminate The fan speed, air intake, air flow and air conditioning may automatically engage at any time to reach desired temperature and reduce humidity
QUICK TIPS
REMINDERS:
•
Pressing any button during AUTO operation will deactivate the AUTO function and switch to manual mode, except for Temperature Control
•
Warm air may flow in through vents if Recirculated Air button is not pressed ON (LED lit)
(Type B shown)
Page 30 of 51

28*IF EQUIPPED SOUL EV FEATURES & FUNCTIONS GUIDE
CENTER PANEL
EV A /C and Driver Only Ventilation Video To view a video on your mobile device, snap this QR Code or visit the listed website
Refer to page 2 for more information
www.KuTechVideos.com/ps23/2017
QR CODES
AUTO
OFF
FRONT
DRIVER
EV
HEAT
REAR
ONLY
A/C MODE
CLIMATE
P
A SSE NGE R
A IR BA G
DRIVER
EV
ONLYPA SSE NGE R
A IR BA G
AB
(Buttons located on Center Panel)
12V120W12V180W
AUX USB
(Located on lower part of Center Panel)
Driver Only Ventilation
Driver Only Ventilation restricts air flow to the
driver’s side vents only This helps to optimize
driving range by limiting the power drawn
from the battery
Press DRIVER ONLY button A to enable air
flow through the driver’s side vents only
Reserved Climate Control*
Reserved Climate Control* is designed to pre-cool or heat the vehicle’s interior
to the preferred temperature while the vehicle is plugged into a charger
When Reserved Climate Control* is set and the charging cable is connected,
climate control begins operating 30 minutes before the set departure time
Press the Reserved Climate Control* button B to display the settings for
appointed ventilation on the UVO Eco with Premium Navigation System*
The Reserved Climate Control* can also be set using the UVO Eco App
For more information, refer to the Owner’s Manual or the Car Multimedia System User’s Manual.
Digital Clock
Standard Audio System* Clock Setup:
1 Press the SETUP button
2 Rotate knob to select Clock mode, then press to enter
3 Rotate knob to adjust Hour, then press to enter
4 Rotate knob to adjust Minute, then press to enter
UVO EV Services with Premium Navigation System* Clock Setup:
Press the SETUP key, then the CLOCK button to
display the Clock setting screen Then use the
on-screen buttons to navigate through setup
Aux/USB/iPod® Port & Power Outlets
REMINDER: For the Tire Mobility Kit, only use the 12V/15A/180W Power Outlet, located on the right side of the outlet /aux port area
The power outlets are inactive when ignition is in the OFF position
QUICK TIP
Page 31 of 51

*IF EQUIPPED 29ALWAYS CHECK THE OWNER’S MANUAL FOR COMPLETE OPER ATING INFORMATION AND SAFET Y WARNINGS
CENTER PANEL
To start the vehicle:
1 Turn off all electrical devices
2 Depress the brake pedal
3 Press the POWER button while gear shift is in P (Park)
When Ready Indicator Light is ON (located in the top left corner of the
LCD screen of the Instrument Cluster), the vehicle can be driven
To turn the power off, press the POWER button again, and ensure the gear
shift is in (P) Park
To use the POWER button, you must have the Smart Key fob on your
person or inside the vehicle
P
POWER
EV Power Button and Smart Key Video To view a video on your mobile device, snap this QR Code or visit the listed website
Refer to page 2 for more information
www.KuTechVideos.com/ps23/2017
AB
QR CODE Power Button
REMINDERS:
•When the Ready Indicator Light is illuminated, the vehicle can be operated
•Do not operate the vehicle if the Ready Indicator Light is not illuminated
•
In an emergency situation while the vehicle is in motion, you are able to turn the vehicle off by pressing the Power button for more than 2 seconds or 3 times within 3 seconds
•If Smart Key fob battery is dead, hold the fob up against the POWER button
To use electrical accessories: Accessory position • When in the OFF position (no light) and without depressing the brake pedal, press the POWER button once (Amber light A )
On position • When already in the ACC position (Amber light A ) and without depressing the brake pedal, press the POWER button again (Reddish-orange light B )
• When in the OFF position (no light) and without depressing the brake pedal, press the POWER button twice (Reddish-orange light B )
Keeping the vehicle in ACC or the ON position without driving may discharge the vehicle’s battery.
QUICK TIPS
For more info and detail steps on how to start the vehicle, please refer to the Owner’s Manual.
Page 32 of 51

Electric Parking Brake Video To view a video on your mobile device, snap this Q")
30*IF EQUIPPED SOUL EV FEATURES & FUNCTIONS GUIDE
CENTER PANEL
ACTIVE ECOECOOFF
ECOOFF
A
(Located below Gear Shift)
Electric Parking Brake Video To view a video on your mobile device, snap this QR Code or visit the listed website
Refer to page 2 for more information
www.KuTechVideos.com/ps23/2017
QR CODEElectric Parking Brake (EPB)
The Electric Parking Brake (EPB) system utilizes an electric motor to engage the
parking brake
Applying the Parking Brake
Depress the brake pedal and pull up the EPB switch A Ensure that the indicator
light is illuminated on the instrument cluster
Releasing the Parking Brake
The EPB will automatically release when the shifter is placed in Reverse or Drive
To release EPB manually, depress the brake pedal, then press the EPB switch A,
with the ignition switch in the ON position Ensure that the indicator light i s O F F
REMINDERS:
•
As a bulb check, the EPB malfunction indicator will illuminate for approximately 3 seconds when the ignition switch is turned ON
•
If the warning light does not illuminate temporarily, or continues to remain lit, take your vehicle to an authorized Kia dealer and have the system checked
• The EPB should not be operated while the vehicle is moving
•
A click or electric brake motor sound may be heard while operating or releasing the EPB, but these conditions are normal and indicate that the EPB is functioning properly
•
•When leaving your keys with parking lot attendants or valet, make sure to inform them how to operate the EPB •If parked on a steep incline/decline, pull up the EPB switch for more than 3 seconds for a firmer EPB application
QUICK TIPS