Page 543 of 586

773
Maintenance
Fuse Name Fuse ratingCircuit Protected
BLOWER RR 40A Blower RR Relay BLOWER 40A Blower Relay
SENSOR (B+) 10A Battery Sensor
B/ALARM HORN 10A B/Alarm Horn Relay FUEL LID 10A Fuel Lid Relay DEICER 15A Deicer Relay
FUEL PUMP 15A Fuel Pump Relay HORN 15A Horn Relay
WIPER 25A Front Wiper (Low) Relay
ECU3 30A Engine Control Relay, Fuse - ECU1
REAR HEATED 40A Rear Heated Relay TCU 15A Transmission Range Switch
MDPS 10A MDPS Unit (Rack)
CRUISE 10A Smart Cruise Control Radar
B/UP LAMP 10A Audio, A/V & Navigation Head Unit, Rear Combination Lamp (IN) LH/RH, Electro Chromic \
Mirror A/CON 7.5A Rear A/C Control Switch, A/C Control Module
ECU1 15A PCM ABS3 7.5A ESC Module, Steering Angle Sensor
ECU2 10A Injector Drive Box
SENSOR1 15A Oxygen Sensor #1/#2/#3/#4, PCM, E/R Junction Box (Cooling Fan1 Relay)
SENSOR2 10A PCM, Canister Close Valve, Variable Intake Solenoid Valve #1/#2, Purge Control Solenoid Valve, Oil Control
Valve #1/#2 (Intake), Oil Control Valve #1/#2 (Exhaust)
SENSOR3 10A PCM, Fuel Pump Relay IGN COIL 20A Ignition Coil #1~#6, Condensor #1/#2
Page 547 of 586

777
Maintenance
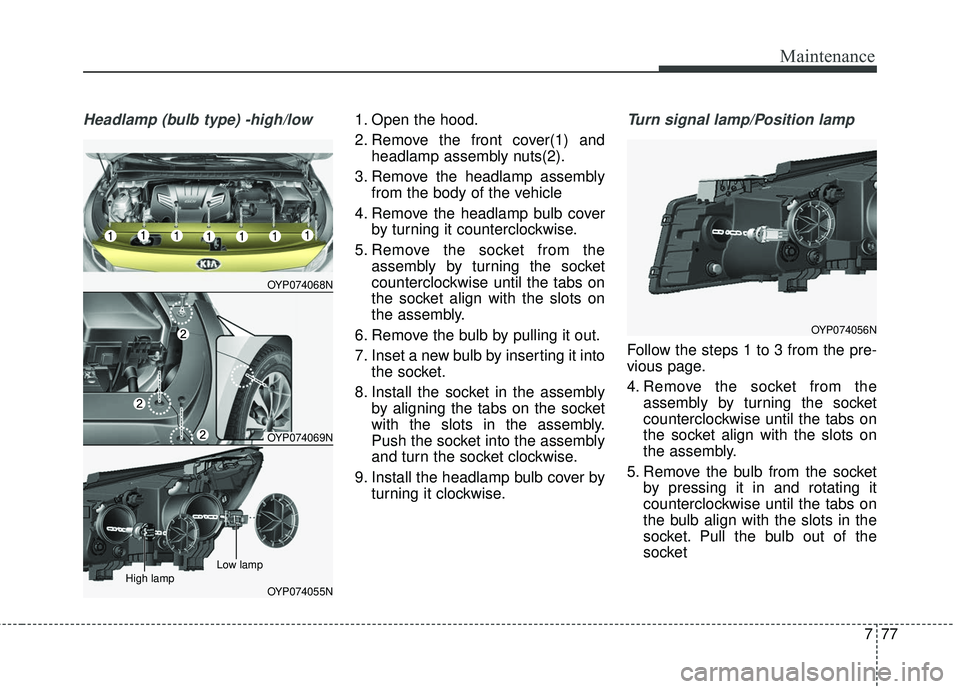
Headlamp (bulb type) -high/low1. Open the hood.
2. Remove the front cover(1) andheadlamp assembly nuts(2).
3. Remove the headlamp assembly from the body of the vehicle
4. Remove the headlamp bulb cover by turning it counterclockwise.
5. Remove the socket from the assembly by turning the socket
counterclockwise until the tabs on
the socket align with the slots on
the assembly.
6. Remove the bulb by pulling it out.
7. Inset a new bulb by inserting it into the socket.
8. Install the socket in the assembly by aligning the tabs on the socket
with the slots in the assembly.
Push the socket into the assembly
and turn the socket clockwise.
9. Install the headlamp bulb cover by turning it clockwise.Turn signal lamp/Position lamp
Follow the steps 1 to 3 from the pre-
vious page.
4. Remove the socket from theassembly by turning the socket
counterclockwise until the tabs on
the socket align with the slots on
the assembly.
5. Remove the bulb from the socket by pressing it in and rotating it
counterclockwise until the tabs on
the bulb align with the slots in the
socket. Pull the bulb out of the
socket
OYP074068N
OYP074069N
OYP074055NHigh lampLow lamp
OYP074056N
Page 548 of 586
Maintenance
78
7
6. Insert a new bulb by inserting it
into the socket and rotating it until
it locks into place.
7. Install the socket in the assembly by aligning the tabs on the socket
with the slots in the assembly.
Push the socket into the assembly
and turn the socket clockwise.
✽ ✽NOTICE
If bulb will not rotate inside socket,
remove bulb, rotate 180°, and try
again.
Front side marker
Follow the steps 1 to 3 from the pre-
vious page.
4. Remove the socket from the
assembly by turning the socket
counterclockwise until the tabs on
the socket align with the slots on
the assembly.
5. Pull the bulb out of the socket.
6. Insert a new bulb into the socket.
7. Install the socket into the assem- bly by aligning the tabs on the
socket with the slots on the
assembly and turning the socket
clockwise.
Front fog lamp bulbs
(if equipped)
OYP074057N
OYP074058N
OYP074059N
OYP074060N
■ Type A
■ Type B
Page 549 of 586

779
Maintenance
1. Remove the front bumper undercover.
2. Reach your hand into the back of the front bumper.
3. Disconnect the power connector from the socket.
4. Remove the bulb-socket from the housing by turning the socket
counter clockwise until the tabs on
the socket align with the slots on
the housing.
5. Install the new bulb-socket into the housing by aligning the tabs on
the socket with the slots in the
housing. Push the socket into the
housing and turn the socket clock-
wise.
6. Connect the power connector to the socket.
7. Reinstall the front bumper under cover.✽ ✽NOTICE
Always have the headlight aiming
adjusted after an accident or the
headlight assembly is reinstalled at a
authorized Kia dealer.
Headlamp (HID type), Front posi-
tion (LED), bulb replacement
If the light bulb does not operate,
have the vehicle checked by an
authorized Kia dealer.
✽ ✽ NOTICE
HID lamps have superior perform-
ance vs. halogen bulbs. HID lamps
are estimated by the manufacturer
to last twice as long or longer than
halogen bulbs depending on their
frequency of use. They will probably
require replacement at some point
in the life of the vehicle. Cycling the
headlamps on and off more than
typical use will shorten HID lamps
life. HID lamps do not fail in the
same manner as halogen incandes-
cent lamps. If a headlamp goes out
after a period of operation but will
immediately relamp when the head-
lamp switch is cycled it is likely the
HID lamp needs to be replaced. HID
lamping components are more com-
plex than conventional halogen
bulbs thus have higher replacement
cost.
Page 551 of 586

781
Maintenance
3. Remove the rear combinationlamp assembly from the body of
the vehicle.
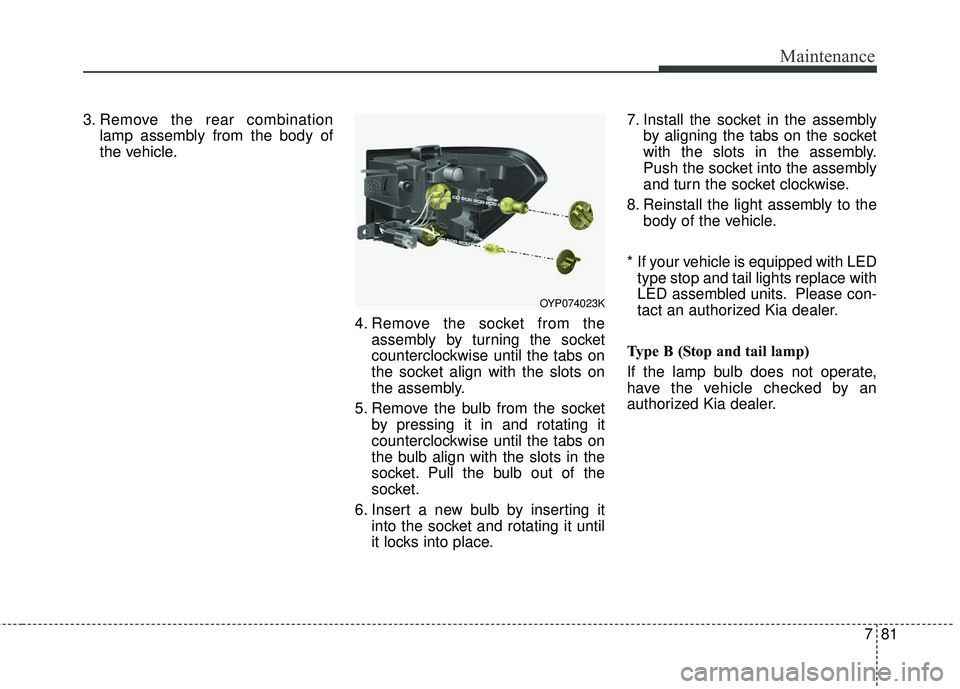
4. Remove the socket from theassembly by turning the socket
counterclockwise until the tabs on
the socket align with the slots on
the assembly.
5. Remove the bulb from the socket by pressing it in and rotating it
counterclockwise until the tabs on
the bulb align with the slots in the
socket. Pull the bulb out of the
socket.
6. Insert a new bulb by inserting it into the socket and rotating it until
it locks into place. 7. Install the socket in the assembly
by aligning the tabs on the socket
with the slots in the assembly.
Push the socket into the assembly
and turn the socket clockwise.
8. Reinstall the light assembly to the body of the vehicle.
* If your vehicle is equipped with LED type stop and tail lights replace with
LED assembled units. Please con-
tact an authorized Kia dealer.
Type B (Stop and tail lamp)
If the lamp bulb does not operate,
have the vehicle checked by an
authorized Kia dealer.
OYP074023K
Page 552 of 586
Maintenance
82
7
Inside lamp1. Open the tailgate.
2. Remove the service cover.
3. Remove the socket from the
assembly by turning the socket
counterclockwise until the tabs on
the socket align with the slots on
the assembly.
4. Remove the bulb from the socket by pressing it in and rotating it
counterclockwise until the tabs on
the bulb align with the slots in the
socket. Pull the bulb out of the
socket.
5. Insert a new bulb by inserting it into the socket and rotating it until
it locks into place.
6. Install the socket in the assembly by aligning the tabs on the socket
with the slots in the assembly.
Push the socket into the assembly
and turn the socket clockwise. 7. Install the service cover by putting
it into the service hole.
* If your vehicle is equipped with LED type stop and tail lights replace with
LED assembled units. Please con-
tact an authorized Kia dealer.
OYP074026K
OYP074024K
OYP074024N
■ Type A
■Type B
Page 554 of 586
Maintenance
84
7
Interior light bulb replacement
1. Using a flat-blade screwdriver,
gently pry the lens from the interi-
or light housing.
2. Remove the bulb by pulling it straight out.
3. Install a new bulb in the socket.
4. Align the lens tabs with the interior light housing notches and snap
the lens into place.
Room lamp
Map lamp
Glove box lamp
Luggage lamp
Vanity mirror lamp
OYP074029K/OYP074031K/OYP074054N/ OYP074032K/OYP074030K
WARNING - Interior lights
Prior to working on the Interior
Lights, ensure that the “OFF”
button is depressed to avoid
burning your fingers or receiv-
ing an electric shock.
Page 562 of 586

Maintenance
92
7
Taking care of leather seats
• Vacuum the seat periodically to
remove dust and sand on the seat.
It will prevent abrasion or damage of
the leather and maintain its quality.
Wipe the natural leather seat cover often with dry or soft cloth.
Sufficient use of a leather protec- tive may prevent abrasion of the
cover and helps maintain the color.
Be sure to read the instructions
and consult a specialist when
using leather coating or protective
agents.
Leather with bright colors(beige, cream beige) is easily contaminat-
ed and clear in appearance. Clean
the seats frequently.
Avoid wiping with wet cloth. It may cause the surface to crack.
Cleaning the leather seats
Remove all contaminations instant-ly. Refer to instructions below for
removal of each contaminant.
Cosmetic products(sunscreen, foundation, etc.)
- Apply cleansing cream on a clothand wipe the contaminated point.
Wipe off the cream with a wet
cloth and remove water with a dry
cloth.
Beverages(coffee, soft drink, etc.) - Apply a small amount of neutraldetergent and wipe until contami-
nations do not smear.
Oil - Remove oil instantly withabsorbable cloth and wipe with
stain remover for natural leather
only.
Chewing gum - Harden the gum with ice andremove gradually.CAUTION - Electrical
components
Never allow water or other liq-uids to come in contact withelectrical/electronic compo-nents inside the vehicle as thismay damage them.
CAUTION - Leather
When cleaning leather products(steering wheel, seats etc.), useneutral detergents or low alco-hol content solutions. If you usehigh alcohol content solutionsor acid/alkaline detergents, thecolor of the leather may fade orthe surface may get stripped off.