Page 71 of 586

355
Safety features of your vehicle
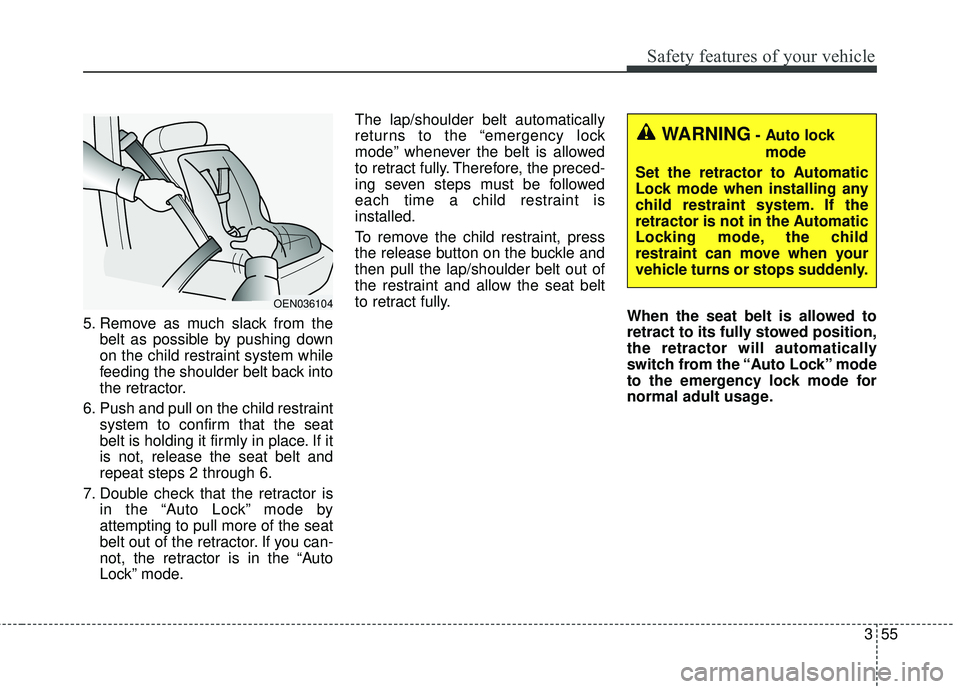
5. Remove as much slack from thebelt as possible by pushing down
on the child restraint system while
feeding the shoulder belt back into
the retractor.
6. Push and pull on the child restraint system to confirm that the seat
belt is holding it firmly in place. If it
is not, release the seat belt and
repeat steps 2 through 6.
7. Double check that the retractor is in the “Auto Lock” mode by
attempting to pull more of the seat
belt out of the retractor. If you can-
not, the retractor is in the “Auto
Lock” mode. The lap/shoulder belt automatically
returns to the “emergency lock
mode” whenever the belt is allowed
to retract fully. Therefore, the preced-
ing seven steps must be followed
each time a child restraint is
installed.
To remove the child restraint, press
the release button on the buckle and
then pull the lap/shoulder belt out of
the restraint and allow the seat belt
to retract fully.
When the seat belt is allowed to
retract to its fully stowed position,
the retractor will automatically
switch from the “Auto Lock” mode
to the emergency lock mode for
normal adult usage.
OEN036104
WARNING- Auto lock
mode
Set the retractor to Automatic
Lock mode when installing any
child restraint system. If the
retractor is not in the Automatic
Locking mode, the child
restraint can move when your
vehicle turns or stops suddenly.
Page 84 of 586
Safety features of your vehicle
68
3
Always be sure that you and all vehi-
cle occupants are seated and
restrained properly (sitting upright
with the seat in an upright position,
centered on the seat cushion, with
the person’s legs comfortably extend-
ed, feet on the floor, and wearing the
safety belt properly) for the most
effective protection by the air bag and
the safety belt.
The ODS (Occupant Detection
System) may not function properly if
the passenger takes actions which
can defeat the detection system.
These include : (1) Failing to sit in an upright posi-
tion.
(2) Leaning against the door or cen- ter console.
(3) Sitting towards the sides or the front of the seat.
(4) Putting legs on the dashboard or resting them on other locations
which reduce the passenger
weight on the front seat.
(5) Improperly wearing the safety
belt.
(6) Reclining the seat back.
Page 86 of 586
Safety features of your vehicle
70
3
1KMN3663
1KMN3664
1KMN3665
- Never sit with hips shifted
towards the front of the seat.
- Never lean on the door or cen-ter console.
- Never sit on one side of the front passenger seat.
- Never place feet on the dash-
board.
OVQ036013N
1KMN3662
- Never put a heavy load or anactive electronic device on
the front passenger seat or
seatback pocket.
- Never excessively recline thefront passenger seatback.
OVQ036014N
- Never place feet on the frontpassenger seatback.
(Continued)
Page 98 of 586

Safety features of your vehicle
82
3
Side and/or curtain air bags
Side and/or curtain air bags are
designed to inflate when an impact is
detected by side collision sensors
depending on the strength, speed or
angles of impact resulting from a
side impact collision. Also, the side and curtain air bags are
designed to inflate when a rollover is
detected by a rollover sensor.
Although the front air bags (driver’s
and front passenger’s air bags) are
designed to inflate in frontal colli-
sions, they also may inflate in other
types of collisions if the front impact
sensors detect a sufficient frontal
force in another type of impact. side
and curtain air bags are designed to
inflate in certain side impact colli-
sions. They may inflate in other type
of collisions where a side force is
detected by the sensors. Side air bag
and/or curtain air bags may also
inflate where rollover sensors indi-
cate the possibility of a rollover
occurring (even if none actually
occurs) or in other situations, incluid-
ing when the vehicle is tilted while
being towed. Even where side and/or
curtain air bags would not provide
impact protection in a rollover, how-
ever, they will deploy to prevent ejec-
tion of occupants, especially those
who are restrained with seat belts.
If the vehicle chassis is impacted by
bumps or objects on unimproved
roads, the air bags may deploy. Drive
carefully on unimproved roads or on
surfaces not designed for vehicle
traffic to prevent unintended air bag
deployment.
OYP034068
OYP034066N
Page 102 of 586
Adding equipment to or modi-
fying your air bag-equipped
vehicle
If you modify your vehicle by chang-
ing your vehicle's frame, bumper sys-
tem, front end or side sheet metal or
ride height, this may affect the opera-
tion of your vehicle's air bag system.
Air bag warning label
Air bag warning labels, some
required by the Canada Motor
Vehicle Safety Standards (CMVSS),
are attached to the sunvisor to alert
the driver and passengers of poten-
tial risks of the air bag system.
WARNING- Tamperingwith SRS
Do not tamper with or discon-
nect SRS wiring, or other com-
ponents of the SRS system.
Doing so could result in the
accidental inflation of the air
bags or by rendering the SRS
inoperative.
WARNING- Towing Vehicle
Always have the ignition off
when your vehicle is being
towed. The side air bags may
inflate if the vehicle is tilted
such as when being towed
because of the rollover sensors
in the vehicle.
OYP034284N
OYP034047N
386
Safety features of your vehicle
Page 120 of 586

Features of your vehicle
18
4
Using the button on the smart key
1. Press the tailgate unlock button
(5) for more than 1 second.
2. When all doors are locked, the hazard warning lights will blink two
times.
For Power Tailgate Only :
The Power Tailgate will open if the
button is pressed for more than 1
second. Also, once the tailgate is
opened and then closed, the tailgate
will be locked again automatically.
If the power tailgate is switched ‘Off’
using the button in the overhead con-
sole, the tailgate unlock button will
operate to unlock the tailgate as
described above.
For detailed information refer to the
“Power sliding door and power tail-
gate“ in this chapter.Panic
1. Press the panic button (6) for more than 1 second.
2. The horn sounds and hazard warning light flash for about 27
seconds.
✽ ✽NOTICE
To stop the horn and lights, press
any button on the smart key.
Start-up
You can start the engine without
inserting the key. For detailed infor-
mation refer to the “Engine start/stop
button” in chapter 5.
Loss of the smart key
A maximum of 2 smart keys can be
registered to a single vehicle.
If you happen to lose your smart key,
you will not be able to start the
engine. You should immediately take
the vehicle and remaining key to your
authorized Kia dealer(tow the vehi-
cle, if necessary) to protect it from
potential theft.
Page 128 of 586

Features of your vehicle
26
4
Once the doors are unlocked, it
may be opened by pulling the door
handle and sliding the door
towards the rear of the vehicle. (for
manual sliding doors)
Once the doors are unlocked, it may be opened by pulling the door
handle once. And then the sliding
door will be opened. (for power
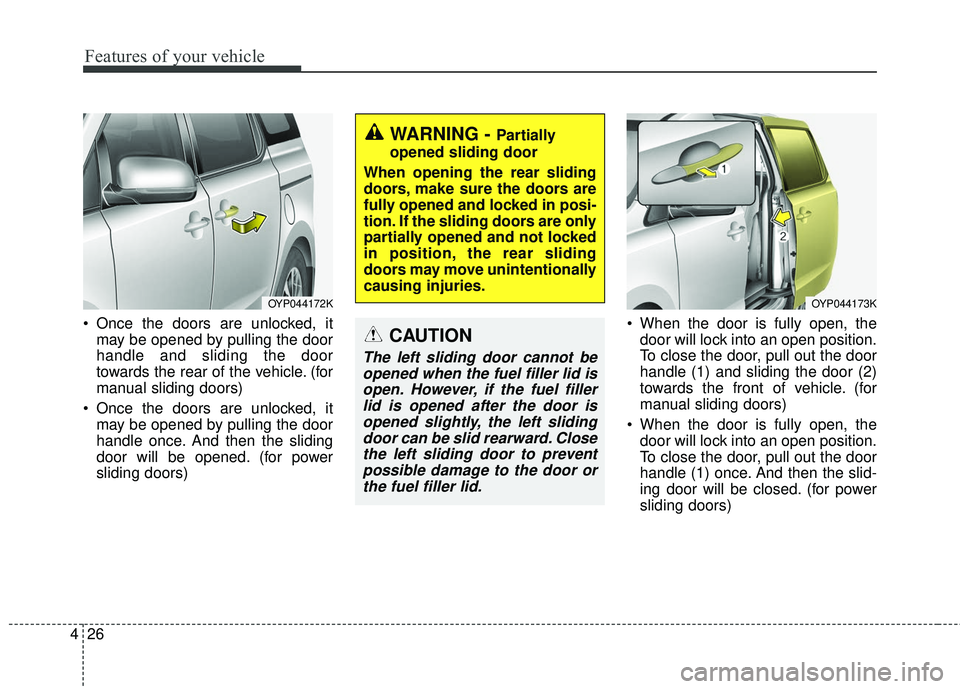
sliding doors) When the door is fully open, the
door will lock into an open position.
To close the door, pull out the door
handle (1) and sliding the door (2)
towards the front of vehicle. (for
manual sliding doors)
When the door is fully open, the door will lock into an open position.
To close the door, pull out the door
handle (1) once. And then the slid-
ing door will be closed. (for power
sliding doors)
OYP044172K
WARNING - Partially
opened sliding door
When opening the rear sliding
doors, make sure the doors are
fully opened and locked in posi-
tion. If the sliding doors are only
partially opened and not locked
in position, the rear sliding
doors may move unintentionally
causing injuries.
CAUTION
The left sliding door cannot be opened when the fuel filler lid isopen. However, if the fuel fillerlid is opened after the door isopened slightly, the left slidingdoor can be slid rearward. Closethe left sliding door to preventpossible damage to the door orthe fuel filler lid.
OYP044173K
Page 173 of 586

471
Features of your vehicle
MIRRORS
Inside rearview mirror
Adjust the rearview mirror so that the
center view through the rear window
is seen. Make this adjustment before
you start driving.
Do not place objects in the rear seat
or cargo area which would interfere
with your vision through the rear win-
dow.
Day/night rearview mirror (if equipped)
Make this adjustment before you
start driving and while the day/night
lever is in the day position.
Pull the day/night lever toward you to
reduce the glare from the headlights
of the vehicles behind you during
night driving.
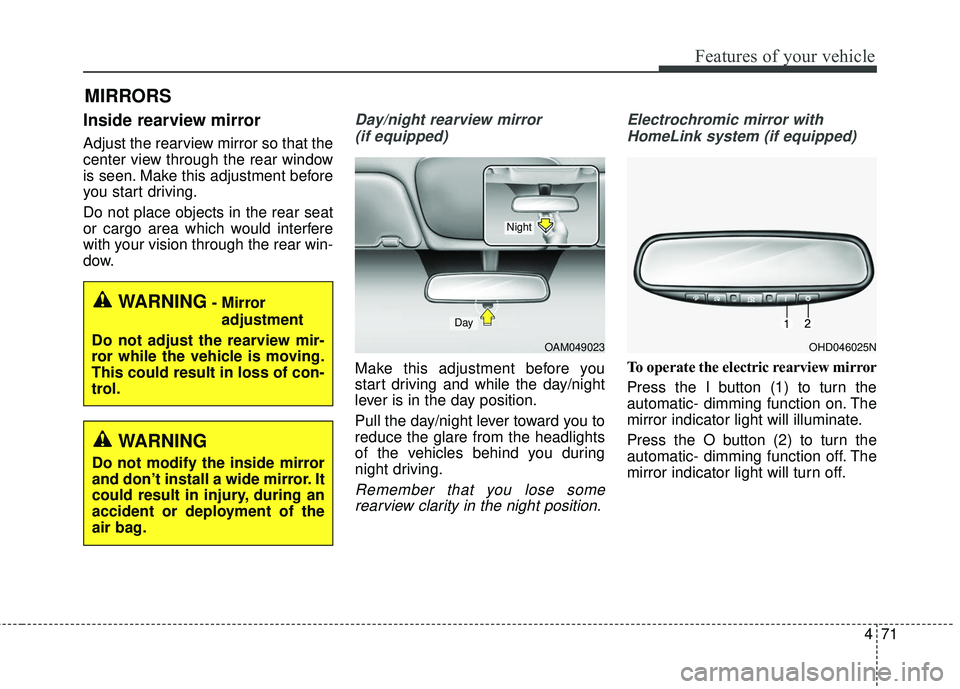
Remember that you lose somerearview clarity in the night position. Electrochromic mirror with
HomeLink system (if equipped)
To operate the electric rearview mirror
Press the I button (1) to turn the
automatic- dimming function on. The
mirror indicator light will illuminate.
Press the O button (2) to turn the
automatic- dimming function off. The
mirror indicator light will turn off.
WARNING- Mirror adjustment
Do not adjust the rearview mir-
ror while the vehicle is moving.
This could result in loss of con-
trol.
WARNING
Do not modify the inside mirror
and don’t install a wide mirror. It
could result in injury, during an
accident or deployment of the
air bag.
OAM049023
Day
Night
OHD046025N