Page 312 of 449
67
What to do in an emergency
Push-starting
Your manual transaxle-equipped vehicle
should not be push-started because it
might damage the emission control sys-
tem.
Vehicles equipped with automatic
transaxle cannot be push-started.
Follow the directions in this section for
jump-starting.
WARNING - Tow startingvehicle
Never tow a vehicle to start it
because the sudden surge forward
when the engine starts could cause
a collision with the tow vehicle.
Page 316 of 449

611
What to do in an emergency
TPMS (Tire Pressure
Monitoring System)
malfunction indicator
The TPMS malfunction indicator will
illuminate after it blinks for approxi-
mately one minute when there is a
problem with the Tire Pressure
Monitoring System. If the system is
able to correctly detect an under infla-
tion warning at the same time as sys-
tem failure then it will illuminate the
TPMS malfunction indicator.
Have the system checked by an
authorized kia dealer as soon as
possible to determine the cause of
the problem.
The TPMS malfunction indicator may
be illuminated if the vehicle is moving
around electric power supply cables
or radios transmitter such as at police
stations, government and public
offices, broadcasting stations, military
installations, airports, or transmitting
towers, etc. This can interfere with
normal operation of the Tire Pressure
Monitoring System (TPMS). The TPMS malfunction indicator may
illuminate if snow chains or some
separately purchased devices such
as notebook computers, mobile
charger, remote starter, navigation
etc. are used in the vehicle. This can
interfere with normal operation of the
Tire Pressure Monitoring System
(TPMS).
WARNING - Low pressure
damage
Do not drive on low pressure
tires. Significantly low tire pres-
sure can cause the tires to over-
heat and fail making the vehicle
unstable resulting in increased
braking distances and a loss of
vehicle control.
Page 319 of 449

What to do in an emergency
14
6
IF YOU HAVE A FLAT TIRE
Jack and tools
The spare tire, jack, jack handle and
wheel lug nut wrench are stored in
the luggage compartment.
Remove the luggage under tray out
of the way to reach the equipment.
(1) Jack handle
(2) Jack
(3) Wheel lug nut wrench
Jacking instructions
The jack is provided for emergency
tire changing only.
To prevent the jack from “rattling”
while the vehicle is in motion, store it
properly.
Follow jacking instructions to reduce
the possibility of personal injury. Always move the vehicle completely
off the road and onto the shoulder
before trying to change a tire. The
jack should be used on firm level
ground. If you cannot find a firm level
place off the road, call a towing serv-
ice company for assistance.
Be sure to use the correct front and
rear jacking positions on the vehicle;
never use the bumpers or any other
part of the vehicle for jack support.
WARNING- Jack
Do not place any portion of your
body under a vehicle that is
only supported by a jack since
the vehicle can easily roll off the
jack. Use vehicle support
stands.
WARNING- Changing tires
Never attempt vehicle repairs in
the traffic lanes of a public road
or highway.
OUB061002
Page 325 of 449

What to do in an emergency
20
6
The compact spare should be inflat-
ed to 420 kPa (60 psi).
Check the inflation pressure after
installing the spare tire. Adjust it to
the specified pressure, as necessary. When using a compact spare tire,
observe the following precautions:
Under no circumstances should you
exceed 80 km/h (50 mph); a higher
speed could damage the tire.
Ensure that you drive slowly enough for the road conditions to avoid all
hazards. Any road hazard, such as a
pothole or debris, could seriously
damage the compact spare.
Any continuous road use of this tire could result in tire failure, loss of
vehicle control, and possible per-
sonal injury.
Do not exceed the vehicle’s maxi- mum load rating or the load-carry-
ing capacity shown on the sidewall
of the compact spare tire.
Avoid driving over obstacles. The compact spare tire diameter is
smaller than the diameter of a con-
ventional tire and reduces the
ground clearance approximately
25 mm (1 inch), which could result
in damage to the vehicle.
Do not take this vehicle through an automatic car wash while the com-
pact spare tire is installed. The compact spare tire should not
be installed on the front axle if the
vehicle must be driven in snow or
on ice.
Do not use the compact spare tire on any other vehicle because this
tire has been designed especially
for your vehicle.
The compact spare tire’s tread life is shorter than a regular tire. Inspect
your compact spare tire regularly
and replace worn compact spare
tires with the same size and design,
mounted on the same wheel.
The compact spare tire should not be used on any other wheels, nor
should standard tires, snow tires,
wheel covers or trim rings be used
with the compact spare wheel. If
such use is attempted, damage to
these items or other car compo-
nents may occur.
Do not use more than one compact spare tire at a time.
Do not tow a trailer while the com- pact spare tire is installed.
WARNING - Spare tire
Do not operate your vehicle on
this compact spare at speeds
over 80 km/h (50 mph). The
compact spare tire is for emer-
gency use only. The original tire
should be repaired or replaced
as soon as is possible to avoid
failure of the spare.
Page 331 of 449

What to do in an emergency
26
6
Distributing the sealant
11. Immediately drive approximately
7~10km (4~6miles or about
10min) to evenly distribute the
sealant in the tire.
Do not exceed a speed of 80 km/h
(50 mph). If possible, do not fall
below a speed of 20 km/h (12 mph).
While driving, if you experience any
unusual vibration, ride disturbance or
noise, reduce your speed and drive
with caution until you can safely pull
off of the side of the road. If this
occures, call for roadside service or
towing.
When you use the Tire Mobility Kit,
the tire pressure sensors and wheel
may be stained by sealant.
Therefore, remove the tire pressure
sensors and wheel stained by
sealant and have it serviced by an
authorized Kia dealer. Checking the tire inflation pres-
sure
1.After driving approximately
7~10km (4 ~6miles or about
10min), stop at a safe location.
2.Connect connection hose (9) of the compressor directly to the tire
valve.
3.Plug the compressor power cord into the vehicle power outlet.
4.Adjust the tire inflation pressure to the recomended tire inflation.
With the ignition switched on, pro-
ceed as follows.
- To increase the inflation pres-sure : Switch on the compressor,
position I. To check the current
inflation pressure setting, briefly
switch off the compressor.✽ ✽ NOTICE
The pressure gauge may show high-
er than actual reading when the
compressor is running. To get an
accurate tire pressure, the compres-
sor needs to be turned off.
- To reduce the inflation pres-
sure: Loosen the screw cap (8)
on the compressor hose.
Page 333 of 449

What to do in an emergency
28
6
TOWING
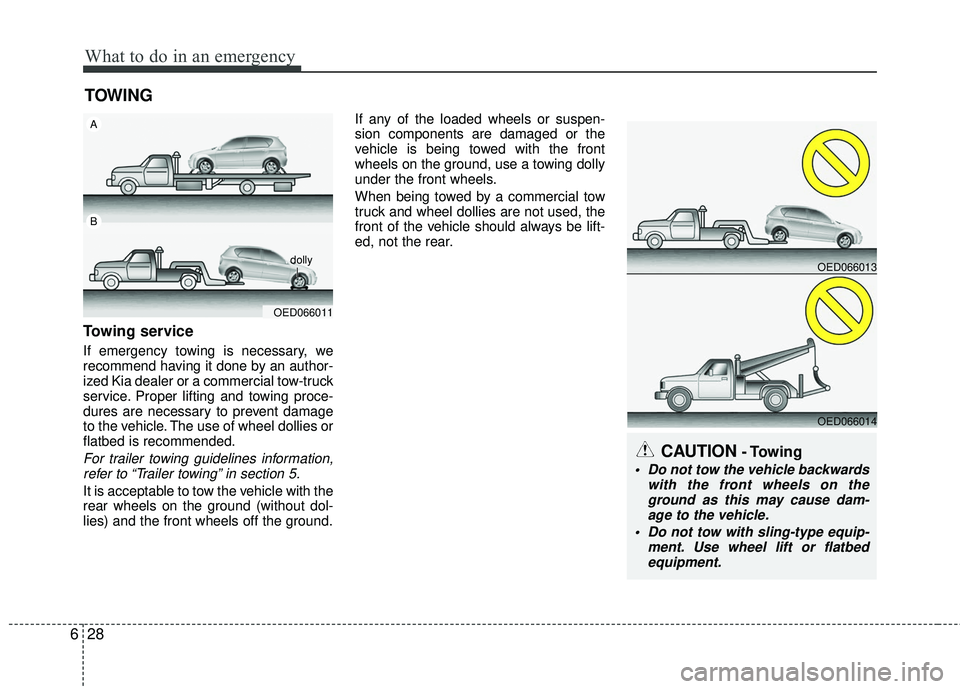
Towing service
If emergency towing is necessary, we
recommend having it done by an author-
ized Kia dealer or a commercial tow-truck
service. Proper lifting and towing proce-
dures are necessary to prevent damage
to the vehicle. The use of wheel dollies or
flatbed is recommended.
For trailer towing guidelines information,
refer to “Trailer towing” in section 5.
It is acceptable to tow the vehicle with the
rear wheels on the ground (without dol-
lies) and the front wheels off the ground. If any of the loaded wheels or suspen-
sion components are damaged or the
vehicle is being towed with the front
wheels on the ground, use a towing dolly
under the front wheels.
When being towed by a commercial tow
truck and wheel dollies are not used, the
front of the vehicle should always be lift-
ed, not the rear.
CAUTION- Towing
Do not tow the vehicle backwards
with the front wheels on theground as this may cause dam- age to the vehicle.
Do not tow with sling-type equip- ment. Use wheel lift or flatbedequipment.
OED066011
A
B
dolly
OED066013
OED066014
Page 334 of 449
629
What to do in an emergency
When towing your vehicle in an emer-
gency without wheel dollies :
1. Set the ignition switch in the ACC posi-tion.
2. Place the transaxle shift lever in N (Neutral).
3. Release the parking brake.
Removable towing hook (front)
(if equipped)
1. Remove the towing hook from the tool case.
2. Remove the hole cover pressing the lower part of the cover on the front
bumper. 3. Install the towing hook by turning it
clockwise into the hole until it is fully
secured.
4. Remove the towing hook and install the cover after use.
CAUTION - Towing gear position
Always place the transaxle shift
lever in N (Neutral) when towingyour vehicle. Failure to place thetransaxle shift lever in N (Neutral)may cause internal damage to the transaxle.
OUB065011
■ 4 door
■ 5 doorOUB065025
Page 335 of 449

What to do in an emergency
30
6
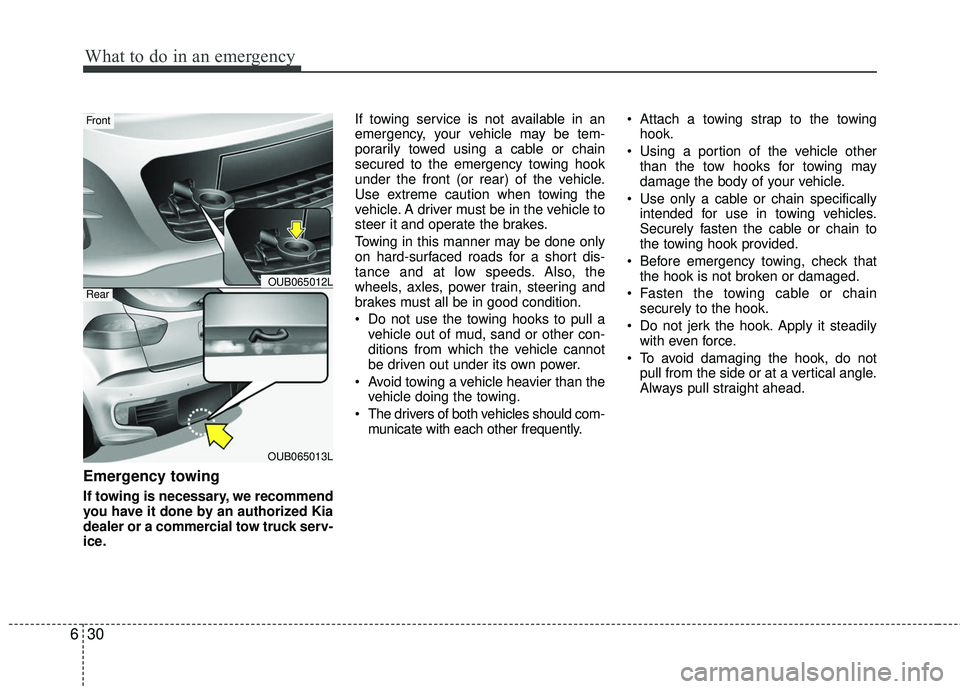
Emergency towing
If towing is necessary, we recommend
you have it done by an authorized Kia
dealer or a commercial tow truck serv-
ice. If towing service is not available in an
emergency, your vehicle may be tem-
porarily towed using a cable or chain
secured to the emergency towing hook
under the front (or rear) of the vehicle.
Use extreme caution when towing the
vehicle. A driver must be in the vehicle to
steer it and operate the brakes.
Towing in this manner may be done only
on hard-surfaced roads for a short dis-
tance and at low speeds. Also, the
wheels, axles, power train, steering and
brakes must all be in good condition.
Do not use the towing hooks to pull a
vehicle out of mud, sand or other con-
ditions from which the vehicle cannot
be driven out under its own power.
Avoid towing a vehicle heavier than the vehicle doing the towing.
The drivers of both vehicles should com- municate with each other frequently. Attach a towing strap to the towing
hook.
Using a portion of the vehicle other than the tow hooks for towing may
damage the body of your vehicle.
Use only a cable or chain specifically intended for use in towing vehicles.
Securely fasten the cable or chain to
the towing hook provided.
Before emergency towing, check that the hook is not broken or damaged.
Fasten the towing cable or chain securely to the hook.
Do not jerk the hook. Apply it steadily with even force.
To avoid damaging the hook, do not pull from the side or at a vertical angle.
Always pull straight ahead.
OUB065013L
Front
RearOUB065012L