2017 KIA RIO ECO mode
[x] Cancel search: ECO modePage 1 of 449

Kia, THE COMPANY
Thank you for becoming the owner of a new Kia vehicle.
As a global car manufacturer focused on building high-quality, value
for money prices, Kia Motors is dedicated to providing you with a
customer service experience that exceeds your expectations.
All information contained in this Owner’s Manual was accurate at the
time of publication. However, Kia reserves the right to make changes
at any time so that our policy of continual product improvement can
be carried out.
This manual applies to all Kia models and includes descriptions and
explanations of optional as well as standard equipment. As a result,
you may encounter material in this manual that is not applicable to
your specific Kia vehicle.Drive safely and enjoy your Kia!
Page 2 of 449

i
Thank you for choosing a Kia vehicle.
When you require service, remember that your Kia Dealer
knows your vehicle best. Your dealer has factory-trained tech-
nicians, recommended special tools, genuine Kia replacement
parts and is dedicated to your complete satisfaction.
Because subsequent owners require this important information
as well, this publication should remain with the vehicle if it is
sold.
This manual will familiarize you with operational, mainte-
nance and safety information about your new vehicle. It is sup-
plemented by a Warranty and Consumer Information manual
that provides important information on all warranties regarding
your vehicle.
We urge you to read these publications carefully and follow the
recommendations to help assure enjoyable and safe operation
of your new vehicle.
Kia offers a great variety of options, components and features
for its various models. Therefore, some of the equipment
described in this manual, along with the various illustrations,
may not be applicable to your particular vehicle.
The information and specifications provided in this manual
were accurate at the time of printing. Kia reserves the right to
discontinue or change specifications or design at any time
without notice and without incurring any obligation. If you
have questions, always check with your Kia dealer.
We assure you of our continuing interest in your motoring
pleasure and satisfaction in your Kia vehicle.
© 2017 Kia Canada Inc.
All rights reserved. Reproduction by any means, electronic or
mechanical, including photocopying, recording, or by any
information storage and retrieval system or translation in
whole or part is not permitted without written authorization
from Kia Canada Inc..
Printed in Korea
Foreword
Page 33 of 449

Safety features of your vehicle
18
3
You should place the lap belt portion as
low as possible and snugly across your
hips. If the lap belt is located too high on
your waist, it may increase the chance of
injury in the event of a collision.
The arm closest to the seat belt buckle
should be over the belt while the other
arm should be under the belt as shown in
the illustration.
Seat belts - Front passenger and rear
seat 3-point system with combinationlocking retractor
To fasten your seat belt:
Combination retractor type seat belts are
installed in the rear seat positions to help
accommodate the installation of child
restraint systems. Although a combina-
tion retractor is also installed in the front
passenger seat position, it is strongly
recommended that children always be
seated in the rear seat. NEVER place
any infant restraint system in the front
seat of the vehicle.
This type of seat belt combines the fea-
tures of both an emergency locking
retractor seat belt and an automatic lock-
ing retractor seat belt. To fasten your seat
belt, pull it out of the retractor and insert
the metal tab into the buckle. There will
be an audible "click" when the tab locks
into the buckle. When not securing a
child restraint, the seat belt operates in
the same way as the driver's seat belt
(Emergency Locking Retractor Type). It
automatically adjusts to the proper length
only after the lap belt portion of the seat
belt is adjusted manually so that it fits
snugly around your hips. When the seat belt is fully extended from
the retractor to allow the installation of a
child restraint system, the seat belt oper-
ation changes to allow the belt to retract,
but not to extend (Automatic Locking
Retractor Type). Refer to “Using a child
restraint system” in this section.
To convert from the automatic locking
feature to the emergency locking opera-
tion mode, allow the unbuckled seat belt
to fully retract.
B200A01NF
Page 42 of 449

327
Safety features of your vehicle
For safety reasons, we recommend that
the child restraint system be used in the
rear seats.
Since all passenger seat belts move
freely under normal conditions and only
lock under extreme or emergency condi-
tions (emergency lock mode), you must
manually change these seat belts to the
auto lock mode to secure a child
restraint.
If the seat belt does not operate as
described in this section, have the sys-
tem checked immediately by your author-
ized Kia dealer.
✽ ✽NOTICE
If the vehicle headrest prevents proper
installation of a child seat (as described
in the child seat system manual), the
headrest of the respective seating posi-
tion shall be readjusted or entirely
removed.
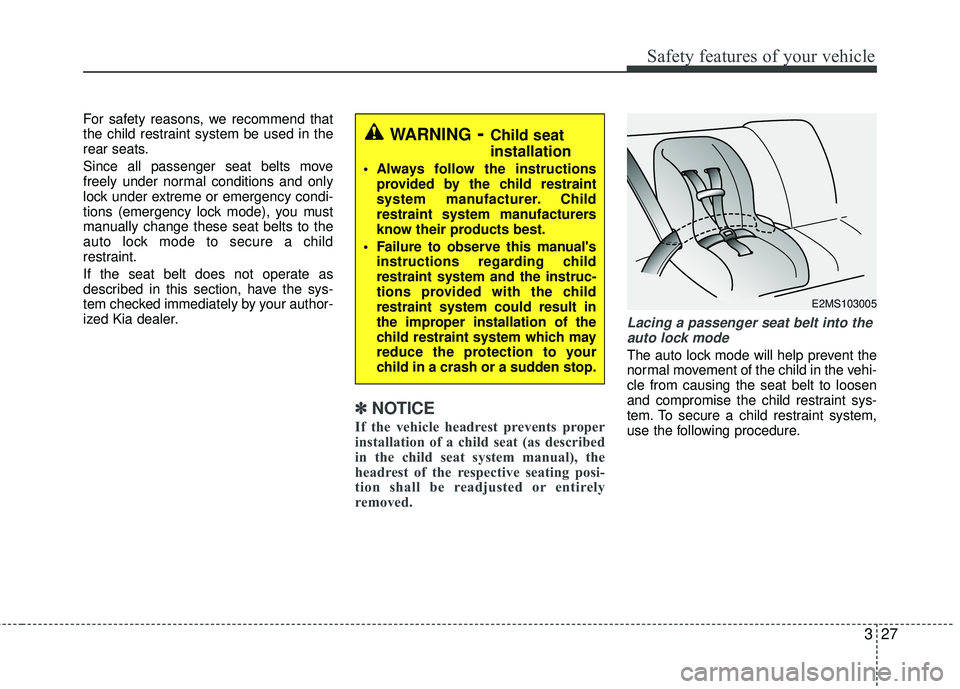
Lacing a passenger seat belt into the
auto lock mode
The auto lock mode will help prevent the
normal movement of the child in the vehi-
cle from causing the seat belt to loosen
and compromise the child restraint sys-
tem. To secure a child restraint system,
use the following procedure.
WARNING- Child seat
installation
Always follow the instructions provided by the child restraint
system manufacturer. Child
restraint system manufacturers
know their products best.
Failure to observe this manual's instructions regarding child
restraint system and the instruc-
tions provided with the child
restraint system could result in
the improper installation of the
child restraint system which may
reduce the protection to your
child in a crash or a sudden stop.
E2MS103005
Page 119 of 449

Features of your vehicle
48
4
Tripmeter
TRIP A: Tripmeter A
TRIP B: Tripmeter B
This mode indicates the distance of indi-
vidual trips selected since the last trip-
meter reset.
The meter's working range is from 0.0 to
999.9 km (0.0 to 999.9 miles).
Pressing the TRIP button for more than 1
second, when the tripmeter (TRIP A or
TRIP B) is being displayed, clears the
tripmeter to zero (0.0). Distance to empty
This mode indicates the estimated dis-
tance to empty based on the current fuel
in the fuel tank and the amount of fuel
delivered to the engine. When the
remaining distance is below 1 km (1
miles), “---” will be displayed and the dis-
tance to empty indicator will blink.
The meter’s working range is from 1 to
999 km (1 to 990 miles). If the vehicle is not on level ground or
the battery power has been interrupt-
ed, the “Distance to empty” function
may not operate correctly.
The trip computer may not register
additional fuel if less than 6 liters (1.6
gallons) of fuel are added to the vehi-
cle.
The fuel consumption and distance to empty values may vary significantly
based on driving conditions, driving
habits, and condition of the vehicle.
The distance to empty value is an esti- mate of the available driving distance.
This value may differ from the actual
driving distance available.
OUB041051C
■Type A■Type B
OUB041052C
■Type A■Type B
Page 120 of 449

449
Features of your vehicle
Average fuel consumption
This mode calculates the average fuel
consumption from the total fuel used and
the distance since the last average con-
sumption reset. The total fuel used is cal-
culated from the fuel consumption input.
For an accurate calculation, drive more
than 50 m (0.03 mile).
Pressing the TRIP button for more than 1
second, when the average fuel consump-
tion is displayed, clears the average fuel
consumption to zero (---).
If the vehicle speed exceeds 1 km/h (0.6
MPH) after refueled more than 6 l, the
average fuel consumption will be cleared
to zero (---).Instant fuel consumption
This mode calculates the instant fuel
consumption during the last few sec-
onds.
✽ ✽
NOTICE
You must drive more than 10 km/h (6
MPH) (type A) or 5 km/h (3 MPH) (type
B) for this mode to calculate the instant
fuel consumption.
Average speed
This mode calculates the average speed
of the vehicle since the last average
speed reset.
Even if the vehicle is not in motion, the
average speed keeps going while the
engine is running.
Pressing the TRIP button for more than 1
second, when the average speed is dis-
played, clears the average speed to zero
(---).
OUB041053C
■Type A■Type B
OUB042054C
■Type A■Type B
OUB041055C
■Type A■Type B
Page 121 of 449

Features of your vehicle
50
4
Elapsed time
This mode indicates the total time trav-
eled since the last elapsed time reset.
Even if the vehicle is not in motion, the
elapsed time keeps going while the
engine is running.
The meter’s working range is from
0:00~99:59.
Pressing the TRIP button for more than 1
second, when the elapsed time is being
displayed, clears the elapsed time to
zero (0:00). Outside temperature (if equipped)
This mode indicates the outside temper-
ature around the vehicle.
The meter's working range is from -40°C
to 60°C (-40°F to 140°F).
Type A
To change the outside temperature dis-
play unit (°C
↔
°F), press the RESET
button more than 1 second in this mode.
Type B
To Change the outside temperature dis-
play unit (°C ↔
°F), see the following
pages in Vehicle Option section.Manual transaxle shift indicator
(if equipped)
This indicator informs you which gear is
desired while driving to save fuel.
For example
: Indicates that shifting up to the 3rdgear is desired (currently the shift
lever is in the 2nd or 1st gear).
: Indicates that shifting down to the 3rd gear is desired (currently the
shift lever is in the 4th or 5th gear).
When the system is not working proper-
ly, the indicator is not displayed.
OUB041056C
■Type A■Type B
OUB041057C
■Type A■Type B
OUB041176N
■Type A■Type B
Page 123 of 449

Features of your vehicle
52
4
Car option (only for Type B clus-
ter, if equipped)
1. When the vehicle is at a standstill,
pressing the TRIP button for more than
2 seconds with the ENGINE
START/STOP button in the ON posi-
tion or engine running, the LCD display
on the cluster will change to the "User
Setting" mode.
You can move to items by pressing the
TRIP button and select the item by
pressing the RESET button.
2. In the "User Setting" mode, select "Vehicle Option".
3. Move (TRIP button) to the desired item and select (RESET button).
Align steering wheel (Steering position) (if equipped)
On - The warning illuminates on the LCD display when the steering wheel is
not aligned with the ENGINE
START/STOP button in the ON
position.
Off - The warning does not illuminate on the LCD display when the steering
wheel is not aligned with the
ENGINE START/STOP button in the
ON position.
Outside temperature unit(if equipped)
You can exchange the outside tempera-
ture unit °C ↔
°F.
OUB041064OUB041065OUB041066