Page 138 of 488

463
Features of your vehicle
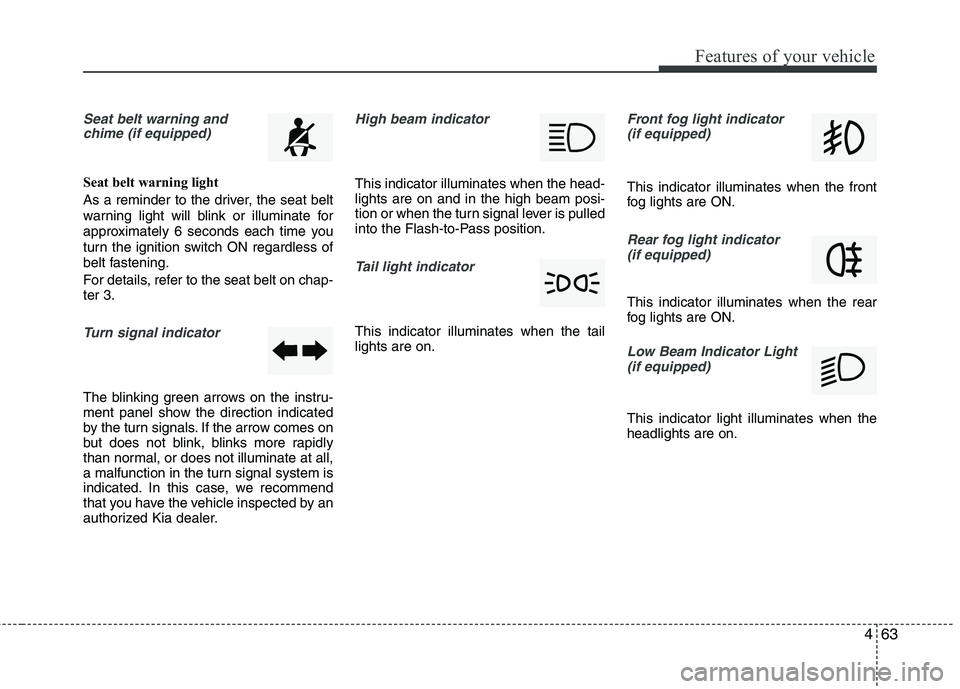
Seat belt warning andchime (if equipped)
Seat belt warning light
As a reminder to the driver, the seat belt
warning light will blink or illuminate for
approximately 6 seconds each time you
turn the ignition switch ON regardless of
belt fastening.
For details, refer to the seat belt on chap- ter 3.
Turn signal indicator
The blinking green arrows on the instru-
ment panel show the direction indicated
by the turn signals. If the arrow comes on
but does not blink, blinks more rapidly
than normal, or does not illuminate at all,
a malfunction in the turn signal system is
indicated. In this case, we recommend
that you have the vehicle inspected by an
authorized Kia dealer.
High beam indicator
This indicator illuminates when the head- lights are on and in the high beam posi-
tion or when the turn signal lever is pulled
into the Flash-to-Pass position.
Tail light indicator
This indicator illuminates when the tail lights are on.
Front fog light indicator
(if equipped)
This indicator illuminates when the front
fog lights are ON.
Rear fog light indicator (if equipped)
This indicator illuminates when the rear
fog lights are ON.
Low Beam Indicator Light
(if equipped)
This indicator light illuminates when the headlights are on.
Page 153 of 488
Features of your vehicle
78
4
High beam operation
To turn on the high beam headlights, push
the lever away from you. Pull it back for
low beams. The high beam indicator will light when
the headlight high beams are switched on.
To prevent the battery from being dis-
charged, do not leave the lights on for a pro-
longed time while the engine is not running. Flashing headlights
To flash the headlights, pull the lever
towards you. It will return to the normal
(low beam) position when released. The
headlight switch does not need to be on
to use this flashing feature.
ORBC040049
■
Type A
ORB040049E
■
Type B
WARNING
Do not use high beam when there
are other vehicles. Using high beamcould obstruct the other driver'svision.
ORBC040050
■ Type A
ORB040050E
■Type B
Page 157 of 488
Features of your vehicle
82
4
Headlight leveling device (if equipped)
Manual type
To adjust the headlight beam level
according to the number of passengers
and loading weight in the luggage area,
turn the beam leveling switch.
The higher the number of the switch
position, the lower the headlight beam
level. Always keep the headlight beam at
the proper leveling position, or headlights
may dazzle other road users.
Listed below are the examples of proper
switch settings. For loading conditions
other than those listed below, adjust the
switch position so that the beam level
may be the nearest as the conditionobtained according to the list.
OTA040200L Loading condition Switch position
Driver only 0
Driver + Front passenger 0
Full passengers 1 Full passengers +
Maximum permissibleloading 3
Driver + Maximum permis-
sible loading 5
Page 448 of 488

Maintenance
70
7
Headlight/Position light (Bulb type)*
1. Open the hood.
2. Remove the headlight bulb cover by
turning it counterclockwise.
3. Disconnect the headlight bulb socket- connector.
4. Remove the bulb from the headlight assembly.
5. Install a new headlight bulb.
6. Connect the headlight bulb socket- connector.
7. Install the headlight bulb cover by turn- ing it clockwise.
* : if equipped
✽✽ NOTICE
If the headlight aiming adjustment is nec-
essary after the headlight assembly is rein-
stalled, we recommend that you consult an
authorized Kia dealer.
❋❋ Traffic Change (For Europe)
The low beam light distribution is asym-
metric.
If you go abroad to a country with oppo-
site traffic direction, this asymmetric part
will dazzle oncoming car driver. To pre-
vent dazzle, ECE regulation demand
several technical solutions (ex. automatic
change system, adhesive sheet, down
aiming). This headlamps are designed
not to dazzle opposite drivers. So, you
need not change your headlamps in a
country with opposite traffic direction.
OTA070026
(Continued)
If a bulb becomes damaged or cracked, replace it immediately
and carefully dispose of it.
Wear eye protection when chang- ing a bulb. Allow the bulb to cool
down before handling it.