Page 116 of 552
413
Features of your vehicle
✽
✽NOTICE
You can activate or deactivate the
Two Press Unlock function. Refer to
“User settings” in this chapter.
Liftgate unlocking
If you are within 28 ~ 40 in (0.7 ~ 1 m)
from the outside liftgate handle, with
your smart key in possession, the lift-
gate will unlock and open when you
press the liftgate handle switch.
The hazard warning lights will blink
twice to indicate that the liftgate is
unlocked.
Also, once the liftgate is opened and
then closed, the liftgate will lock
automatically.
Panic
1. Press the panic button (4) for more than 1 second.
2. The horn sounds and hazard warning light flash for about 27
seconds.
✽ ✽NOTICE
To stop the horn and lights, press
any button on the smart key.
Start-up
You can start the engine without
inserting the key. For detailed infor-
mation refer to the “Engine start/stop
button” in chapter 6.
Page 118 of 552

415
Features of your vehicle
Battery replacement
A smart key battery should last for
several years, but if the smart key is
not working properly, try replacing
the battery with a new one. If you are
unsure how to use your smart key or
replace the battery, contact an
authorized Kia dealer.
1. Remove the mechanical key.
2. Pry open the rear cover.
3. Replace the battery with a newbattery (CR2032). When replacing
the battery, make sure the battery
is in the correct position. 4. Install the battery in the reverse
order of removal.
you years of trouble-free use, how-
ever it can malfunction if exposed
to moisture or static electricity. If
you are unsure how to use or
replace the battery, contact an
authorized Kia dealer.
the smart key to malfunction. Be
sure to use the correct battery.
don't drop it, get it wet, or expose it
to heat or sunlight.
An inappropriately dis- posed battery can be harm-
ful to the environment and
human health. Dispose the
battery according to your
local law(s) or regulations.
Smart key immobilizer system
Your vehicle is equipped with an
electronic engine immobilizer system
to reduce the risk of unauthorized
vehicle use.
Your immobilizer system is com-
prised of a small transponder in the
smart key and electronic devices
inside the vehicle.
With the immobilizer system, when-
ever you turn the engine start/stop
button to the ON position by pressing
the button while carrying the smart
key, it verifies if the smart key is valid.
If the key is determined to be valid,
the engine will start.
If the key is determined to be invalid,
the engine will not start.
Do not put metal accessories near
the ignition switch.
Metal accessories may interrupt the
transponder signal and may prevent
the engine from being started.
OJF045400L
CAUTION - Smart key
damage
Do not drop, get wet or exposethe smart key to heat or sun-light, or it will be damaged.
Page 120 of 552

417
Features of your vehicle
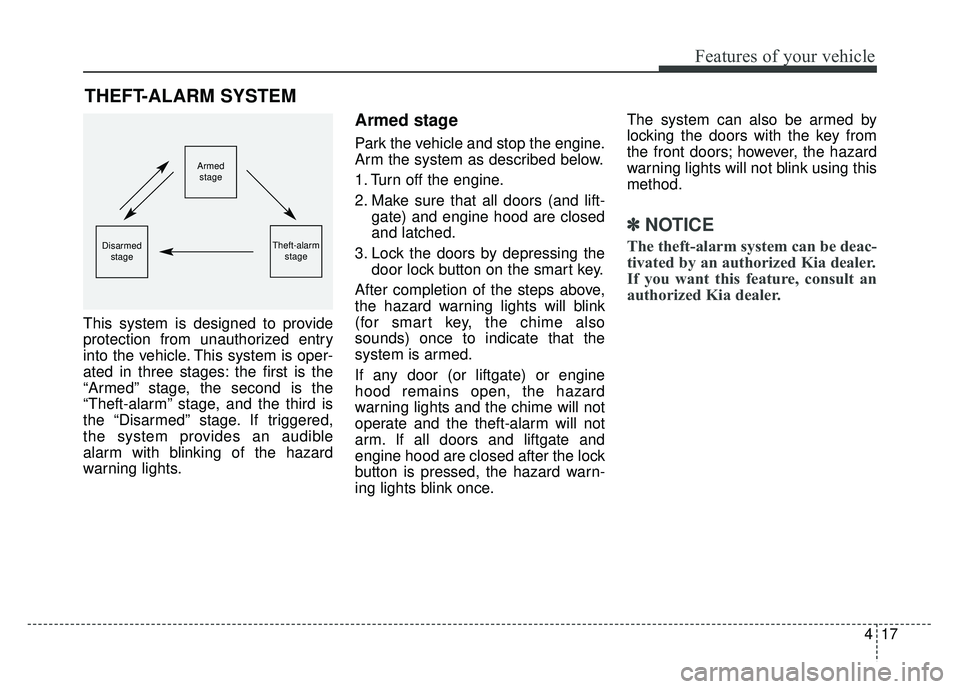
This system is designed to provide
protection from unauthorized entry
into the vehicle. This system is oper-
ated in three stages: the first is the
“Armed” stage, the second is the
“Theft-alarm” stage, and the third is
the “Disarmed” stage. If triggered,
the system provides an audible
alarm with blinking of the hazard
warning lights.
Armed stage
Park the vehicle and stop the engine.
Arm the system as described below.
1. Turn off the engine.
2. Make sure that all doors (and lift-gate) and engine hood are closed
and latched.
3. Lock the doors by depressing the door lock button on the smart key.
After completion of the steps above,
the hazard warning lights will blink
(for smart key, the chime also
sounds) once to indicate that the
system is armed.
If any door (or liftgate) or engine
hood remains open, the hazard
warning lights and the chime will not
operate and the theft-alarm will not
arm. If all doors and liftgate and
engine hood are closed after the lock
button is pressed, the hazard warn-
ing lights blink once. The system can also be armed by
locking the doors with the key from
the front doors; however, the hazard
warning lights will not blink using this
method.
✽ ✽
NOTICE
The theft-alarm system can be deac-
tivated by an authorized Kia dealer.
If you want this feature, consult an
authorized Kia dealer.
THEFT-ALARM SYSTEM
Armed
stage
Theft-alarm stageDisarmedstage
Page 121 of 552

Features of your vehicle
18
4
Do not arm the system until all
passengers have left the vehicle. If
the system is armed while a pas-
senger(s) remains in the vehicle,
the alarm may be activated when
the remaining passenger(s) leave
the vehicle. If any door (or liftgate)
or engine hood is opened within
30 seconds after the system
enters the armed stage, the sys-
tem is disarmed to prevent an
unnecessary alarm.Theft-alarm stage
The alarm will be activated if any of
the following occurs while the system
is armed.
A front or rear door is opened with-
out using the smart key.
The liftgate is opened without using
smart key.
The engine hood is opened.
The horn will sound and the hazard
warning lights will blink continuously
for approximately 27 seconds, and
repeat the horn 3 times unless the
system is disarmed. To turn off the
system, unlock the doors with the
smart key.
Disarmed stage
The system will be disarmed when
The doors (and liftgate) are unlocked with the smart key.
After depressing the unlock button,
the hazard warning lights will blink
and the chime will sound twice (in
smart key) to indicate that the sys-
tem is disarmed.
After depressing the unlock button, if
any door (or liftgate) is not opened
within 30 seconds, the system will be
rearmed.
Page 131 of 552

Features of your vehicle
28
4
Power windows
The Engine Start/Stop button must
be in the ON position for power win-
dows to operate.
Each door has a power window
switch that controls the door's win-
dow. The driver has a power window
lock button which can block the oper-
ation of rear passenger windows.
The power windows can be operated
for approximately 30 seconds after
the engine is turned off.
If the front doors are opened; howev-
er, the power windows cannot be
operated even within the 30 second
period.
✽ ✽
NOTICE
While driving with the rear windows
down or with the sunroof (if
equipped) in an open (or partially
open) position, your vehicle may
demonstrate a wind buffeting or
pulsation noise. This noise is a nor-
mal occurrence and can be reduced
or eliminated by taking the follow-
ing actions. If the noise occurs with
one or both of the rear windows
down, partially lower both front
windows approximately one inch. If
you experience the noise with the
sunroof open, slightly reduce the
size of the sunroof opening.
Window opening and closing
The driver’s door has a master power
window switch that controls all the
windows in the vehicle.
To open or close a window, press
down or pull up the front portion of
the corresponding switch to the first
detent position (5).
OJF045016
WARNING
Do not install any accessories
in the area of windows. It may
impact jam protection.
Page 135 of 552
Features of your vehicle
32
4
Opening the hood
1. Pull the release lever to unlatch
the hood. The hood should pop
open slightly.
Open the hood after turning off the
engine on a flat surface, shifting the
shift lever to the P (Park) position
and setting the parking brake. 2. Go to the front of the vehicle, raise
the hood slightly, push the second-
ary latch (1) upward inside of the
hood center and lift the hood (2).
3. Raise the hood. It will completely rise by itself after it has been
raised about halfway. 4. Pull out the stay rod.
5. Hold the hood opened with the
stay rod (1).
HOOD
ODE046014
ODE046015 ODE046016
WARNING - Stay Rod
To prevent from being burned by hot metal, grab the stay rod
in the area wrapped in rubber.
Ensure the stay rod is com- pletely inserted into the hole
provided whenever you inspect
the engine compartment. This
will prevent the hood from
falling and possibly injuring
you.
Page 136 of 552

433
Features of your vehicle
Hood open warning
The warning message will appear on
the LCD display when hood is open.
The warning chime will operate when
the vehicle is being driven at or
above 2 mph (3 km/h) with the hood
open.
Closing the hood
1. Before closing the hood, check thefollowing:
partment must be correctly
installed.
bustible material must be
removed from the engine com-
partment.
2. Lower the hood halfway and push down to securely lock in place.
3. Check that the hood has engaged properly. If the hood can be raised
slightly, it is not properly engaged.
Open it again and close it with a lit-
tle more force.WARNING - Fire risk
Do not leave gloves, rags or any
other combustible material in the
engine compartment. Doing so
may cause a heat-induced fire.
WARNING - Unsecured
engine hood
Always double check to be sure
that the hood is firmly latched
before driving away. If it is not
latched, the hood could fly open
while the vehicle is being driv-
en, causing a total loss of visi-
bility, which might result in an
accident.
CAUTION - Hood obstruc-
tion
Before closing the hood, ensure that all obstructions areremoved from the hood open-ing. Closing the hood with anobstruction present in the hoodopening may result in propertydamage.
ODE046118N
Page 137 of 552

Features of your vehicle
34
4
Opening the fuel filler lid
The fuel filler lid must be opened
from inside the vehicle by pressing
the fuel filler lid opener button.
If the fuel filler lid does not open
because ice has formed around it,
tap lightly or push on the lid to break
the ice and release the lid. Do not pry
on the lid. If necessary, spray around
the lid with an approved de-icer fluid
(do not use radiator anti-freeze) or
move the vehicle to a warm place
and allow the ice to melt. 1. Stop the engine.
2. To open the fuel filler lid, push the
fuel filler lid opener button.
3. Pull open the fuel filler lid (1).
4. To remove the cap, turn the fuel filler cap (2) counterclockwise.
5. Refuel as needed.
Closing the fuel filler lid
1. To install the cap, turn it clockwise until it “clicks” once. This indicates
that the cap is securely tightened.
2. Close the fuel filler lid and push it in lightly making sure that it is
securely closed.
✽ ✽NOTICE
There may be an intermittent noise
near the refueling hole while the
engine is idling if the fuel cap is not
closed securely. This occurs normal-
ly with the OBD system.
✽ ✽NOTICE
When refueling on unlevel ground,
the fuel gauge may not point to the F
position.
It is not a malfunction. If you move
your vehicle to a level ground, the fuel
gauge will move to the full position.
FUEL FILLER LID
ODE046017N
ODE046018