Page 25 of 62
, you can also move through the
system using the touch screen, steering wheel
controls and voice commands.
Driver Informati")
23
Quick Tip
In addition to the Driver Information System
Control s (DIS), you can also move through the
system using the touch screen, steering wheel
controls and voice commands.
Driver Information System (DIS) Controls (Continued)
H UVO – Displays the UVO menu which provides access
to the following options: Roadside Assist, Vehicle
Diagnostics, My POIs, eServices Guide, Apps and
UVO Settings
I Power Rear Window Sunshade – Operates the one-
touch power rear window shade
J Surround View Monitor* – Turns on the parking support
system, which shows the 360-degree surroundings of
the K900 on the navigation screen
K SNOW mode* – Turns on SNOW mode, which helps with
driving on slippery, snowy or muddy roads
L / - Press to select previous/next radio/SiriusXM®*
station or media track /file/chapter. Press and hold to
automatically cycle through radio stations or rewind/fast
forward media tracks/files/chapters
CENTER PANEL
*IF EQUIPPED
ALWAYS CHECK THE OWNER’S MANUAL FOR COMPLE TE OPER ATING INFORMATION AND SAFE T Y WARNINGS.
Page 26 of 62

24
A When lit, indicates a disc is inserted
B Press to eject disc
C Insert disc
D Press to turn the display OFF/ON
E Press and hold to reset /restart the system
F Press to power ON. Press quickly to turn A / V OFF. Press
and hold to turn system OFF. Rotate to adjust volume
G Press to select FM/AM modes
H Press to select SiriusXM®* mode
I Press to select MEDIA (Disc, Jukebox, USB/iPod®, Aux,
Pandora®, Bluetooth® Audio) modes
J Press to display a map of the current location or repeat
voice guidance
K Press to select previous/next radio/SiriusXM® stations/
Disc/MP3/Jukebox/USB/iPod® tracks/files/chapters. Press
and hold to automatically search radio stations. Press and
hold to quickly move through media tracks/files/chapters
L Rotate to change Radio/SiriusXM® stations/Disc/
Jukebox/USB/iPod® files. Press to select
Quick Tips
- Use the touchscreen and/or the DIS to navigate
through the menus/selections
- Prolonged use of the navigation system in ACC mode may drain the vehicle’s battery. A warning
screen may appear periodically to remind users
that the navigation system should be operated with
the engine running to prevent battery discharge
- When using the voice command feature, wait for the system BEEP before speaking the command
- Surround Sound can be turned on or off
REMINDER: Your vehicle’s audio system may differ
from that in the image.
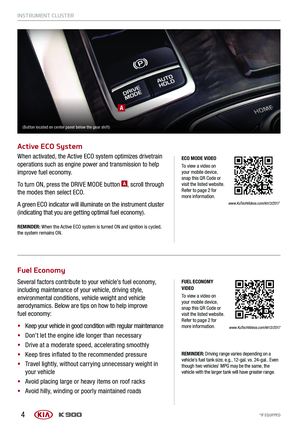
UVO Luxury Services with Premium Navigation
ABCDE
K
LF
GHIJ
www.kutechvideos.com/audio/ k900_avn
UVO LUXURY
SERVICES WITH
PREMIUM NAVIGATION
SYSTEM VIDEO
To view a video on
your mobile device,
snap this QR Code or
visit the listed website.
Refer to page 2 for
more information.
For further system operation, refer to the Car
Navigation System Owner’s Manual.
CENTER PANEL
*IF EQUIPPED
CENTER PANEL
*IF EQUIPPED
Page 27 of 62

25
Clock
Aux/USB/iPod
® Port & Power Outlets
Center Panel Clock Setup:
Clock setup is completed through the navigation system
screen. See below or refer to the Car Navigation System
Owner’s Manual for more information.
UVO Luxury Services with Premium Navigation
System Clock Setup:
Select SET TINGS on the navigation screen. Select CLOCK.
Select TIME SET TINGS and set the time, then select OK.
If equipped, additional power outlets are located inside the
center console and in the rear passenger’s center console.
For further system operation, refer to the Car Navigation System Owner’s Manual.
( The outlets shown are
located in the center panel)
UVO Luxury Services Registration/Activation – To use UVO Luxury Services follow
these activation steps:
1. Press the UVO button on DIS controls
(Located on Center Console)
2. Select UVO Settings on the navigation screen
3. Choose Service Activation and select Activation
4. Review and Agree to the UVO Terms and Conditions
5. Complete the form fields for Account Registration
(email and password) and press Submit
6. Complete the activation by downloading the UVO
Luxury Services app for your iPhone®
or Android™
UVO Luxury Services with Premium Navigation* (Continued)
Sound Settings
To adjust the sound settings, press the HOME icon using the touch screen or the HOME button on the center
panel, select SET TINGS, then select SOUND. From the SOUND menu, you can adjust the following settings:
§ Volume Ratio
§
Fade/Balance
§ Treble/Middle/Bass
§
Surround Sound §
Variable EQ
§
Speed Dependent Vol.
§
To u ch To n e
§
VIP Sound*
CENTER PANEL
*IF EQUIPPED
ALWAYS CHECK THE OWNER’S MANUAL FOR COMPLE TE OPER ATING INFORMATION AND SAFE T Y WARNINGS.
Page 28 of 62
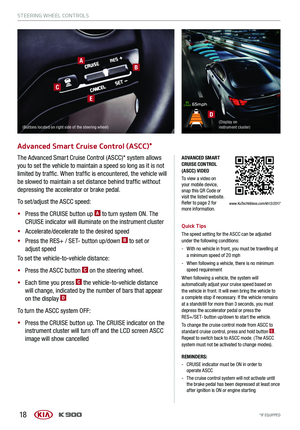
 Climate Control button
C Front Windshield Defrost button
D Fan Speed Control buttons
E Mode Select button
F Recirculated Air ON/O")
26
A Driver’s Temperature Control buttons
B AUTO (Automatic) Climate Control button
C Front Windshield Defrost button
D Fan Speed Control buttons
E Mode Select button
F Recirculated Air ON/OFF button
G Front Passenger’s Temperature Control buttons
H Climate Control System OFF button
I Rear Window Defrost button
J Air Conditioning ON/OFF button
K SYNC (Synchronize All Zones) Temperature
Control button
L CLIMATE Information Screen Selection button
Automatic Climate Control System
A
BC
D
EF
IJKL
G
H
Climate Control Auto Function
Press AUTO
B to select full auto operation. In AUTO
mode the driver, front passenger and rear passenger
have full control of their own temperature zones.
The mode, fan speed, air intake and air conditioning
will activate and adjust accordingly to achieve the
temperature settings for each zone.
To set temperatures:
§
Press A to set the driver’s zone temperature
§
Press G to set the front passenger’s zone
temperature
REMINDER: Pressing any button during AUTO operation will
deactivate the AUTO function and switch to manual mode,
except for temperature control.
Front Climate Control
Defrost Outside Windshield
1. Set fan speed to the highest position
2. Set temperature to hot
3. Press the front defrost button
Face-Level F lo or- L evel
Bi-Level Floor/Defrost-Level
Air Flow Modes
To select air flow modes, press the Mode Select
button
E:
Tri-Zone Climate Control
Pressing the SYNC button
K synchronizes all three
climate control zones (driver, passenger and rear)
to the driver's temperature control. Defog Inside Windshield
1. Set desired fan speed
2. Set desired temperature
3. Press the front defrost button
CENTER PANEL
*IF EQUIPPED
CENTER PANEL
*IF EQUIPPED
Page 29 of 62

REMINDER: Your automatic climate control system
may differ from the image. See your Owner’s
Manual for more details.
Quick Tips
- Keep inside glass")
27
Automatic Climate Control System (continued)
REMINDER: Your automatic climate control system
may differ from the image. See your Owner’s
Manual for more details.
Quick Tips
- Keep inside glass as clean as possible to help reduce window fogging
- Defrost Mode activates A /C and opens the fresh air vent to help dehumidify the air and improve
defroster performance
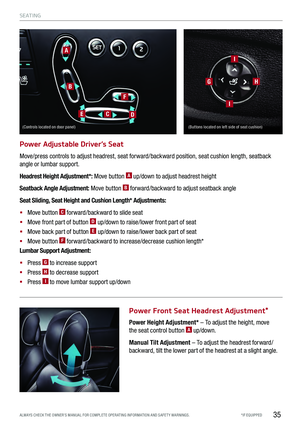
Rear Climate Control
A Fan Speed Control knob
B Rear Climate Control OFF button
C Rear Climate Control LCD screen
D Rear Temperature Control knob
E AUTO (Automatic) Climate Control button
F Climate Control RE AR LOCK button
Turn the rear temperature control knob D to set the rear
passenger’s zone temperature.
The rear seat, rear audio and rear climate controls can be
activated or deactivated by using the RE AR LOCK button
F.
The RE AR LOCK button light
F will be illuminated when the
rear seat controls are locked.
RE AR LOCK settings can also be changed in the UVO
eServices with Premium Navigation system.
To set from the navigation system:
§
Press the CLIMATE button
§ Deselect the Rear Climate option
RE AR LOCK settings return to the default setting when
ignition is cycled.
AB
CDE
F
www.KuTechVideos.com/kh13/2017
TRI-ZONE
AUTOMATIC CLIMATE
CONTROL VIDEO
To view a video on
your mobile device,
snap this QR Code or
visit the listed website.
Refer to page 2 for
more information.
REMINDER: If the rear climate controls have been deactivated through
navigation system, they must be activated the same way.
CENTER PANEL
*IF EQUIPPED
ALWAYS CHECK THE OWNER’S MANUAL FOR COMPLE TE OPER ATING INFORMATION AND SAFE T Y WARNINGS.
Page 30 of 62
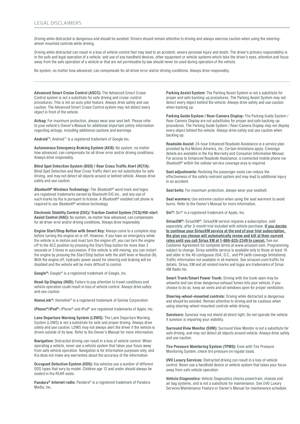
 and Sport Mode
To shift into any gear from Park, depress the brake pedal,
then press the Unlock button A, located on the side of the
gear shift lever, and")
28
Automatic Transmission (Shift by Wire) and Sport Mode
To shift into any gear from Park, depress the brake pedal,
then press the Unlock button A, located on the side of the
gear shift lever, and shift.
P: Park – To shift into Park from any gear, press the P button
B on the gear shift while vehicle is stationary and the brake
pedal is depressed.
R: Reverse – To shift into Reverse, depress brake pedal,
press the Unlock button
A, and move the shift lever forward
twice to skip over Neutral and into Reverse.
N: Neutral
D: Drive
[+]: Sport Mode Upshift
[–]: Sport Mode Downshift
Sport Shift Mode: With the gear shift in Drive, pull the lever
to the left for Sport mode.
§ To upshift [+] – move the shift lever forward
§ To downshift [-] – pull the shift lever rearward
Paddle Shifters*: Paddle shifting is operable when the shift
lever is in the Sport mode position.
REMINDERS:
- Paddle shifters can be operated when the vehicle speed is more than 6 mph
- When in Sport mode, pulling the left and right paddle shifters at the same
time will NOT shift gears
www.KuTechVideos.com/kh13/2017
AUTOMATIC
TRANSMISSION
( SHIFT BY WIRE)
AND SPORT MODE
To view a video on
your mobile device,
snap this QR Code or
visit the listed website.
Refer to page 2 for
more information.
B
A
Quick Tips
- Press the Unlock button A when shifting from P
(Park) to any gear
- The instrument cluster and the light on top of
the shift lever identifies the gear the vehicle is
currently in
REMINDERS:
- When in P (Park), if the Unlock button is not pressed while shifting, the transmission does
not shift
- If the vehicle is turned off while in Neutral without shifting into Park, it will remain in Neutral until
the driver’s door is opened. At that point it will
automatically shift into Park
- If going through a car wash, remind the attendant to keep the vehicle in Neutral (N) and keep the
engine running. Also, disable the power trunk
lid control using the button inside the glove
compartment, turn off the auto rain-sensing
wipers and fold in the mirrors
(Button located on center panel below the gear shift)
CD
CENTER PANEL
*IF EQUIPPED
CENTER PANEL
*IF EQUIPPED
Page 31 of 62
 system utilizes an electric
motor to engage the parking brake.
Applying the Parking Brake
Depress the brake pedal and pull up the EPB switch
C.
Ensure that the")
29
The Electric Parking Brake (EPB) system utilizes an electric
motor to engage the parking brake.
Applying the Parking Brake
Depress the brake pedal and pull up the EPB switch
C.
Ensure that the indicator light
is illuminated on the
instrument cluster.
Releasing the Parking Brake
The EPB will automatically release when the shifter is placed
in Reverse or Drive. To release EPB manually, depress the
brake pedal, then press the EPB switch
C, with the ignition
switch in the ON position. Ensure that the indicator light
i s O F F.
Electric Parking Brake (EPB)
Auto Hold
Quick Tip
Pull up and hold EPB switch again to increase brake
pressure if parked on a decline or incline.
www.KuTechVideos.com/kh13/2017
ELECTRIC PARKING
BRAKE (EPB) / AUTO
HOLD VIDEO
To view a video on
your mobile device,
snap this QR Code or
visit the listed website.
Refer to page 2 for
more information.
REMINDERS:
- As a bulb check, the EPB malfunction indicator will illuminate for approximately 3 seconds when the ignition switch is turned ON
- If the warning light does not illuminate temporarily or remains continuously lit, take your vehicle to an authorized Kia dealer and
have the system checked
- The EPB should not be operated while the vehicle is moving
- A click or electric brake motor sound may be heard while operating or releasing the EPB. These conditions are normal and indicate
that the EPB is functioning properly
Auto Hold temporarily maintains the vehicle at a standstill even if the brake pedal is released. Auto
Hold can be turned On/Off using the AUTO HOLD switch D on the center panel. Before Auto Hold
will operate, the driver’s door, engine hood and trunk must be closed and the driver’s seat belt must
be fastened.
The Auto Hold indicator, which is in the instrument cluster, has four states:
White : Standby – With vehicle at a standstill, and AUTO HOLD switch
D turned ON, the indicator
will illuminate white. While driving the vehicle (vehicle is not at a standstill), the Auto Hold indicator
will remain white.
Green : Engaged – When coming to a complete stop by depressing the brake pedal, the Auto Hold
indicator changes from white to green.
OFF (not illuminated) – The indicator will turn OFF when the AUTO HOLD switch
D is manually
turned OFF or when the EPB is manually turned ON.
Yellow : Malfunction – When the indicator is illuminated yellow, there may be a system malfunction.
Take your vehicle to a local Kia dealer.
CENTER PANEL
*IF EQUIPPED
ALWAYS CHECK THE OWNER’S MANUAL FOR COMPLE TE OPER ATING INFORMATION AND SAFE T Y WARNINGS.
Page 32 of 62

30
Drive Mode Integrated Control System
NORMAL, ECO, SPORT, SMART and SNOW drive modes
may be changed according the driver’s preference or road
conditions. The system’s default mode is NORMAL and is not
displayed on the instrument cluster nor the navigation screen.
To change the drive mode from the NORMAL (default) mode,
press the DRIVE MODE button
A.
ECO Mode – A green ECO indicator will illuminate on the
instrument cluster. To deactivate, press the DRIVE MODE
button
A again to change the selection to another setting.
SPORT Mode – A yellow SPORT indicator will illuminate on
the instrument cluster. To deactivate, press the DRIVE MODE
button
A again to change the selection to another setting.
SNOW Mode – To activate, press the SNOW MODE button
B
located below the gear shift. It will operate regardless of the
mode you selected with the Drive Mode button. To deactivate
SNOW mode, press SNOW mode button
B again.
Smart Mode
When SMART mode is activated, the system automatically
selects the drive mode (ECO, NORMAL, SPORT ) best suited
to the current driving style (economic, average, aggressive). A
SMART indicator will illuminate on the instrument cluster. The
color of the SMART indicator (green, white, red) depends on
the current driving style. To deactivate, press the DRIVE MODE
button
A again to change the selection to another setting.
Quick Tip
When the ENGINE START/STOP button is turned
off, the system will default to Normal mode and
each mode will need to be selected again when the
vehicle restarts.
REMINDERS:
When ECO mode is selected, the following may occur to improve fuel economy:
- Acceleration may be slightly reduced even when
the accelerator is fully depressed
- Air conditioner performance may be limited
- Shift pattern of the automatic trans mission
may change
- Engine noise may increase
- System’s power will be limited when
driving uphill
- When SPORT mode is selected, fuel economy
may decrease
- When SNOW MODE is selected, the SNOW mode
will operate regardless of which drive mode
(NORMAL/SPORT/ECO/SMART) is selected
B
(Button located on center panel below the gear shift)
A
CENTER PANEL
*IF EQUIPPED
CENTER PANEL
*IF EQUIPPED