2017 KIA CARENS RHD reset
[x] Cancel search: resetPage 175 of 723

479
Features of your vehicle
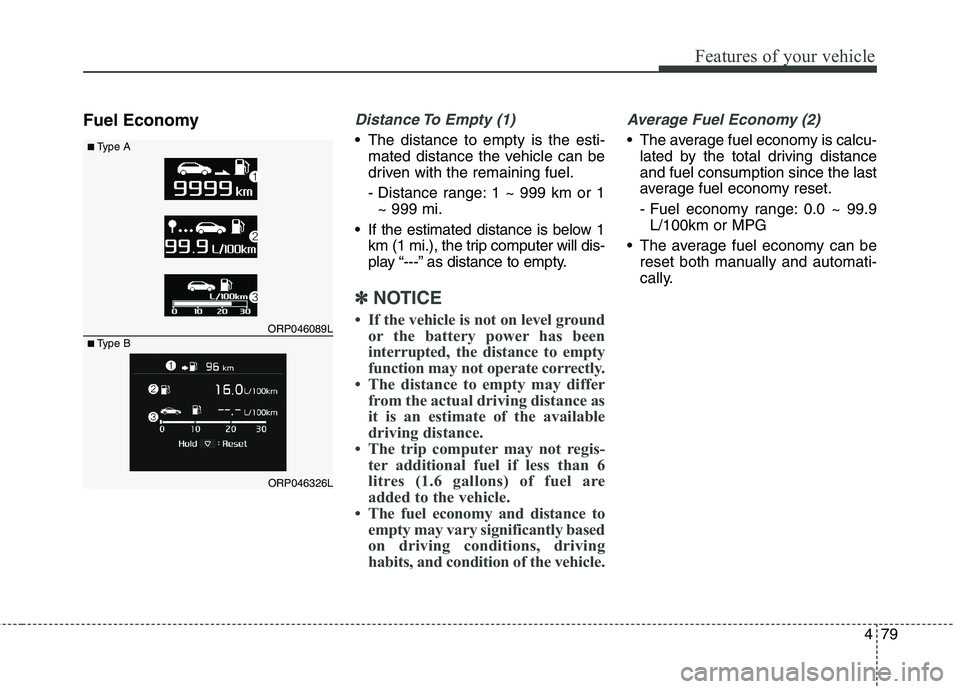
Fuel EconomyDistance To Empty (1)
The distance to empty is the esti-mated distance the vehicle can be
driven with the remaining fuel.
- Distance range: 1 ~ 999 km or 1~ 999 mi.
If the estimated distance is below 1 km (1 mi.), the trip computer will dis-
play “---” as distance to empty.
✽✽ NOTICE
If the vehicle is not on level ground or the battery power has been
interrupted, the distance to empty
function may not operate correctly.
The distance to empty may differ from the actual driving distance as
it is an estimate of the available
driving distance.
The trip computer may not regis- ter additional fuel if less than 6
litres (1.6 gallons) of fuel are
added to the vehicle.
The fuel economy and distance to empty may vary significantly based
on driving conditions, driving
habits, and condition of the vehicle.
Average Fuel Economy (2)
The average fuel economy is calcu-lated by the total driving distance and fuel consumption since the last
average fuel economy reset.
- Fuel economy range: 0.0 ~ 99.9L/100km or MPG
The average fuel economy can be reset both manually and automati-
cally.
ORP046089L
ORP046326L
■
Type A
■Type B
Page 176 of 723

Features of your vehicle
80
4
Choose the average fuel reset mode
you prefer with in "User settings" of
the "LCD Display" as below ;
- OFF (manual reset)
The average fuel economy will not
reset automatically.
To clear the average fuel economy
manually, press the RESET button
" " on the steering wheel for more
than 1 second when the average fuel
economy is displayed.
- After Ignition (automatic reset) The average fuel economy will reset
4 hours after the engine is turned off.
- After refuelling (automatic reset) The average fuel economy will reset
to zero (---) when the vehicle speed
exceeds 1 km/h after refuelling
more than 6 litres.✽✽ NOTICE
The average fuel economy is not dis-
played for more accurate calculation
if the vehicle does not drive more
than 10 seconds or 50 meters (0.03
miles) since the ignition switch or
Engine Start/Stop button is turned
to ON.Instant Fuel Economy (3)
This mode displays the instant fuel economy during the last few sec-
onds when the vehicle speed ismore than 10 km/h (6.2 MPH).
- Fuel economy range: 0.0 ~ 20.0L/100km or 0.0 ~ 50.0 MPG
Page 252 of 723

Features of your vehicle
156
4
Adjusting the driver and passenger
side temperature individually
Press the "SYNC" button again to
adjust the driver and passenger
side temperature individually. The
illumination of button turns off.
Operate the driver side tempera- ture control knob to adjust the driv-
er side temperature.
Operate the passenger side tem- perature control knob to adjust the
passenger side temperature. Temperature conversion
You can switch the temperature
mode between Centigrade to
Fahrenheit as follows:
Whilst pressing the OFF button,
press the AUTO button for 3 seconds
or more.
The display will change from
Centigrade to Fahrenheit, or from
Fahrenheit to Centigrade.
✽✽
NOTICE
If the battery has been discharged or disconnected, the temperature
mode display will reset to
Centigrade.
If you re-connect the battery after it has been completely discharged
or after it has been disconnected
from the vehicle, the system will
be initiated and the display will
first show 22°C on the screen
which is the initial setting.
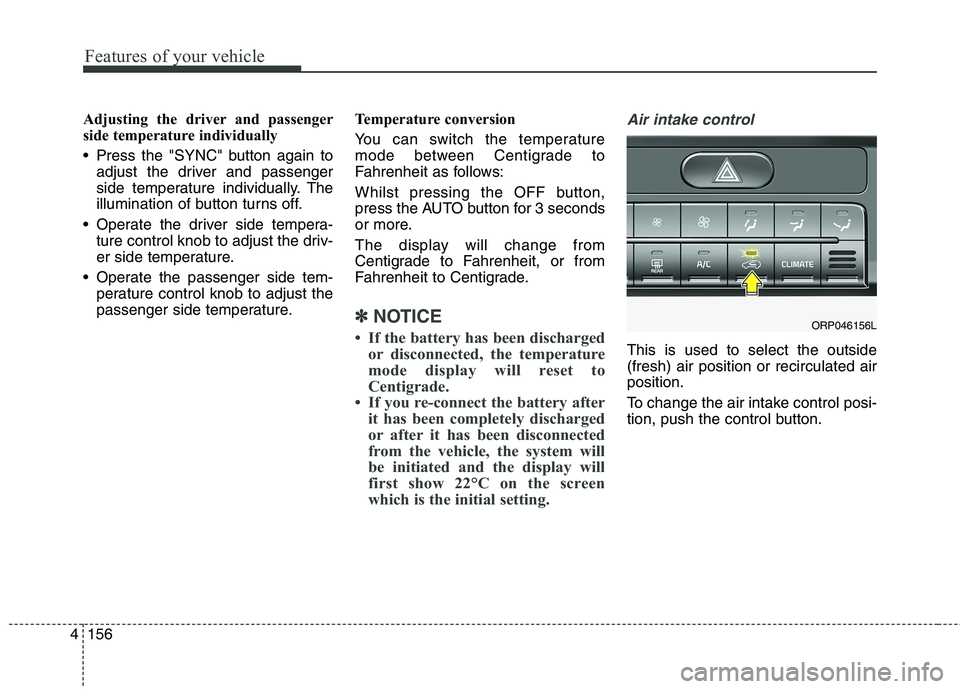
Air intake control
This is used to select the outside (fresh) air position or recirculated airposition.
To change the air intake control posi-
tion, push the control button.
ORP046156L
Page 262 of 723

Features of your vehicle
166
4
This indicator illuminates
when the auto defoggingsystem senses the mois-ture of inside the wind-
screen and operates.
If more moisture is in the vehicle,
higher steps operate as follow.
Step 1 : Operating the air condition- ing
Step 2 : Blowing air flow toward the windscreen
Step 3 : Outside air position
Step 4 : Increasing air flow toward the windscreen If your vehicle is equipped with the
auto defogging system, it is automat-
ically activated when the conditions
are met. To cancel or reset the Auto
Defogging system, press the front
windscreen defroster button for 3
seconds when the ignition switch is in
the ON position. When the Auto
Defogging System is Cancelled, ADS
OFF symbol will blink 3 times and the
ADS OFF will be displayed on the cli-
mate control information screen.
When the Auto Defogging System is
reset, ADS OFF symbol will blink 6times without a signal. In case of automatic climate control
system with a climate button, it blinks
defroster button indicator. Blinking
time is same as above.
To use the auto defogging system
again, follow the procedures men-
tioned above.
If the battery has been disconnected or discharged, it resets to the auto
defogging status.✽✽
NOTICE
If the A/C off is manually selected
whilst the auto defogging system is
on, the auto defogging indicator will
blink 3 times to give notice that the
A/C off can not be selected.
CAUTION
Do not remove the sensor cover located on the upper end of thedriver side windscreen glass. Damage to the system partscould occur and may not be cov-ered by your vehicle warranty.
Page 286 of 723

53
Audio system
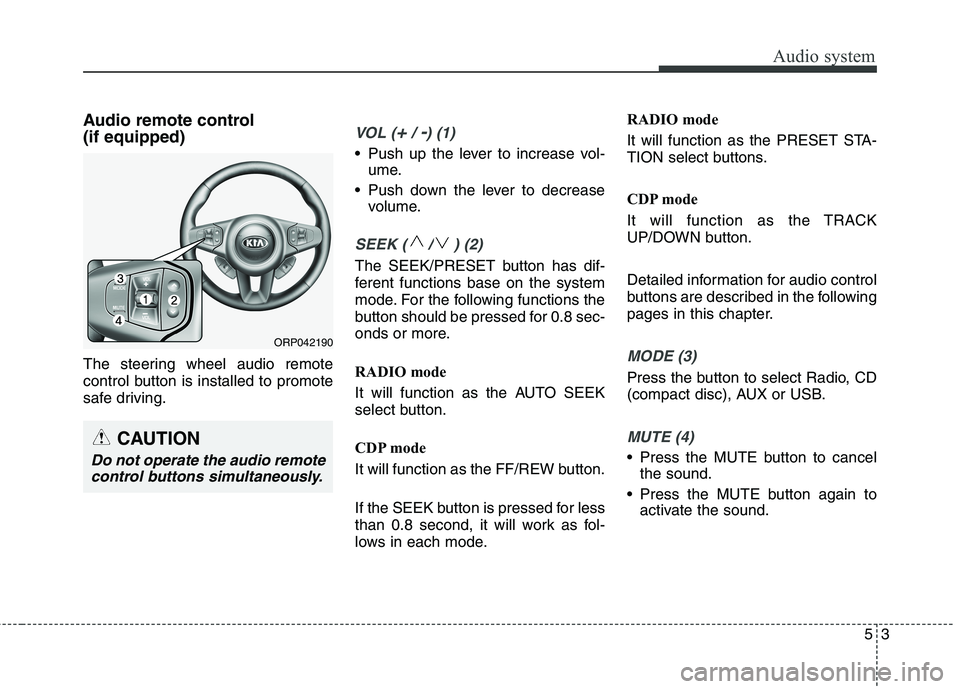
Audio remote control (if equipped)
The steering wheel audio remote
control button is installed to promote
safe driving.VOL (+/ -) (1)
• Push up the lever to increase vol-ume.
Push down the lever to decrease volume.
SEEK ( / ) (2)
The SEEK/PRESET button has dif-
ferent functions base on the system
mode. For the following functions the
button should be pressed for 0.8 sec-
onds or more.
RADIO mode
It will function as the AUTO SEEK
select button.
CDP mode
It will function as the FF/REW button.
If the SEEK button is pressed for less
than 0.8 second, it will work as fol-
lows in each mode. RADIO mode
It will function as the PRESET STA-
TION select buttons.
CDP mode
It will function as the TRACK
UP/DOWN button.
Detailed information for audio control
buttons are described in the following
pages in this chapter.
MODE (3)
Press the button to select Radio, CD
(compact disc), AUX or USB.
MUTE (4)
Press the MUTE button to cancel
the sound.
Press the MUTE button again to activate the sound.
CAUTION
Do not operate the audio remote
control buttons simultaneously.
ORP042190
Page 295 of 723

Audio system
12
5
✽✽
NOTICE - USING THE iPod ®
DEVICE
Some iPod models may not sup- port communication protocol and
files may not properly play.
Supported iPod models:
- iPhone 3GS/4
- iPod touch 1st~4th generation
- iPod nano 1st~6th generation
- iPod classic
The order of search or playback of songs in the iPod can be different
from the order searched in the
audio system.
If the iPod disabled due to its own malfunction, reset the iPod.
(Reset: Refer to iPod manual)
An iPod may not operate normal- ly on low battery. (Continued)(Continued)
Some iPod devices, such as the
iPhone, can be connected through
the Bluetooth ®
Wireless Technology
interface. The device must have
audio Bluetooth®
Wireless
Technology capability (such as for
stereo headphone Bluetooth®
Wireless Technology ). The device
can play, but it will not be con-
trolled by the audio system.
To use iPod features within the audio, use the cable provided upon purchas-
ing an iPod device.
Skipping or improper operation may occur depending on the characteris-
tics of your iPod/Phone device.
If your iPhone is connected to both the Bluetooth ®
Wireless Technology
and USB, the sound may not be prop-
erly played. In your iPhone, select the
Dock connector or Bluetooth®
Wireless Technology to change the
sound output (source). (Continued)(Continued)
When connecting iPod with the
iPod Power Cable, insert the con-
nector to the multimedia socket
completely. If not inserted com-
pletely, communications between
iPod and audio may be interrupted.
When adjusting the sound effects of the iPod and the audio system,
the sound effects of both devices
will overlap and might reduce or
distort the quality of the sound.
Deactivate (turn off) the equalizer function of an iPod when adjust-
ing the audio system’s volume, and
turn off the equalizer of the audio
system when using the equalizer of
an iPod.
When not using iPod with car audio, detach the iPod cable from
iPod. Otherwise, iPod may remain
in accessory mode, and may not
work properly.
Page 298 of 723

515
Audio systemFeatures of your vehicle
FEATURE OF YOUR AUDIO ❈Display and settings may differ
depending on the selected audio.
Audio Head Unit (for RDS model) (1) (EJECT) Ejects the disc. (2)
Changes to FM/AM mode.
Each time the key is pressed,the mode is changed in order of FM1 ➟
FM2 ➟FMA ➟AM ➟AMA. (3)
Changes to CD, USB(iPod), AUX, My
Music, BT Audio mode.
Each time the key is pressed, the
mode is changed in order of CD,
USB(iPod), AUX, My Music, BT
Audio.
(4) (for
Bluetooth®Wireless
Technology equipped model)
Operates Phone Screen ❈ When a phone is not connected,
the connection screen is dis-
played.
(5) PWR/VOL kob Power Knob: Turns power On/Off
by pressing the knob
Volume Knob: Sets volume by
turning the knob left/right (6)
Radio Mode : Automatically search-
es for broadcast frequencies.
CD, USB, iPod, My Music modes
- Shortly press the key (under 0.8
seconds): Moves to next or previ- ous song (file)
- Press and hold the key (over 0.8 seconds): Rewinds or fast-forwardsthe current song.
(7) ~ (Preset)
Radio Mode: Saves frequencies
(channels) or receives saved fre-quencies (channels)
CD, USB, iPod, My Music mode
- : Repeat
- : Random
In the Radio, Media, Setup, and
Menu pop up screen, the number
menu is selected.
2 RDM
1 RPT
61
SEEK
TRACK
PHONE
MEDIA
RADIO
Page 301 of 723

Audio system
18
5
Audio Head Unit (1) (EJECT) Ejects the disc. (2)
Changes to FM/AM mode.
Each time the key is pressed,the mode is changed in order of FM1 ➟
FM2 ➟AM. (3)
Changes to CD, USB(iPod), AUX, My
Music, BT Audio mode.
Each time the key is pressed, the
mode is changed in order of CD,
USB(iPod), AUX, My Music, BT
Audio mode.
(4) (for
Bluetooth®Wireless
Technology equipped model)
Operates Phone Screen ❈ When a phone is not connected,
the connection screen is dis-
played.
(5) PWR/VOL knob Power Knob: Turns power On/Off
by pressing the knob
Volume Knob: Sets volume by
turning the knob left/right (6)
Radio Mode : Automatically search-
es for broadcast frequencies.
CD, USB, iPod, My Music modes
- Shortly press the key (under 0.8
seconds): Moves to next or previ- ous song (file)
- Press and hold the key (over 0.8 seconds): Rewinds or fast-forwardsthe current song.
(7) ~ (Preset)
Radio Mode: Saves frequencies
(channels) or receives saved fre-quencies (channels)
CD, USB, iPod, My Music mode
- : Repeat
- : Random
In the Radio, Media, Setup, and
Menu pop up screen, the number
menu is selected.
2 RDM
1 RPT
61
SEEK
TRACK
PHONE
MEDIA
RADIO