2017 JEEP WRANGLER ABS
[x] Cancel search: ABSPage 255 of 527

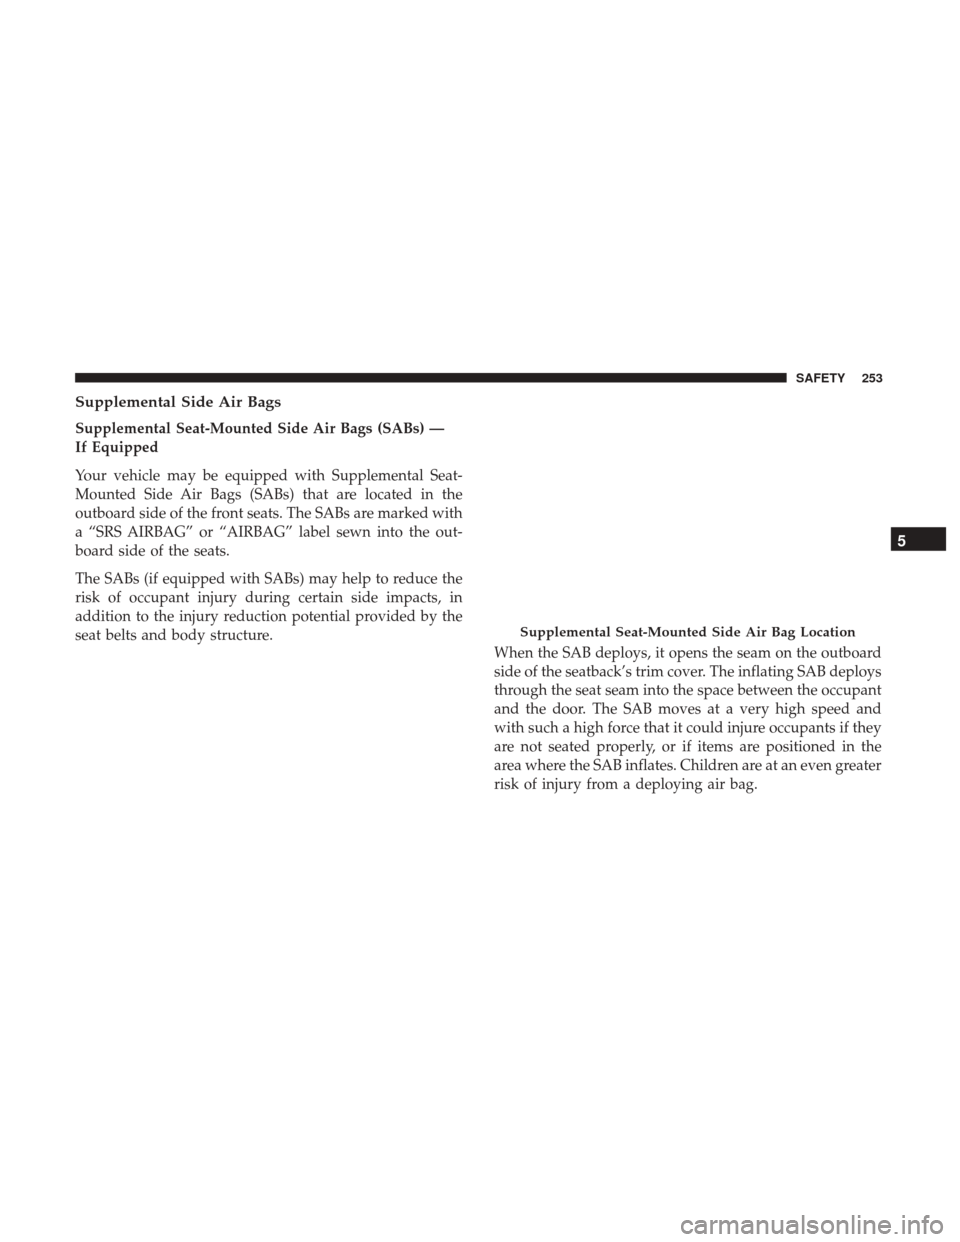
Supplemental Side Air Bags
Supplemental Seat-Mounted Side Air Bags (SABs) —
If Equipped
Your vehicle may be equipped with Supplemental Seat-
Mounted Side Air Bags (SABs) that are located in the
outboard side of the front seats. The SABs are marked with
a “SRS AIRBAG” or “AIRBAG” label sewn into the out-
board side of the seats.
The SABs (if equipped with SABs) may help to reduce the
risk of occupant injury during certain side impacts, in
addition to the injury reduction potential provided by the
seat belts and body structure.When the SAB deploys, it opens the seam on the outboard
side of the seatback’s trim cover. The inflating SAB deploys
through the seat seam into the space between the occupant
and the door. The SAB moves at a very high speed and
with such a high force that it could injure occupants if they
are not seated properly, or if items are positioned in the
area where the SAB inflates. Children are at an even greater
risk of injury from a deploying air bag.
Supplemental Seat-Mounted Side Air Bag Location
5
SAFETY 253
Page 256 of 527

WARNING!
Do not use accessory seat covers or place objects
between you and the SABs; the performance could be
adversely affected and/or objects could be pushed into
you, causing serious injury.
SABs (if equipped with SABs) are designed to activate in
certain side impacts. The Occupant Restraint Controller
(ORC) determines whether the deployment of the SAB in a
particular impact event is appropriate, based on the sever-
ity and type of collision. The side impact sensors aid the
ORC in determining the appropriate response to impact
events. The system is calibrated to deploy the SAB on the
impact side of the vehicle during impacts that require SAB
occupant protection. In side impacts, the SABs deploy
independently: a left side impact deploys the left SAB only
and a right side impact deploys the right side SAB only.
Vehicle damage by itself is not a good indicator of whether
or not SABs should have deployed.
The SABs (if equipped with SABs) will not deploy in all
side collisions, including some collisions at certain angles,
or some side collisions that do not impact the area of the
passenger compartment. SABs (if equipped with SABs) are a supplement to the seat
belt restraint system. SABs deploy in less time than it takes
to blink your eyes.
WARNING!
•
Occupants, including children, who are up against or
very close to side air bags can be seriously injured or
killed. Occupants, including children, should never
lean on or sleep against the door, side windows, or
area where the side air bags inflate, even if they are
in an infant or child restraint.
• Seat belts (and child restraints where appropriate)
are necessary for your protection in all collisions.
They also help keep you in position, away from an
inflating side air bag. To get the best protection from
the side air bags, occupants must wear their seat belts
properly and sit upright with their backs against the
seats. Children must be properly restrained in a child
restraint or booster seat that is appropriate for the
size of the child.
254 SAFETY
Page 257 of 527

WARNING!
•SABs need room to inflate. Do not lean against the
door or window. Sit upright in the center of the seat.
• Being too close to the SABs during deployment
could cause you to be severely injured or killed.
• Relying on the SABs alone could lead to more severe
injuries in a collision. The SABs work with your seat
belt to restrain you properly. In some collisions,
SABs won’t deploy at all. Always wear your seat belt
even though you have SABs.
NOTE: Air bag covers may not be obvious to you, but they
will open during air bag deployment.
Air Bag System Components
• Occupant Restraint Controller (ORC)
• Air Bag Warning Light
•Steering Wheel and Column
• Instrument Panel
• Knee Impact Bolsters
• Driver and Front Passenger Air Bags
• Supplemental Side Air Bags •
Front and Side Impact Sensors
• Seat Belt Pretensioners
• Seat Track Position Sensors
• Seat Belt Buckle Switch
If A Deployment Occurs
The front air bags are designed to deflate immediately after
deployment.
NOTE: Front and/or side air bags will not deploy in all
collisions. This does not mean something is wrong with the
air bag system.
If you do have a collision which deploys the air bags, any
or all of the following may occur:
• The air bag material may sometimes cause abrasions
and/or skin reddening to the occupants as the air bags
deploy and unfold. The abrasions are similar to friction
rope burns or those you might get sliding along a carpet
or gymnasium floor. They are not caused by contact with
chemicals. They are not permanent and normally heal
quickly. However, if you haven’t healed significantly
within a few days, or if you have any blistering, see your
doctor immediately.5
SAFETY 255
Page 350 of 527

Totally Integrated Power Module
The Totally Integrated Power Module is located in the
engine compartment near the battery. This center contains
cartridge fuses, mini fuses, and relays. A label that identi-
fies each component is printed on the inside of the cover.
CavityCartridge Fuse Mini Fuse Description
J1 –– –
J2 30 Amp Pink –Transfer Case Module
J3 –– –
J4 25 Amp Clear –Driver Door Node
J5 25 Amp Clear –Passenger Door Node
J6 40 Amp Green –Anti-Lock Brake System (ABS) Pump/
Stability Control System
J7 30 Amp Pink –Anti-Lock Brake System (ABS) Valve/
Stability Control System
J8 –– –
Totally Integrated Power Module
348 IN CASE OF EMERGENCY
Page 386 of 527

4. Remove the air cleaner filter element from the housingassembly.
Engine Air Cleaner Filter Installation
NOTE: Inspect and clean the housing if dirt or debris is
present before replacing the air filter element.
1. Install the air cleaner filter element into the housing assembly with the air cleaner filter inspection surface
facing downward. 2. Install the air cleaner cover onto the housing assembly
locating tabs.
3. Latch the spring clips and lock the air cleaner cover to the housing assembly and install air hose.
4. Tighten air intake clamp and tighten air cleaner intake tube bolts.
Accessory Drive Belt Inspection
WARNING!
•Do not attempt to inspect an accessory drive belt
with vehicle running.
• When working near the radiator cooling fan, discon-
nect the fan motor lead. The fan is temperature
controlled and can start at any time regardless of
ignition mode. You could be injured by the moving
fan blades.
• You can be badly injured working on or around a
motor vehicle. Only do service work for which you
have the knowledge and the proper equipment. If
you have any doubt about your ability to perform a
service job, take your vehicle to a competent me-
chanic.
Air Cleaner Filter
1 — Air Cleaner Filter
2 — Air Cleaner Filter Inspection Surface 384 SERVICING AND MAINTENANCE
Page 390 of 527

4. Disengage the two retaining tabs that secure the two airfilter access doors to the HVAC housing.
5. Open the two air filter access doors.
6. Remove the two particulate air filters from the HVAC air inlet housing. Pull the filter elements straight out of
the housing, one at a time. 7. Install the A/C air filter with the air filter position
indicators pointing in the same direction as removal.
CAUTION!
The cabin air filter is identified with an arrow to
indicate airflow direction through the filter. Failure to
properly install the filter will result in the need to
replace it more often.
Air Filter Retaining Tabs
1 — Left Retaining Tab
2 — Right Retaining Tab
Air Filter Access Door Open
1 — Air Conditioning Filter Access Door
2 — Air Conditioning Air Filter
388 SERVICING AND MAINTENANCE
Page 391 of 527

8. Close A/C Air Filter access doors and secure retainingtabs.
9. Rotate the glove compartment door back into position.
Refer to the “Maintenance Plan” for the proper mainte-
nance intervals.
Body Lubrication
Locks and all body pivot points, including such items as
seat tracks, door hinge pivot points and rollers, liftgate,
tailgate, decklid, sliding doors and hood hinges, should be
lubricated periodically with a lithium based grease, such as
MOPAR Spray White Lube to assure quiet, easy operation
and to protect against rust and wear. Prior to the applica-
tion of any lubricant, the parts concerned should be wiped
clean to remove dust and grit; after lubricating excess oil
and grease should be removed. Particular attention should
also be given to hood latching components to ensure
proper function. When performing other underhood ser-
vices, the hood latch, release mechanism and safety catch
should be cleaned and lubricated.
The external lock cylinders should be lubricated twice a
year, preferably in the Fall and Spring. Apply a small
amount of a high quality lubricant, such as MOPAR Lock
Cylinder Lubricant directly into the lock cylinder.
Windshield Wiper Blades
Clean the rubber edges of the wiper blades and the
windshield periodically with a sponge or soft cloth and a
mild nonabrasive cleaner. This will remove accumulations
of salt or road film.
Operation of the wipers on dry glass for long periods may
cause deterioration of the wiper blades. Always use washer
fluid when using the wipers to remove salt or dirt from a
dry windshield.
Avoid using the wiper blades to remove frost or ice from
the windshield. Keep the blade rubber out of contact with
petroleum products such as engine oil, gasoline, etc.
NOTE: Life expectancy of wiper blades varies depending
on geographical area and frequency of use. Poor perfor-
mance of blades may be present with chattering, marks,
water lines or wet spots. If any of these conditions are
present, clean the wiper blades or replace as necessary.
8
SERVICING AND MAINTENANCE 389
Page 403 of 527

WARNING!(Continued)
•To avoid contamination from foreign matter or mois-
ture, use only new brake fluid or fluid that has been
in a tightly closed container. Keep the master cylin-
der reservoir cap secured at all times. Brake fluid in
a open container absorbs moisture from the air
resulting in a lower boiling point. This may cause it
to boil unexpectedly during hard or prolonged brak-
ing, resulting in sudden brake failure. This could
result in a collision.
• Overfilling the brake fluid reservoir can result in
spilling brake fluid on hot engine parts, causing the
brake fluid to catch fire. Brake fluid can also damage
painted and vinyl surfaces, care should be taken to
avoid its contact with these surfaces.
• Do not allow petroleum based fluid to contaminate
the brake fluid. Brake seal components could be
damaged, causing partial or complete brake failure.
This could result in a collision.
Front/Rear Axle Fluid
For normal service, periodic fluid level checks are not
required. When the vehicle is serviced for other reasons the
exterior surfaces of the axle assembly should be inspected.
If gear oil leakage is suspected inspect the fluid level. Refer
to “Fluids And Lubricants” in “Technical Specifications”
for further information.
Fluid Level Check
Lubricant should be at the bottom edge of the oil fill hole.
Adding Fluid
Add lubricant only at the fill hole and only to the level
specified above.
Selection Of Lubricant
Use only the manufacturer’s recommended fluid. Refer to
“Fluids And Lubricants” in “Technical Specifications” for
further information.
8
SERVICING AND MAINTENANCE 401