2017 JEEP GRAND CHEROKEE ignition
[x] Cancel search: ignitionPage 310 of 372
Media Mode is entered by pushing the ME-
DIA button located on the faceplate. Once in
Media Mode, press the “Source” button on
the touchscreen and the desired mode button
on the touchscreen. Disc (if equipped), USB,
SD Card (if equipped), AUX and Bluetooth (if
equipped), are the Media sources available.
When available, you can select the “Browse”
button on the touchscreen to be given these
options:
• Now Playing
• Artists
• Albums
• Genres
• Songs
• Playlists
• Folders
Source
Press the “Source” button on the touch-
screen to select the desired audio source:
Disc (if equipped), USB, SD (if equipped),
AUX and Bluetooth (if equipped). This screen
will time out after a few seconds and return to
the main radio screen if no selection is made.You can press the “Source,” “Pause/Play” or
the “Info” button on the touchscreen for
artist information on the current song play-
ing.
Disc Mode — If Equipped
Your vehicle may have a remote Disc player
located in the center console storage bin.
Disc Mode is entered by either inserting a
CD/Disc or by pushing the MEDIA button on
the faceplate. Once in Media Mode, press the
“Source” button on the touchscreen and se-
lect “Disc.”
Inserting Compact Disc
Gently insert one disc into the disc player
with the disc label following the illustration
indicated on the player. The disc will auto-
matically be pulled into the disc player and
the disc icon will illuminate on the radio
display. If a disc does not go into the slot
more than 1.0 inch (2.5 cm), a disc may
already be loaded and must be ejected before
a new disc can be loaded.
If you insert a disc with the ignition ON and
the radio ON, the unit will switch to disc
mode and begin to play when you insert the
disc. The display will show the track number
and index time in minutes and seconds. Play
will begin at the start of track 1.
Browse
Press the “Browse” button on the touch-
screen to scroll through and select a desired
track on the Disc. Press the “Exit” button on
the touchscreen if you wish to cancel the
browse function.
Eject Button — Ejecting a Disc
Push the eject button to eject the disc. If you
have ejected a disc and have not removed it
within 10 seconds, it will be reloaded. If the
Disc is not removed, the radio will reinsert
the disc but will not play it.
A disc can be ejected with the radio and
ignition OFF.
MULTIMEDIA
308
Page 311 of 372
USB/iPod Mode
USB/iPod Mode is entered by either inserting
a USB Jump Drive or iPod cable into the USB
port, or by pushing the MEDIA button located
on the faceplate. Once in Media Mode, press
the “Source” button on the touchscreen and
select “USB/iPod.”
Inserting USB/iPod Device
Gently insert the USB/iPod device into the
USB Port. If you insert a USB/iPod device
with the ignition ON, the unit will switch to
USB/iPod mode and begin to play when you
insert the device. The display will show the
track number and index time in minutes and
seconds. Play will begin at the start of track
1.
Browse
Press the “Browse” button on the touch-
screen to select Artist, Albums, Genres,
Songs, Playlists or Folders from the USB/
iPod device. Once the desired selection is
made you can chose from the available media
by pressing the button on the touchscreen.
Press the “Exit” button on the touchscreen if
you wish to cancel the browse function.AUX Mode
AUX Mode is entered by inserting a AUX
device using a stereo cable with a 3.5 mm
audio jack into the AUX port, or by pushing
the MEDIA button located on the faceplate.
Once in Media Mode, press the “Source”
button on the touchscreen and select “AUX.”
Inserting Auxiliary Device
Gently insert the Auxiliary device cable into
the AUX Port. If you insert a Auxiliary device
with the ignition ON, the unit will switch to
AUX mode and begin to play when you insert
the device cable.
Controlling The Auxiliary Device
The control of the Auxiliary device (e.g., se-
lecting playlists, play, fast forward, etc.) can-
not be provided by the radio; use the device
controls instead. Adjust the volume with the
VOLUME/MUTE rotary knob, or with the vol-
ume of the attached device.
The vehicle radio unit is acting as the ampli-
fier for audio output from the Auxiliary de-
vice. Therefore if the volume control on the
Auxiliary device is set too low, there will be
insufficient audio signal for the radio unit to
play the music on the device.
Track Selection
Seek Up/Seek Down
Press and release the “Right Arrow”but-
ton on the touchscreen for the next selection.
Press and release the “Left Arrow”
button
on the touchscreen to return to the beginning
of the current selection, or return to the
beginning of the previous selection if the Disc
is within the first second of the current selec-
tion.
Fast Seek Up
Press and hold the “Right Arrow”button
on the touchscreen and the desired mode will
begin to fast forward through the current
track until the button on the touchscreen is
released.
309
Page 312 of 372
Fast Seek Down
Press and hold the “Left Arrow”button
on the touchscreen and the desired mode will
begin to rewind through the current track
until the button on the touchscreen is re-
leased.
Info
Press the “Info” button on the touchscreen to
display the current track information. Press
the “X” button on the touchscreen to cancel
this feature.
Shuffle
Press the “Shuffle” button on the touch-
screen to play the selections on the USB/iPod
device in random order to provide an interest-
ing change of pace. Press the “Shuffle” but-
ton on the touchscreen a second time to turn
this feature off.
Repeat
Press the “Repeat” button on the touch-
screen to repeat the song selection. To cancel
repeat, press the “Repeat” button on the
touchscreen a second time.
Bluetooth Source
Bluetooth Streaming Audio (BTSA) or
Bluetooth Mode is entered by pairing a
Bluetooth device containing music to the
Uconnect system.
Before proceeding, the Bluetooth device
must be paired with the Uconnect Phone to
communicate with the Uconnect system.
See the “Pairing Procedure” in this manual
for further details.
Once the Bluetooth device is paired to the
Uconnect system, push the MEDIA button
located on the faceplate. Once in Media
Mode, press the “Source” button on the
touchscreen and select “Bluetooth.”
NOTE:
For mobile phone compatibility and pairing
instructions, please visit
UconnectPhone.com.
Pairing A Bluetooth Audio Device
To begin using your audio device, you must
pair your compatible Bluetooth enabled au-
dio device. Pairing is the process of estab-
lishing a wireless connection between a de-
vice and the Uconnect system.
NOTE:
• You must have Bluetooth enabled on your device to complete this procedure.
• The vehicle must be in PARK.
1. Place the ignition in the ACC or ON position.
2. Push the PHONE button on the faceplate.
• If there is no devices currently con-nected with the system, a pop-up will
appear asking if you would like to pair a
device.
3. Select “Yes” to begin the pairing process.
MULTIMEDIA
310
Page 315 of 372
For Uconnect customer support:
• U.S. residents - visit UconnectPhone.comor call 1-877-855-8400
• Canadian residents - call 1-800-465-2001 (English) or
1-800-387-9983 (French)
Pairing A Phone
To begin using your Uconnect Phone, you
must pair your compatible Bluetooth enabled
mobile phone. Mobile phone pairing is the
process of establishing a wireless connection
between a cellular phone and the Uconnect
system.
To complete the pairing process, you will
need to reference your mobile phone Owner's
Manual. Please visit UconnectPhone.com for
complete mobile phone compatibility infor-
mation.
NOTE:
• You must have Bluetooth enabled on yourphone to complete this procedure.
• The vehicle must be in PARK.
1. Place the ignition in the ACC or ON position. 2. Push the PHONE button on the faceplate.
• If there is no phones currently con-nected with the system, a pop-up will
appear asking if you would like to pair a
mobile phone.
3. Select “Yes” to begin the pairing process.
4. Search for available devices on your Bluetooth enabled mobile phone.
• Press the Settings button on your mo- bile phone.
• Select Bluetooth and ensure it is en- abled. Once enabled, the mobile phone
will begin to search for Bluetooth
connections.
5. If No is selected, and you still would like to pair a mobile phone, press the “Set-
tings” button from the Uconnect Phone
main screen.
• Select “Paired Phones” then press the “Add Device” button on the touch-
screen.
• Search for available devices on your Bluetooth enabled mobile phone (see below). When prompted on the phone,
select “Uconnect” and accept the con-
nection request.
6. Uconnect Phone will display an in prog- ress screen while the system is
connecting.
7. When your mobile phone finds the Uconnect system, select “Uconnect.”
8. When prompted on the mobile phone, accept the connection request from
Uconnect Phone.
NOTE:
Some mobile phones will require you to
enter the PIN number.
9. When the pairing process has successfully completed, the system will prompt you to
choose whether or not this is your favorite
phone. Selecting “Yes” will make this
phone the highest priority. This phone will
take precedence over other paired phones
within range and will connect to the
Uconnect system automatically when en-
tering the vehicle. Only one mobile phone
and/or one Bluetooth audio device can be
connected to the Uconnect system at a
313
Page 316 of 372
time. If “No” is selected, simply select
“Uconnect” from the mobile phone/audio
device Bluetooth screen, and the
Uconnect system will reconnect to the
Bluetooth device.
Making A Phone Call
1. Push the PHONE button on the steeringwheel.
2. After the BEEP, say “dial” (or “call” a full name or phone number).
SMS Message Reader
After pairing your Uconnect system with a
Bluetooth enabled mobile device with the
Message Access Profile (MAP), the Uconnect
system can announce a new incoming text
message and read it to you over the vehicle’s
audio system.
NOTE:
Only incoming text messages received during
the current ignition cycle can be viewed/read. To enable incoming text messaging:
iPhone
1. Press the settings button on the mobile
phone.
2. Select Bluetooth.
• Ensure Bluetooth is enabled, and themobile phone is paired to the
Uconnect system.
3. Select
located under DEVICES next to
Uconnect.
4. Turn “Show Notifications” to On.
Android Devices
1. Push the Menu button on the mobilephone.
2. Select Settings.
3. Select Connections.
Enable iPhone Incoming Text Messages
MULTIMEDIA
314
Page 317 of 372
4. Turn “Show Notifications” to On.• A pop up will appear asking you toaccept a request for permission to con-
nect to your messages. Select “Don’t
ask again” and press OK. NOTE:
All incoming text messages received during
the current ignition cycle will be deleted from
the Uconnect system when the ignition is
turned to the Off position.
SiriusXM Premier Over 160 Channels
• Get every channel available on your satel-
lite radio, and enjoy all you want, all in one
place. Hear commercial-free music plus
sports, news, talk and entertainment. Get
all the premium programming, including
Howard Stern, every NFL game, Oprah
Radio, every MLB and NHL game, every
NASCAR race, Martha Stewart and more.
And get 20+ extra channels, including
SiriusXM Latino, offering 20 channels of
commercial free music, news, talk, com-
edy, sports and more dedicated to Spanish
language programming.
• To access SiriusXM Satellite Radio, push the RADIO button on the faceplate and
then press the “SXM” button on the touch-
screen. • SiriusXM services require subscriptions,
sold separately after the 12-month trial
included with the new vehicle purchase. If
you decide to continue your service at the
end of your trial subscription, the plan you
choose will automatically renew and bill at
then-current rates until you call SiriusXM at
1-866-635-2349 for U.S. residents and
1-888-539-7474 for Canadian residents to
cancel. See SiriusXM Customer Agreement
for complete terms at www.siriusxm.com for
U.S. residents and www.siriusxm.ca for Ca-
nadian residents. All fees and program-
ming subject to change. Our satellite ser-
vice is available only to those at least
18 and older in the 48 contiguous USA
and D.C. Our Sirius satellite service is also
available in PR (with coverage limita-
tions). Our Internet radio service is avail-
able throughout our satellite service area
and in AK and HI. ©2016 Sirius XM Radio
Inc. Sirius, XM and all related marks and
logos are trademarks of Sirius XM Radio
Inc.
Enable Android Device Incoming Text Messages
315
Page 326 of 372

Media ControlsThe controls are accessed by pressing the
desired button on the touchscreen and
choosing between Disc, AUX, USB,
Bluetooth or SD Card.
NOTE:
Uconnect will automatically switch to the
appropriate mode when something is first
connected or inserted into the system.
UCONNECT REAR SEAT
ENTERTAINMENT (RSE)
SYSTEM — IF EQUIPPED
Your Rear Seat Entertainment System is de-
signed to give your family years of enjoyment.
You can play your favorite CDs, DVDs or
Blu-ray Discs, listen to audio over the wire-
less headphones, or plug and play a variety of
standard video games or audio devices.
Please review this Owner's Manual to become
familiar with its features and operation.
Getting Started
•Screen(s) located in the rear of front seats:
Open the LCD screen cover by lifting up on
cover. • Place the ignition in the ON or ACC posi-
tion.
• Your vehicle may be equipped with a Blu- ray Disc Player. If equipped with a Blu-ray
disc player, the icon will be present on the
Player.
• Turn on the Rear Seat Entertainment sys- tem by pushing the power button on the
remote control.
Media Controls
1 — Repeat
Music Track
2 — Music
Track And Time
3 — Shuffle
Music Tracks
4 — Music
Track Informa-
tion5 — Show
Songs Currently
In Cue To Be
Played
6 — Browse
Music By
7 — Music
SourceRSE System Screen
MULTIMEDIA
324
Page 329 of 372
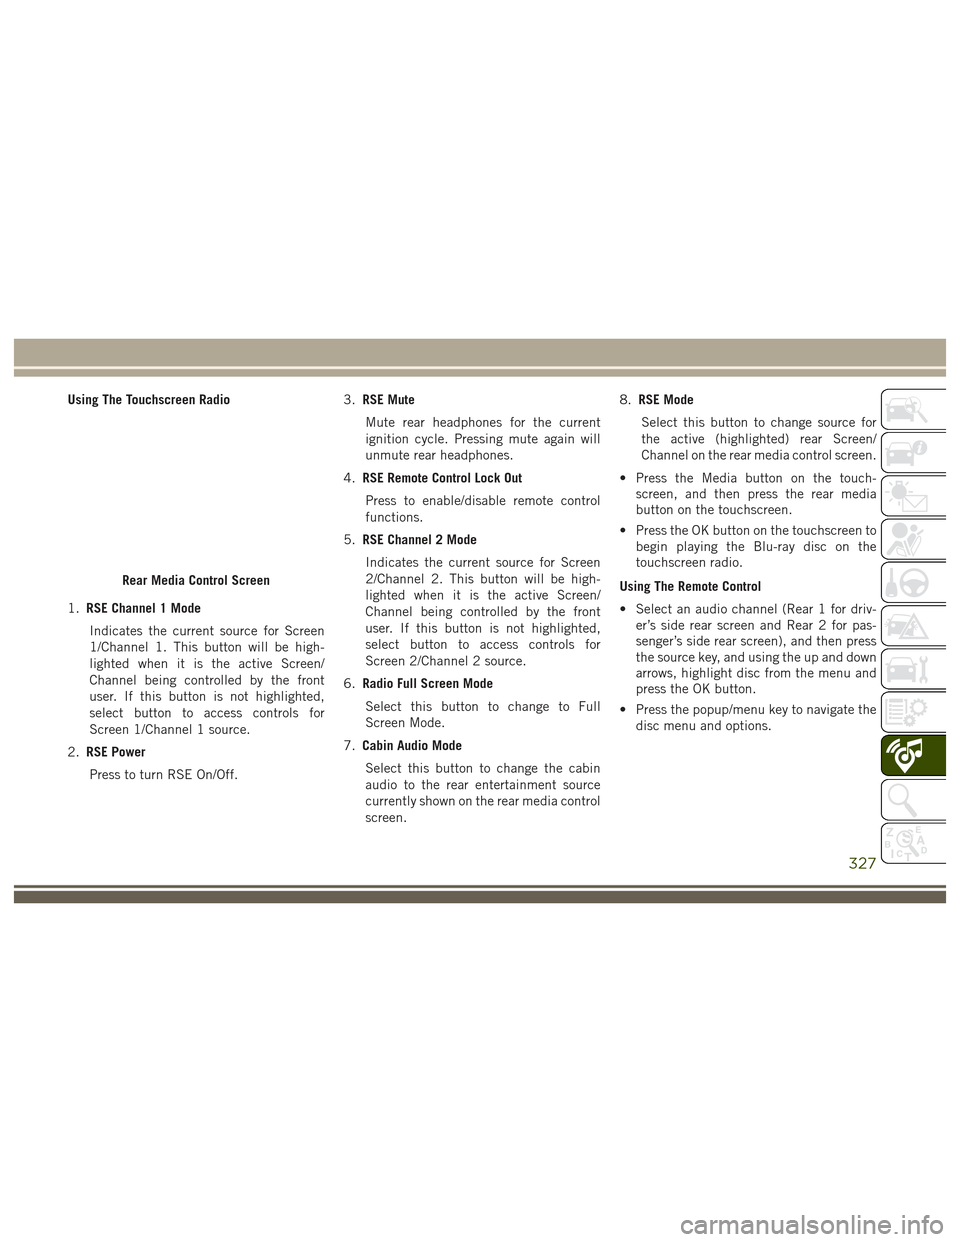
Using The Touchscreen Radio
1.RSE Channel 1 Mode
Indicates the current source for Screen
1/Channel 1. This button will be high-
lighted when it is the active Screen/
Channel being controlled by the front
user. If this button is not highlighted,
select button to access controls for
Screen 1/Channel 1 source.
2. RSE Power
Press to turn RSE On/Off. 3.
RSE Mute
Mute rear headphones for the current
ignition cycle. Pressing mute again will
unmute rear headphones.
4. RSE Remote Control Lock Out
Press to enable/disable remote control
functions.
5. RSE Channel 2 Mode
Indicates the current source for Screen
2/Channel 2. This button will be high-
lighted when it is the active Screen/
Channel being controlled by the front
user. If this button is not highlighted,
select button to access controls for
Screen 2/Channel 2 source.
6. Radio Full Screen Mode
Select this button to change to Full
Screen Mode.
7. Cabin Audio Mode
Select this button to change the cabin
audio to the rear entertainment source
currently shown on the rear media control
screen. 8.
RSE Mode
Select this button to change source for
the active (highlighted) rear Screen/
Channel on the rear media control screen.
• Press the Media button on the touch- screen, and then press the rear media
button on the touchscreen.
• Press the OK button on the touchscreen to begin playing the Blu-ray disc on the
touchscreen radio.
Using The Remote Control
• Select an audio channel (Rear 1 for driv- er’s side rear screen and Rear 2 for pas-
senger’s side rear screen), and then press
the source key, and using the up and down
arrows, highlight disc from the menu and
press the OK button.
• Press the popup/menu key to navigate the disc menu and options.
Rear Media Control Screen
327