Page 41 of 48
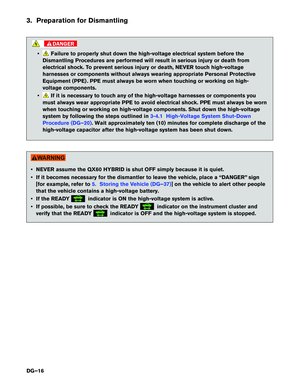
Rear Ducts Exploded View
1. Rear ventilator duct 1 2. Rear ventilator duct 2 3. Rear ventilator duct 3
4. Rear ventilator duct lower 5. Rear cooling unit assembly 6. Rear ventilator duct upper AAYIA0310ZZ
DG–41
Page 42 of 48
.
2.
Remove the service plug. Refer to Alternate Procedure 2 (Remove Service Plug) (DG–24).
3.")
6-2.2 Removal Procedure
1. Discharge high-voltage battery. Refer to 3-3 Discharge Procedures (DG–18).
2.
Remove the service plug. Refer to Alternate Procedure 2 (Remove Service Plug) (DG–24).
3.
Release clips that retain the seat back board to the storage box lid.
4. Open the storage box lid.
5.
Remove the BOSE subwoofer (2) (if equipped) from the storage box (5) using the following steps.
a. Remove spare tire clamp (1) from bracket (4) .
b.
Lift subwoofer (2) to disconnect harness (3) then remove subwoofer (2) from storage box (5) .
6. Remove back door kicking plate by releasing the back door kicking plate clips and pawls using a suitable tool. : Pawl
: Clip
7.
Remove storage box screws and storage box.
8. Release the storage box side finisher clips using a suitable tool, then remove.
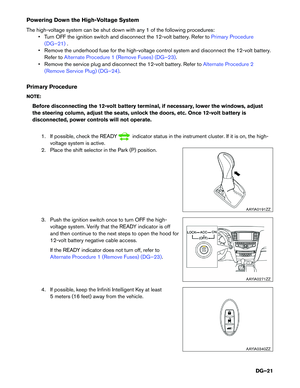
9. Remove the third row seat front bolts covers and bolts (2) .
10. Pull the third row seatback release lever (1) and fold down the seatbacks (LH/RH) . AAYIA0305ZZ
AAYIA0306ZZ
AAYIA0307ZZ
DG–42
Page 43 of 48
 and position storage box front
brackets (1) aside. Then remove seat rear bolts (B) and
the third row seat.
12. Partially remove the RH and LH rear door welt.
13. Remove the seat b")
11. Remove bolts (A) and position storage box front
brackets (1) aside. Then remove seat rear bolts (B) and
the third row seat.
12. Partially remove the RH and LH rear door welt.
13. Remove the seat belt bolt cover and bolt from the RH and LH luggage side lower finisher.
14. Remove the seat belt from the RH and LH luggage side lower finisher.
15. Remove the RH and LH luggage side lower finisher coat hook bolt and coat hook.
16. Remove the RH and LH luggage side lower finisher cover, and then remove the RH and LH luggage side
lower finisher bolt (A) . : Vehicle front
17.
Disconnect the harness connector from the power
socket (LH only) .
18. Remove the luggage side lower finisher RH and LH.
19. Remove the rear ventilator ducts.
Use the following steps and refer to the 6-2.1 Exploded Views (DG–40).
a.
Remove the clips and rear ventilator duct 1 (1) .
b. Remove bolts securing the third row seat cross member and third row seat cross
member (1) .
c. Remove the clips and rear ventilator duct 2 (2) .
d. Remove the screws and the rear ventilator duct 3 (3) .
e. Remove the clips and rear ventilator duct upper (6) .
f. Remove the storage box bracket (RH) .
g. Remove the nut and rear ventilator duct lower (4) . AAYIA0308ZZ
AAYIA0309ZZ
AAYIA0313ZZ
DG–43
Page 44 of 48
20. Disconnect harness connector (1) from high-voltage
battery . Immediately protect the terminals of the disconnected
high-voltage
harness connector socket using insulated
tape so that they are not exposed. Touching high-voltage components without wearing
appropriate
Personal Protective Equipment (PPE) will
cause electrocution.
Follow the procedure shown below to disconnect the DC/DC converter harness connector.
21. Pull back the DC/DC converter 12-volt battery positive terminal cover. Remove nut (1) and disconnect DC/DC
converter 12-volt battery positive terminal (2) . Touching high-voltage components without wearing
appropriate
Personal Protective Equipment (PPE) will
cause electrocution. AAYIA0387ZZ
AAYIA0394ZZ
AAYIA0388ZZ
DG–44
Page 45 of 48
22. Release clip, then disconnect harness connector (1)
from DC/DC converter. Touching high-voltage components without wearing
appropriate
Personal Protective Equipment (PPE) will
cause electrocution.
23. Remove nuts (1) and battery inlet duct B (2) . Touching high-voltage components without wearing
appropriate
Personal Protective Equipment (PPE) will
cause electrocution.
24. Release clips (1) and remove DC/DC converter outlet duct (2) . Touching high-voltage components without wearing
appropriate
Personal Protective Equipment (PPE) will
cause electrocution.
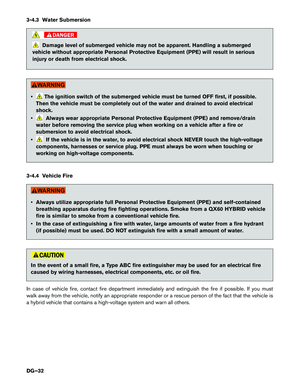
25. Remove the DC/DC converter inlet duct (1) . Touching high-voltage components without wearing
appropriate
Personal Protective Equipment (PPE) will
cause electrocution. AAYIA0389ZZ
AAYIA0390ZZ
AAYIA0391ZZ
AAYIA0392ZZ
DG–45
Page 46 of 48
26. Remove nuts (1) and DC/DC converter.
Touching high-voltage components without wearing
appropriate
Personal Protective Equipment (PPE) will
cause electrocution.
27. Disconnect inverter harness connector (1) from high- voltage battery. Touching high-voltage components without wearing
appropriate
Personal Protective Equipment (PPE) will
cause electrocution.
28. Release clip (A) and remove nut (C) , then disconnect main harness connector (B) from high-voltage battery. Touching high-voltage components without wearing
appropriate
Personal Protective Equipment (PPE) will
cause electrocution.
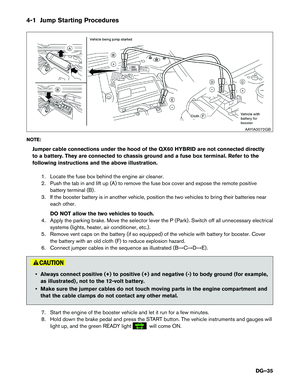
29. Remove gas vent hose (1) from floor panel. Touching high-voltage components without wearing
appropriate
Personal Protective Equipment (PPE) will
cause electrocution. AAYIA0393ZZ
AAYIA0411ZZ
AAYIA0412ZZ
AAYIA0295ZZ
DG–46
Page 47 of 48
30. Remove bolts (A) and high-voltage battery.
Touching high-voltage components without wearing
appropriate
Personal Protective Equipment (PPE) will
cause electrocution.
6-3 High-Voltage Battery Recycling
The high-voltage battery is recyclable. For information regarding recycling of the high-voltage battery, it is
recommended you contact the nearest INFINITI retailer or Infiniti Consumer Affairs at: United States:
1-800-662-6200 or in Canada: 1-800-361-4792. AAYIA0296ZZ
DG–47
Page 48 of 48
© 2016 Nissan North America, Inc.
All
rights reserved.
This document may not be altered without the written permission of Nissan North America, Inc.
Pub. No. DG17EAL50HU0


 from high-voltage
battery . Immediately protect the terminals of the disconnected
high-voltage
harness connector socket using insulated
tape so that they are not")

from DC/DC converter. Touching high-voltage components without wearing
appropriate
Personal Protective Equipment (PPE) will
cause electrocution")
 and DC/DC converter.
Touching high-voltage components without wearing
appropriate
Personal Protective Equipment (PPE) will
cause electrocution.
27. Disconnect inverter harness conn")
 and high-voltage battery.
Touching high-voltage components without wearing
appropriate
Personal Protective Equipment (PPE) will
cause electrocution.
6-3 High-Voltage Battery Recyc")
