2017 HYUNDAI TUCSON LIMITED service
[x] Cancel search: servicePage 4 of 642
F4
INTRODUCTION
Congratulations, and thank you for choosing HYUNDAI. We are pleased to welcome you to the growing number of dis-
criminating people who drive HYUNDAIS. We are very proud of the advanced engineering and high-quality construc-
tion of each HYUNDAI we build.
Your Owner’s Manual will introduce you to the features and operation of your new HYUNDAI. To become familiar with
your new HYUNDAI, so that you can fully enjoy it, read this Owner’s Manual carefully before driving your new vehicle.
This manual contains important safety information and instructions intended to familiarize you with your vehicle’s con-
trols and safety features so you can safely operate your vehicle.
This manual also contains information on maintenance designed to enhance safe operation of the vehicle. It is recom-
mended that all service and maintenance on your car be performed by an authorized HYUNDAI dealer. HYUNDAI deal-
ers are prepared to provide high-quality service, maintenance and any other assistance that may be required.
This Owner’s Manual should be considered a permanent part of your vehicle, and should be kept in the vehicle so you
can refer to it at any time. The manual should stay with the vehicle if you sell it to provide the next owner with impor-
tant operating, safety and maintenance information.
HYUNDAI MOTOR AMERICA
Copyright 2015 HYUNDAI Motor America. All rights reserved. No part of this publication may be reproduced, stored
in any retrieval system or transmitted in any form or by any means without the prior written permission of HYUNDAI
Motor America.Severe engine and transmission damage may result from the use of poor quality fuels and lubricants that
do not meet HYUNDAI specifications. You must always use high quality fuels and lubricants that meet the
specifications listed on Page 8-7 in the Vehicle Specifications section of the Owner’s Manual.
CAUTION
Page 19 of 642
F19
If you have a flat tire..........................................6-15
Towing ...................................................................6-23
Towing service .................................................................6-23
Removable towing hook ................................................6-24
Emergency towing ..........................................................6-25
Tie-down hook ................................................................6-26Engine compartment .............................................7-3
Maintenance services ...........................................7-5
Owner's Responsibility .....................................................7-5
Owner Maintenance Precautions..................................7-5
Owner maintenance ...............................................7-6
Owner Maintenance Schedule .......................................7-7
Scheduled maintenance services.........................7-8
Explanation of scheduled maintenance items..7-26
Engine oil ..............................................................7-30
Checking the Engine Oil Level .....................................7-30
Checking the Engine Oil and Filter .............................7-31
Engine coolant......................................................7-32
Checking the Engine Coolant Level ............................7-32
Changing Engine Coolant ..............................................7-35
Brake fluid ............................................................7-36
Checking the Brake Fluid Level ...................................7-36
Washer fluid .........................................................7-37
Checking the Washer Fluid Level................................7-37
Parking brake .......................................................7-37
Checking the Parking Brake .........................................7-37
Air cleaner ............................................................7-38
Filter Replacement ..........................................................7-38
F19
7Maintenance
Page 20 of 642
F20
Climate control air filter .....................................7-40
Filter Inspection ...............................................................7-40
Wiper blades .........................................................7-42
Blade Inspection ..............................................................7-42
Blade Replacement .........................................................7-42
Battery...................................................................7-45
For Best Battery Service ..............................................7-46
Battery Recharging ........................................................7-46
Reset features .................................................................7-47
Tires and wheels ..................................................7-48
Tire Care ............................................................................7-48
Recommended Cold Tire Inflation Pressures ...........7-49
Check Tire Inflation Pressure ......................................7-50
Tire Rotation.....................................................................7-51
Wheel Alignment and Tire Balance ............................7-52
Tire Replacement ............................................................7-52
Wheel Replacement ........................................................7-53
Tire Traction .....................................................................7-53
Tire Maintenance ............................................................7-54
Tire Sidewall Labeling ....................................................7-54
Tire Terminology and Definitions................................7-58
All Season Tires ...............................................................7-61
Summer Tires ...................................................................7-61
Snow Tires ........................................................................7-61
Radial-Ply Tires ...............................................................7-62
Low Aspect Ratio Tires..................................................7-62
Fuses ......................................................................7-64
Instrument Panel Fuse Replacement..........................7-65
Engine Compartment Panel Fuse Replacement.......7-66
Fuse/Relay Panel Description ......................................7-69
Light bulbs.............................................................7-77
Headlamp, Parking lamp, Turn signal lamp,
side marker and front fog lamp bulb
replacement ......................................................................7-78
Side repeater lamp replacement .................................7-88
Rear combination light bulb replacement .................7-88
High mounted stop lamp replacement .......................7-91
License plate light bulb replacement .........................7-91
Interior light bulb replacement ....................................7-92
Appearance care ..................................................7-94
Exterior Care ....................................................................7-94
Interior Care .....................................................................7-99
Emission control system ...................................7-101
Crankcase Emission Control System ........................7-101
Evaporative Emission Control System Including
Onboard Refueling Vapor Recovery (ORVR) .........7-101
Exhaust Emission Control System ............................7-102
California perchlorate notice ...........................7-105
F20
Page 58 of 642
2-31
Safety system of your vehicle
2
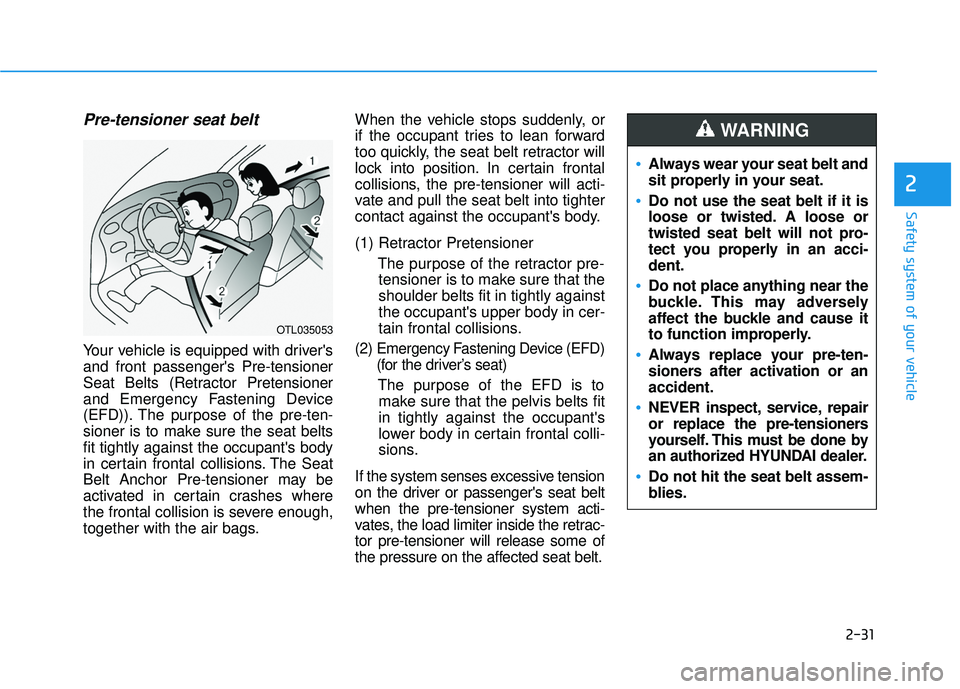
Pre-tensioner seat belt
Your vehicle is equipped with driver's and front passenger's Pre-tensioner
Seat Belts (Retractor Pretensioner
and Emergency Fastening Device
(EFD)). The purpose of the pre-ten-
sioner is to make sure the seat beltsfit tightly against the occupant's body
in certain frontal collisions. The Seat
Belt Anchor Pre-tensioner may be
activated in certain crashes where
the frontal collision is severe enough,
together with the air bags.When the vehicle stops suddenly, or
if the occupant tries to lean forward
too quickly, the seat belt retractor will
lock into position. In certain frontal
collisions, the pre-tensioner will acti-
vate and pull the seat belt into tighter
contact against the occupant's body.
(1) Retractor Pretensioner
The purpose of the retractor pre-tensioner is to make sure that the shoulder belts fit in tightly againstthe occupant's upper body in cer-
tain frontal collisions.(2) Emergency Fastening Device (EFD) (for the driver’s seat)
The purpose of the EFD is tomake sure that the pelvis belts fitin tightly against the occupant's
lower body in certain frontal colli-
sions.
If the system senses excessive tension
on the driver or passenger's seat beltwhen the pre-tensioner system acti-
vates, the load limiter inside the retrac-tor pre-tensioner will release some of
the pressure on the affected seat belt.
Always wear your seat belt and
sit properly in your seat.
Do not use the seat belt if it is
loose or twisted. A loose or
twisted seat belt will not pro-
tect you properly in an acci-dent.
Do not place anything near the
buckle. This may adversely
affect the buckle and cause it
to function improperly.
Always replace your pre-ten-
sioners after activation or anaccident.
NEVER inspect, service, repair
or replace the pre-tensioners
yourself. This must be done by
an authorized HYUNDAI dealer.
Do not hit the seat belt assem-
blies.
WARNING
OTL035053
Page 96 of 642
2-69
Safety system of your vehicle
2
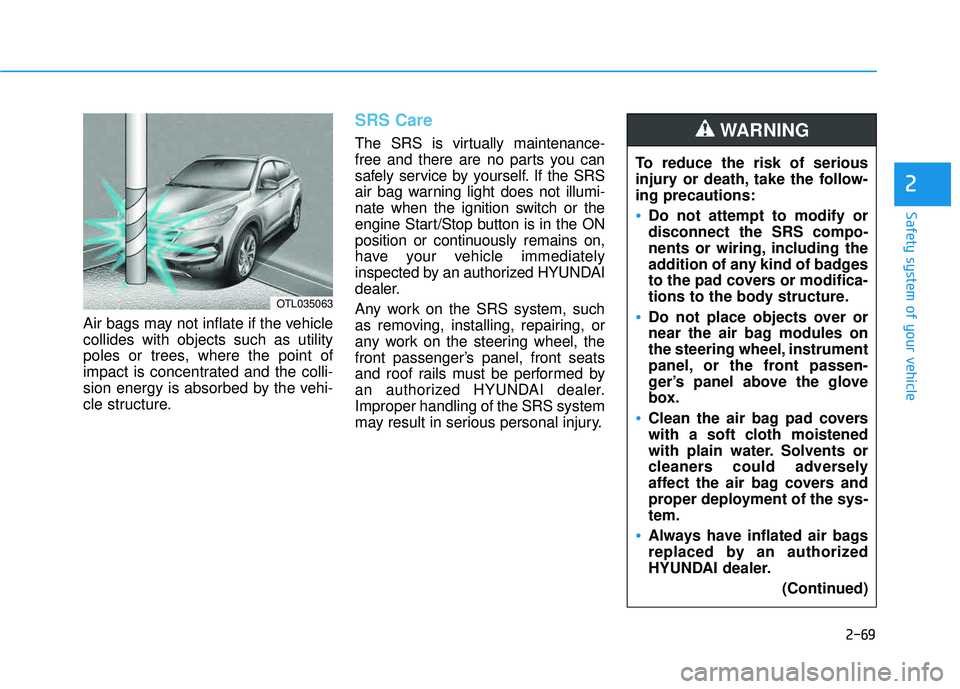
Air bags may not inflate if the vehicle collides with objects such as utility
poles or trees, where the point of
impact is concentrated and the colli-
sion energy is absorbed by the vehi-
cle structure.
SRS Care
The SRS is virtually maintenance-
free and there are no parts you can
safely service by yourself. If the SRS
air bag warning light does not illumi-
nate when the ignition switch or the
engine Start/Stop button is in the ON
position or continuously remains on,
have your vehicle immediately
inspected by an authorized HYUNDAI
dealer.
Any work on the SRS system, such
as removing, installing, repairing, or
any work on the steering wheel, the
front passenger’s panel, front seats
and roof rails must be performed by
an authorized HYUNDAI dealer.Improper handling of the SRS system
may result in serious personal injury.To reduce the risk of serious
injury or death, take the follow-ing precautions:
Do not attempt to modify or disconnect the SRS compo-
nents or wiring, including the
addition of any kind of badges
to the pad covers or modifica-
tions to the body structure.
Do not place objects over or
near the air bag modules on
the steering wheel, instrument
panel, or the front passen-
ger’s panel above the glove
box.
Clean the air bag pad covers
with a soft cloth moistened
with plain water. Solvents or
cleaners could adversely
affect the air bag covers and
proper deployment of the sys-tem.
Always have inflated air bags
replaced by an authorized
HYUNDAI dealer.
(Continued)
WARNING
OTL035063
Page 111 of 642
3-13
Convenient features of your vehicle
3
Immobilizer System
The immobilizer system protects your
vehicle from theft. If an improperly
coded key (or other device) is used,
the engine’s fuel system is disabled.
When the ignition switch is placed in
the ON position, the immobilizer sys-
tem indicator should come on briefly,
then go off. If the indicator starts to
blink, the system does not recognize
the coding of the key.
Turn the ignition switch to the
LOCK/OFF position, then turn the igni-
tion switch to the ON position again.
The system may not recognize your
key’s coding if another immobilizer
key or other metal object (i.e., key
chain) is near the key. The engine
may not start because the metal may
interrupt the transponder signal from
transmitting normally. If the system repeatedly does not
recognize the coding of the key, it is
recommended that you contact your
HYUNDAI dealer.Do not attempt to alter this system or
add other devices to it. Electrical
problems could result that may make
your vehicle inoperable.
The transponder in your key is an
important part of the immobilizer
system. It is designed to give
years of trouble-free service, how-
ever you should avoid exposure to
moisture, static electricity and
rough handling. Immobilizer sys-
tem malfunction could occur.
Information
This device complies with Part 15 of
the FCC rules.
Operation is subject to the following
three conditions:
1. This device may not cause harmful
interference.
2. This device must accept any interfer- ence received, including interference
that may cause undesired operation.
3. Changes or modifications not expressly approved by the party
responsible for compliance could
void the user ’s authority to operate
the device.
i
NOTICE
In order to prevent theft of your
vehicle, do not leave spare keys
anywhere in your vehicle. Your
immobilizer password is a cus-
tomer unique password andshould be kept confidential.
WARNING
Page 124 of 642
3-26
Convenient features of your vehicle
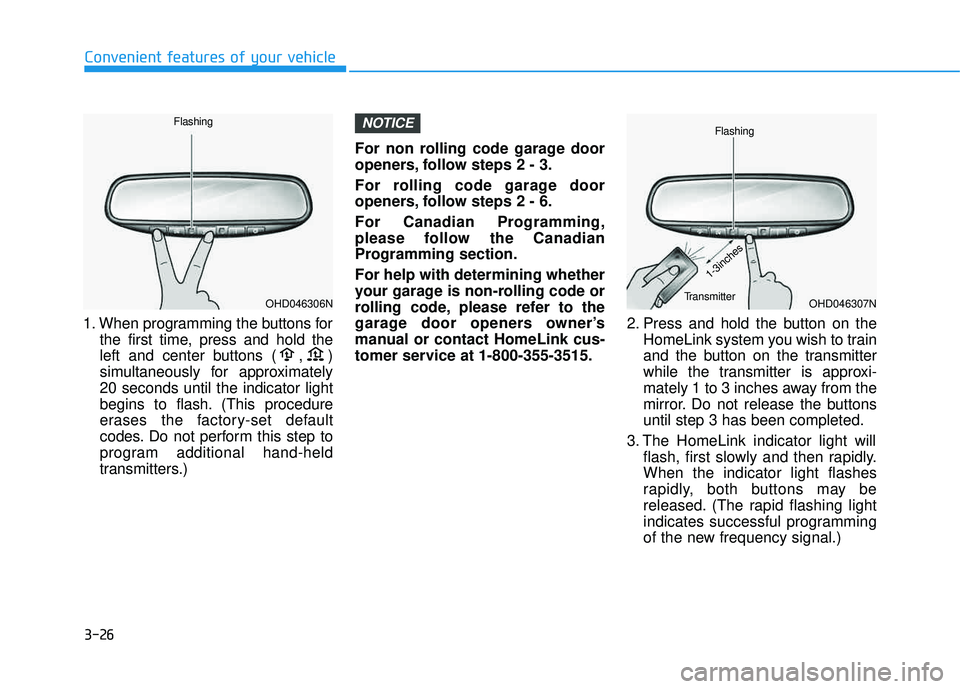
1. When programming the buttons forthe first time, press and hold the
left and center buttons ( , )
simultaneously for approximately20 seconds until the indicator light
begins to flash. (This procedure
erases the factory-set default
codes. Do not perform this step to
program additional hand-held
transmitters.) For non rolling code garage door
openers, follow steps 2 - 3.
For rolling code garage door
openers, follow steps 2 - 6.
For Canadian Programming,
please follow the Canadian
Programming section. For help with determining whether
your garage is non-rolling code or
rolling code, please refer to the
garage door openers owner’s
manual or contact HomeLink cus-
tomer service at 1-800-355-3515.
2. Press and hold the button on the
HomeLink system you wish to train
and the button on the transmitter
while the transmitter is approxi-
mately 1 to 3 inches away from the
mirror. Do not release the buttonsuntil step 3 has been completed.
3. The HomeLink indicator light will flash, first slowly and then rapidly.When the indicator light flashes
rapidly, both buttons may be
released. (The rapid flashing light
indicates successful programming
of the new frequency signal.)
NOTICE
OHD046307N
Flashing
1-3inches
TransmitterOHD046306N
Flashing
Page 168 of 642
3-70
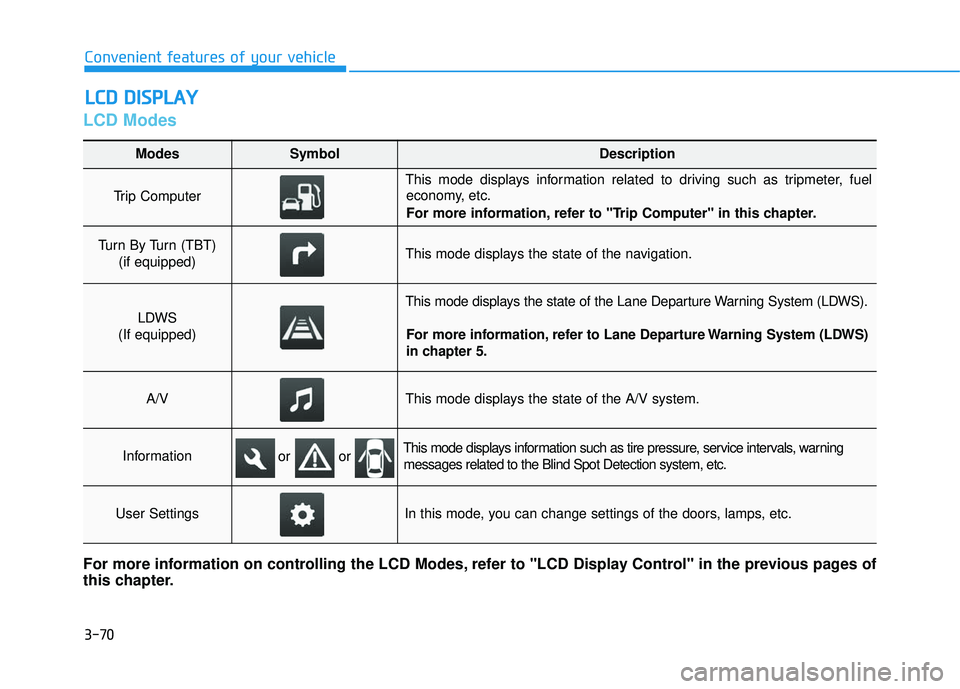
LCD Modes
LLCC DD DD IISS PP LLAA YY
Convenient features of your vehicle
Modes SymbolDescription
Trip Computer
This mode displays information related to driving such as tripmeter, fuel
economy, etc.
For more information, refer to "Trip Computer" in this chapter.
Turn By Turn (TBT)
(if equipped)This mode displays the state of the navigation.
LDWS
(If equipped)
This mode displays the state of the Lane Departure Warning System (LDWS).
For more information, refer to Lane Departure Warning System (LDWS)
in chapter 5.
A/VThis mode displays the state of the A/V system.
InformationThis mode displays information such as tire pressure, service intervals, warningmessages related to the Blind Spot Detection system, etc.
User SettingsIn this mode, you can change settings of the doors, lamps, etc.
For more information on controlling the LCD Modes, refer to "LCD Display Control" in the previous pages of
this chapter.
or or