2017 Hyundai Sonata Plug-in Hybrid light
[x] Cancel search: lightPage 91 of 744

3-4
Convenient features of your vehicle
Unlocking your vehicle
To unlock your vehicle:
1. Make sure you have the smart keyin your possession.
2. Press either the button on the door handle of the Door Unlock button
(2) on the smart key. The driver's
door will unlock and the hazard
warning lights will blink two times.
3. If you press the driver door outside door handle button or Door Unlock
button on the smart key again
within four seconds, then all the
doors will unlock.
Information
• The door handle button will onlyoperate when the smart key is with-
in 28-40 inches (0.7~1m) from the
outside door handle.
• Either the driver or front passenger door can be opened with the door
handle button when the smart key is
within this range.
• If you press the front passenger out- side door handle, while carrying the
Smart Key, all doors will unlock.
• After unlocking the doors, the doors will lock automatically after 30 sec-
onds unless a door is opened.
Opening the trunk
To open the trunk:
1. Make sure you have the smart key in your possession.
2. Press either the trunk handle but- ton or press and hold the trunk
Unlock button (3) on the smart key
for more than one second. The
hazard warning lights will blink two
times.
3. Once the trunk is opened and then closed, the trunk will lock automat-
ically.
Information
The trunk handle button will only
operate when the smart key is within
28 inches (0.7 m) from the trunk han-
dle.
i
i
OLF044002N
Page 92 of 744

3-5
Convenient features of your vehicle
3
Panic button
Press the Panic button (4) and hold
for more than one second. The horn
sounds and hazard warning lights
blink for about 30 seconds. To cancel
the panic mode, press any button on
the Smart Key.
Start-up
You can start the engine without
inserting the key.
For more information, refer to the
"Engine Start/Stop Button" sec-
tion in chapter 5.
To prevent damaging the smart key:
• Keep the smart key in a cool, dryplace to avoid damage or mal-
function. Exposure to moisture
or high temperature may cause
the internal circuit of the smart
key to malfunction which may
not be covered under warranty.
Avoid dropping or throwing the smart key.
Protect the smart key from extreme temperatures. Always have the smart key with
you when leaving the vehicle. If
the smart key is left near the vehi-
cle, the vehicle battery may be dis-
charged.
Mechanical key
If the Smart Key does not operate
normally, you can lock or unlock the
door by using the mechanical key.
To remove the mechanical key from
the smart key fob, press and hold the
release button (1) and pull the
mechanical key (2) out.
To unlock the vehicle using the
mechanical key, insert the mechani-
cal key into the key hole on the driv-
er door.
To reinstall the mechanical key, put
the key into the hole and push it until
a click sound is heard.
NOTICE
NOTICEOLF044007
Page 100 of 744

3-13
Convenient features of your vehicle
3
This system helps to protect your
vehicle and valuables. The horn will
sound and the hazard warning lights
will blink continuously if any of the
following occurs:
- A door is opened without using thesmart key.
- The trunk is opened without using the smart key.
- The hood is opened.
The alarm continues for 30 seconds,
then the system resets. To turn off
the alarm, unlock the doors with
smart key.
The Theft Alarm System automati-
cally sets 30 seconds after you lock
the doors and the trunk. For the sys-
tem to activate, you must lock the
doors and the trunk from outside the
vehicle with the smart key or by
pressing the button on the outside of
the door handle with the smart key in
your possession.
The hazard warning lights will blink
and the chime will sound once to
indicate the system is armed. Once the security system is set,
opening any door, the trunk, or the
hood without using the smart key will
cause the alarm to activate.
The Theft Alarm System will not set if
the hood, the trunk, or any door is
not fully closed. If the system will not
set, check the hood, the trunk, or the
doors are fully closed.
Do not attempt to alter this system or
add other devices to it.Information
• Do not lock the doors until all pas-
sengers have left the vehicle. If the
remaining passenger leaves the
vehicle when the system is armed,
the alarm will be activated.
• If the vehicle is not disarmed with the smart key, open the doors by using
the mechanical key and start hybrid
system by directly pressing the
switch with the smart key.
• If the system is disarmed by unlock- ing the vehicle, but neither a door or
the trunk is opened within 30 sec-
onds, the doors will relock and the
system will rearm automatically.
i
T TH
H E
EF
FT
T -
-A
A L
LA
A R
RM
M
S
S Y
Y S
ST
T E
EM
M
Page 103 of 744

3-16
Convenient features of your vehicle
S
ST
T E
EE
ER
R I
IN
N G
G
W
W H
HE
EE
EL
L
Electric Power Steering (EPS)
The system assists you with steering
the vehicle. If the engine is turned off
or if the power steering system
becomes inoperative, you may still
steer the vehicle, but it will require
increased steering effort.
Should you notice any change in the
effort required to steer during normal
vehicle operation, have the system
checked by an authorized HYUNDAI
dealer.
Information
The following symptoms may occur
during normal vehicle operation:
• The steering effort may be high
immediately after placing the engine
Start/Stop button is in the ON posi-
tion.
This happens as the system per-
forms the EPS system diagnostics.
When the diagnostics are completed,
the steering wheel will return to its
normal condition.
• A click noise may be heard from the EPS relay after the engine Start/Stop
button is in the ON/OFF position.
• Motor noise may be heard when the vehicle is at a stop or at a low driving
speed.
• If the outside ambient temperature is low, when you operate the steer-
ing wheel a noise from the electric
power steering may occur. As the
temperature increases, the noise will
disappear.
i
If the Electric Power Steering
System does not operate nor-
mally, the warning light ( ) will
illuminate on the instrument
cluster. You may steer the vehi-
cle, but it will require increased
steering efforts. Take your vehi-
cle to an authorized HYUNDAI
dealer and have the system
checked as soon as possible.
CAUTION
Page 104 of 744

3-17
Convenient features of your vehicle
3
Tilt Steering / Telescope Steering
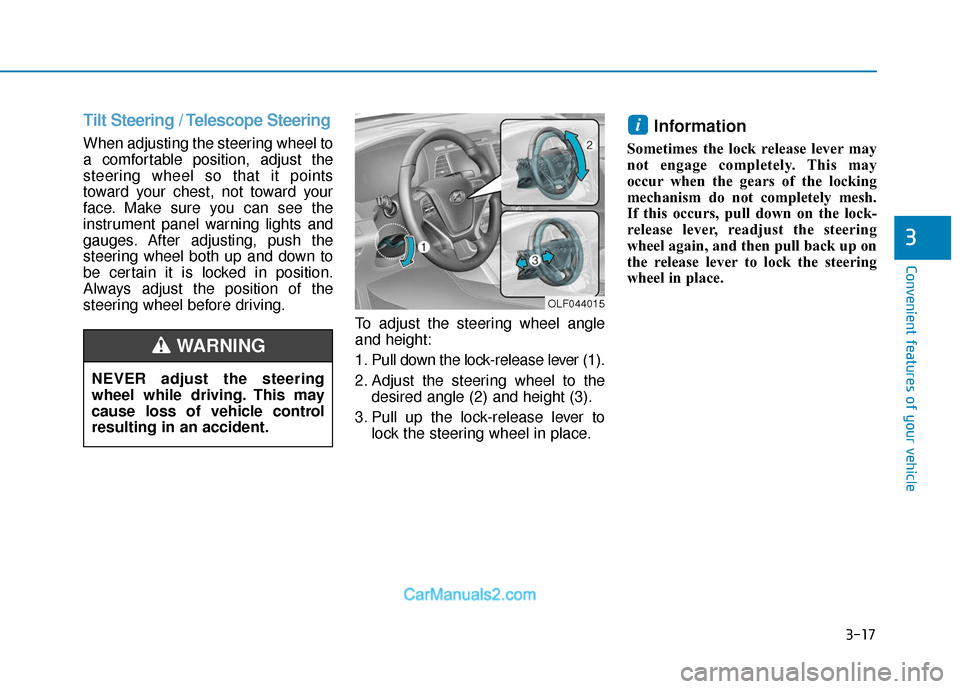
When adjusting the steering wheel to
a comfortable position, adjust the
steering wheel so that it points
toward your chest, not toward your
face. Make sure you can see the
instrument panel warning lights and
gauges. After adjusting, push the
steering wheel both up and down to
be certain it is locked in position.
Always adjust the position of the
steering wheel before driving.To adjust the steering wheel angle
and height:
1. Pull down the lock-release lever (1).
2. Adjust the steering wheel to thedesired angle (2) and height (3).
3. Pull up the lock-release lever to lock the steering wheel in place.
Information
Sometimes the lock release lever may
not engage completely. This may
occur when the gears of the locking
mechanism do not completely mesh.
If this occurs, pull down on the lock-
release lever, readjust the steering
wheel again, and then pull back up on
the release lever to lock the steering
wheel in place.
i
OLF044015
NEVER adjust the steering
wheel while driving. This may
cause loss of vehicle control
resulting in an accident.
WARNING
Page 107 of 744

3-20
Convenient features of your vehicle
Pull the day/night lever toward you to
reduce glare from the headlamps of
the vehicles behind you during night
driving.
Remember that you lose some
rearview clarity in the night position.
Blue Link®center (if equipped)
For details, refer to the Blue Link®
Owner's Guide, Navigation Manual
or Audio Manual.
Electric chromic mirror (ECM) with HomeLink®system,
compass and Blue Link®
(for U.S.A)
Your vehicle may be equipped with a
Gentex Automatic-Dimming Mirror
with a Z-Nav™ Electronic Compass
Display and an Integrated HomeLink
®
Wireless Control System. During
nighttime driving, this feature will
automatically detect and reduce
rearview mirror glare while the com-
pass indicates the direction the vehi-
cle is pointed. The HomeLink
®
Universal Transceiver allows you to
activate your garage door(s), electric
gate, home lighting, etc.
OLF044021
Page 108 of 744

3-21
Convenient features of your vehicle
3
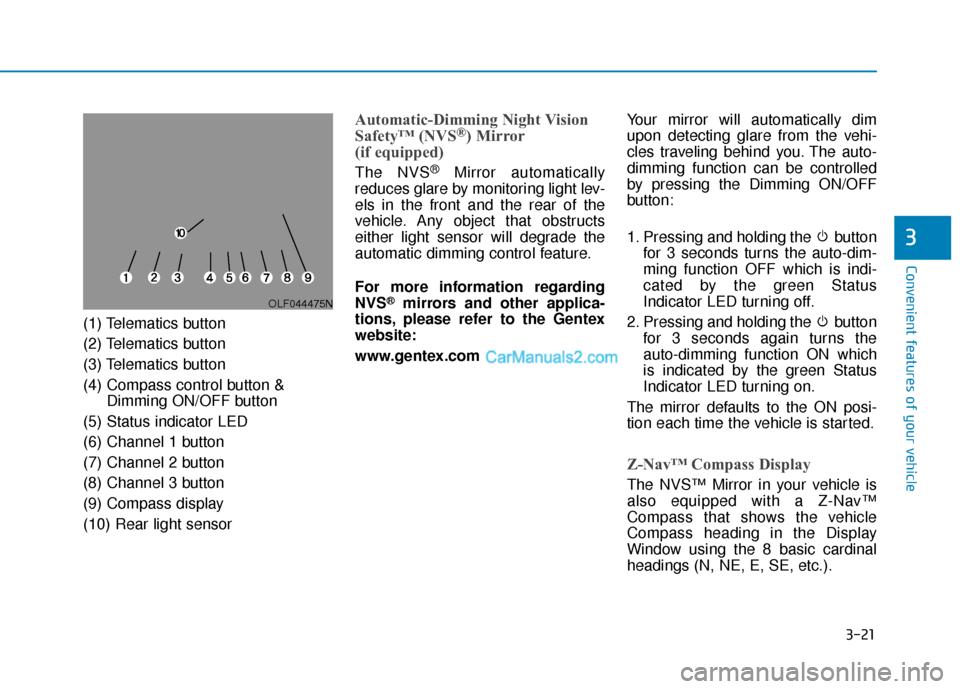
(1) Telematics button
(2) Telematics button
(3) Telematics button
(4) Compass control button &Dimming ON/OFF button
(5) Status indicator LED
(6) Channel 1 button
(7) Channel 2 button
(8) Channel 3 button
(9) Compass display
(10) Rear light sensor
Automatic-Dimming Night Vision
Safety™ (NVS®) Mirror
(if equipped)
The NVS®Mirror automatically
reduces glare by monitoring light lev-
els in the front and the rear of the
vehicle. Any object that obstructs
either light sensor will degrade the
automatic dimming control feature.
For more information regarding
NVS
®mirrors and other applica-
tions, please refer to the Gentex
website:
www.gentex.com Your mirror will automatically dim
upon detecting glare from the vehi-
cles traveling behind you. The auto-
dimming function can be controlled
by pressing the Dimming ON/OFF
button:
1. Pressing and holding the button
for 3 seconds turns the auto-dim-
ming function OFF which is indi-
cated by the green Status
Indicator LED turning off.
2. Pressing and holding the button for 3 seconds again turns the
auto-dimming function ON which
is indicated by the green Status
Indicator LED turning on.
The mirror defaults to the ON posi-
tion each time the vehicle is started.
Z-Nav™ Compass Display
The NVS™ Mirror in your vehicle is
also equipped with a Z-Nav™
Compass that shows the vehicle
Compass heading in the Display
Window using the 8 basic cardinal
headings (N, NE, E, SE, etc.).
OLF044475N
Page 110 of 744

3-23
Convenient features of your vehicle
3
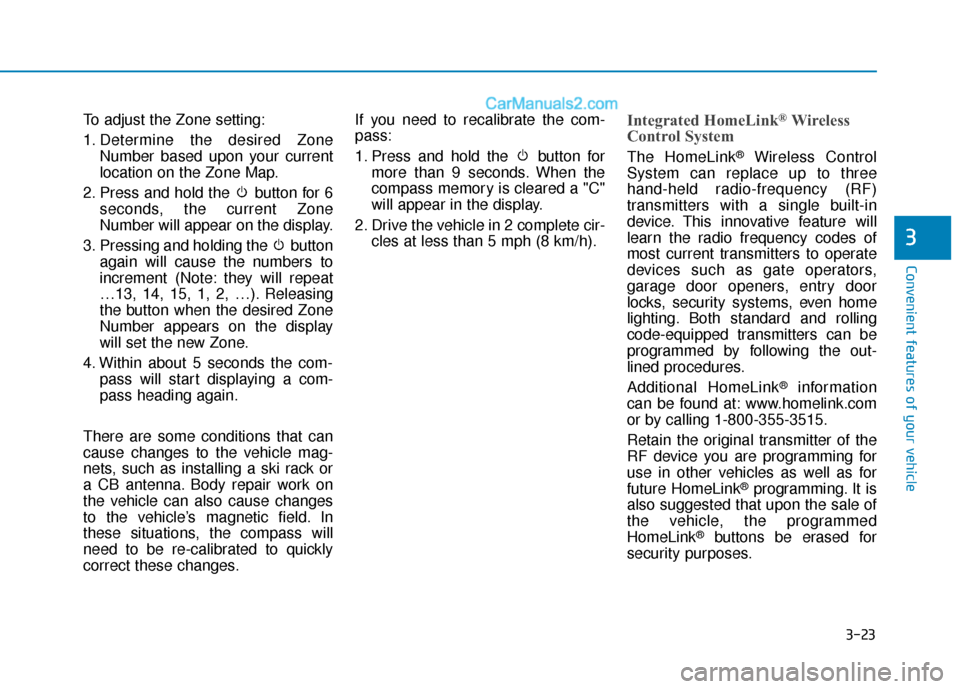
To adjust the Zone setting:
1. Determine the desired ZoneNumber based upon your current
location on the Zone Map.
2. Press and hold the button for 6 seconds, the current Zone
Number will appear on the display.
3. Pressing and holding the button again will cause the numbers to
increment (Note: they will repeat
…13, 14, 15, 1, 2, …). Releasing
the button when the desired Zone
Number appears on the display
will set the new Zone.
4. Within about 5 seconds the com- pass will start displaying a com-
pass heading again.
There are some conditions that can
cause changes to the vehicle mag-
nets, such as installing a ski rack or
a CB antenna. Body repair work on
the vehicle can also cause changes
to the vehicle’s magnetic field. In
these situations, the compass will
need to be re-calibrated to quickly
correct these changes. If you need to recalibrate the com-
pass:
1. Press and hold the button for
more than 9 seconds. When the
compass memory is cleared a "C"
will appear in the display.
2. Drive the vehicle in 2 complete cir- cles at less than 5 mph (8 km/h).Integrated HomeLink®Wireless
Control System
The HomeLink®Wireless Control
System can replace up to three
hand-held radio-frequency (RF)
transmitters with a single built-in
device. This innovative feature will
learn the radio frequency codes of
most current transmitters to operate
devices such as gate operators,
garage door openers, entry door
locks, security systems, even home
lighting. Both standard and rolling
code-equipped transmitters can be
programmed by following the out-
lined procedures.
Additional HomeLink
®information
can be found at: www.homelink.com
or by calling 1-800-355-3515.
Retain the original transmitter of the
RF device you are programming for
use in other vehicles as well as for
future HomeLink
®programming. It is
also suggested that upon the sale of
the vehicle, the programmed
HomeLink
®buttons be erased for
security purposes.