Page 15 of 563

1-4
Your vehicle at a glance
I
IN
N T
TE
ER
R I
IO
O R
R
O
O V
VE
ER
R V
V I
IE
E W
W
1. Door lock/unlock button ....................3-15
2. Driver position memory system ........3-20
3. Side view mirrors control switch ........3-40
4. Central door lock switch ....................3-16
5. Power window switches ....................3-45
6. Power window lock switch ................3-47
7. Hood release lever ............................3-56
8. Instrument panel illumination
control switch ....................................3-69
9. Blind spot detection system button* ....5-74
10. Lane departure warning system button* ................................................5-69
11. Fuel filler door opener button ..........3-63
12. Trunk release button ........................3-59
13. ESC OFF button ..............................5-43
14. Fuse box ..........................................7-57
15. Steering wheel ................................3-22
16. Steering wheel tilt/telescope lever ......3-23
17. Seat ..................................................2-4
18. Brake pedal ....................................5-28
19. Accelerator pedal
* : if equipped
OLF014003NThe actual shape may differ from the illustration.
Page 17 of 563
1-6
Your vehicle at a glance
E
EN
N G
GI
IN
N E
E
C
C O
O M
M P
PA
A R
RT
TM
M E
EN
N T
T
1. Engine coolant reservoir ...................7-27
2. Radiator cap .....................................7-28
3. Brake fluid reservoir ..........................7-30
4. Air cleaner.........................................7-32
5. Engine oil dipstick .............................7-24
6. Engine oil filler cap ...........................7-25
7. Windshield washer fluid reservoir .....7-31
8. Fuse box ...........................................7-59
9. Battery ..............................................7-38
OLF014006
The actual engine room in the vehicle may differ from the illustration.
Page 132 of 563

3-47
Convenient features of your vehicle
3
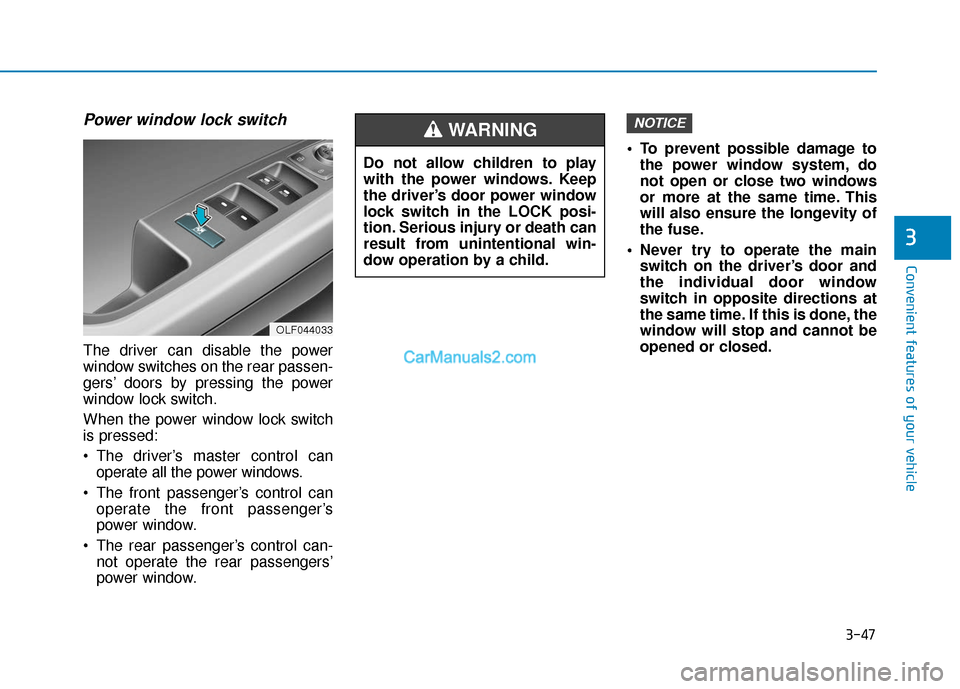
Power window lock switch
The driver can disable the power
window switches on the rear passen-
gers’ doors by pressing the power
window lock switch.
When the power window lock switch
is pressed:
The driver’s master control canoperate all the power windows.
The front passenger’s control can operate the front passenger’s
power window.
The rear passenger’s control can- not operate the rear passengers’
power window. To prevent possible damage to
the power window system, do
not open or close two windows
or more at the same time. This
will also ensure the longevity of
the fuse.
Never try to operate the main switch on the driver’s door and
the individual door window
switch in opposite directions at
the same time. If this is done, the
window will stop and cannot be
opened or closed.
NOTICE
OLF044033
Do not allow children to play
with the power windows. Keep
the driver’s door power window
lock switch in the LOCK posi-
tion. Serious injury or death can
result from unintentional win-
dow operation by a child.
WARNING
Page 136 of 563

3-51
Convenient features of your vehicle
Resetting the sunroof
Sunroof needs to be reset if the fol-
lowing occurs :
- Battery is discharged or discon-nected or the related fuse has been
replaced or disconnected
- The one-touch sliding function of the sunroof does not normally oper-
ate
Reset procedure :
1. Place the ignition switch to the ON position or start the engine. It is
recommended to reset the sunroof
while the engine is running.
2. Push the control lever forward. The sunroof will close completely or tilt
depending on the condition of the
sunroof.
3. Release the control lever until the sunroof does not move. 4. Push the control lever forward
about 10 seconds.
- When the sunroof is in the close position :
The glass will tilt and slightly move up and down.
- When the sunroof is in the tilt position:
The glass will slightly move up and down.
Do not release the lever until the
operation is completed.
If you release the lever during opera-
tion, start the procedure again from
step 2. 5. Within 3 seconds, push the control
lever forward until the sunroof
operates as follows:
Tilt down → Slide Open → Slide
Close.
Do not release the lever until the
operation is completed.
If you release the lever during opera-
tion, start the procedure again from
step 2.
6. Release the sunroof control lever after all steps have completed.
(The sunroof system has been
reset.)
Information
• If the sunroof is not reset when thevehicle battery is disconnected or
discharged, or the sunroof fuse is
blown, the sunroof may not operate
normally.
• For more detailed information, we recommend that you contact an
authorized HYUNDAI dealer.
i
3
Page 140 of 563

3-55
Convenient features of your vehicle
3
Periodically remove any dirt thatmay accumulate on the sunroof
guide rail or between the sun-
roof and roof panel.
Do not try to open the sunroof when the temperature is below
freezing or when the sunroof is
covered with snow or ice, the
motor could be damaged.
Information
After the vehicle is washed or in a
rainstorm, be sure to wipe off any
water that is on the sunroof before
operating it.
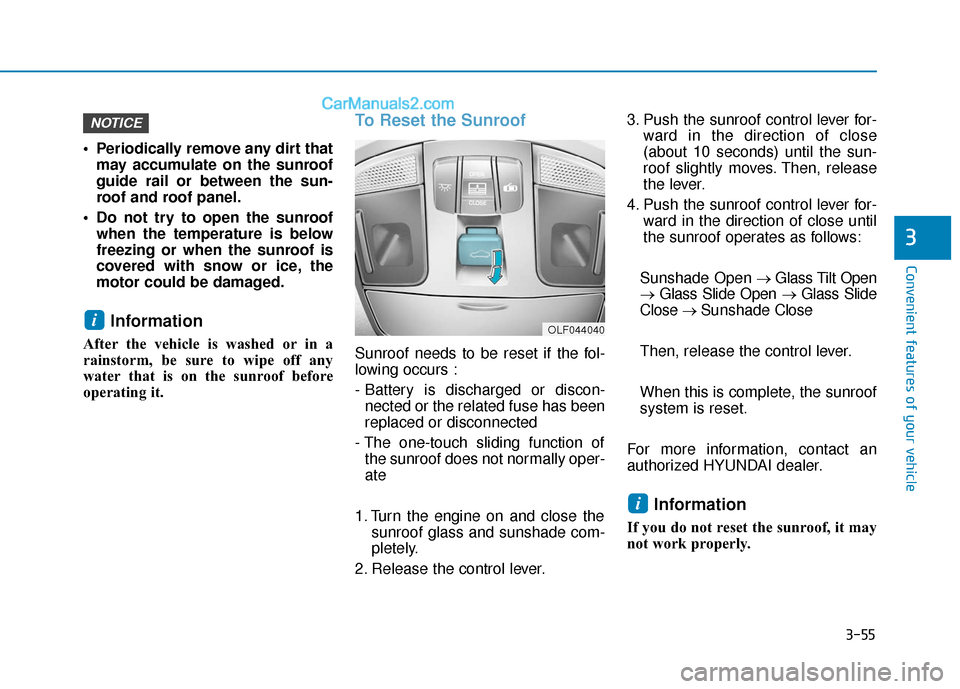
To Reset the Sunroof
Sunroof needs to be reset if the fol-
lowing occurs :
- Battery is discharged or discon-nected or the related fuse has been
replaced or disconnected
- The one-touch sliding function of the sunroof does not normally oper-
ate
1. Turn the engine on and close the sunroof glass and sunshade com-
pletely.
2. Release the control lever. 3. Push the sunroof control lever for-
ward in the direction of close
(about 10 seconds) until the sun-
roof slightly moves. Then, release
the lever.
4. Push the sunroof control lever for- ward in the direction of close until
the sunroof operates as follows:
Sunshade Open → Glass Tilt Open
→ Glass Slide Open → Glass Slide
Close → Sunshade Close
Then, release the control lever.
When this is complete, the sunroof
system is reset.
For more information, contact an
authorized HYUNDAI dealer.
Information
If you do not reset the sunroof, it may
not work properly.
i
i
NOTICE
OLF044040
Page 164 of 563
3-79
Convenient features of your vehicle
3
Service in OFF
If the service interval is not set,
"Service in OFF" message is dis-
played.
Information
If any of the following conditions
occurs, the mileage and days may be
incorrect.
- The battery cable is disconnected.
- The fuse switch is turned off.
- The battery is discharged.
Warning Message
If one of followings occurs, warning
messages will be displayed on the
information mode for several seconds.
- Malfunction of below systems
(TPMS)
system (AEB)
i
OLF044457N/OLF044456N
■ Type A, C ■Type B, D
Page 174 of 563
3-89
Convenient features of your vehicle
3
Check BRAKE SWITCH fuse
This warning message illuminatesif the brake switch fuse is discon-
nected.
It means that you should replace the fuse with a new one. If that is
not possible, you can start the
engine by pressing the Engine
Start/Stop button for 10 seconds in
the ACC position.
Turn on "FUSE SWITCH"
This warning message illuminatesif the fuse switch under the steer-
ing wheel is OFF.
It means that you should turn the fuse switch on.
For more information, refer to
"Fuses" in chapter 7.
Low Tire Pressure
This warning message illuminates if
the tire pressure is low with the igni-
tion switch or the Engine/Start Button
in ON position.
For more information, refer to
"Tire Pressure Monitoring System
(TPMS)" in chapter 6.
OLF044132LOLF044148LOLF044146L
Page 244 of 563

3-159
Convenient features of your vehicle
3
To prevent damage to the Power
Outlets :
Use the power outlet only whenthe engine is running and
remove the accessory plug after
use. Using the accessory plug
for prolonged periods of time
with the engine off could cause
the battery to discharge.
Only use 12V electric acces- sories which are less than 180
W(Watt) in electric capacity.
Adjust the air-conditioner or heater to the lowest operating
level when using the power outlet.
Close the cover when not in use.
Some electronic devices can cause electronic interference
when plugged into a vehicle’s
power outlet. These devices may
cause excessive audio static
and malfunctions in other elec-
tronic systems or devices used
in your vehicle.
(Continued)(Continued)
Push the plug in as far as it will
go. If good contact is not made,
the plug may overheat and the
fuse may open.
Plug in battery equipped electri- cal/electronic devices with
reverse current protection. The
current from the battery may
flow into the vehicle’s electri-
cal/electronic system and cause
system malfunction.
NOTICE
Avoid electrical shocks. Do not
place your fingers or foreign
objects (pin, etc.) into a power
outlet or touch the power outlet
with a wet hand.
WARNING