2017 Hyundai Sonata Noise
[x] Cancel search: NoisePage 344 of 563

5-36
Driving your vehicle
If the EPB Malfunction Indicator is still on, have the system
checked by an authorized
HYUNDAI dealer.
If the Parking Brake Warning Light does not illuminate or
blinks even though the EPB
switch was pulled up, the EPB
may not be applied.
If the Parking Brake Warning Light blinks when the EPB
Malfunction Indicator is on,
press the EPB switch, then pull
it up. Once more, press the
switch back to its original posi-
tion and pull it back up. If the
EPB Malfunction Indicator does
not go off, have your vehicle
checked by an authorized
HYUNDAI dealer.
Emergency braking
If there is a problem with the brake
pedal while driving, emergency brak-
ing is possible by pulling up and
holding the EPB switch. Braking is
possible only while you are holding
the EPB switch. However, braking
distance will be longer than normal. During emergency braking the
Parking Brake Warning Light will
illuminate to indicate that the sys-
tem is operating.
If there is a noise or burning smell
after using the emergency brake,
have your vehicle checked by an
authorized HYUNDAI dealer as
soon as possible.
NOTICE
NOTICENOTICE
Do not operate the parking
brake while the vehicle is mov-
ing except in an emergency sit-
uation. It could damage the
brake system and lead to a
severe accident.
WARNING
Page 405 of 563

5-97
Driving your vehicle
5
Information
• Install tire chains on the front tires.It should be noted that installing tire
chains on the tires will provide a
greater driving force, but will not
prevent side skids.
• Do not install studded tires without first checking local, state and
municipal regulations for possible
restrictions against their use.
Chain installation
When installing tire chains, follow the
manufacturer's instructions and
mount them as tightly possible. Drive
slowly (less than 20 mph (30 km/h))
with chains installed. If you hear the
chains contacting the body or chas-
sis, stop and tighten them. If they still
make contact, slow down until the
noise stops. Remove the tire chains
as soon as you begin driving on
cleared roads.
When mounting snow chains, park
the vehicle on level ground away
from traffic. Turn on the vehicle
Hazard Warning Flasher and place a
triangular emergency warning device
behind the vehicle (if available).
Always place the vehicle in P (Park),
apply the parking brake and turn off
the engine before installing snow
chains.i
The use of tire chains may
adversely affect vehicle han-
dling:
Drive less than 20 mph
(30 km/h) or the chain manu-
facturer's recommended speed
limit, whichever is lower.
Drive carefully and avoid
bumps, holes, sharp turns,
and other road hazards, which
may cause the vehicle to
bounce.
Avoid sharp turns or locked
wheel braking.
WARNING
Page 406 of 563

5-98
Driving your vehicle
- When using tire chains:
Wrong size chains or improperly installed chains can damage
your vehicle's brake lines, sus-
pension, body and wheels.
Use SAE "S" class or wire chains.
If you hear noise caused by chains contacting the body,
retighten the chain to prevent
contact with the vehicle body.
To prevent body damage, retighten the chains after driving
0.3~0.6 miles (0.5~1.0 km).
Do not use tire chains on vehi- cles equipped with aluminum
wheels. If unavoidable, use a
wire type chain.
Use wire chains less than 0.47 inch (12 mm) wide to prevent
damage to the chain's connec-
tion.
Winter Precautions
Use high quality ethylene glycolcoolant
Your vehicle is delivered with high
quality ethylene glycol coolant in the
cooling system. It is the only type of
coolant that should be used because
it helps prevent corrosion in the cool-
ing system, lubricates the water
pump and prevents freezing. Be sure
to replace or replenish your coolant
in accordance with the maintenance
schedule in chapter 7. Before winter,
have your coolant tested to assure
that its freezing point is sufficient for
the temperatures anticipated during
the winter.
Change to "winter weight" oil ifnecessary
In some climates it is recommended
that a lower viscosity "winter weight"
oil be used during cold weather. See
chapter 8 for recommendations. If
you aren’t sure what weight oil you
should use, consult an authorized
HYUNDAI dealer.
Check battery and cables
Winter puts additional burdens on
the battery system. Visually inspect
the battery and cables as described
in chapter 7. The level of charge in
your battery can be checked by an
authorized HYUNDAI dealer or a
service station.
NOTICE
Page 441 of 563

6-28
9. Switch off the compressor.
10. Detach the hoses from thesealant bottle connector and
from the tire valve.
Return the Tire Mobility Kit to its stor-
age location in the vehicle.
Distributing the sealant
11. Immediately drive approximately 4~6miles (7~10km or about 10
minutes) to evenly distribute the
sealant in the tire.
Do not exceed a speed of 50 mph
(80 km/h). If possible, do not fall
below a speed of 12 mph (20 km/h).
While driving, if you experience any
unusual vibration, ride disturbance or
noise, reduce your speed and drive
with caution until you can safely pull
off of the side of the road.
Call for road side service or towing.
When you use the Tire Mobility Kit,
the tire pressure sensors and wheel
may be damaged by sealant, have it
inspected at an authorized dealer. Checking the tire inflation pres-
sure
1. After driving approximately
4~6miles (7~10km or about
10 minutes), stop at a safe loca-
tion.
2. Connect hose (9) of the compres- sor directly to the tire valve.
3. Plug the compressor power cord into the vehicle power outlet.
What to do in an emergency
OLF064020
Do not attempt to drive your
vehicle if the tire pressure is
below 29 psi (200kpa). This
could result in an accident due
to sudden tire failure.
CAUTION
Do not leave your vehicle run-
ning in a poorly ventilated area
for extended periods of time.
Carbon monoxide poisoning
and suffocation can occur.
WARNING
Page 458 of 563

7
Maintenance
7-13
60,000 miles (96,000 km) or 48 months
❑Inspect vacuum hose
❑Inspect air conditioning refrigerant
❑Inspect brake hoses and lines
❑Inspect drive shafts and boots
❑Inspect exhaust pipe and muffler
❑Inspect front brake disc/pads, calipers
❑Inspect rear brake disc/pads
❑Inspect steering gear box, linkage & boots/lower arm ball joint,
upper arm ball joint
❑ Inspect suspension mounting bolts
❑Inspect brake fluid
❑Inspect fuel filter *1
❑Inspect fuel cap, fuel lines, fuel hoses and connections
❑Inspect fuel tank air filter (if equipped) *1
❑Inspect parking brake
❑Inspect vapor hose and fuel filler cap
❑Inspect valve clearance (if equipped) *2
(Every 60,000 miles (96,000 km) or 72 months)
❑Inspect drive belts
(First, 60,000 miles (96,000 km) or 72 months
after every 15,000 miles (24,000 km) or 24 months)
❑ Inspect intercooler, in/out hose, air intake hose
- Turbo GDI (Every 6,200miles (10,000km))
❑ Replace climate control air filter (for evaporator and blower unit)
❑Replace air cleaner filter
(Continued)
67,500 miles (108,000 km) or 54 months
❑Inspect air cleaner filter
❑Inspect vacuum hose
❑Inspect intercooler, in/out hose, air intake hose
- Turbo GDI (Every 6,200miles (10,000km))
❑Replace engine oil and filter (2.4 GDI) *3
(67,500 miles (108,000 km) or 108 months)
❑ Add fuel additive *4 (67,500 miles (108,000 km) or 108 months)
Normal Maintenance Schedule (CONT.)
*1Fuel filter & Fuel tank air filter are considered to be maintenance free\
but peri-
odic inspection is recommended for this maintenance schedule depends on
fuel quality. If there are some important safety matters like fuel flow restric-
tion, surging, loss of power, hard starting problem etc, replace the fuel filter
immediately regardless of maintenance schedule and consult an authorized
HYUNDAI dealer for details.
*
2Inspect for excessive tappet noise and/or engine vibration and adjust if nec-
essary.
*
3Engine oil (16. TGDI/2.0 TGDI) At first, replace at 3,000 miles (5,000 km) or
6 months, after that, every 5,000 miles (8,000 km) or 6 months.
*
4If TOP TIER Detergent Gasoline is not available, one bottle of additive is rec-
ommended. Additives are available from your authorized HYUNDAI dealer
along with information on how to use them. Do not mix other additives.
❈ Inspect : Inspect and if necessary, adjust, correct, clean or replace.
(Continued)
❑Replace engine oil and filter (2.4 GDI) *3
(60,000 miles (96,000 km) or 96 months)
❑ Add fuel additive *4 (60,000 miles (96,000 km) or 96 months)
Page 462 of 563

7
Maintenance
7-17
Normal Maintenance Schedule (CONT.)
120,000 miles (192,000 km) or 96 months
❑Inspect vacuum hose
❑Inspect air conditioning refrigerant
❑Inspect brake hoses and lines
❑Inspect drive shafts and boots
❑Inspect exhaust pipe and muffler
❑Inspect front brake disc/pads, calipers
❑Inspect rear brake disc/pads
❑Inspect steering gear box, linkage & boots/lower arm ball joint,
upper arm ball joint
❑ Inspect suspension mounting bolts
❑Inspect brake fluid
❑Inspect fuel filter *1
❑Inspect fuel cap, fuel lines, fuel hoses and connections
❑Inspect fuel tank air filter (if equipped) *1
❑Inspect parking brake
❑Inspect vapor hose and fuel filler cap
❑Inspect valve clearance (if equipped) *2
(Every 60,000 miles (96,000 km) or 72 months)
❑Inspect drive belts (First, 60,000 miles (96,000 km) or 72 months
after every 15,000 miles (24,000 km) or 24 months)
❑ Inspect intercooler, in/out hose, air intake hose
- Turbo GDI (Every 6,200miles (10,000km))
❑ Replace climate control air filter (for evaporator and blower unit)
❑Replace air cleaner filter
❑Replace engine oil and filter (2.4 GDI) *3
(120,000 miles (192,000 km) or 192 months)
(Continued)
*1Fuel filter & Fuel tank air filter are considered to be maintenance free\
but period-
ic inspection is recommended for this maintenance schedule depends on fuel
quality. If there are some important safety matters like fuel flow restriction, surg-
ing, loss of power, hard starting problem etc, replace the fuel filter immediately
regardless of maintenance schedule and consult an authorized HYUNDAI deal-
er for details.
*
2Inspect for excessive tappet noise and/or engine vibration and adjust if necessary.
*3Engine oil (1.6 TGDI/2.0 TGDI) At first, replace at 3,000 miles (5,000 km) or 6
months, after that, every 5,000 miles (8,000 km) or 6 months.
*
4If TOP TIER Detergent Gasoline is not available, one bottle of additive is recom-
mended. Additives are available from your authorized HYUNDAI dealer along with
information on how to use them. Do not mix other additives.
❈ Inspect : Inspect and if necessary, adjust, correct, clean or replace.
127,500 miles (204,000 km) or 102 months
❑ Inspect air cleaner filter
❑Inspect vacuum hose
❑Inspect intercooler, in/out hose, air intake hose
- Turbo GDI (Every 6,200miles (10,000km))
❑Replace engine oil and filter (2.4 GDI) *3
(127,500 miles (204,000 km) or 204 months)
❑ Add fuel additive *4 (127,500 miles (204,000 km) or 204 months)
(Continued)
❑Replace coolant (First, 120,000 miles (192,000 km) or 120 months
after every 30,000 miles (48,000 km) or 24 months)
❑ Add fuel additive *4 (120,000 miles (192,000 km) or 192 months)
Page 467 of 563

7-22
Maintenance
Valve Clearance (if equipped)
Inspect for excessive valve noise
and/or engine vibration and adjust if
necessary. Have an authorized
HYUNDAI dealer perform the opera-
tion.
Cooling System
Check cooling system components,
such as radiator, coolant reservoir,
hoses and connections for leakage
and damage. Replace any damaged
parts.
Engine Coolant
The coolant should be changed at
the intervals specified in the mainte-
nance schedule.
Automatic Transmission Fluid
Automatic transmission fluid should
not be checked under normal usage
conditions. But in severe conditions,
the fluid should be changed at an
authorized HYUNDAI dealer in accor-
dance to the scheduled maintenance
at the beginning of this chapter.
Automatic transmission fluid
color is basically red.
As the vehicle is driven, the auto-
matic transmission fluid will begin
to look darker. This is a normal
condition and you should not
judge the need to replace the fluid
based upon the changed color.
Ecoshift dual clutch transmis-
sion Fluid
Inspect the Ecoshift dual clutch
transmission fluid according to the
maintenance schedule.
NOTICE
The use of a non-specified fluid
could result in transmission
malfunction and failure. Use
only the specified automatic
transmission fluid (refer to
"Recommended Lubricants and
Capacities" in chapter 8).
CAUTION
Page 480 of 563

7-35
7
Maintenance
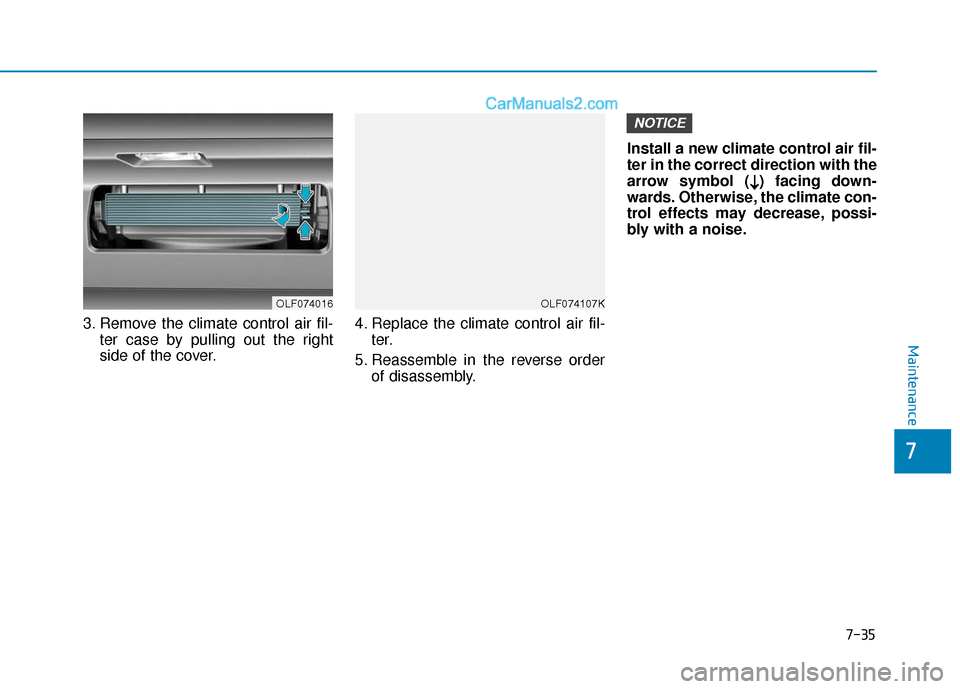
3. Remove the climate control air fil-ter case by pulling out the right
side of the cover. 4. Replace the climate control air fil-
ter.
5. Reassemble in the reverse order of disassembly. Install a new climate control air fil-
ter in the correct direction with the
arrow symbol (
↓ ↓) facing down-
wards. Otherwise, the climate con-
trol effects may decrease, possi-
bly with a noise.
NOTICE
OLF074107KOLF074016