2017 Hyundai Sonata fuel gauge
[x] Cancel search: fuel gaugePage 152 of 563

3-67
Convenient features of your vehicle
3
I
IN
N S
ST
T R
R U
U M
M E
EN
N T
T
C
C L
LU
U S
ST
T E
ER
R
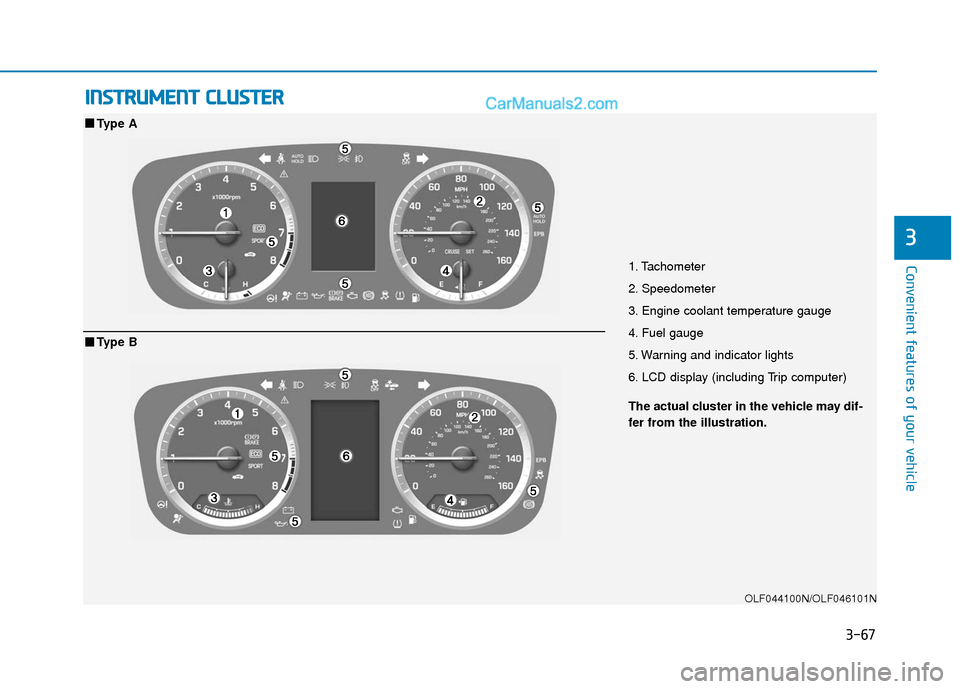
1. Tachometer
2. Speedometer
3. Engine coolant temperature gauge
4. Fuel gauge
5. Warning and indicator lights
6. LCD display (including Trip computer)
OLF044100N/OLF046101N
■ ■
Type A
The actual cluster in the vehicle may dif-
fer from the illustration.
■ ■Type B
Page 153 of 563

3-68
Convenient features of your vehicle
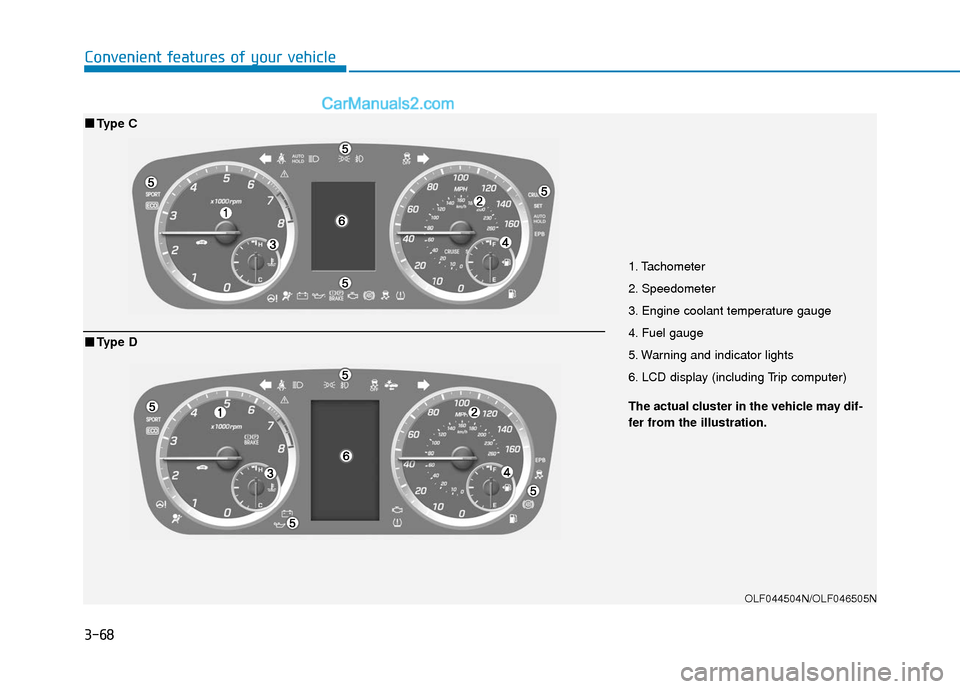
1. Tachometer
2. Speedometer
3. Engine coolant temperature gauge
4. Fuel gauge
5. Warning and indicator lights
6. LCD display (including Trip computer)
OLF044504N/OLF046505N
■ ■Type C
The actual cluster in the vehicle may dif-
fer from the illustration.
■ ■Type D
Page 157 of 563

3-72
Convenient features of your vehicle
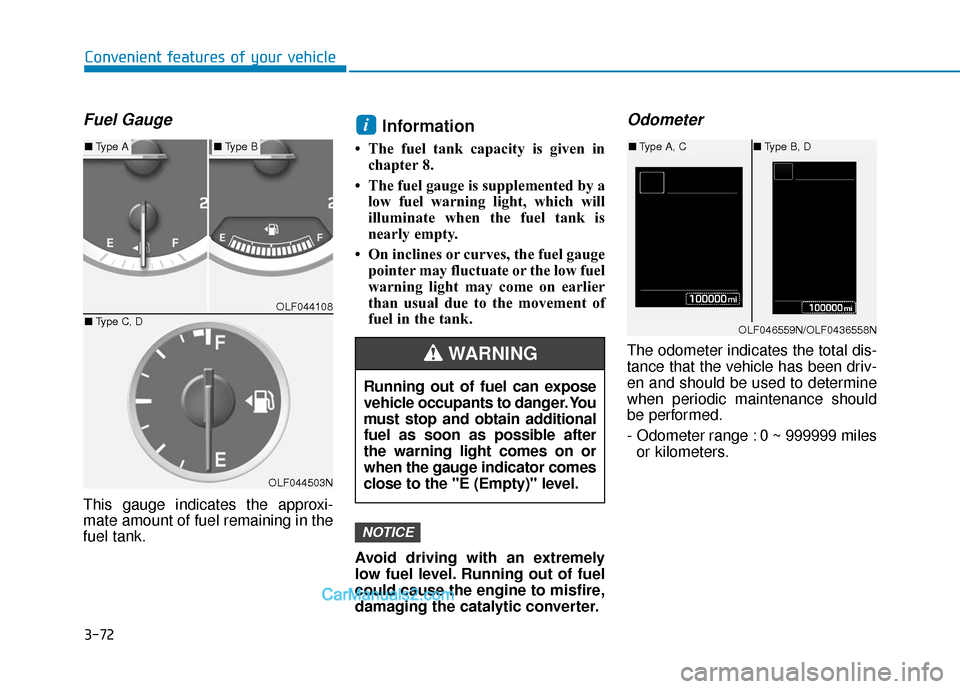
Fuel Gauge
This gauge indicates the approxi-
mate amount of fuel remaining in the
fuel tank.
Information
• The fuel tank capacity is given inchapter 8.
• The fuel gauge is supplemented by a low fuel warning light, which will
illuminate when the fuel tank is
nearly empty.
• On inclines or curves, the fuel gauge pointer may fluctuate or the low fuel
warning light may come on earlier
than usual due to the movement of
fuel in the tank.
Avoid driving with an extremely
low fuel level. Running out of fuel
could cause the engine to misfire,
damaging the catalytic converter.
Odometer
The odometer indicates the total dis-
tance that the vehicle has been driv-
en and should be used to determine
when periodic maintenance should
be performed.
- Odometer range : 0 ~ 999999 miles or kilometers.
NOTICE
i
OLF044108
OLF044503N
■ Type A■Type B
■ Type C, D
Running out of fuel can expose
vehicle occupants to danger. You
must stop and obtain additional
fuel as soon as possible after
the warning light comes on or
when the gauge indicator comes
close to the "E (Empty)" level.
WARNING
OLF046559N/OLF0436558N
■Type A, C ■Type B, D
Page 486 of 563

7-41
7
Maintenance
T
TI
IR
R E
ES
S
A
A N
N D
D
W
W H
HE
EE
EL
LS
S
Tire Care
For proper maintenance, safety, and
maximum fuel economy, you must
always maintain recommended tire
inflation pressures and stay within the
load limits and weight distribution rec-
ommended for your vehicle.
(Continued)Replace tires that are worn,
show uneven wear, or are dam-
aged. Worn tires can cause
loss of braking effectiveness,
steering) control, or traction.
ALWAYS replace tires with the
same size as each tire that
was originally supplied with
this vehicle. Using tires and
wheels other than the recom-
mended sizes could cause
unusual handling characteris-
tics, poor vehicle control, or
negatively affect your vehi-
cle’s Anti-Lock Brake System
(ABS) resulting in a serious
accident.
Tire failure may cause loss of
vehicle control resulting in an
accident. To reduce risk of
SERIOUS INJURY or DEATH,
take the following precautions:
Inspect your tires monthly for
proper inflation as well as
wear and damage.
The recommended cold tire
pressure for your vehicle can
be found in this manual and on
the tire label located on the dri-
ver’s side center pillar. Always
use a tire pressure gauge to
measure tire pressure. Tires
with too much or too little
pressure wear unevenly caus-
ing poor handling.
Check the pressure of the
spare every time you check
the pressure of the other tires
on your vehicle.
(Continued)
WARNING
Page 488 of 563

7-43
7
Maintenance
Check Tire Inflation Pressure
Check your tires, including the spare
tire, once a month or more.
How to check
Use a good quality tire pressure
gauge to check tire pressure. You
can not tell if your tires are properly
inflated simply by looking at them.
Radial tires may look properly inflat-
ed when they are under-inflated.
Remove the valve cap from the tire
valve stem. Press the tire gauge firm-
ly onto the valve to get a pressure
measurement. If the cold tire inflation
pressure matches the recommended
pressure on the tire and loading
information label, no further adjust-
ment is necessary. If the pressure is
low, add air until you reach the rec-
ommended pressure. Make sure to
put the valve caps back on the valve
stems. Without the valve cap, dirt or
moisture could get into the valve
core and cause air leakage. If a valve
cap is missing, install a new one as
soon as possible.If you overfill the tire, release air by
pushing on the metal stem in the
center of the tire valve. Recheck the
tire pressure with the tire gauge. Be
sure to put the valve caps back on
the valve stems. Without the valve
cap, dirt or moisture could get into
the valve core and cause air leakage.
If a valve cap is missing, install a new
one as soon as possible.
Under-inflation results in
excessive wear, poor handling
and reduced fuel economy.
Wheel deformation is also
possible. Keep your tire pres-
sures at the proper levels. If a
tire frequently needs refilling,
have it checked by an author-
ized HYUNDAI dealer.
Over-inflation produces a
harsh ride, excessive wear at
the center of the tire tread,
and a greater possibility of
damage from road hazards.
CAUTION
Page 556 of 563

I-5
Ecoshift dual clutch transmission ...................................5-18Shift indicator .............................................................3-73
Manual shift mode......................................................5-23
Electric chromic mirror (ECM) with compass and HomeLink
®system.......................................................3-33
Electric chromic mirror (ECM) with HomeLink®
system, compass and Blue Link®.................................3-26
Electronic parking brake (EPB) ......................................5-31
Electric power steering (EPS).........................................3-22
Electronic stability control (ESC)...................................5-43
Emission control system .................................................7-90
Engine ........................................................................\
.......8-2
Engine compartment..................................................1-6, 7-3
Engine compartment panel fuse .....................................7-59
Engine coolant ................................................................7-27
Engine coolant temperature gauge .................................3-71
Engine number ................................................................8-10
Engine oil ........................................................................\
7-24
Engine start/stop button ....................................................5-9
Explanation of scheduled maintenance items.................7-21
Exterior care....................................................................7-82\
Exterior overview (front) ..................................................1-2
Exterior overview (rear) ...................................................1-3 Flat tire (with spare tire) .................................................6-15
Changing tires ............................................................6-16
Compact spare tire......................................................6-20
Jack and tools .............................................................6-15
Flat tire (with Tire Mobility Kit) ....................................6-23
Floor mat anchor (s) .....................................................3-162
Fluid Brake fluid ..................................................................7-30
Washer fluid ...............................................................7-31
Folding rear seats ............................................................2-12
Folding the side view mirrors .........................................3-42
Front seats ........................................................................\
.2-6
Fuel filler lid ...................................................................3-63 Emergency fuel filler door release .............................3-66
Fuel gauge .......................................................................3\
-72
Fuel requirements .............................................................F-7
Fuse switch .....................................................................7-5\
9
Fuses ........................................................................\
.......7-57 Engine compartment panel fuse .................................7-59
Fuse switch .................................................................7-59
Fuse/relay panel description .......................................7-61
Instrument panel fuse .................................................7-58
Main fuse ....................................................................7-60\
Multi fuse ...................................................................7-60
I
Index
FE