Page 514 of 562

7-57
7
Maintenance
F
FU
U S
SE
E S
S
A vehicle’s electrical system is pro-
tected from electrical overload dam-
age by fuses.
This vehicle has 2 (or 3) fuse panels,
one located in the driver's side panel
bolster, the other in the engine com-
partment near the battery.
If any of your vehicle's lights, acces-
sories, or controls do not work, check
the appropriate circuit fuse. If a fuse
has blown, the element inside the
fuse will be melted or broken.
If the electrical system does not
work, first check the driver's side
fuse panel. Before replacing a blown
fuse, turn the engine and all switches
off, and then disconnect the negative
battery cable. Always replace a
blown fuse with one of the same rat-
ing.
If the replacement fuse blows, this
indicates an electrical problem. Avoid
using the system involved and imme-
diately consult an authorized
HYUNDAI dealer.Information
Three kinds of fuses are used: blade
type for lower amperage rating, car-
tridge type, and fusible link for higher
amperage ratings.
i
Normal
■
Blade type
■ Cartridge type Blown
Normal Blown
Normal Blown
OLF074075
Do not use a screwdriver or any
other metal object to remove
fuses because it may cause a
short circuit and damage the
system.
CAUTION
NEVER replace a fuse with any-
thing but another fuse of the
same rating.
A higher capacity fuse could
cause damage and possibly
cause a fire.
Do not install a wire or alu-
minum foil instead of the
proper fuse - even as a tem-
porary repair. It may cause
extensive wiring damage and
possibly a fire.
WARNING
Normal Blown
■ Multi fuse
Page 517 of 562
7-60
Maintenance
Main fuse
If the main fuse is blown, it must be
removed as follows:
1. Turn off the engine.
2. Disconnect the negative batterycable.
3. Remove the fuse panel cover by pressing the tab and pulling it up.
4. Remove the nuts shown in the pic- ture above.
5. Replace the fuse with a new one of the same rating.
6. Reinstall in the reverse order of removal.
Information
If the main fuse is blown, consult an
authorized HYUNDAI dealer.
Multi fuse
If the multi fuse is blown, it must be
removed as follows:
1. Turn off the engine.
2. Disconnect the negative battery
cable.
3. Remove the fuse panel cover by pressing the tab and pulling it up.
4. Remove the nuts shown in the pic- ture above.
5. Replace the fuse with a new one of the same rating.
6. Reinstall in the reverse order of removal.
Information
If the multi fuse is blown, consult an
authorized HYUNDAI dealer.
i
i
OLF074025OLF074026
Page 525 of 562
7-68
Maintenance
Engine compartment main fuse panel
Fuse Name Fuse rating Protected Component
FUSE
B/UP LAMP10ATransaxle Range Switch, PCM (G4KJ/G4KH-A/T), TCM (G4FJ-DCT), Audio,
Electro Chromic Mirror, Rear Combination Lamp (IN) LH/RH
1 SENSOR15AOxygen Sensor (Up/Down)
2 SENSOR15A
Purge Control Solenoid Valve, Canister Close Valve, RCV Control Solenoid Valve,
Fuel Pump Relay, E/R Junction Block (RLY. 12 - Cooling Fan 2 Relay),
[G4KJ/G4KH] Variable Intake Solenoid Valve, Oil Control Valve (Exhaust),
[G4FJ] Oil Control Valve #1/#2 (Intake/Exhaust)
1 ECU10APCM/ECM
1 TCU10APCM (G4KJ/G4KH-A/T), TCM (G4FJ-DCT)
1 ECU10APCM/ECM
IGN COIL20AIgnition Coil #1/#2/#3/#4, Condenser (G4FJ)
INJECTOR15A-
AMS10ABattery Sensor
Page 528 of 562

7-71
7
Maintenance
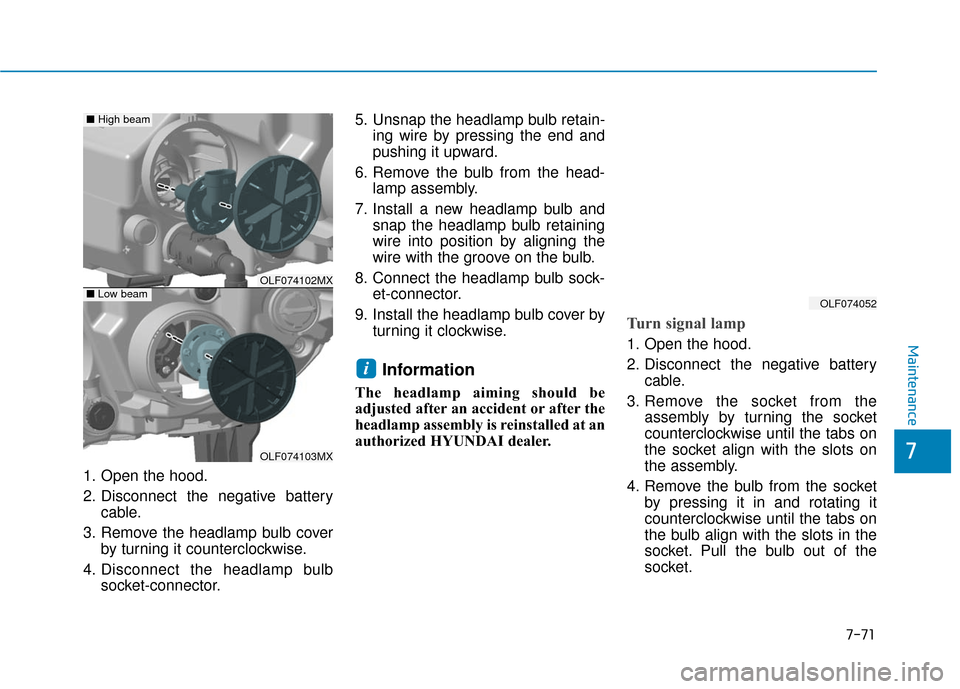
1. Open the hood.
2. Disconnect the negative batterycable.
3. Remove the headlamp bulb cover by turning it counterclockwise.
4. Disconnect the headlamp bulb socket-connector. 5. Unsnap the headlamp bulb retain-
ing wire by pressing the end and
pushing it upward.
6. Remove the bulb from the head- lamp assembly.
7. Install a new headlamp bulb and snap the headlamp bulb retaining
wire into position by aligning the
wire with the groove on the bulb.
8. Connect the headlamp bulb sock- et-connector.
9. Install the headlamp bulb cover by turning it clockwise.
Information
The headlamp aiming should be
adjusted after an accident or after the
headlamp assembly is reinstalled at an
authorized HYUNDAI dealer.
Turn signal lamp
1. Open the hood.
2. Disconnect the negative batterycable.
3. Remove the socket from the assembly by turning the socket
counterclockwise until the tabs on
the socket align with the slots on
the assembly.
4. Remove the bulb from the socket by pressing it in and rotating it
counterclockwise until the tabs on
the bulb align with the slots in the
socket. Pull the bulb out of the
socket.
i
OLF074102MX
OLF074103MX
■Low beam
■High beam
OLF074052
Page 529 of 562
7-72
Maintenance
5. Insert a new bulb by inserting it into the socket and rotating it until
it locks into place.
6. Install the socket in the assembly by aligning the tabs on the socket
with the slots in the assembly.
7. Push the socket into the assembly and turn the socket clockwise.
Side marker
1. Open the hood.
2. Disconnect the negative batterycable.
3. Remove the socket from the assembly by turning the socket
counterclockwise until the tabs on
the socket align with the slots on
the assembly.
4. Remove the bulb from the socket by pulling out the bulb.
5. Insert a new bulb.
Daytime running lamp/
Position lamp
If the LED lamp does not operate,
have the vehicle checked by an
authorized HYUNDAI dealer.
OLF074084N
Page 531 of 562

7-74
Maintenance
Information
HID lamps have superior perform-
ance vs. halogen bulbs.
HID lamps are estimated by the man-
ufacturer to last twice as long or
longer than halogen bulbs depending
on their frequency of use. They will
probably require replacement at some
point in the life of the vehicle. Cycling
the headlamps on and off more than
typical use will shorten HID lamps
life. HID lamps do not fail in the same
manner as halogen incandescent
lamps. If a headlamp goes out after a
period of operation but will immedi-
ately relight when the headlamp
switch is cycled it is likely the HID
lamp needs to be replaced. HID light-
ing components are more complex
than conventional halogen bulbs thus
have higher replacement cost.
The headlamp aiming should be
adjusted after an accident or after
the headlamp assembly is rein-
stalled at an authorized HYUNDAI
dealer.
Turn signal lamp
1. Open the hood.
2. Disconnect the negative batterycable.
3. Remove the socket from the assembly by turning the socket
counterclockwise until the tabs on
the socket align with the slots on
the assembly.
4. Remove the bulb from the socket by pressing it in and rotating it
counterclockwise until the tabs on
the bulb align with the slots in the
socket. Pull the bulb out of the
socket. 5. Insert a new bulb by inserting it
into the socket and rotating it until
it locks into place.
6. Install the socket in the assembly by aligning the tabs on the socket
with the slots in the assembly.
7. Push the socket into the assembly and turn the socket clockwise.
NOTICE
i
OLF074052
Page 532 of 562
7-75
7
Maintenance
Side marker
1. Open the hood.
2. Disconnect the negative batterycable.
3. Remove the socket from the assembly by turning the socket
counterclockwise until the tabs on
the socket align with the slots on
the assembly.
4. Remove the bulb from the socket by pulling out the bulb.
5. Insert a new bulb.
Daytime running lamp/
Position lamp
If the LED lamp does not operate,
have the vehicle checked by an
authorized HYUNDAI dealer.
Side Repeater Lamp
Replacement
If the LED lamp does not operate,
have the vehicle checked by an
authorized HYUNDAI dealer.
OLF074084N
OLF074053N
Page 547 of 562

7-90
Maintenance
Canister
Fuel vapors generated inside the fuel
tank are absorbed and stored in the
onboard canister. When the engine is
running, the fuel vapors absorbed in
the canister are drawn into the surge
tank through the purge control sole-
noid valve.
Purge Control Solenoid Valve(PCSV)
The purge control solenoid valve is
controlled by the Engine Control
Module (ECM); when the engine
coolant temperature is low during
idling, the PCSV closes so that evap-
orated fuel is not taken into the
engine. After the engine warms-up
during ordinary driving, the PCSV
opens to introduce evaporated fuel to
the engine.
3. Exhaust Emission Control System
The Exhaust Emission Control
System is a highly effective system
which controls exhaust emissions
while maintaining good vehicle per-
formance.
When the engine starts or fails to
start, excessive attempts to restart
the engine may cause damage to the
emission system.
Vehicle modifications
This vehicle should not be modi-
fied. Modification of your vehicle
could affect its performance, safety
or durability and may even violate
governmental safety and emis-
sions regulations.
In addition, damage or performance
problems resulting from any modifi-
cation may not be covered under
warranty.
If you use unauthorized electronic devices, it may cause the vehicle to
operate abnormally, wire damage,
battery discharge and fire. For your
safety, do not use unauthorized
electronic devices.
Engine exhaust (carbon monox-ide) precautions
Carbon monoxide can be present
with other exhaust fumes. If you
smell exhaust fumes of any kind in
your vehicle, drive with all the win-
dows fully open. Have your vehicle
checked and repaired immediately.
Engine exhaust gases contain
carbon monoxide (CO). Though
colorless and odorless, it is
dangerous and could be lethal if
inhaled. Follow the instructions
on this page to avoid CO poi-
soning.
WARNING