Page 137 of 562

3-40
Convenient features of your vehicle
Erasing HomeLink®buttons
Individual buttons cannot be erased.
However, to erase all three pro-
grammed buttons:
1. Press and hold the two outerHomeLink
®buttons until the indi-
cator light begins to flash-after 20
seconds.
2. Release both buttons. Do not hold for longer than 30 seconds.
The Integrated HomeLink
®Wireless
Control System is now in the training
(learn) mode and can be pro-
grammed at any time following the
appropriate steps in the Programming
chapters above.
NVS
®is a registered trademark and
Z-Nav™ is a trademark of the Gentex
Corporation, Zeeland, Michigan.
HomeLink
®is a registered trademark
owned by Johnson Controls,
Incorporated, Milwaukee, Wisconsin.
FCC ID: NZLZTVHL3
IC: 4112A-ZTVHL3
Information
This device complies with Part 15 of
the FCC Rules.
Operation is subject to the following
three conditions:
1. This device may not cause harmful interference, and
2. This device must accept any interfer- ence received, including interference
that may cause undesired operation.
3. The transceiver has been tested and complies with FCC and Industry
Canada rules. Changes or modifica-
tions not expressly approved by the
party responsible for compliance
could void the user’s authority to
operate the device.
Side View Mirrors
Be sure to adjust mirror angles
before driving.
Your vehicle is equipped with both
left-hand and right-hand side view
mirrors. The mirrors can be adjusted
remotely with the remote switch. The
mirror heads can be folded to pre-
vent damage during an automatic
car wash or when passing through a
narrow street.
The right side view mirror is convex.
Objects seen in the mirror are closer
than they appear.
i
OLF044024
Page 177 of 562
3-80
Convenient features of your vehicle
User Settings Mode
On this mode, you can change setting of the instrument cluster, doors, lamps, and so on.
Driving Assist
ItemsExplanation
SCC
(Smart Cruise Control)
Adjust the sensitivity of Smart Cruise Control (SCC) in 3 stages.
- Slow / Normal / Fast
For more information, refer to "Smart Cruise Control (SCC)" in chapter 5.
AEB
(Autonomous Emergency Braking, if equipped)To activate or deactivate the AEB system.
For more information, refer to "Autonomous Emergency Braking (AEB)" in chapter 5.
FCW
(Forward Collision Warning, if equipped)To adjust the initial warning alert time for the Forward Collision Warning / Autonomous
Emergency Braking system. The option settings are Slow, Normal, or Fast.
For more information, refer to "Autonomous Emergency Braking (AEB)" in chapter 5.
RCTA
(Rear Cross Traffic Alert)To activate or deactivate the RCTA system.
For more information, refer to "Rear Cross Traffic Alert (RCTA)" in chapter 5.
Page 179 of 562
Lights
3-82
Convenient features of your vehicle
ItemsExplanation
One Touch Turn Signal
The one touch turn signal function will be deactivated.
The lane change signals will blink 3, 5, or 7 times when the turn signal lever ismoved slightly.
For more information, refer to "Light" in this chapter.
Head Lamp Delay
The head lamp delay function will be activated.
The headlamp delay function will be deactivated.
For more information, refer to "Light" in this chapter.
Welcome Light
The welcome light function will be activated.
The welcome light function will be deactivated.
For more information, refer to "Welcome System" in this chapter.
Sound
ItemsExplanation
Park Assist System Vol. (Level 1~3)
BSD (Blind Spot Detection) Sound The BSD sound function will be deactivated.
The BSD sound function will be activated.
Page 183 of 562
3-86
Convenient features of your vehicle
Press brake pedal to start engine
This warning message illuminatesif the Engine Start/Stop button
changes to the ACC position twice
by pressing the button repeatedly
without depressing the brake pedal.
It means that you should depress the brake pedal to start the engine.
Press START button with key
This warning message illuminatesif you press the Engine Start/Stop
button while the warning message
"Key not detected" is illuminating.
At this time, the immobilizer indica- tor light blinks.
Low Key Battery
This warning message illuminates if
the battery of the smart key is dis-
charged when the Engine Start/Stop
button changes to the OFF position.
OLF044124LOLF044120LOLF044122L
Page 211 of 562

3-114
Convenient features of your vehicle
Turn signals and lane changesignals
To signal a turn, push down on the
lever for a left turn or up for a right
turn in position (A). To signal a lane
change, move the turn signal lever
slightly and hold it in position (B). The
lever will return to the OFF position
when released or when the turn is
completed.
If an indicator stays on and does not
flash or if it flashes abnormally, one
of the turn signal bulbs may be
burned out and will require replace-
ment.
Onetouch turn signal function
To activate an One Touch Turn Signal
function, move the turn signal lever
slightly and then release it. The lane
change signals will blink 3, 5 or 7
times.
You can activate or deactivate the
One Touch Turn Signal function or
choose the number of blinking (3, 5,
or 7) from the User Settings Mode
(Light) on the LCD display.
For more information, refer to the
"LCD Display" section in this
chapter.
OLF044091N
Do not place any accessories,
stickers or tint the windshield.
Have the windshield glass
replaced from an authorized
dealer.
Do not remove or impact relat-
ed parts of the Smart High
Beam system.
Be careful that water doesn’t
get into the Smart High Beam
unit.
Do not place objects on the
dashboard that reflects light
such as mirrors, white paper,
etc. The system may malfunc-
tion if sunlight is reflected.
At times, the Smart High
Beam system may not work
properly, always check the
road conditions for your safe-
ty. When the system does not
operate normally, manually
change between the high
beam and low beam.
WARNING
Page 213 of 562

3-116
Convenient features of your vehicle
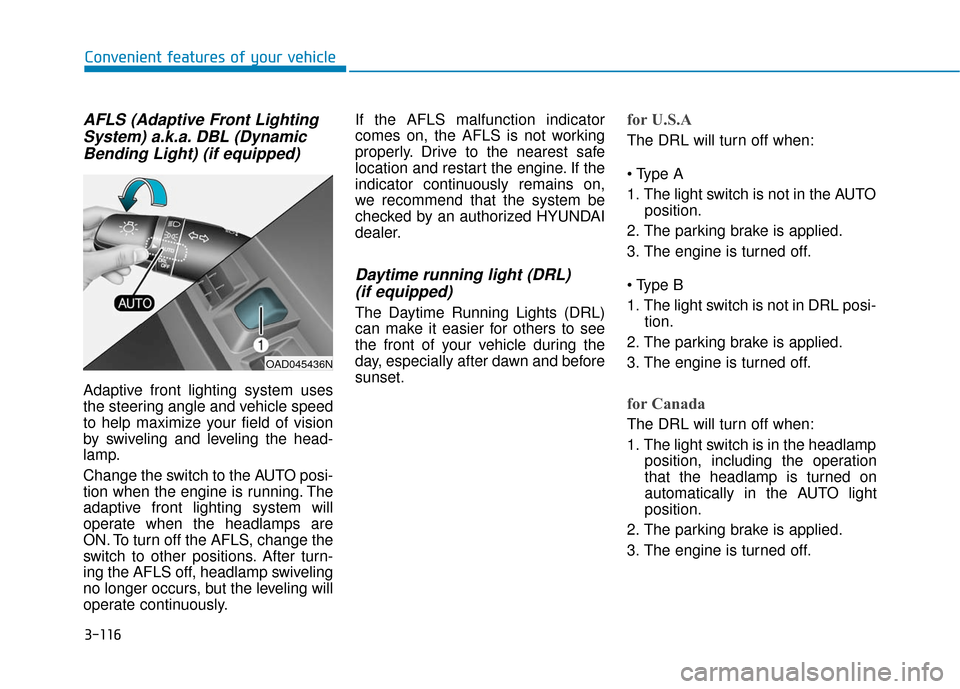
AFLS (Adaptive Front LightingSystem) a.k.a. DBL (DynamicBending Light) (if equipped)
Adaptive front lighting system uses
the steering angle and vehicle speed
to help maximize your field of vision
by swiveling and leveling the head-
lamp.
Change the switch to the AUTO posi-
tion when the engine is running. The
adaptive front lighting system will
operate when the headlamps are
ON. To turn off the AFLS, change the
switch to other positions. After turn-
ing the AFLS off, headlamp swiveling
no longer occurs, but the leveling will
operate continuously. If the AFLS malfunction indicator
comes on, the AFLS is not working
properly. Drive to the nearest safe
location and restart the engine. If the
indicator continuously remains on,
we recommend that the system be
checked by an authorized HYUNDAI
dealer.
Daytime running light (DRL)
(if equipped)
The Daytime Running Lights (DRL)
can make it easier for others to see
the front of your vehicle during the
day, especially after dawn and before
sunset.
for U.S.A
The DRL will turn off when:
1. The light switch is not in the AUTO
position.
2. The parking brake is applied.
3. The engine is turned off.
1. The light switch is not in DRL posi- tion.
2. The parking brake is applied.
3. The engine is turned off.
for Canada
The DRL will turn off when:
1. The light switch is in the headlamp position, including the operation
that the headlamp is turned on
automatically in the AUTO light
position.
2. The parking brake is applied.
3. The engine is turned off.
OAD045436N
Page 245 of 562

3-148
Convenient features of your vehicle
Air conditioning
All HYUNDAI Air Conditioning
Systems are filled with environmen-
tally friendly R-134a refrigerant.
1. Start the engine.
2. Push the air conditioning button.
3. Set the mode to the Face Levelmode.
4. Set the air intake control to the recirculated air position. However,
prolonged operation of the recircu-
lated air position will excessively
dry the air. In this case, change the
air position.
5. Adjust the fan speed control and temperature control to maintain
maximum comfort.
When maximum cooling is desired,
set the temperature control to the
extreme left position then set the fan
speed control to the highest speed. When using the air conditioning
system, monitor the engine tem-
perature gauge closely while driv-
ing up hills or in heavy traffic
when outside temperatures are
high. Air conditioning system
operation can cause engine over-
heating. Continue to use the blow-
er fan, but turn the air condition-
ing system off if the engine tem-
perature gauge indicates engine
overheating.
Air conditioning system operation
tips
If the vehicle has been parked in
direct sunlight during hot weather,
open the windows for a short time
to let the hot air inside the vehicle
escape.
After sufficient cooling has been achieved, switch back from the
recirculated air to the fresh outside
air position.
To help reduce moisture inside of the windows on rainy or humid
days, decrease the humidity inside
the vehicle by operating the air
conditioning system with the win-
dows and sunroof closed.
Use the air conditioning system every month only for a few minutes
to ensure maximum system per-
formance.
NOTICE
Page 251 of 562

3-154
Convenient features of your vehicle
C
CL
LI
IM
M A
AT
TE
E
C
C O
O N
NT
TR
R O
O L
L
A
A D
DD
DI
IT
T I
IO
O N
NA
AL
L
F
F E
E A
A T
TU
U R
RE
ES
S
(
( I
IF
F
E
E Q
Q U
UI
IP
P P
PE
ED
D )
)
Automatic Ventilation
(if equipped)
When the ignition switch is in the ON
position or when the engine is run-
ning and temperature is below 59°F
(15°C) with the recirculated air posi-
tion selected more than five minutes,
the air intake position will automati-
cally change to the outside (fresh) air
position.
To cancel or reset the Automatic
Ventilation
When the air conditioning system is
on, select Face Level mode and
while pressing the A/C button, press
the recirculated air position button
five times within three seconds.
Sunroof Inside Air
Recirculation (if equipped)
When the heater or air conditioning
system is on with the sunroof
opened, the outside (fresh) air posi-
tion will be automatically selected. At
this time, if you press the recirculated
air position button, the recirculated
air position will be selected but will
change back to the outside (fresh) air
position after 3 minutes.
When the sunroof is closed, the air
intake position will return to the orig-
inal position that was selected.