Page 286 of 614
4189
Features of your vehicle
(7) DISP
Turns the monitor display on/off.
(8) CLOCK
Displays the time/date/day. (9)
SCAN
Radio mode : Previews all receiv- able broadcasts for 5 seconds
each.
Media (CD/USB/My Music) m odes
: Previews each song (file) for 10 seconds each.
(10) SETUP
Changes to Setup mode.
(11) TUNE knob
Radio mode : Turn to change broadcast frequencies.
Media (CD/USB/iPod®/My Music)
modes : Turn to search tracks/chan-
nels/files.
(12) CAT/FOLDER
SiriusXM Radio : Category Search.
MP3 CD/USB mode : Search Folder. (13)
DISC-IN LED
LED that indicates whether a disc is inserted.
Page 332 of 614
![Hyundai Santa Fe Sport 2017 Owners Manual 4235
Features of your vehicle
Setup Mode
Press the [SETUP]button to display
the Setup screen.
You can select and control options
related to [Display], [Sound],
[Clock/Calendar], [Phone] and
[System].](/manual-img/35/16751/w960_16751-331.png "Hyundai Santa Fe Sport 2017 Owners Manual 4235
Features of your vehicle
Setup Mode
Press the [SETUP]button to display
the Setup screen.
You can select and control options
related to [Display], [Sound],
[Clock/Calendar], [Phone] and
[System].")
4235
Features of your vehicle
Setup Mode
Press the [SETUP]button to display
the Setup screen.
You can select and control options
related to [Display], [Sound],
[Clock/Calendar], [Phone] and
[System].
With the Display Button
Press the [SETUP] button
�Select
[Display].
You can select and control options
related to [Brightness], [Mode Pop
up] and [Media Display].
Adjusting the Brightness
Use the [Left/Right] buttons to adjust
the screen brightness or set the
Brightness on Automatic, Day or
Night mode.
Press the [Default] button to reset.
Automatic : Adjusts the brightness automatically.
Day : Always maintains the bright- ness on high.
Night : Always maintains the bright- ness on low. Mode Pop-up
This feature is used to display the
Mode Pop-up screen when entering
radio and media modes.
When this feature is turned on,
pressing the [RADIO]
or [MEDIA]
button will display the Mode Pop-up
screen.
✽ ✽ NOTICE
The media Mode Pop-up screen can
be displayed only when two or more
media modes have been connected.
Page 335 of 614
Features of your vehicle
238
4
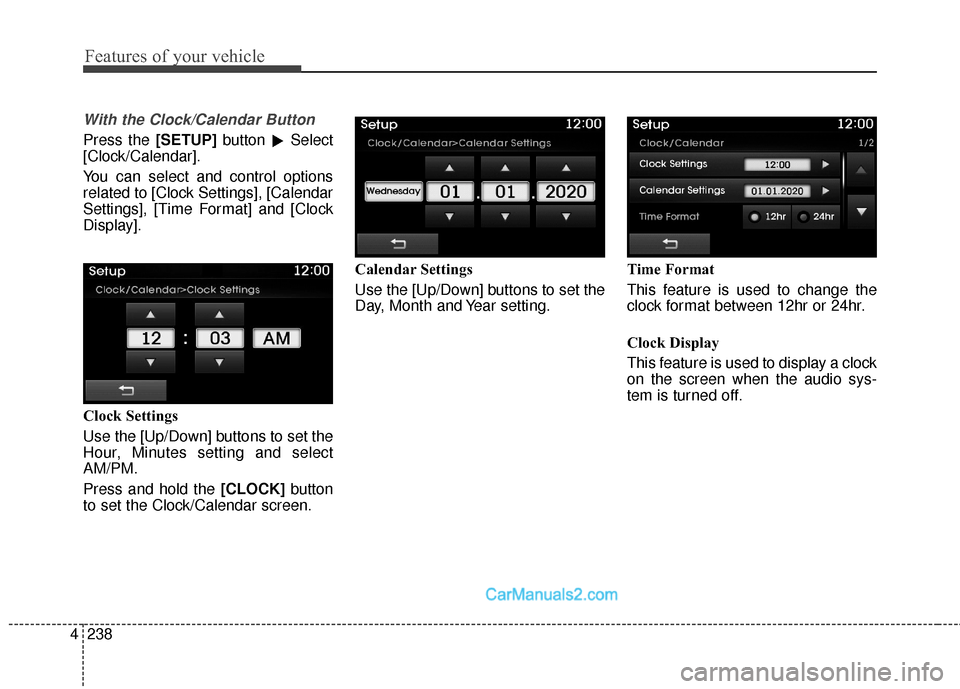
With the Clock/Calendar Button
Press the [SETUP] button
�Select
[Clock/Calendar].
You can select and control options
related to [Clock Settings], [Calendar
Settings], [Time Format] and [Clock
Display].
Clock Settings
Use the [Up/Down] buttons to set the
Hour, Minutes setting and select
AM/PM.
Press and hold the [CLOCK] button
to set the Clock/Calendar screen. Calendar Settings
Use the [Up/Down] buttons to set the
Day, Month and Year setting.
Time Format
This feature is used to change the
clock format between 12hr or 24hr.
Clock Display
This feature is used to display a clock
on the screen when the audio sys-
tem is turned off.
Page 495 of 614
What to do in an emergency
26
6
When towing your vehicle in an
emergency without wheel dollies :
1. Set the ignition switch in the ACC
position.
2. Place the shift lever in N (Neutral).
3. Release the parking brake.Removable towing hook
(if equipped)
1. Open the talegate, and remove the towing hook from the tool
case.
2. Remove the hole cover pressing the lower part of the cover on the
bumper.
3. Install the towing hook by turning it clockwise into the hole until it is
fully secured.
4. Remove the towing hook and install the cover after use.
Emergency towing
If towing is necessary, we recom-
mend you to have it done by an
authorized HYUNDAI dealer or a
commercial tow truck service.
CAUTION
Failure to place the transaxleshift lever in N (Neutral) maycause internal damage to thetransaxle.
ODM066015L
■Rear
ODM066013L
■Rear
Page 540 of 614

Sunroof (See section 4)
Trip co")
743
Maintenance
Reset items
Items should be reset after the bat-
tery has been discharged or the bat-
tery has been disconnected.
Auto up/down window (See section 4)
Sunroof (See section 4)
Trip computer (See section 4)
Climate control system (See section 4)
Clock (See section 4)
Audio (See section 4)(Continued)
Disconnect the battery charg- er in the following order.
1. Turn off the battery charger main switch.
2. Unhook the negative clamp from the negative battery
terminal.
3. Unhook the positive clamp from the positive battery
terminal.
Before performing mainte- nance or recharging the bat-
tery, turn off all accessories
and stop the engine.
The negative battery cable must be removed first and
installed last when the battery
is disconnected.WARNING- Rechargingbattery
When recharging the battery,
observe the following precau-
tions:
The battery must be removed
from the vehicle and placed in
an area with good ventilation.
Do not allow cigarettes, sparks, or flame near the battery.
Watch the battery during charging, and stop or reduce
the charging rate if the battery
cells begin gassing (boiling)
violently or if the temperature
of the electrolyte of any cell
exceeds 120°F (49°C).
Wear eye protection when checking the battery during
charging.
(Continued)
Page 559 of 614
Maintenance
62
7
If the headlights or other electrical
components do not work and the
fuses are OK, check the fuse block in
the engine compartment. If a fuse is
blown, it must be replaced.Fuse switch
Always, put the mode switch at the
ON position.
If you move the switch to the OFF
position, some items such as audio
and digital clock must be reset and
transmitter (or smart key) may not
work properly.
Engine compartment panel fuse
replacement
1. Turn the ignition switch and all other switches off.
2. Remove the fuse box cover by pressing the tab and pulling up.
ODM072019
CAUTION
Always place the fuse switch inthe ON position while drivingthe vehicle.
OAN077007N
Page 571 of 614

Maintenance
74
7
1. Open the hood.
2. Remove the headlamp bulb cover
by turning it counterclockwise.
3. Disconnect the headlamp bulb socket-connector.
4. Remove the socket from the assembly by turning the socket
counterclockwise until the tabs on
the socket align with the slots on
the assembly.
5. Remove the bulb by pulling it out.
6. Inset a new bulb by inserting it into the socket. 7. Install the socket in the assembly
by aligning the tabs on the socket
with the slots in the assembly.
Push the socket into the assembly
and turn the socket clockwise.
8. Install the headlamp bulb cover by turning it clockwise.
✽ ✽NOTICE
Always have the headlight aiming
adjusted after an accident or the
headlight assembly is reinstalled at
an authorized HYUNDAI dealer.
Turn signal lamp bulbs /
Side marker lamp bulbs
1. Remove the socket from the assembly by turning the socket
counterclockwise until the tabs on
the socket align with the slots on
the assembly.
2. Remove the bulb from the socket by pressing it in and rotating it
counterclockwise until the tabs on
the bulb align with the slots in the
socket. Pull the bulb out of the
socket
3. Insert a new bulb by inserting it into the socket and rotating it until
it locks into place.
4. Install the socket in the assembly by aligning the tabs on the socket
with the slots in the assembly.
Push the socket into the assembly
and turn the socket clockwise.
OAN077009N
T
T
T
T
u
u
u
u
r
r
r
r
n
n
n
n
s
s
s
s
i
i
i
i
g
g
g
g
n
n
n
n
a
a
a
a
l
l
l
l
H
H
H
H
i
i
i
i
g
g
g
g
h
h
h
h L
L
L
L
o
o
o
o
w
w
w
w
S
S
S
S
i
i
i
i
d
d
d
d
e
e
e
e
m
m
m
m
a
a
a
a
r
r
r
r
k
k
k
k
e
e
e
e
r
r
r
r
 DISP
Turns the monitor display on/off.
(8) CLOCK
Displays the time/date/day. (9)
SCAN
Radio mode : Previews all receiv- able broadcasts for 5 seconds
each.
Medi")
.
3. Release the")
