Page 165 of 569
Features of your vehicle
62
4
Compass function
The Compass can be turned ON and
OFF and will remember the last state
when the ignition is cycled. To turn
the display feature ON/OFF:
1. Press and release the button
within 1 second to turn the display
feature OFF.
2. Press and release the button again within 1 second to turn the
display back ON.
Additional options can be set with
press and hold sequences of the
button and are detailed below.
There is a difference between mag-
netic north and true north. The com-
pass in the mirror can compensate
for this difference when it knows the
Magnetic Zone in which it is operat-
ing. This is set either by the dealer or
by the user. The operating Zone
Numbers for North America are
shown in the figure on the following
section.
B520C05NF
Page 168 of 569
465
Features of your vehicle
Programming
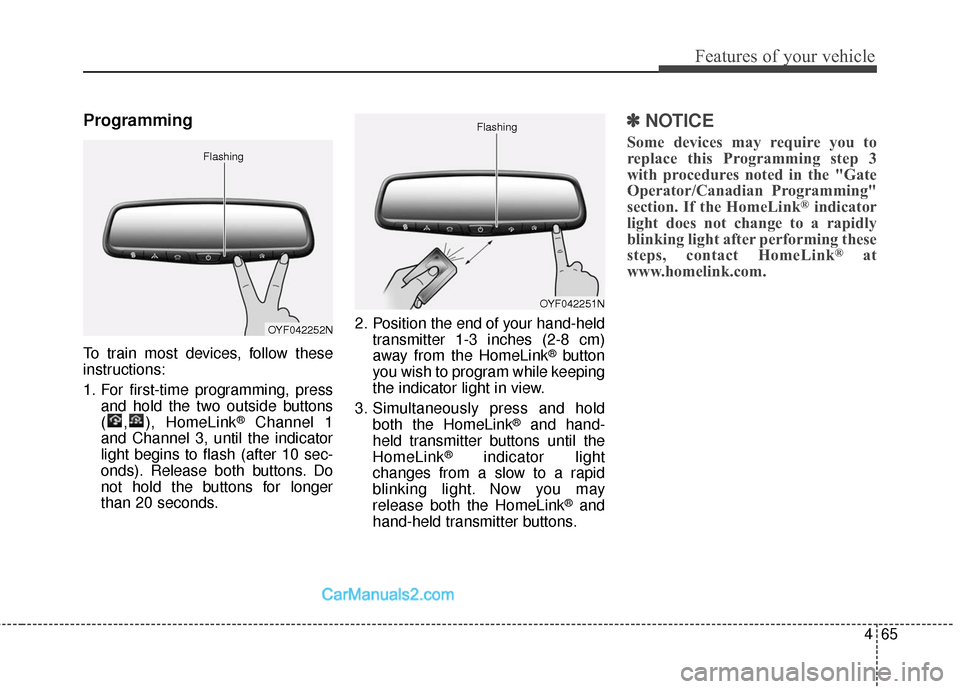
To train most devices, follow these
instructions:
1. For first-time programming, pressand hold the two outside buttons
( , ), HomeLink
®Channel 1
and Channel 3, until the indicator
light begins to flash (after 10 sec-
onds). Release both buttons. Do
not hold the buttons for longer
than 20 seconds. 2. Position the end of your hand-held
transmitter 1-3 inches (2-8 cm)
away from the HomeLink
®button
you wish to program while keeping
the indicator light in view.
3. Simultaneously press and hold both the HomeLink
®and hand-
held transmitter buttons until the
HomeLink
®indicator light
changes from a slow to a rapid
blinking light. Now you may
release both the HomeLink
®and
hand-held transmitter buttons.
✽ ✽ NOTICE
Some devices may require you to
replace this Programming step 3
with procedures noted in the "Gate
Operator/Canadian Programming"
section. If the HomeLink
®indicator
light does not change to a rapidly
blinking light after performing these
steps, contact HomeLink
®at
www.homelink.com.
OYF042252N
Flashing
OYF042251N
Flashing
Page 170 of 569
467
Features of your vehicle
Reprogramming a single
HomeLink®button
To program a device to HomeLink
®
using a HomeLink®button previously
trained, follow these steps:
1. Press and hold the desired HomeLink
®button. DO NOT
release the button.
2. The indicator light will begin to flash after 20 seconds. Without
releasing the HomeLink
®button,
proceed with "Programming" step
2.
For questions or comments, contact
HomeLink
®at www.homelink.comor
1-800-355-3515. Erasing HomeLink
®buttons
Individual buttons cannot be erased.
However, to erase all three pro-
grammed buttons:
1. Press and hold the two outer HomeLink
®buttons until the indi-
cator light begins to flash after 10
seconds.
2. Release both buttons. Do not hold for longer than 20 seconds.
The Integrated HomeLink
®Wireless
Control System is now in the training
(learn) mode and can be pro-
grammed at any time following the
appropriate steps in the
Programming sections above. FCC ID: NZLTLMHL4
IC: 4112A-TLMHL4
This device complies with Part 15
of the FCC Rules.
Operation is subject to the following
two conditions:
1. This device may not cause harm-
ful interference, and
2. This device must accept any inter- ference received, including inter-
ference that may cause undesired
operation.
CAUTION
The transceiver has been testedand complies with FCC andIndustry Canada rules. Changesor modifications not expresslyapproved by the party responsi-ble for compliance could voidthe user's authority to operatethe device.
Page 171 of 569

Features of your vehicle
68
4
NVS®is a registered trademark and
Z-Nav™ is a trademark of the
Gentex Corporation, Zeeland,
Michigan. HomeLink
®is a registered
trademark owned by Johnson
Controls, Incorporated, Milwaukee,
Wisconsin.
Blue Link®center
For the details, refer to the Blue
Link® Owner’s Guide, navigation
manual or audio manual. The audio
manual is in this section.
Side view mirrors
Be sure to adjust mirror angles
before driving.
Your vehicle is equipped with both
left-hand and right-hand side view
mirrors. The mirrors can be adjusted
remotely with the remote switch. The
mirror heads can be folded back to
prevent damage during an automatic
car wash or when passing in a nar-
row street.
CAUTION - Side view
mirrors
The right side view mirrors is convex. Objects seen in themirror are closer than theyappear.
Use your interior rearview mir- ror or direct observation todetermine the actual distanceof following vehicles whenchanging lanes.
ONCNCO2009
OYF042250N
■Type A
■ Type B
Page 208 of 569
4105
Features of your vehicle
If there is a malfunction with either
the alternator or electrical charging
system:
1. Drive carefully to the nearest safelocation and stop your vehicle.
2. Turn the engine off and check the alternator drive belt for looseness
or breakage.
If the belt is adjusted properly,
there may be a problem in the
electrical charging system.
In this case, have your vehicle
inspected by an authorized
HYUNDAI dealer as soon as pos-
sible.Engine Oil Pressure Warning Light
This warning light illuminates:
Once you set the ignition switch or Engine Start/Stop Button to the ON
position.
- It remains on until the engine isstarted.
When the engine oil pressure is low.
If the engine oil pressure is low:
1. Drive carefully to the nearest safe location and stop your vehicle.
2. Turn the engine off and check the engine oil level (For more details,
refer to "Engine Oil" in section 7).
If the level is low, add oil as
required.
If the warning light remains on
after adding oil or if oil is not avail-
able, have your vehicle inspected
by an authorized HYUNDAI dealer
as soon as possible.
CAUTION - Engine Oil
Pressure
Warning Light
If the engine does not stop immediately after the EngineOil Pressure Warning Light isilluminated, severe damagecould result.
If the warning light stays on while the engine is running, itindicates that there may beserious engine damage ormalfunction. In this case,
1. Stop the vehicle as soon as it is safe to do so.
2. Turn off the engine and check the oil level. If the oillevel is low, fill the engineoil to the proper level.
3. Start the engine again. If the warning light stays on afterthe engine is started, turnthe engine off immediately.In this case, have your vehi-cle inspected by an author-ized HYUNDAI dealer.
Page 213 of 569
Features of your vehicle
110
4
This indicator light illuminates for 2
seconds and goes off:
When the vehicle can not detect
the smart key which is in the vehi-
cle while the Engine Start/Stop
Button is ON.
In this case, have your vehicle
inspected by an authorized
HYUNDAI dealer.
This indicator light blinks:
When the battery of the smart key is weak.
- At this time, you can not start theengine. However, you can start
the engine if you press the Engine
Start/Stop Button with the smart
key. (For more details, refer to
"Starting the Engine" in section
5).
When there is a malfunction with the immobilizer system.
In this case, have your vehicle
inspected by an authorized
HYUNDAI dealer.Turn Signal Indicator
Light
This indicator light blinks:
When using the turn signals.
If any of the following occurs, there
may be a malfunction with the turn
signal system. In this case, have your
vehicle inspected by an authorized
HYUNDAI dealer.
- The indicator light does not blink but illuminates.
- The indicator light blinks more rap- idly.
- The indicator light does not illumi- nate at all.
High Beam Indicator
Light
This indicator light illuminates:
When the headlights are on and in the high beam position
When the turn signal lever is pulled into the Flash-to-Pass position.
Smart High Beam indi-
cator (if equipped)
This warning light illuminates :
When the high-Beam is on with the light switch in the AUTO light posi-
tion.
If your vehicle detects oncoming or preceding vehicles, the Smart High
Beam system will switch the high
beam to low beam automatically.
For more details, refer to "Smart
High Beam" in this chapter.
Page 215 of 569
Features of your vehicle
112
4
Cruise Indicator Light
(if equipped)
This indicator light illuminates:
When the cruise control system is enabled.
For more details, refer to "Cruise
Control System" in section 5.
Cruise SET Indicator Light (if equipped)
This indicator light illuminates:
When the cruise control speed is set.
For more details, refer to "Cruise
Control System" in section 5.
Downhill Brake Control(DBC) Indicator Light
This warning light illuminates:
Once you set the ignition switch or Engine Start/Stop Button to the ON
position.
- It illuminates for approximately 3seconds and then goes off.
When you activate the DBC sys- tem by pressing the DBC button.
This warning light blinks:
When the DBC is operating. This warning light illuminates yellow:
When there is a malfunction with
the DBC system.
In this case, have your vehicle
inspected by an authorized
HYUNDAI dealer.
For more details, refer to "Downhill
Brake Control (DBC) System" in
chapter 5.
Page 223 of 569
Features of your vehicle
120
4
Battery saver function
• The purpose of this feature is to
prevent the battery from being dis-
charged. The system automatically
turns off the parking lights when
the driver removes the ignition key
(smart key : turns off the engine)
and opens the driver-side door.
With this feature, the parking lights will be turned off automatically if
the driver parks on the side of the
road at night.
If necessary, to keep the lights on
when the ignition key is removed
(smart key : turns off the engine),
perform the following:
1) Open the driver-side door.
2) Turn the parking lights OFF and ON again using the light switch
on the steering column.
Headlamp delay (if equipped)
If you turn the ignition switch to the
ACC or OFF position with the head-
lights ON, the headlights remain on
for about 5 minutes. However, if the
driver’s door is opened and closed,
the headlights are turned off after 15
seconds.
The headlights can be turned off by
pressing the lock button on the trans-
mitter (or smart key) twice or turning
the light switch to the OFF or Auto
position.
However, if you turn the light switch
to the Auto position when it is dark
outside, the headlights will not be
turned off.
You can activate or deactivate this
feature. Refer to "User Settings" in
this section.
LIGHTING
CAUTION
If the driver gets out of the vehi-cle through other doors (otherthan the driver's door), the bat-tery saver function does notoperate and the headlamp delaydoes not turn off automatically.This will cause the battery to bedischarged. In this case, makesure to turn off the lamp beforegetting out of the vehicle.