Page 129 of 456

451
Features of your vehicle
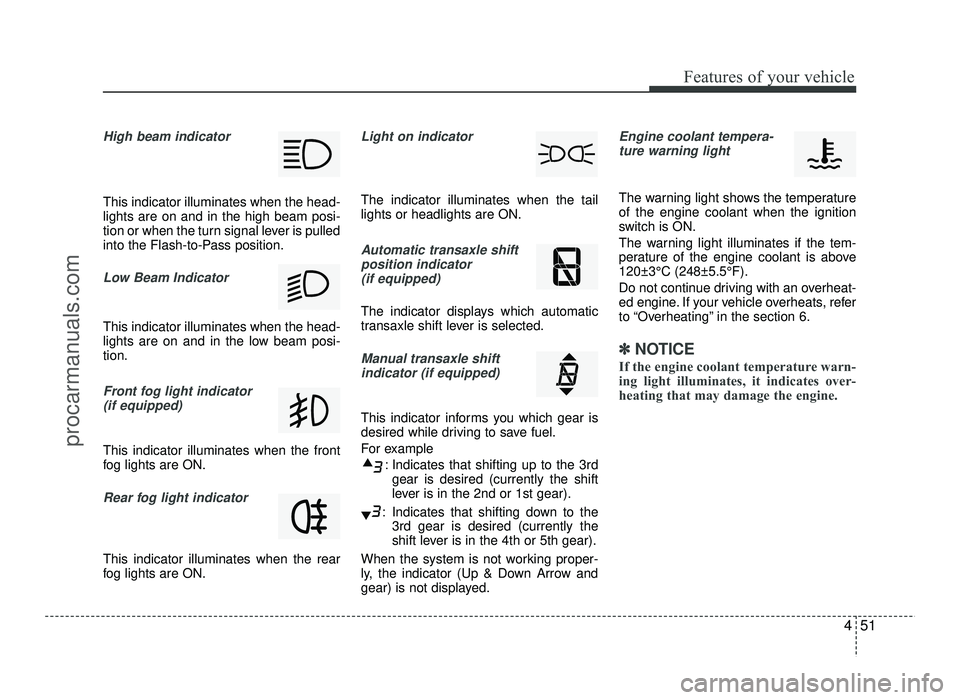
High beam indicator
This indicator illuminates when the head- lights are on and in the high beam posi-
tion or when the turn signal lever is pulled
into the Flash-to-Pass position.
Low Beam Indicator
This indicator illuminates when the head-
lights are on and in the low beam posi-tion.
Front fog light indicator (if equipped)
This indicator illuminates when the front
fog lights are ON.
Rear fog light indicator
This indicator illuminates when the rear
fog lights are ON.
Light on indicator
The indicator illuminates when the tail lights or headlights are ON.
Automatic transaxle shift
position indicator (if equipped)
The indicator displays which automatic
transaxle shift lever is selected.
Manual transaxle shift
indicator (if equipped)
This indicator informs you which gear is
desired while driving to save fuel.
For example
: Indicates that shifting up to the 3rdgear is desired (currently the shift
lever is in the 2nd or 1st gear).
: Indicates that shifting down to the 3rd gear is desired (currently the
shift lever is in the 4th or 5th gear).
When the system is not working proper-
ly, the indicator (Up & Down Arrow and
gear) is not displayed.
Engine coolant tempera- ture warning light
The warning light shows the temperature of the engine coolant when the ignition
switch is ON.
The warning light illuminates if the tem-
perature of the engine coolant is above120±3°C (248±5.5°F).
Do not continue driving with an overheat-
ed engine. If your vehicle overheats, refer
to “Overheating” in the section 6.
✽✽ NOTICE
If the engine coolant temperature warn-
ing light illuminates, it indicates over-
heating that may damage the engine.
procarmanuals.com
Page 150 of 456

Features of your vehicle
72
4
Auto light position (if equipped)
When the light switch is in the AUTO light position, the taillights and headlights will
be turned ON or OFF automaticallydepending on the amount of light outside
the vehicle. High beam operation
To turn on the high beam headlights, push
the lever away from you. Pull it back for
low beams. The high beam indicator will light when
the headlight high beams are switched on.
To prevent the battery from being dis-
charged, do not leave the lights on for aprolonged time while the engine is not
running.
OED040801
CAUTION
Never place anything over sensor
(1) located on the instrumentpanel, this will ensure better auto-
light system control.
Don’t clean the sensor using a window cleaner, the cleanser may
leave a light film which couldinterfere with sensor operation.
If your vehicle has window tint or other types of metallic coating onthe front windshield, the Auto
light system may not work prop-erly.
OYN049201
WARNING
Do not use high beam when there
are other vehicles. Using highbeam could obstruct the other dri-ver's vision.
procarmanuals.com
Page 151 of 456

473
Features of your vehicle
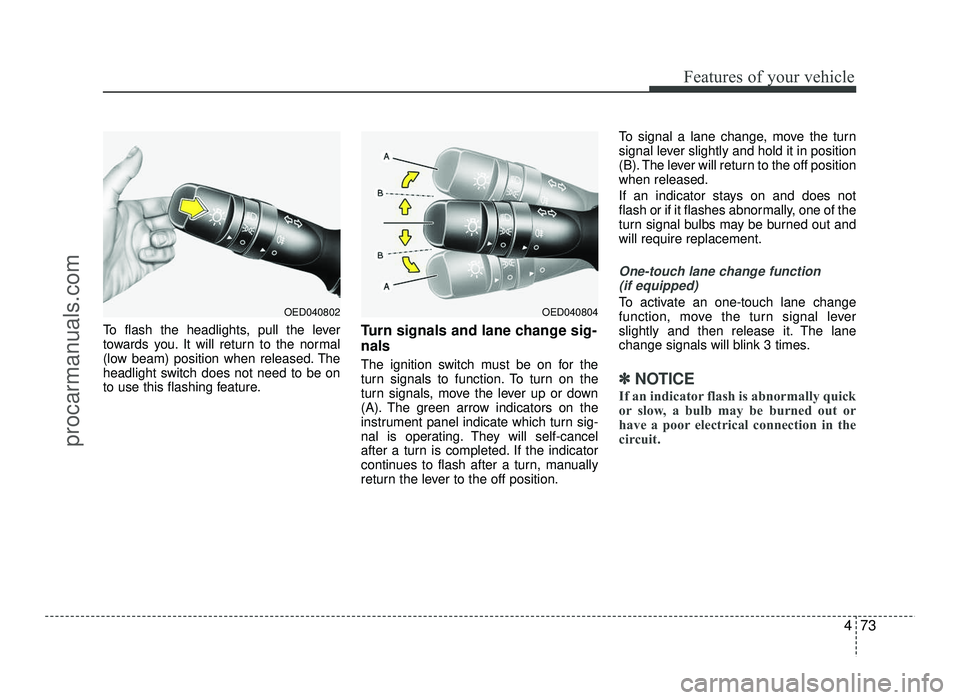
To flash the headlights, pull the lever
towards you. It will return to the normal
(low beam) position when released. The
headlight switch does not need to be on
to use this flashing feature.Turn signals and lane change sig- nals
The ignition switch must be on for the
turn signals to function. To turn on the
turn signals, move the lever up or down
(A). The green arrow indicators on the
instrument panel indicate which turn sig-
nal is operating. They will self-cancel
after a turn is completed. If the indicator
continues to flash after a turn, manually
return the lever to the off position.To signal a lane change, move the turn
signal lever slightly and hold it in position
(B). The lever will return to the off positionwhen released.
If an indicator stays on and does not
flash or if it flashes abnormally, one of the
turn signal bulbs may be burned out andwill require replacement.
One-touch lane change function
(if equipped)
To activate an one-touch lane change
function, move the turn signal lever
slightly and then release it. The lane
change signals will blink 3 times.
✽✽ NOTICE
If an indicator flash is abnormally quick
or slow, a bulb may be burned out or
have a poor electrical connection in the
circuit.
OED040804OED040802
procarmanuals.com
Page 153 of 456
475
Features of your vehicle
Headlight leveling device (if equipped)
To adjust the headlight beam level
according to the number of the passen-
gers and loading weight in the luggage
area, turn the beam leveling switch.The higher the number of the switch
position, the lower the headlight beam
level. Always keep the headlight beam at
the proper leveling position, or headlights
may dazzle other road users.
Listed below are the examples of proper
switch settings. For loading conditions
other than those listed below, adjust the
switch position so that the beam level
may be the nearest as the conditionobtained according to the list.
Loading condition
Driver only
Driver + Front passengerFull passengers
(including driver)Full passengers (including
driver) + Maximum per-
missible loading
Driver + Maximum per-
missible loading
Switch position
00 1 3 5
OYN049047
OYN049047R
■Left-hand drive type
■Right-hand drive type
procarmanuals.com
Page 411 of 456
Maintenance
72
7
DescriptionFuse ratingSystemProtected Component
20AHEADLAMP HIGH BEAMSHeadlamp High Beam
10AHORNHorn, Burglar Alarm Horn, Battery Sensor
20AHEADLAMP DIPPED BEAMSHeadlamp Low Beam
20AFUEL PUMPFuel Pump Relay (Gasoline)
10AELECTRONIC (ENGINE)
CONTROL UNIT/AIR HTRECU (Gasoline), Air Heater (Diesel)
15AINJECTORINJECTOR, FUEL PUMP RELAY (GASOLINE)
E-EGR, WGT, E-EGR, CPS, FUEL HEATER RELAY (DIESEL)
10ASENSOR 1AIR CONDITIONING RELAY, STOP SW, COOLING FAN RELAY (HIGH),
COOLING FAN RELAY (LOW)
10AB/UP LAMPRear Combination Lamp
10AAIR CONDITIONERAir Conditioning Relay
10AHEADLAMP DIPPED BEAMSCluster(Low Indicator), Head Lamp Low LH
20AELECTRONIC (ENGINE) CONTROL UNITECU
10AHEADLAMP DIPPED BEAMSHead Lamp Low RH
10AELECTRONIC (ENGINE) CONTROL UNITECU, TCU, GLOW Relay
10ARAIN SENSORRain Sensor
procarmanuals.com
Page 415 of 456
Maintenance
76
7
❈❈
Traffic Change (For Europe)
The low beam light distribution is asym-
metric. If you go abroad to a country with
an opposite traffic direction, this asymmet-
ric part will dazzle the oncoming driver. To
prevent dazzle, ECE regulations demand
several technical solutions (ex. automatic
change system, adhesive sheet, down
aiming). Headlamps are designed not to
dazzle opposing drivers. So you don´t
need to change your headlamps in a
country with the opposite traffic direction.
1. Open the hood.
2. Remove the headlight bulb cover byturning it counterclockwise.
3. Disconnect the headlight bulb socket- connector.
4. Unsnap the headlight bulb retaining wire by depressing the end and push-
ing it upward.
5. Remove the bulb from the headlight assembly.
OJC070028
OJC070031
OJC070030
■Type A
OJC075037
OJC075039
■Type B
procarmanuals.com