2017 Hyundai Ioniq Hybrid bulb
[x] Cancel search: bulbPage 162 of 553

3-60
Convenient features of your vehicle
Exterior Light WarningLight (if equipped)
This warning light illuminates:
When one of the exterior bulbs (headlamp, tail lamp, fog lamp, etc.)
is not operating properly. One of the
bulbs may need to be replaced.
Information
Make sure to replace the burned out
bulb with a new one of the same
wattage rating.
Cruise Indicator Light
(if equipped)
This indicator light illuminates:
When the cruise control system is enabled.
For more details, refer to “Cruise
Control System” in chapter 5.
Cruise SET Indicator Light (if equipped)
This indicator light illuminates:
When the cruise control speed is set.
For more details, refer to “Cruise
Control System” in chapter 5.
Speed Limiter Indicator Light (if equipped)
This indicator light illuminates
when:
When the speed limiter is enabled.
i
■ Type A ■
Type B
Page 168 of 553

3-66
Convenient features of your vehicle
This indicator displays which exterior light is selected using the lighting control.Wiper
This indicator displays which wiperspeed is selected using the wipercontrol.
Check headlight (if equipped)
This warning message is displayed if
the headlamps are not operating
properly. The headlamp bulb mayneed to be replaced.Information
Make sure to replace the burned out
bulb with a new one of the same wattage
rating.
i
■ For Europe
■ Except Europe■For Europe
■ Except Europe
OAE046117L/OAE046182LOAE046118L/OAE046183LOAD045142L
Page 196 of 553

3-94
Convenient features of your vehicle
The lever will return to the OFF posi-
tion when released or when the turnis completed.
If an indicator stays on and does not
flash or if it flashes abnormally, one of
the turn signal bulbs may be burnedout and will require replacement.
One-touch turn signal function
To activate an one-touch turn signal
function, move the turn signal lever
slightly and then release it. The lane
change signals will blink 3, 5 or 7
times.
You can activate/deactivate the One
Touch Turn Signal function or choose
the number of blinking (3, 5, or 7)from the User Settings Mode on the
LCD display.For more details, refer
to "LCD Display" in this chapter.
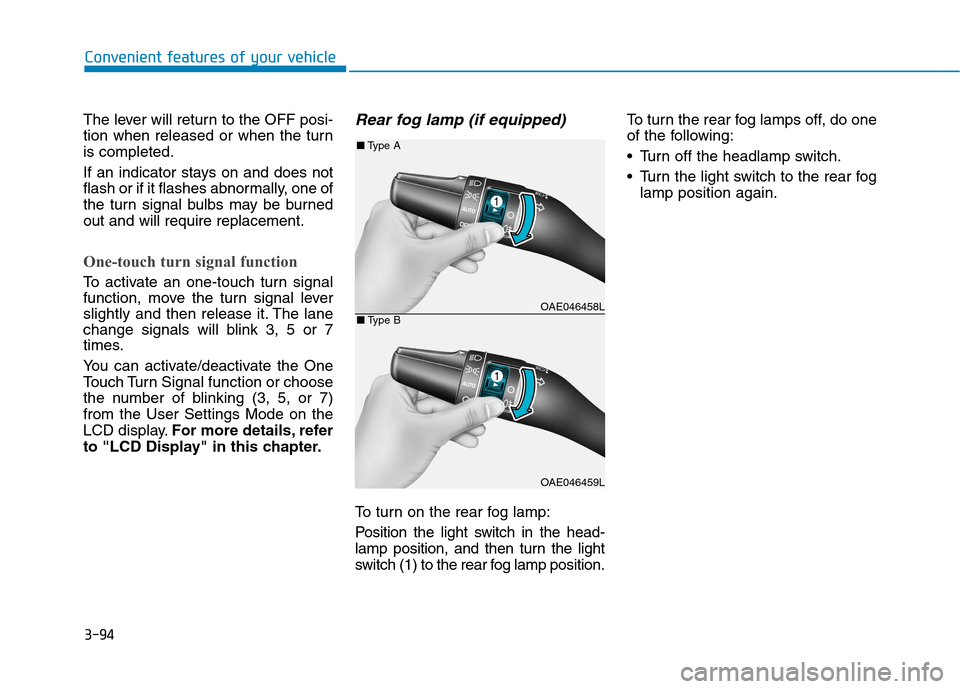
Rear fog lamp (if equipped)
To turn on the rear fog lamp:
Position the light switch in the head-
lamp position, and then turn the light
switch (1) to the rear fog lamp position. To turn the rear fog lamps off, do one
of the following:
• Turn off the headlamp switch.
Turn the light switch to the rear fog
lamp position again.
OAE046458L
OAE046459L
■Type A
■Type B
Page 423 of 553

Tires and wheels ..................................................7-41Tire care ............................................................................7-41
Recommended cold tire inflation pressures ...........7-42
Check tire inflation pressure........................................7-43
Tire rotation .....................................................................7-44
Wheel alignment and tire balance ..............................7-45
Tire replacement ............................................................7-45
Wheel replacement .........................................................7-46
Tire traction ....................................................................7-46
Tire maintenance ............................................................7-47
Tire sidewall labeling ......................................................7-47
Low aspect ratio tires ....................................................7-51
Fuses ......................................................................7-52 Instrument panel fuse replacement ...........................7-53
Engine compartment panel fuse replacement.........7-54
Fuse/relay panel description .......................................7-56 Light bulbs.............................................................7-66
Headlamp, position lamp, turn signal lamp
bulb replacement .............................................................7-67Headlamp aiming .............................................................7-71
Daytime running lamp ....................................................7-75
Side repeater lamp replacement .................................7-75
Rear combination lamp bulb replacement ................7-76
Rear fog lamp ..................................................................7-81
High mounted stop lamp ...............................................7-81
License plate light bulb replacement .........................7-81
Interior light bulb replacement ....................................7-81
Appearance care ..................................................7-83 Exterior care ....................................................................7-83
Interior care......................................................................7-88
Emission control system .....................................7-90 Crankcase emission control system ...........................7-90
Evaporative emission control system.........................7-90
Exhaust emission control system ...............................7-91
Page 487 of 553

7-66
MaintenanceL
L IIGG HH TT BB UU LLBB SS
Consult an authorized HYUNDAI
dealer to replace most vehicle light
bulbs. It is difficult to replace vehicle
light bulbs because other parts of the
vehicle must be removed before you
can get to the bulb. This is especially
true for removing the headlamp
assembly to get to the bulb(s).
Removing/installing the headlamp
assembly can result in damage to
the vehicle.
Information
After heavy driving, rain or washing,
the lamps could appear frosty. This
condition is caused by the temperature
difference between the lamp inside and
the outside temperature. This is similar
to the condensation on your windows
inside your vehicle during the rain and
doesn’t indicate a problem with your
vehicle. If the water leaks into the light
bulb circuitry, have your vehicle
checked by an authorized HYUNDAI
dealer. Information
A normally functioning lamp may flicker momentarily to stabilize the
vehicle’s electrical control system.
However, if the lamp goes out after
flickering momentarily, or contin-
ues to flicker, we recommend the
system be checked by an authorized
HYUNDAI dealer.
The position lamp may not turn on when the position lamp switch is
turned on, but the position lamp and
headlamp switch may turn on when
the headlamp switch is turned on.
This may be caused by network fail-
ure or vehicle electrical control sys-
tem malfunction. If this occurs, we
recommend the system be checked
by an authorized HYUNDAI dealer.i
i
Prior to replacing a lamp,
depress the foot brake, move
the shift lever into P (Park),
apply the parking brake, place
the ignition switch in the
LOCK/OFF position, and take
the key with you when leaving
the vehicle to avoid sudden
movement of the vehicle and
to prevent possible electric
shock.
Be aware the bulbs may be hot
and may burn your fingers.
WARNING
Page 488 of 553

7-67
7
Maintenance
Headlamp, position lamp,
turn signal lamp bulb replace-ment
Type A
(1) Headlamp (Low) (2) Headlamp (High)
(3) Turn signal lamp
(4) Position lamp Always handle them carefully, and
avoid scratches and abrasions. If
the bulbs are lit, avoid contact with
liquids.
Never touch the glass with bare hands. Residual oil may cause the
bulb to overheat and burst when lit.
A bulb should be operated only when installed in a headlamp.
If a bulb becomes damaged or cracked, replace it immediatelyand carefully dispose of it.
Information
Traffic Change (For Europe)
The low beam light distribution is
asymmetric. If you go abroad to a
country with opposite traffic direc-
tion, this asymmetric part will dazzle
oncoming car driver. To prevent daz-
zle, ECE regulation demand several
technical solutions (ex. automatic
change system, adhesive sheet, down
aiming). This headlamps are designed
not to dazzle opposite drivers. So, you
need not change your headlamps in a
country with opposite traffic direc-
tion.
i
OAE076028
Handle halogen bulbs with
care. Halogen bulbs contain
pressurized gas that will pro-
duce flying pieces of glassthat could cause injuries if
broken.
Wear eye protection when
changing a bulb. Allow the
bulb to cool down before han-dling it.
WARNING
OAE076052
Page 489 of 553

7-68
Maintenance
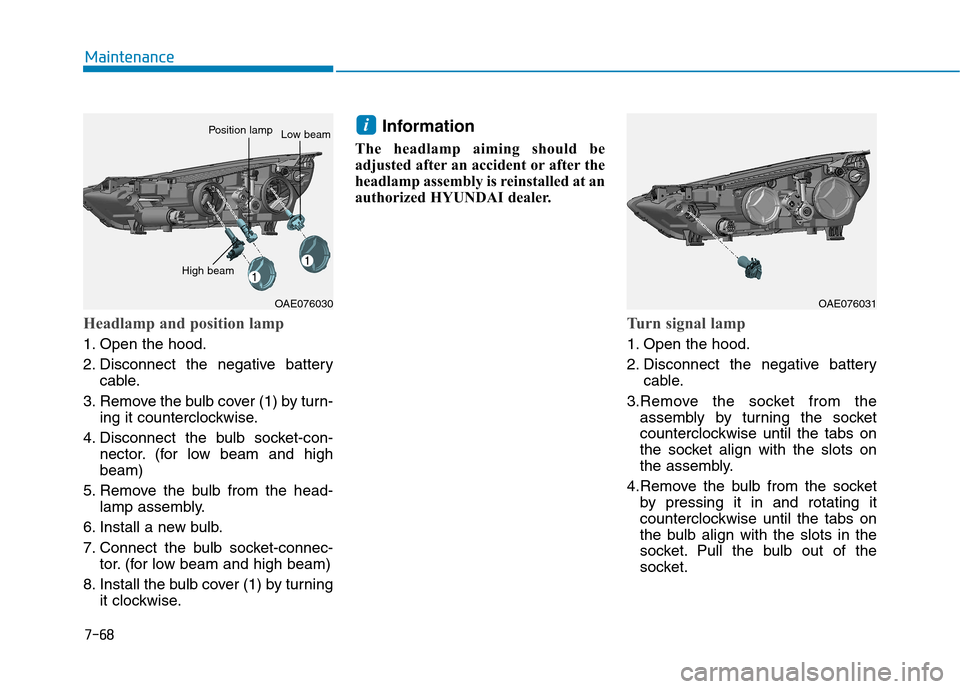
Headlamp and position lamp
1. Open the hood.
2. Disconnect the negative batterycable.
3. Remove the bulb cover (1) by turn- ing it counterclockwise.
4. Disconnect the bulb socket-con- nector. (for low beam and high beam)
5. Remove the bulb from the head- lamp assembly.
6. Install a new bulb.
7. Connect the bulb socket-connec- tor. (for low beam and high beam)
8. Install the bulb cover (1) by turning it clockwise. Information
The headlamp aiming should be
adjusted after an accident or after the
headlamp assembly is reinstalled at an
authorized HYUNDAI dealer.
Turn signal lamp
1. Open the hood.
2. Disconnect the negative battery cable.
3.Remove the socket from the assembly by turning the socket
counterclockwise until the tabs on
the socket align with the slots on
the assembly.
4.Remove the bulb from the socket by pressing it in and rotating it
counterclockwise until the tabs on
the bulb align with the slots in the
socket. Pull the bulb out of the
socket.
i
OAE076030
High beam
Position lampLow beam
OAE076031
Page 490 of 553

7-69
7
Maintenance
5.Insert a new bulb by inserting it intothe socket and rotating it until it
locks into place.
6.Install the socket in the assembly by aligning the tabs on the socket
with the slots in the assembly.
7.Push the socket into the assembly and turn the socket clockwise.Type B
(1) Headlamp (Low/High)
(2) Turn signal lamp
(3) Position lamp
Headlamp and position lamp
If the light bulb does not operate,
have the vehicle checked by an
authorized HYUNDAI dealer. Information
If your vehicle is equipped with High
Intensity Discharge (HID) headlamps,
these headlamps contain mercury. So
if you need to have your vehicle dis-
posed, you should remove the HID
Headlamps before disposal. The
removed HID headlamps should be
recycled, re-used or disposed as haz-
ardous waste.
iOAE076029 HID headlamp Do not attempt to replace or
inspect the low beam (XENON
bulb) due to electric shock dan-
ger. If the low beam (XENON
bulb) is not working, have your
vehicle checked by an author-
ized HYUNDAI Dealer.
WARNING