Page 11 of 553

1-4
Your vehicle at a glanceI
I NN TTEERR IIOO RR OO VVEERR VV IIEE WW (( II))
1. Door lock/unlock button ....................3-14
2. Driver position memory system ........3-18
3. Outside rearview mirror folding
switch ................................................3-26
4. Outside rearview mirror control switch ................................................3-25
5. Central door lock switch ....................3-14
6. Power window switches ....................3-27
7. Power window lock switch ................3-31
8. Headlight leveling device ..................3-96
9. Instrument panel illumination control switch ......................................3-43
10. Blind spot detection system button ..5-38
11. Lane keeping assist system ..............5-59
12. ESC OFF button ..............................5-31
13. Fuel filler door opener ....................3-39
14. Hood release lever ........................3-36
15. Fuse box ..........................................7-53
16. Steering wheel tilt/telescope lever ......3-21
17. Steering wheel ................................3-20
18. Seat ..................................................2-4
OAE016003L
The actual shape may differ from the illustration.
■
Left-hand drive
Page 12 of 553

1-5
Your vehicle at a glance
IINN TTEERR IIOO RR OO VVEERR VV IIEE WW (( IIII))
1
1. Door lock/unlock button ....................3-14
2. Driver position memory system ........3-18
3. Outside rearview mirror folding
switch ................................................3-26
4. Outside rearview mirror control switch ................................................3-25
5. Central door lock switch ....................3-14
6. Power window switches ....................3-28
7. Power window lock switch ................3-31
8. Headlight leveling device ..................3-96
9. Instrument panel illumination control switch ......................................3-43
10. Blind spot detection system button ..5-38
11. Lane keeping assist system ..............5-59
12. ESC OFF button ..............................5-31
13. Fuel filler door opener ....................3-39
14. Hood release lever ..........................3-36
15. Fuse box ..........................................7-53
16. Steering wheel ................................3-20
17. Seat ..................................................2-5
OAE016003R
■ Right-hand drive
The actual shape may differ from the illustration.
Page 125 of 553

3-23
Convenient features of your vehicle
3
When cleaning the mirror, use a
paper towel or similar material
dampened with glass cleaner. Do
not spray glass cleaner directly on
the mirror as that may cause the
liquid cleaner to enter the mirrorhousing.
Day/night rearview mirror (if equipped)
Make this adjustment before you
start driving and while the day/night
lever is in the day position.
Pull the day/night lever toward you to reduce glare from the headlights of
the vehicles behind you during night
driving.
Remember that you lose somerearview clarity in the night position.
Electric Chromic Mirror (ECM)
(if equipped)
The electric rearview mirror automati-cally controls the glare from the head-
lamp of the car behind you in night-
time or low light driving conditions.
When the engine is running, the
glare is automatically controlled by
the sensor mounted in the rearview
mirror. The sensor detects the light
level around the vehicle, and auto-matically adjusts to control the head-
lamp glare from vehicles behind you.
Whenever the shift lever is placed in
R (Reverse), the mirror will automat-
ically go to the brightest setting in
order to improve the drivers view
behind the vehicle.
NOTICE
NEVER adjust the mirror while
driving. This may cause loss of
vehicle control resulting in anaccident.
WARNING
OAE046010
Day Night
Page 145 of 553
3-43
Convenient features of your vehicle
3
Instrument cluster control
Instrument panel illumination
When the vehicle's position lights or headlights are on, press the illumina-
tion control button to adjust the
brightness of the instrument panelillumination. When pressing the illumination con-
trol button, the interior switch illumi-nation intensity is also adjusted. The brightness of the instrument
panel illumination is displayed.
If the brightness reaches to the maximum or minimum level, achime will sound.
Never adjust the instrument
cluster while driving. This could
result in loss of control and lead
to an accident that may cause
death, serious injury, or property
damage.
WARNING
OAE046167L/OAE046113L
■
Type B
■
Type A
OAEE046412
Page 161 of 553

3-59
Convenient features of your vehicle
3
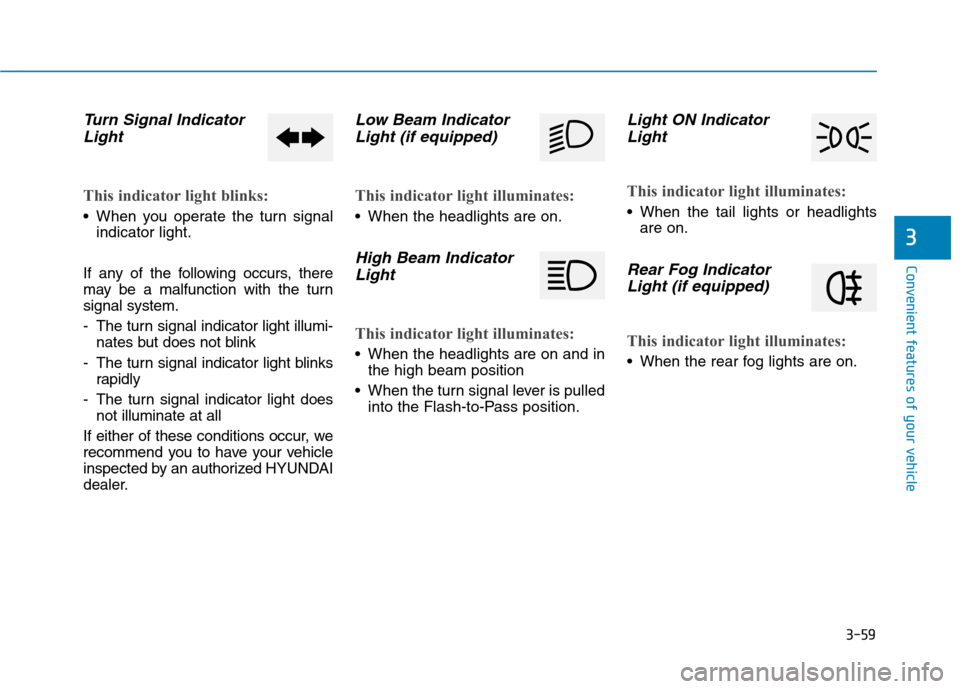
Turn Signal IndicatorLight
This indicator light blinks:
When you operate the turn signal indicator light.
If any of the following occurs, there
may be a malfunction with the turnsignal system.
- The turn signal indicator light illumi- nates but does not blink
- The turn signal indicator light blinks rapidly
- The turn signal indicator light does not illuminate at all
If either of these conditions occur, we
recommend you to have your vehicle
inspected by an authorized HYUNDAI
dealer.
Low Beam Indicator Light (if equipped)
This indicator light illuminates:
When the headlights are on.
High Beam Indicator
Light
This indicator light illuminates:
When the headlights are on and in the high beam position
When the turn signal lever is pulled into the Flash-to-Pass position.
Light ON Indicator
Light
This indicator light illuminates:
When the tail lights or headlights are on.
Rear Fog Indicator
Light (if equipped)
This indicator light illuminates:
When the rear fog lights are on.
Page 168 of 553
3-66
Convenient features of your vehicle
This indicator displays which exterior light is selected using the lighting control.Wiper
This indicator displays which wiperspeed is selected using the wipercontrol.
Check headlight (if equipped)
This warning message is displayed if
the headlamps are not operating
properly. The headlamp bulb mayneed to be replaced.Information
Make sure to replace the burned out
bulb with a new one of the same wattage
rating.
i
■ For Europe
■ Except Europe■For Europe
■ Except Europe
OAE046117L/OAE046182LOAE046118L/OAE046183LOAD045142L
Page 197 of 553

3-95
Convenient features of your vehicle
3
Battery saver function
The purpose of this feature is to pre-
vent the battery from being dis-
charged. The system automatically
turns off the position lamp when the
driver turns the engine off and opens
the driver-side door.
With this feature , the position lamps
will turn off automatically if the driver
parks on the side of road at night.
If necessary, to keep the lamps on
when the engine is turned off, perform
the following:
1) Open the driver-side door.
2) Turn the position lamps OFF and
ON again using the light switch on
the steering column.
Headlamp delay function
(if equipped)
If you place the ignition switch to the
ACC or OFF position with the head-lamps ON, the headlamps (and/orposition lamps) remain on for about 5
minutes. However, with the engine off
if the driver’s door is opened and
closed, the headlamps (and/or posi-
tion lamps) are turned off after 15
seconds. The headlamps (and/or position
lamps) can be turned off by pressing
the lock button on the remote key or
smart key twice or turning the light
switch to the OFF or AUTO position.
However, if you turn the light switch
to the AUTO position when it is dark
outside, the headlamps will not be
turned off.
You can activate or deactivate the
Headlamp Delay function from theUser Settings Mode on the LCD dis-
play. For more details, refer to
"LCD Display" in this chapter. If the driver gets out of the vehicle
through other doors (except dri-
ver's door), the battery saver func-tion does not operate and the
headlamp delay function does not
turn off automatically. Therefore, It
causes the battery to be dis-
charged. In this case, make sure to
turn off the lamp before getting out
of the vehicle.
Daytime running light (DRL)
The Daytime Running Lights (DRL)
can make it easier for others to see
the front of your vehicle during the
day, especially after dawn and beforesunset.
The DRL system will turn the dedi- cated lamp OFF when:
1. The headlights are in the ON posi-
tion.
2. The engine is turned off.
NOTICE
Page 198 of 553

3-96
Convenient features of your vehicle
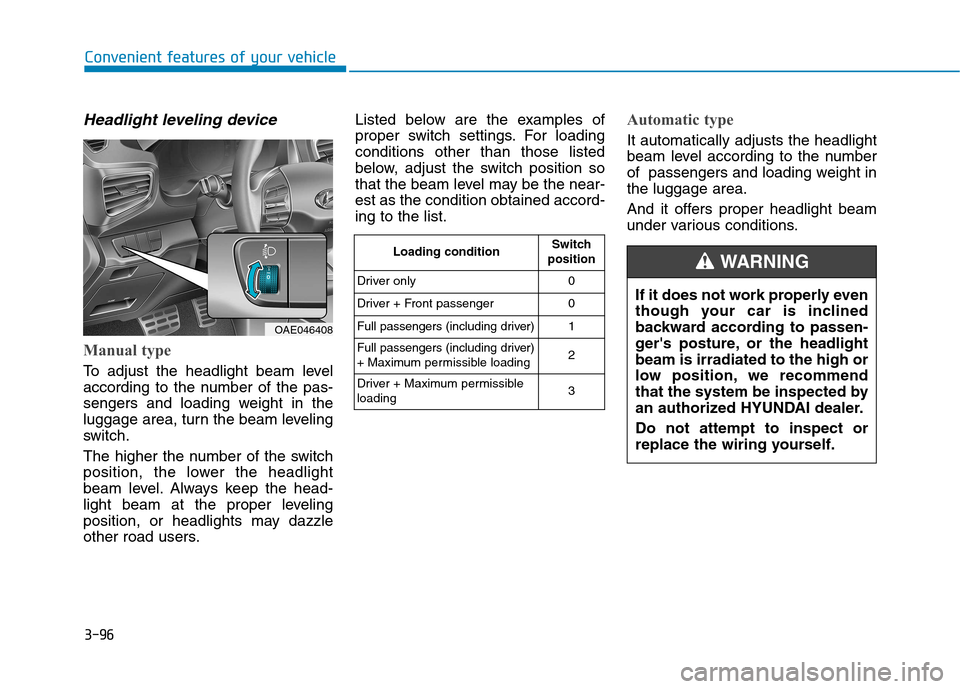
Headlight leveling device
Manual type
To adjust the headlight beam level
according to the number of the pas-
sengers and loading weight in the
luggage area, turn the beam leveling
switch.
The higher the number of the switch
position, the lower the headlight
beam level. Always keep the head-
light beam at the proper leveling
position, or headlights may dazzle
other road users.Listed below are the examples of
proper switch settings. For loadingconditions other than those listed
below, adjust the switch position so
that the beam level may be the near-est as the condition obtained accord-ing to the list.
Automatic type
It automatically adjusts the headlight
beam level according to the number
of passengers and loading weight inthe luggage area.
And it offers proper headlight beam
under various conditions.
OAE046408
Loading condition
Switch
position
Driver only 0
Driver + Front passenger 0
Full passengers (including driver) 1
Full passengers (including driver)
+ Maximum permissible loading 2
Driver + Maximum permissibleloading 3
If it does not work properly even
though your car is inclined
backward according to passen-
ger's posture, or the headlightbeam is irradiated to the high or
low position, we recommend
that the system be inspected by
an authorized HYUNDAI dealer. Do not attempt to inspect or
replace the wiring yourself.
WARNING