Page 385 of 582
5-46
Driving your vehicle
The system may not work prop-erly when the bumper has been
damaged, or if the rear bumperhas been replaced or repaired.
The sensing range differs some- what according to the width of
the road. When the road is nar-
row, the system may detect
other vehicles in the next lane.
The system may turn off due to strong electromagnetic waves.
Non-operating condition
The BSD indicator on the outside
rearview mirror may not illuminate
properly when:
The outside rearview mirror hous-ing is damaged.
The mirror is covered with dirt, snow, or debris.
The window is covered with dirt, snow, or debris.
The window is tinted.
NOTICE
(Continued)
The Blind Spot Detection
System (BSD) and Rear Cross
Traffic Alert (RCTA) are not a
substitute for proper and safe
driving practices. Always
drive safely and use caution
when changing lanes or back-
ing up your vehicle. The BlindSpot Detection System (BSD)
may not detect every object
alongside the vehicle.
The warning light on the out-
side rearview mirror will illu-
minate whenever a vehicle is
detected at the rear side bythe system.
To avoid accidents, do not
focus only on the warninglight and neglect to see the
surrounding of the vehicle.
Drive safely even though the
vehicle is equipped with aBlind Spot Detection System
(BSD) and Rear Cross Traffic
Alert (RCTA). Do not solely
rely on the system but check
your surrounding before
changing lanes or backing the
vehicle up.
The system may not alert the driver in some conditions so
always check your surround-ings while driving. (Continued)
WARNING
Page 400 of 582
5-61
Driving your vehicle
5
LKAS operation
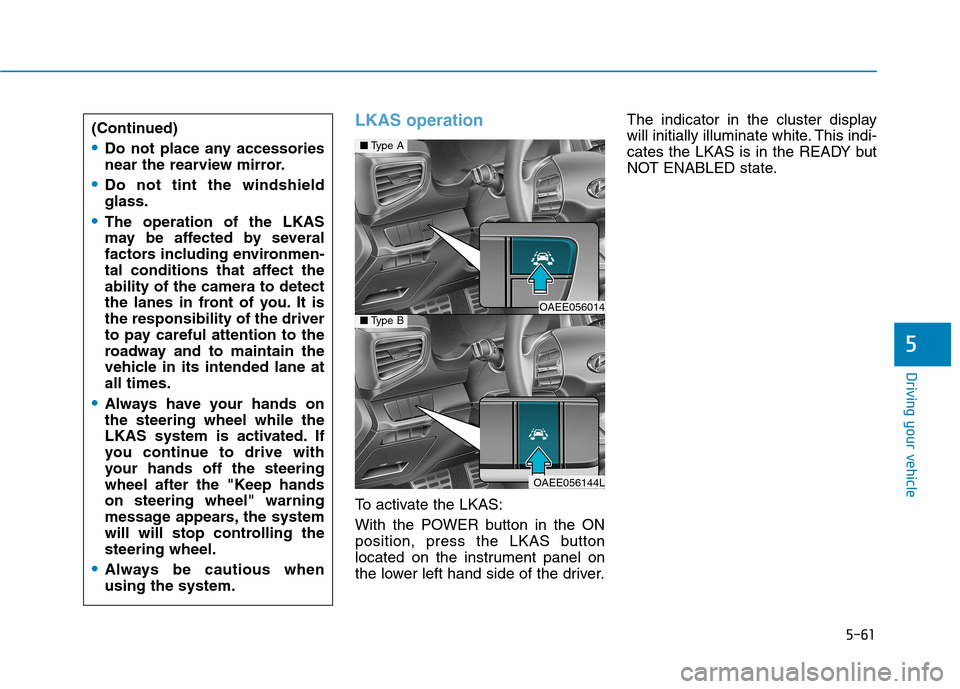
To activate the LKAS:
With the POWER button in the ON
position, press the LKAS button
located on the instrument panel on
the lower left hand side of the driver.The indicator in the cluster display
will initially illuminate white. This indi-
cates the LKAS is in the READY but
NOT ENABLED state.
(Continued)
Do not place any accessories
near the rearview mirror.
Do not tint the windshield glass.
The operation of the LKAS
may be affected by several
factors including environmen-
tal conditions that affect theability of the camera to detect
the lanes in front of you. It isthe responsibility of the driver
to pay careful attention to the
roadway and to maintain the
vehicle in its intended lane atall times.
Always have your hands on the steering wheel while the
LKAS system is activated. If
you continue to drive with
your hands off the steering
wheel after the "Keep handson steering wheel" warning
message appears, the system
will will stop controlling thesteering wheel.
Always be cautious when using the system.
■
Type A
OAEE056014 ■Type B
OAEE056144L
Page 406 of 582
5-67
Driving your vehicle
5
Limitations of the system
The LKAS may operate prematurely
even if the vehicle does not depart
from the intended lane, OR, the
LKAS may not warn you if the vehicle
leaves the intended lane under the
following circumstances:
The lanes ahead are not visibledue to rain, snow, water on the road, damaged or stained road
surface, or other factors.
The brightness outside changes suddenly such as when entering or
exiting a tunnel.
The brightness outside is too low such as when the headlamps are
not on at night or the vehicle isgoing through a tunnel.
The surrounding of the inside rear view mirror temperature is highdue to direct sunlight.
It is difficult to distinguish the lane marking from the road surface or
the lane marking is faded or not
clearly marked.
Driving on a steep grade, over a hill, or when driving on a curvedroad. When light coming from a street
light or an oncoming vehicle is
reflected on a wet road surfacesuch as a puddle in the road.
The windshield or the LKAS cam- era lens is blocked with dirt or
debris.
The field of view in front is obstructed by sun glare.
The lanes are incomplete or the area is in a construction zone.
There are more than two lane lines on the road in front of you.
The lane line is merged or divided. (e.g. tollgate)
The lane number increases or decreases or the lane marker are
crossing complicatedly.
The lane markings are not clearly visible from the road.
The shadow is on the lane marker by a median strip.
The lane width is too wide or too narrow. See previous page.
The windshield glass is fogged up; a clear view of the road is obstruct-ed. There are markings on the road
surface that look like a lane line
that is inadvertently being detected
by the camera.
There is a boundary structure in the roadway such as a concrete
barrier, guardrail and reflector post
that is inadvertently being detected
by the camera.
There is not enough distance between you and the vehicle in
front to be able to detect the lane
line or the vehicle ahead is driving
on the lane line.
The adverse road conditions cause excessive vehicle vibrations while
driving.
Page 433 of 582
5-94
Driving your vehicle
Information
The ESC system (if equipped) must be
turned OFF before rocking the vehi-
cle.
If you are still stuck after rocking
the vehicle a few times, have the
vehicle pulled out by a tow vehicle
to avoid vehicle overheating, pos-
sible damage to the reduction
gear and tire damage. See
"Towing" in chapter 6.Smooth cornering
Avoid braking or gear changing in
corners, especially when roads are
wet. Ideally, corners should always
be taken under gentle acceleration.
Driving at night
Night driving presents more hazards
than driving in the daylight. Here are
some important tips to remember:
Slow down and keep more dis- tance between you and other vehi-
cles, as it may be more difficult tosee at night, especially in areas
where there may not be any street
lights.
Adjust your mirrors to reduce the glare from other driver's head-
lamps.
Keep your headlamps clean and properly aimed. Dirty or improperly
aimed headlamps will make it
much more difficult to see at night.
Avoid staring directly at the head- lamps of oncoming vehicles. You
could be temporarily blinded, and it
will take several seconds for your
eyes to readjust to the darkness.
Driving in the rain
Rain and wet roads can make driving
dangerous. Here are a few things to
consider when driving in the rain or
on slick pavement:
Slow down and allow extra follow-ing distance. A heavy rainfall
makes it harder to see and increas-es the distance needed to stop
your vehicle.
Turn OFF your Cruise Control. (if equipped)
Replace your windshield wiper blades when they show signs ofstreaking or missing areas on thewindshield.
Be sure your tires have enough tread. If your tires do not have
enough tread, making a quick stop
on wet pavement can cause a skid
and possibly lead to an accident.
See "Tire Tread" in chapter 7 .
Turn on your headlamps to make it easier for others to see you.
Driving too fast through large pud- dles can affect your brakes. If you
must go through puddles, try to
drive through them slowly.
NOTICE
i
Page 513 of 582
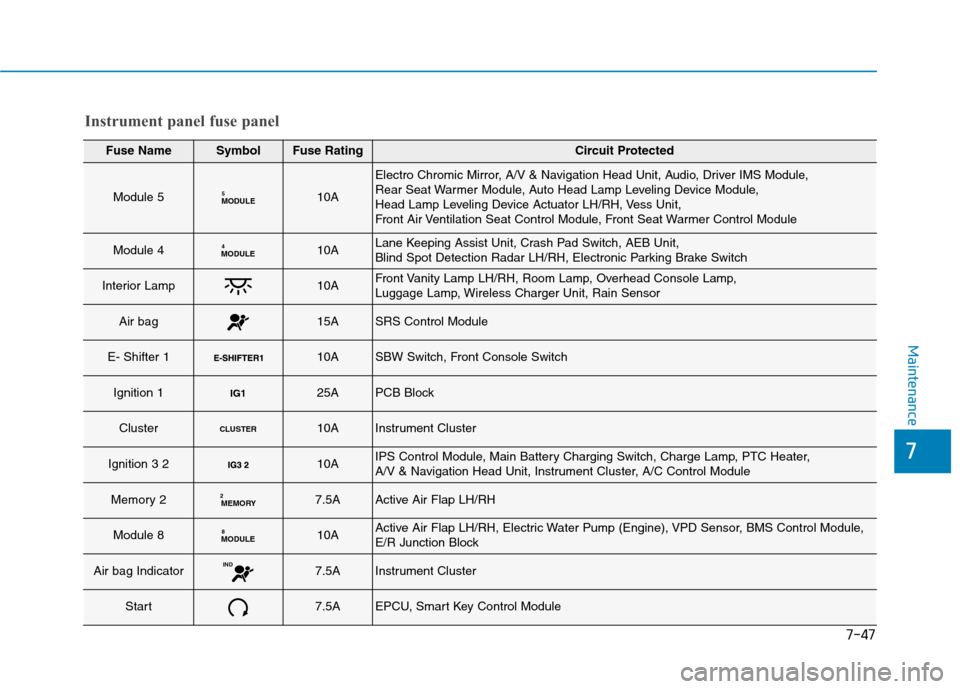
7-47
7
Maintenance
Instrument panel fuse panel
Fuse NameSymbolFuse RatingCircuit Protected
Module 5MODULE510A
Electro Chromic Mirror, A/V & Navigation Head Unit, Audio, Driver IMS Module,
Rear Seat Warmer Module, Auto Head Lamp Leveling Device Module,
Head Lamp Leveling Device Actuator LH/RH, Vess Unit,
Front Air Ventilation Seat Control Module, Front Seat Warmer Control Module
Module 4MODULE410ALane Keeping Assist Unit, Crash Pad Switch, AEB Unit,
Blind Spot Detection Radar LH/RH, Electronic Parking Brake Switch
Interior Lamp10AFront Vanity Lamp LH/RH, Room Lamp, Overhead Console Lamp,
Luggage Lamp, Wireless Charger Unit, Rain Sensor
Air bag15ASRS Control Module
E- Shifter 1 10ASBW Switch, Front Console Switch
Ignition 1IG125APCB Block
ClusterCLUSTER10AInstrument Cluster
Ignition 3 2 10AIPS Control Module, Main Battery Charging Switch, Charge Lamp, PTC Heater,
A/V & Navigation Head Unit, Instrument Cluster, A/C Control Module
Memory 2MEMORY
27.5AActive Air Flap LH/RH
Module 8MODULE 810AActive Air Flap LH/RH, Electric Water Pump (Engine), VPD Sensor, BMS Control Module,
E/R Junction Block
Air bag IndicatorIND7.5AInstrument Cluster
Start7.5AEPCU, Smart Key Control Module
Page 514 of 582
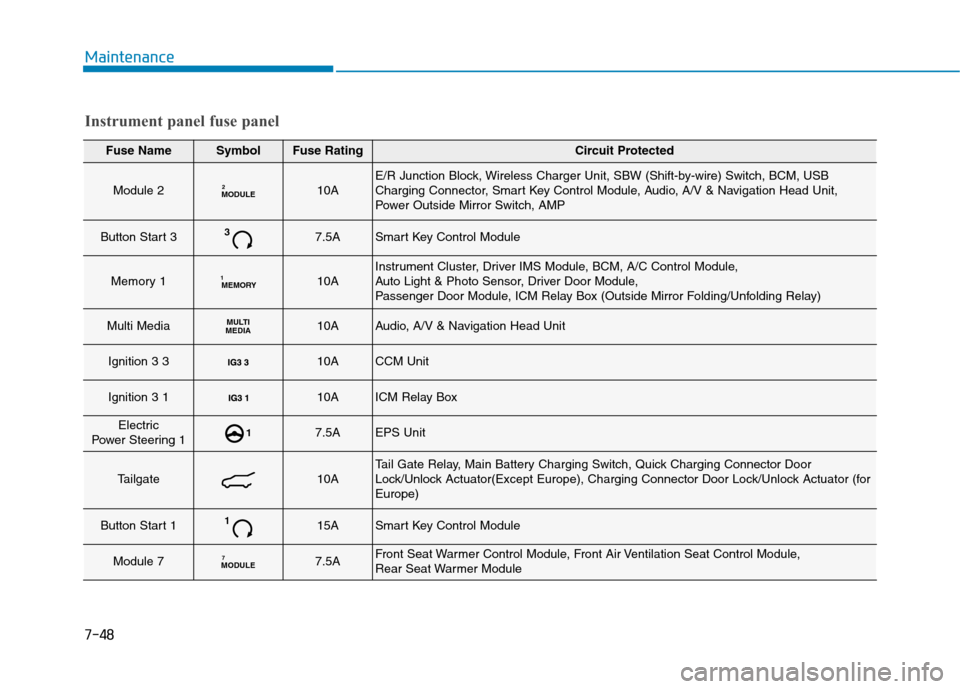
Maintenance
Fuse NameSymbolFuse RatingCircuit Protected
Module 2MODULE210AE/R Junction Block, Wireless Charger Unit, SBW (Shift-by-wire) Switch, BCM, USB
Charging Connector, Smart Key Control Module, Audio, A/V & Navigation Head Unit,
Power Outside Mirror Switch, AMP
Button Start 337.5ASmart Key Control Module
Memory 1MEMORY
110AInstrument Cluster, Driver IMS Module, BCM, A/C Control Module,
Auto Light & Photo Sensor, Driver Door Module,
Passenger Door Module, ICM Relay Box (Outside Mirror Folding/Unfolding Relay)
Multi MediaMULTI
MEDIA10AAudio, A/V & Navigation Head Unit
Ignition 3 3 10ACCM Unit
Ignition 3 1 10AICM Relay Box
Electric
Power Steering 117.5AEPS Unit
Tailgate10ATail Gate Relay, Main Battery Charging Switch, Quick Charging Connector Door
Lock/Unlock Actuator(Except Europe), Charging Connector Door Lock/Unlock Actuator (forEurope)
Button Start 1115ASmart Key Control Module
Module 7MODULE 77.5AFront Seat Warmer Control Module, Front Air Ventilation Seat Control Module,
Rear Seat Warmer Module
Instrument panel fuse panel
7-48
Page 516 of 582
7-50
Maintenance
Fuse NameSymbolFuse RatingCircuit Protected
AMP30AAMP
Module 1MODULE110ADriver Power Outside Mirror, Passenger Power Outside Mirror, Data Link Connector, AEB Unit
Door Lock20ADoor Lock/Unlock Relay, ICM Relay Box (Dead Lock Relay),
Driver/Passenger Smart Key Outside Handle, Driver/Passenger Door Module
Wiper Front 2FRT210AWiper Motor, PCB Block (Front Wiper (Low) Relay)
Module 6MODULE 67.5ABCM, Smart Key Control Module
Seat Heater FrontFRT25AFront Seat Warmer Control Module, Front Air Ventilation Seat Control Module
Heated Mirror10ADriver Power Outside Mirror, Passenger Power Outside Mirror, A/C Control Module
Rear Heated25ARear Defogger (+) (Upper)
Wiper Front 1FRT130AWiper Motor, PCB Block (Front Wiper (Low) Relay)
Instrument panel fuse panel
Page 536 of 582
7-70
Maintenance
1. Using a flat-head screwdriver,gently pry the lens from the interi- or light housing.
2. Remove the bulb by pulling it straight out.
3. Install a new bulb in the socket.
4. Align the lens tabs with the interior light housing notches and snap
the lens into place.
Use care not to dirty or damage
lenses, lens tabs, and plastichousings.
NOTICE
■ Vanity mirror lamp
■Tailgate room lamp
OAE076048
OAE076047
■ Map lamp (Bulb type)
OAE076045
OAE076046
■Room lamp (Bulb type)
Map lamp, room lamp, vanity mirror lamp and tailgate room lamp