Page 312 of 582

4-16
Multimedia System
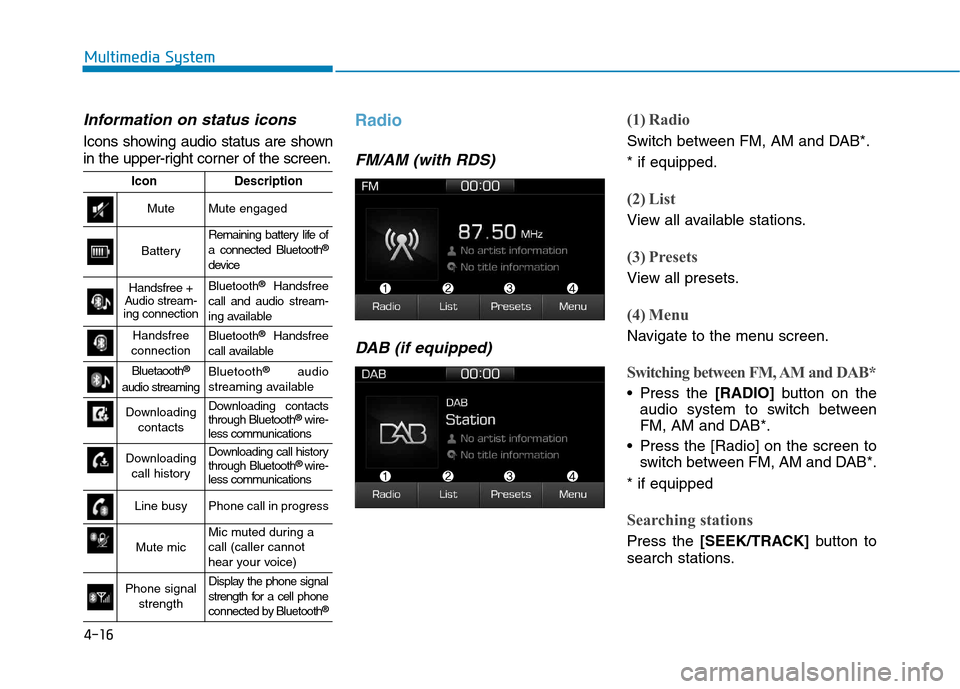
Information on status icons
Icons showing audio status are shown
in the upper-right corner of the screen.
Radio
FM/AM (with RDS)DAB (if equipped)
(1) Radio
Switch between FM, AM and DAB*. * if equipped.
(2) List
View all available stations.
(3) Presets
View all presets.
(4) Menu
Navigate to the menu screen.
Switching between FM, AM and DAB*
Press the [RADIO]button on the
audio system to switch between
FM, AM and DAB*.
Press the [Radio] on the screen to switch between FM, AM and DAB*.
* if equipped
Searching stations
Press the [SEEK/TRACK] button to
search stations.
IconDescription
MuteMute engaged
Battery
Remaining battery life of a connected Bluetooth ®
device
Handsfree +
Audio stream-
ing connectionBluetooth ®
Handsfree
call and audio stream-
ing available
Handsfree
connectionBluetooth ®
Handsfree
call available
Bluetaooth ®
audio streamingBluetooth ®
audio
streaming available
Downloading contactsDownloading contacts through Bluetooth ®
wire-
less communications
Downloading
call historyDownloading call history through Bluetooth ®
wire-
less communications
Line busyPhone call in progress
Mute micMic muted during a call (caller cannot
hear your voice)
Phone signal
strengthDisplay the phone signal
strength for a cell phone
connected by Bluetooth ®
Page 313 of 582
![Hyundai Ioniq Electric 2017 Owners Manual 4-17
Multimedia System
4
List
A list of all available stations in the
vehicle’s current location is dis-
played. Press the desired station.
Favourite stations can be saved to
[Presets] by pressin Hyundai Ioniq Electric 2017 Owners Manual 4-17
Multimedia System
4
List
A list of all available stations in the
vehicle’s current location is dis-
played. Press the desired station.
Favourite stations can be saved to
[Presets] by pressin](/manual-img/35/14909/w960_14909-312.png)
4-17
Multimedia System
4
List
A list of all available stations in the
vehicle’s current location is dis-
played. Press the desired station.
Favourite stations can be saved to
[Presets] by pressing the [+].
Presets
Save up to 40 frequently used stations.
To listen to a preset, press the desired station list. Press and hold the desired slot from
1 through 40. This saves the currentstation in the selected slot.
If the slot is empty, simply pressing
saves the station to the slot.
Menu
Press the [Menu], and select the desired function.
Traffic Announcement (TA): Enableor disable Traffic Announcements.
Scan: All available stations are played for five seconds each.
Sound Settings: Audio sound set- tings can be changed.
FM/AM (without RDS)
(1) Band
Switch between FM, AM.
(2) Presets
View all presets.
(3) List
View all available stations.
(4) Menu
Navigate to the menu screen.
Switching between FM, AM
Press the [RADIO]button on the
audio system to switch between FM, AM.
Press the [Band] on the screen to switch between FM, AM.
Searching stations
Press the [SEEK/TRACK] button to
search stations.
List
A list of all available stations in the
vehicle’s current location is dis-
played. Press the desired station.
Favourite stations can be saved to
[Presets] by pressing the [save].
Page 447 of 582

6-6
What to do in an emergency
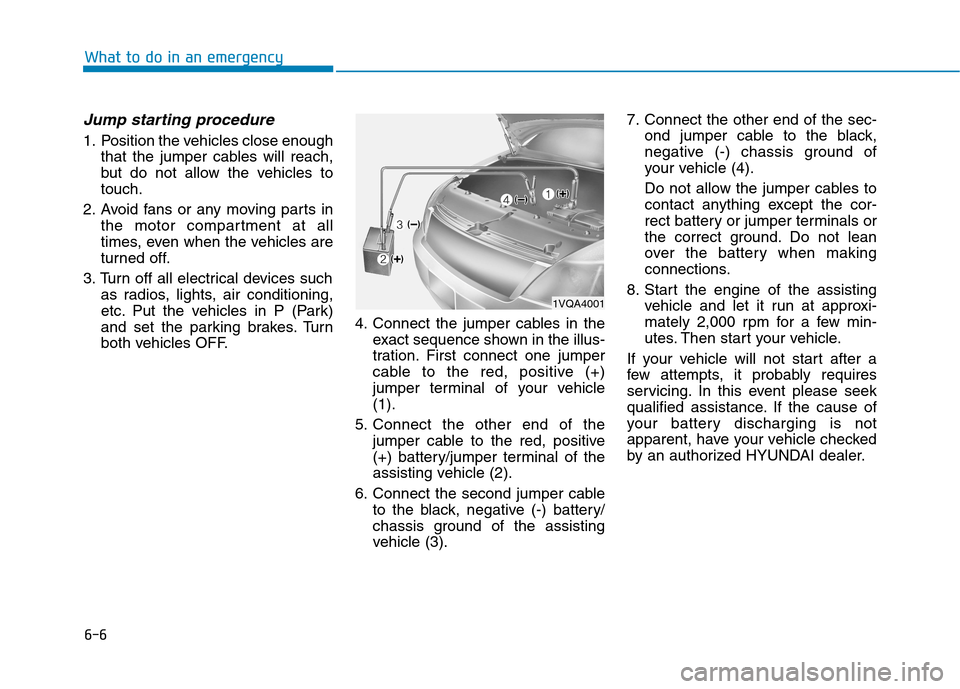
Jump starting procedure
1. Position the vehicles close enoughthat the jumper cables will reach,
but do not allow the vehicles totouch.
2. Avoid fans or any moving parts in the motor compartment at all
times, even when the vehicles are
turned off.
3. Turn off all electrical devices such as radios, lights, air conditioning,
etc. Put the vehicles in P (Park)
and set the parking brakes. Turn
both vehicles OFF. 4. Connect the jumper cables in the
exact sequence shown in the illus-
tration. First connect one jumper
cable to the red, positive (+)
jumper terminal of your vehicle(1).
5. Connect the other end of the jumper cable to the red, positive
(+) battery/jumper terminal of the
assisting vehicle (2).
6. Connect the second jumper cable to the black, negative (-) battery/
chassis ground of the assisting
vehicle (3). 7. Connect the other end of the sec-
ond jumper cable to the black,
negative (-) chassis ground of
your vehicle (4).
Do not allow the jumper cables to
contact anything except the cor-
rect battery or jumper terminals or
the correct ground. Do not lean
over the battery when making
connections.
8. Start the engine of the assisting vehicle and let it run at approxi-
mately 2,000 rpm for a few min-
utes. Then start your vehicle.
If your vehicle will not start after a
few attempts, it probably requires
servicing. In this event please seek
qualified assistance. If the cause of
your battery discharging is not
apparent, have your vehicle checked
by an authorized HYUNDAI dealer.
1VQA4001
Page 454 of 582

6-13
What to do in an emergency
6
The TPMS Malfunction Indicator
may illuminate after blinking for
one minute if the vehicle is near
electric power supply cables or
radio transmitters such as police
stations, government and public
offices, broadcasting stations,
military installations, airports,
transmitting towers, etc.
Additionally, the TPMS Malfunction
Indicator may illuminate if snow
chains are used or electronic
devices such as computers, charg-
ers, remote starters, navigation,
etc. This may interfere with normal
operation of the TPMS.
Changing a tire with TPMS
If you have a flat tire, the Low Tire
Pressure and Position telltales will
come on. Have the flat tire repaired
by an authorized HYUNDAI dealer
as soon as possible or replace the
flat tire with the spare tire.
Once the original tire equipped with
a tire pressure monitoring sensor isreinflated to the recommended pres-
sure and reinstalled on the vehicle,
the Low Tire Pressure Telltale andTPMS Malfunction Indicator will go
off within a few minutes of driving.
If the indicators do not extinguish
after a few minutes, please visit an
authorized HYUNDAI dealer.Each wheel is equipped with a tirepressure sensor mounted inside the
tire behind the valve stem. You must
use TPMS specific wheels. It is rec-
ommended that you always have
your tires serviced by an authorized
HYUNDAI dealer.
You may not be able to identify a tire
with low pressure by simply looking
at it. Always use a good quality tire
pressure gauge to measure. Pleasenote that a tire that is hot (from being
driven) will have a higher pressuremeasurement than a tire that is cold.
A cold tire means the vehicle has
been sitting for 3 hours and driven forless than 1.6 km (1 mile) in that 3
hour period.
Allow the tire to cool before measur-
ing the inflation pressure. Always be
sure the tire is cold before inflating to
the recommended pressure.
NOTICE
Never use a puncture-repairing
agent not approved by HYUNDAIdealer to repair and/or inflate a
low pressure tire. Tire sealant
not approved by HYUNDAI deal-
er may damage the tire pressure
sensor.
CAUTION
Page 552 of 582
8-9
8
Specifications & Consumer information
The radio frequency components of
the vehicle comply with requirements
and other relevant provisions of
Directive 1995/5/EC.
Further information including the
manufacturer's declaration of con-
formity is available on HYUNDAI
web site as follows:
http://service.hyundai-motor.com
CE0678
DDEECCLLAA RRAA TTIIOO NN OO FF
C
C OO NNFFOO RRMM IITT YY
■ Example
Page:
< prev 1-8 9-16 17-24