2017 HYUNDAI I30 brakes
[x] Cancel search: brakesPage 465 of 659
5-161
Driving your vehicle
5
Trailer brakes
If your trailer is equipped with a brak-
ing system, make sure it conforms
your country’s regulations and that it
is properly installed and operating
correctly.
If your trailer weighs more than the
maximum trailer weight without trail-
er brakes loaded, then it needs its
own brakes and they must be ade-
quate. Be sure to read and follow the
instructions for the trailer brakes so
you’ll be able to install, adjust and
maintain them properly. Be sure not
to tap into your vehicle's brake sys-
tem.
Driving with a trailer
Towing a trailer requires a certain
amount of experience. Before setting
out for the open road, you must get
to know your trailer. Acquaint your-
self with the feel of handling and
braking with the added weight of the
trailer. And always keep in mind that
the vehicle you are driving is now
longer and not nearly as responsive
as your vehicle is by itself.
Before you start, check the trailer
hitch and platform, safety chains,
electrical connector(s), lights, tires
and brakes.
During your trip, occasionally check
to be sure that the load is secure,
and that the lights and trailer brakes
are still working.
Distance
Stay at least twice as far behind the
vehicle ahead as you would when
driving your vehicle without a trailer.
This can help you avoid situations
that require heavy braking and sud-
den turns.
Passing
You will need more passing distance
up ahead when you’re towing a trail-
er. And, because of the increased
vehicle length, you’ll need to go
much farther beyond the passed
vehicle before you can return to your
lane.
Do not use a trailer with its own
brakes unless you are absolute-
ly certain that you have proper-
ly set up the brake system. This
is not a task for amateurs. Use
an experienced, competent trail-
er shop for this work.
WARNING
Page 467 of 659
5-163
Driving your vehicle
5
Driving on hills
Reduce speed and shift to a lower
gear before you start down a long or
steep downgrade. If you don’t shift
down, you might have to use your
brakes so much that they would get
overheated and may not operate effi-
ciently.
On a long uphill grade, shift down
and reduce your speed to around 70
km/h (45 mph) to reduce the possi-
bility of engine and transmission
overheating.
If your trailer weighs more than the
maximum trailer weight without trail-
er brakes and you have an automat-
ic transmission/dual clutch transmis-
sion, you should drive in D (Drive)
when towing a trailer.
Operating your vehicle in D (Drive)
when towing a trailer will minimize
heat build-up and extend the life of
your transmission.To prevent engine and/or trans-
mission overheating:
When towing a trailer on steep
grades (in excess of 6%) pay
close attention to the engine
coolant temperature gauge to
ensure the engine does not
overheat. If the needle of the
coolant temperature gauge
moves towards "H" (HOT), pull
over and stop as soon as it is
safe to do so, and allow the
engine to idle until it cools
down. You may proceed once the
engine has cooled sufficiently.
If you tow a trailer with the max- imum gross vehicle weight and
maximum trailer weight, it can
cause the engine or transmis-
sion to overheat. When driving
in such conditions, allow the
engine to idle until it cools
down. You may proceed once the
engine or transmission has
cooled sufficiently.
(Continued)(Continued)
You must decide your vehicle
speed according to trailer weight
and uphill grade.
Vehicles equipped with a dual clutch transmission when tow-
ing a trailer on steep grades, the
clutch in the transmission could
overheat.
When the clutch is overheated,
the safe protection mode
engages. If the safe protection
mode engages, the gear posi-
tion indicator on the cluster
blinks with a chime sound.
At this time, a warning message
will appear on the LCD display
and driving may not be smooth.
If you ignore this warning, the
driving condition may become
worse.
To return to normal driving con-
dition, stop the vehicle on a flat
road and apply the foot brake for
a few minutes before driving off.
NOTICE
Page 468 of 659
5-164
Driving your vehicle
Parking on hills
Generally, if you have a trailer
attached to your vehicle, you should
not park your vehicle on a hill.
However, if you ever have to park
your trailer on a hill, here's how to do
it:
1. Pull the vehicle into the parkingspace.
Turn the steering wheel in the direction of the curb (right if head-
ed down hill, left if headed up hill).
2. Shift the vehicle to P (Park, for automatic transmission/dual
clutch transmission vehicle) or
neutral (for manual transmission
vehicle).
3. Set the parking brake and shut off the vehicle.
4. Place wheel chocks under the trailer wheels on the down hill side
of the wheels.
5. Start the vehicle, hold the brakes, shift to neutral, release the park-
ing brake and slowly release the
brakes until the trailer chocks
absorb the load. 6. Reapply the brakes and parking
brakes.
7. Move the shift lever to P (Park, for automatic transmission/dual
clutch transmission vehicle) or 1st
gear when the vehicle is parked
on a uphill grade and in R
(Reverse) on a downhill (for man-
ual transmission vehicle).
8. Shut off the vehicle and release the vehicle brakes but leave the
parking brake set.
Ready to leave after parking ona hill
1. With the shift lever to P (Park, for
automatic transmission/dual clutch
transmission vehicle) or neutral (for
manual transmission vehicle),
apply your brakes and hold the
brake pedal down while you:
and
2. Slowly remove your foot from the brake pedal.
3. Drive slowly until the trailer is clear of the chocks.
4. Stop and have someone pick up and store the chocks.
To prevent serious or fatal
injury:
Do not get out of the vehicle
without the parking brake
firmly set. If you have left the
engine running, the vehicle
can move suddenly. You and
others could be seriously or
fatally injured.
Do not apply the accelerator
pedal to hold the vehicle on
an uphill.
WARNING
Page 473 of 659

6-3
What to do in an emergency
If you have a flat tire while
driving
If a tire goes flat while you are driving:
Take your foot off the acceleratorpedal and let the vehicle slow
down while driving straight ahead.
Do not apply the brakes immedi-
ately or attempt to pull off the road
as this may cause loss of vehicle
control resulting in an accident.
When the vehicle has slowed to
such a speed that it is safe to do
so, brake carefully and pull off the
road. Drive off the road as far as
possible and park on firm, level
ground. If you are on a divided
highway, do not park in the median
area between the two traffic lanes. When the vehicle is stopped, press
the hazard warning flasher button,
move the shift lever into P (Park,
for automatic transmission/dual
clutch transmission vehicle) or neu-
tral (for manual transmission vehi-
cle), apply the parking brake, and
place the ignition switch in the
LOCK/OFF position.
Have all passengers get out of the vehicle. Be sure they all get out on
the side of the vehicle that is away
from traffic.
When changing a flat tire, follow the instructions provided later in
this chapter.If the engine doesn't turn over
or turns over slowly
Be sure the shift lever is in N(Neutral) or P (Park) if it is an auto-
matic transmission/dual clutch
transmission vehicle. The engine
starts only when the shift lever is in
N (Neutral) or P (Park).
Check the battery connections to be sure they are clean and tight.
Turn on the interior light. If the light dims or goes out when you operate
the starter, the battery is drained.
Do not push or pull the vehicle to start
it. This could cause damage to your
vehicle. See instructions for "Jump
Starting" provided in this chapter.
6
I
I F
F
T
T H
H E
E
E
E N
N G
G I
I N
N E
E
W
W I
I L
L L
L
N
N O
O T
T
S
S T
T A
A R
R T
T
Push or pull starting the vehicle
may cause the catalytic con-
verter to overload which can
lead to damage to the emission
control system.
CAUTION
Page 475 of 659

6-5
What to do in an emergency
To prevent damage to your vehi-
cle:
Only use a 12-volt power supply(battery or jumper system) to
jump start your vehicle.
Do not attempt to jump start your vehicle by push-starting.
Information
An inappropriately disposedbattery can be harmful to the
environment and human
health. Dispose the battery
according to your local law(s)
or regulations.
Jump starting procedure
1. Position the vehicles close enough that the jumper cables will reach,
but do not allow the vehicles to
touch.
2. Avoid fans or any moving parts in the engine compartment at all
times, even when the vehicles are
turned off.
3. Turn off all electrical devices such as radios, lights, air conditioning,
etc. Put the vehicles in P (Park, for
automatic transmission/dual
clutch transmission vehicle) or
neutral (for manual transmission
vehicle), and set the parking
brakes. Turn both vehicles OFF.
i
NOTICE
6
(Continued)
When lifting a plastic-cased
battery, excessive pressure
on the case may cause battery
acid to leak. Lift with a battery
carrier or with your hands on
opposite corners.
Do not attempt to jump start
your vehicle if your battery is
frozen.
NEVER attempt to recharge
the battery when the vehicle’s
battery cables are connected
to the battery.
The electrical ignition system
works with high voltage.
NEVER touch these compo-
nents with the engine running
or when the ignition switch is
in the ON position.
Do not allow the (+) and (-)
jumper cables to touch. It may
cause sparks.
The battery may rupture or
explode when you jump start
with a low or frozen battery.
Pb
Page 483 of 659
6-13
What to do in an emergency
6
If you drive the vehicle for about 10
minutes at speeds above 25 km/h
after replacing the low pressure tire
with the spare tire, the below will
happen:
The TPMS malfunction indicatormay blink for approximately 1 minute
and then remain continuously illumi-
nated because the TPMS sensor is
not mounted on the spare wheel. You may not be able identify a low
tire by simply looking at it. Always
use a good quality tire pressure
gauge to measure the tire's inflation
pressure. Please note that a tire that
is hot (from being driven) will have a
higher pressure measurement than a
tire that is cold (from sitting station-
ary for at least 3 hour and driven less
than 1.6 km (1 mile) during that 3
hour period).
Allow the tire to cool before measur-
ing the inflation pressure. Always be
sure the tire is cold before inflating to
the recommended pressure.
A cold tire means the vehicle has
been sitting for 3 hours and driven for
less than 1.6 km (1 mile) in that 3
hour period.
The TPMS cannot alert you to
severe and sudden tire dam-
age caused by external factors
such as nails or road debris.
If you feel any vehicle instabil-
ity, immediately take your foot
off the accelerator, apply the
brakes gradually and with
light force, and slowly move to
a safe position off the road.
WARNING
Page 511 of 659
6-41
What to do in an emergency
6
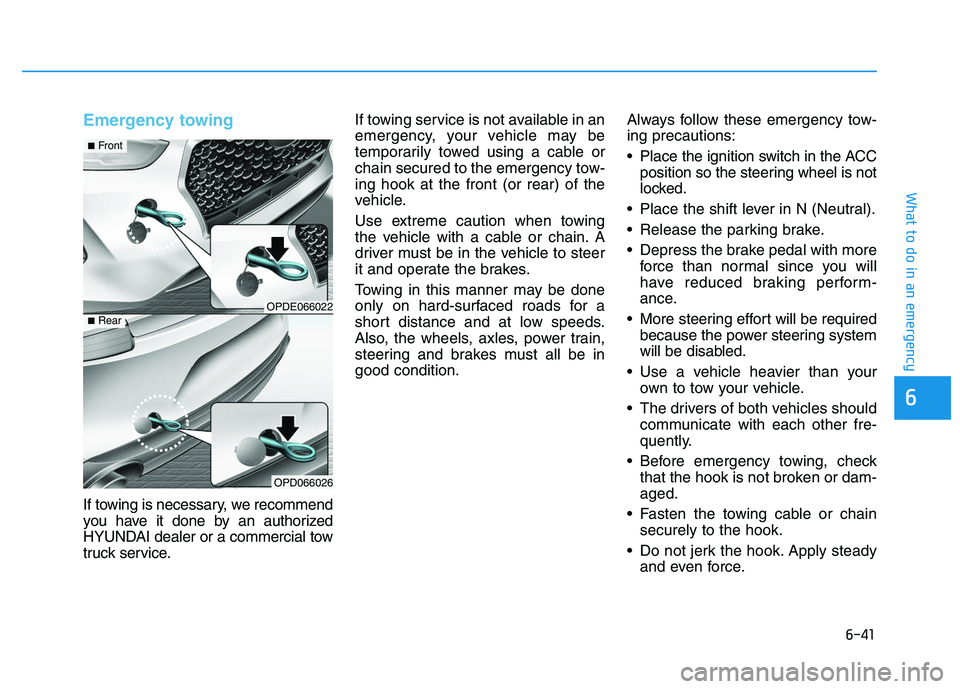
Emergency towing
If towing is necessary, we recommend
you have it done by an authorized
HYUNDAI dealer or a commercial tow
truck service.If towing service is not available in an
emergency, your vehicle may be
temporarily towed using a cable or
chain secured to the emergency tow-
ing hook at the front (or rear) of the
vehicle.
Use extreme caution when towing
the vehicle with a cable or chain. A
driver must be in the vehicle to steer
it and operate the brakes.
Towing in this manner may be done
only on hard-surfaced roads for a
short distance and at low speeds.
Also, the wheels, axles, power train,
steering and brakes must all be in
good condition.
Always follow these emergency tow-
ing precautions:
Place the ignition switch in the ACC
position so the steering wheel is not
locked.
Place the shift lever in N (Neutral).
Release the parking brake.
Depress the brake pedal with more force than normal since you will
have reduced braking perform-
ance.
More steering effort will be required because the power steering system
will be disabled.
Use a vehicle heavier than your own to tow your vehicle.
The drivers of both vehicles should communicate with each other fre-
quently.
Before emergency towing, check that the hook is not broken or dam-
aged.
Fasten the towing cable or chain securely to the hook.
Do not jerk the hook. Apply steady and even force.
OPDE066022
OPD066026
■Front
■Rear
Page 526 of 659

7-13
7
Maintenance
Normal Maintenance Schedule (Gasoline Engine, for Europe) (Cont.)
I : Inspect and if necessary, adjust, correct, clean or replace.
R : Replace or change.
*
8: Manual transmission/dual clutch transmission fluid should be changed anytime they have been submerged in water.
*9: Inspect for excessive valve noise and/or engine vibration and adjust if necessary.We recommend that the system be checked by an authorized HYUNDAI dealer.
Months24487296120144168192
Miles x 1,00020406080100120140160
Km x 1,000306090120150180210240
Brake/clutch fluidRRRRRRRR
Disc brakes and padsIIIIIIII
Steering gear rack, linkage and bootsIIIIIIII
Driveshaft and bootsIIIIIIII
Tire (pressure & tread wear)IIIIIIII
Front suspension ball jointsIIIIIIII
Air conditioner refrigerant IIIIIIII
Air conditioner compressor IIIIIIII
Climate control air filter RRRRRRRR
Manual transmission fluid *8IIII
Dual clutch transmission fluid *8IIII
Automatic transaxle fluid No check, No service required
Valve clearance (1.6 MPI) *9II
Exhaust systemIIIIIIII
MAINTENANCE INTERVALS
MAINTENANCE
ITEM