Page 316 of 637
4-59
Multimedia System
4
(7) DISP
• Each time the button is shortly
pressed, sets Screen Off ➟Screen
On ➟Screen Off
• Audio operation is maintained and
only the screen will be turned Off.
• In the Screen Off state, press any
button to turn the Screen On again.(8) CLOCK
• Displays the time/date/day.
(9) TA/SCAN
• Radio mode
- Shortly press the button : TA
On/Off
- Press and hold the button :
Previews each broadcast for 5
seconds each.
• CD, USB, My Music mode
- Press and hold the button :
Previews each song (file) for 10
seconds each.
- Press and hold the button again
to continue listening to the cur-
rent song (file).(10) SETUP
• Converts to Setup mode.
(11) TUNE knob
• Radio mode : turn to change
broadcast frequencies.
• CD, USB, iPod
®, My Music mode :
turn to search tracks/channels/
files.
(12) FOLDER
• MP3 CD/USB mode : Folder Search
Page 319 of 637
4-62
Multimedia System
(7) DISP
• Each time the button is shortly
pressed, sets Screen Off ➟Screen
On ➟Screen Off
• Audio operation is maintained and
only the screen will be turned Off.
• In the Screen Off state, press any
button to turn the Screen On again.(8) CLOCK
• Displays the time/date/day.
(9) SCAN
• Radio mode : previews all receiv-
able broadcasts for 5 seconds
each.
• CD, USB, My Music mode : pre-
views each song (file) for 10 sec-
onds each.
(10) SETUP
• Converts to Setup mode.(11) TUNE knob
• Radio mode : turn to change
broadcast frequencies.
• CD, USB, iPod
®, My Music mode :
turn to search tracks/channels/
files.
(12) FOLDER
• MP3 CD/USB mode : Folder
Search
Page 360 of 637
4-103
Multimedia System
4
Setup Mode
(Type B-1, Type B-2,Type B-3,
Type B-4)
Press the [SETUP]button to display
the Setup screen.
You can select and control options
related to [Display], [Sound], [Clock/
Day], [Phone] and [System].
With the Display Button
Press the [SETUP]button
�Select
[Display]
You can select and control options
related to [Brightness], [Pop-up
Mode], [Scroll text] and [Song Info].
Adjusting the Brightness
Use the [Left/Right] buttons to adjust
the screen brightness or set the
Brightness on Automatic, Day or
Night mode.
Press the [Default] button to reset.
• Automatic : Adjusts the brightness
automatically.
• Day : Always maintains the bright-
ness on high.
• Night : Always maintains the bright-
ness on low.
Page 363 of 637
4-106
Multimedia System
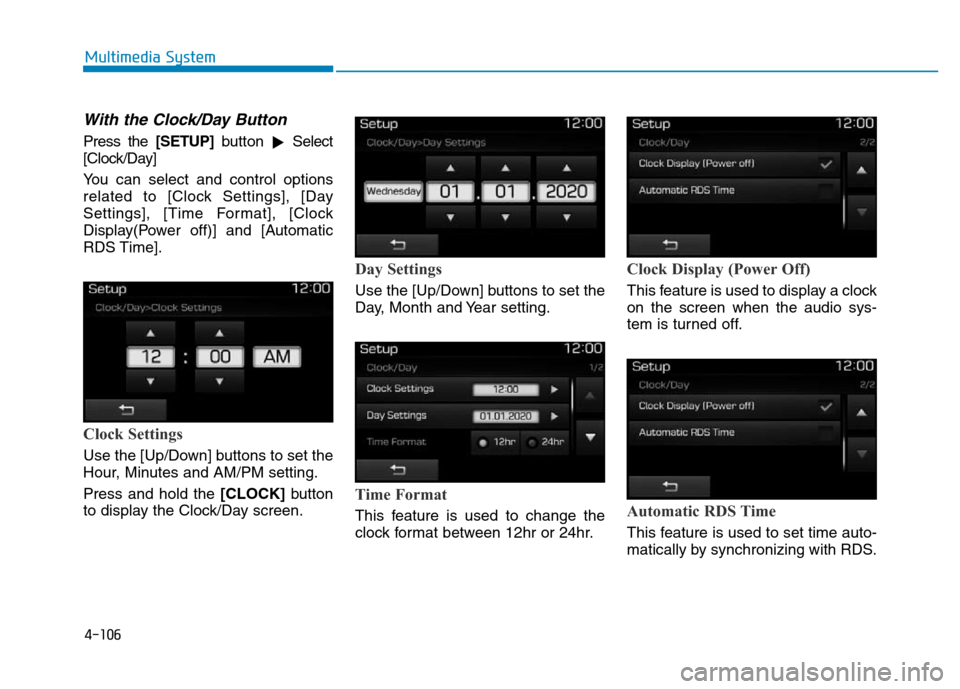
With the Clock/Day Button
Press the [SETUP]button
�Select
[Clock/Day]
You can select and control options
related to [Clock Settings], [Day
Settings], [Time Format], [Clock
Display(Power off)] and [Automatic
RDS Time].
Clock Settings
Use the [Up/Down] buttons to set the
Hour, Minutes and AM/PM setting.
Press and hold the [CLOCK]button
to display the Clock/Day screen.
Day Settings
Use the [Up/Down] buttons to set the
Day, Month and Year setting.
Time Format
This feature is used to change the
clock format between 12hr or 24hr.
Clock Display (Power Off)
This feature is used to display a clock
on the screen when the audio sys-
tem is turned off.
Automatic RDS Time
This feature is used to set time auto-
matically by synchronizing with RDS.
Page 367 of 637
4-110
Multimedia System
Setup Mode
(Type B-5, Type B-6)
Press the [SETUP]button to display
the Setup screen.
You can select and control options
related to [Display], [Sound],
[Clock/Calendar], [Phone] and
[System].
With the Display Button
Press the [SETUP]button
�Select
[Display]
You can select and control options
related to [Brightness], [Mode Pop
up], [Text Scroll] and [Media Display].
Adjusting the Brightness
Use the [Left/Right] buttons to adjust
the screen brightness or set the
Brightness on Automatic, Day or
Night mode.
Press the [Default] button to reset.
• Automatic : Adjusts the brightness
automatically.
• Day : Always maintains the bright-
ness on high.
• Night : Always maintains the bright-
ness on low.
Page 370 of 637
4-113
Multimedia System
4
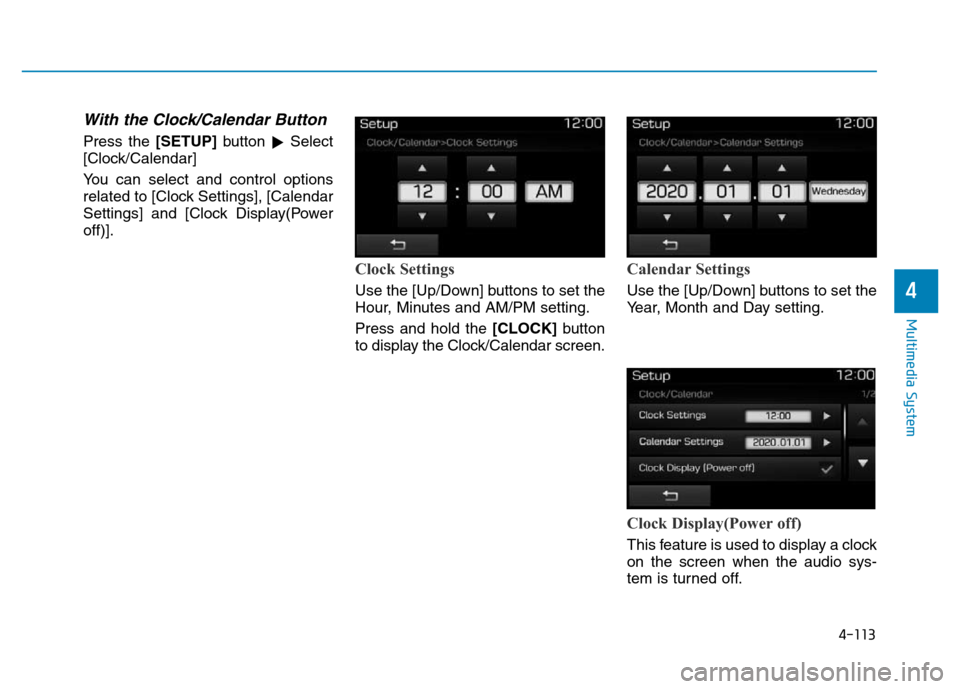
With the Clock/Calendar Button
Press the [SETUP]button
�Select
[Clock/Calendar]
You can select and control options
related to [Clock Settings], [Calendar
Settings] and [Clock Display(Power
off)].
Clock Settings
Use the [Up/Down] buttons to set the
Hour, Minutes and AM/PM setting.
Press and hold the [CLOCK]button
to display the Clock/Calendar screen.
Calendar Settings
Use the [Up/Down] buttons to set the
Year, Month and Day setting.
Clock Display(Power off)
This feature is used to display a clock
on the screen when the audio sys-
tem is turned off.
Page 491 of 637

6-8
What to do in an emergency
If your temperature gauge indicates
overheating, you experience a loss
of power, or hear loud pinging or
knocking, the engine may be over-
heating. If this happens, you should:
1. Pull off the road and stop as soon
as it is safe to do so.
2. Place the shift lever in P (Park, for
automatic transmission vehicle) or
neutral (for manual transmission
vehicle) and set the parking brake.
If the air conditioning is ON, turn it
OFF.
3. If engine coolant is running out
under the vehicle or steam is com-
ing out from the hood, stop the
engine. Do not open the hood until
the coolant has stopped running
or the steaming has stopped. If
there is no visible loss of engine
coolant and no steam, leave the
engine running and check to be
sure the engine cooling fan is
operating. If the fan is not running,
turn the engine off.4. Check for coolant leaking from the
radiator, hoses or under the vehi-
cle. (If the air conditioning had been
in use, it is normal for cold water to
be draining from it when you stop.)
5. If engine coolant is leaking out, stop
the engine immediately and we rec-
ommend that you call an authorized
HYUNDAI dealer for assistance.
IF THE ENGINE OVERHEATS
While the engine is
running, keep hands,
clothing and tools
away from the mov-
ing parts such as the
cooling fan and drive
belt to prevent seri-
ous injury.
WARNING
NEVER remove the
radiator cap or the
drain plug while the
engine and radiator
are hot. Hot coolant
and steam may blow out under
pressure, causing serious injury.
Turn the engine off and wait
until the engine cools down.
Use extreme care when remov-
ing the radiator cap. Wrap a
thick towel around it, and turn it
counterclockwise slowly to the
first stop. Step back while the
pressure is released from the
cooling system. When you are
sure all the pressure has been
released, press down on the
cap, using a thick towel, and
continue turning counterclock-
wise to remove it.
WARNING
Page 578 of 637
7-67
7
Maintenance
Fuse switch
Always, place the fuse switch to the
ON position.
If you move the switch to the OFF
position, some items such as the
audio system and digital clock must
be reset and the smart key may not
work properly.
Information
If the fuse switch is OFF, the above
message will appear.• Always place the fuse switch in
the ON position while driving the
vehicle.
• Place the fuse switch in the OFF
position when the vehicle is
parked more than a month to
prevent battery discharge.
• Do not move the transportation
fuse switch repeatedly. The fuse
switch may be damaged.
NOTICEi
OAD075023OAD045144/OTL045155L
■Conventional cluster ■Supervision cluster
Page:
< prev 1-8 9-16 17-24
 DISP
• Each time the button is shortly
pressed, sets Screen Off ➟Screen
On ➟Screen Off
• Audio operation is maintained and
only the screen will be turned Off.
•")
 DISP
• Each time the button is shortly
pressed, sets Screen Off ➟Screen
On ➟Screen Off
• Audio operation is maintained and
only the screen will be turned Off.
• In")
![Hyundai Elantra 2017 Owners Manual 4-103
Multimedia System
4
Setup Mode
(Type B-1, Type B-2,Type B-3,
Type B-4)
Press the [SETUP]button to display
the Setup screen.
You can select and control options
related to [Display], [Sound], [Clo](/manual-img/35/14543/w960_14543-359.png "Hyundai Elantra 2017 Owners Manual 4-103
Multimedia System
4
Setup Mode
(Type B-1, Type B-2,Type B-3,
Type B-4)
Press the [SETUP]button to display
the Setup screen.
You can select and control options
related to [Display], [Sound], [Clo")
![Hyundai Elantra 2017 Owners Manual 4-110
Multimedia System
Setup Mode
(Type B-5, Type B-6)
Press the [SETUP]button to display
the Setup screen.
You can select and control options
related to [Display], [Sound],
[Clock/Calendar], [Phone]](/manual-img/35/14543/w960_14543-366.png "Hyundai Elantra 2017 Owners Manual 4-110
Multimedia System
Setup Mode
(Type B-5, Type B-6)
Press the [SETUP]button to display
the Setup screen.
You can select and control options
related to [Display], [Sound],
[Clock/Calendar], [Phone]")