Page 329 of 637
Radio Mode
(Type B-1, Type B-2,Type B-3,
Type B-4)
Radio Mode Display Controls
(1) Mode Display
Displays currently operating mode.
(2) Frequency
Displays the current frequency.
(3) Preset
Displays current preset number [1] ~
[6].
(4) Preset Display
Displays saved presets.
(5) Auto store
Automatically saves frequencies with
superior reception to Preset buttons.
(6) RDS Menu
Displays the RDS Menu.
(7) RDS Info
Displays RDS broadcast information.
With the Radio Mode Button
Pressing the [RADIO]button will
change the operating mode in order
of FM1 ➟FM2 ➟FMA ➟AM ➟
AMA.
If [Pop-up Mode] is turned on within
[SETUP]�[Display], then pressing
the [RADIO]button will display the
Radio Pop-up Mode screen.
Turn the TUNEknob to move the
focus. Press the knob to select.
SEEK
Press the [SEEK TRACK]button to
play the previous/next frequency.
TUNE
Turn the TUNEknob to select the
desired frequency.
4-72
Multimedia System
Page 330 of 637
![Hyundai Elantra 2017 Owners Manual 4-73
Multimedia System
4
Selecting/Saving Presets
Press the [1] ~ [6] buttons to play the
desired preset.
Press the [Preset] button to display
the broadcast information for the fre-
quency saved to ea](/manual-img/35/14543/w960_14543-329.png "Hyundai Elantra 2017 Owners Manual 4-73
Multimedia System
4
Selecting/Saving Presets
Press the [1] ~ [6] buttons to play the
desired preset.
Press the [Preset] button to display
the broadcast information for the fre-
quency saved to ea")
4-73
Multimedia System
4
Selecting/Saving Presets
Press the [1] ~ [6] buttons to play the
desired preset.
Press the [Preset] button to display
the broadcast information for the fre-
quency saved to each button.
While listening to a frequency you
want to save as a preset, press and
hold one of the [1] ~ [6] preset but-
tons to save the current frequency to
the selected preset.
Auto Store
Press the [Auto store] button to auto-
matically save receivable frequen-
cies to Preset buttons.
While Auto Store is operating, press-
ing the [Auto store] button again will
cancel Auto Store and restore the
previous frequency.
RDS Menu
Press the [RDS Menu] button to set
the AF (Alternative Frequency),
Region and News features.
The RDS Menu is not supported
within AM or AMA mode.
Scan
Press the [TA/SCAN]button :
Previews each broadcast for 5 sec-
onds each
Once scan is complete, the previous
frequency will be restored.
While Scan is operating, pressing
and holding the [TA/SCAN]button
will cancel the scan operation.
TA (Traffic Announcement)
Press the [TA/SCAN]button to turn
the TA (Traffic Announcement) feature
On/Off.
Page 331 of 637
4-74
Multimedia System
Radio Mode
(Type B-5, Type B-6)
Radio Mode Display Controls
(1) Mode Display
Displays currently operating mode.
(2) Frequency
Displays the current frequency.
(3) Preset
Displays current preset number [1] ~
[6].
(4) Preset Display
Displays preset buttons.
(5) Auto store
Automatically saves frequencies with
superior reception to Preset buttons.
With the Radio Mode Button
Pressing the [RADIO]button will
change the operating mode in order
of FM1
➟FM2 ➟AM.If [Mode Pop-up] is turned on within
[SETUP]�[Display], then pressing
the [RADIO]button will display the
Radio Mode Pop-up screen.
Turn the TUNEknob to move the
focus. Press the knob to select.
SEEK
Press the [SEEK TRACK]button to
play the previous/next frequency.
TUNE
Turn the TUNEknob to select the
desired frequency.
Selecting /Saving Presets
Press the [Preset] button to display
the broadcast information for the fre-
quency saved to each button.
Page 332 of 637
![Hyundai Elantra 2017 Owners Manual 4-75
Multimedia System
4
Press the [1] ~ [6] buttons to play the
desired preset.
While listening to a frequency you
want to save as a preset, press and
hold one of the [1] ~ [6] preset but-
tons to sa](/manual-img/35/14543/w960_14543-331.png "Hyundai Elantra 2017 Owners Manual 4-75
Multimedia System
4
Press the [1] ~ [6] buttons to play the
desired preset.
While listening to a frequency you
want to save as a preset, press and
hold one of the [1] ~ [6] preset but-
tons to sa")
4-75
Multimedia System
4
Press the [1] ~ [6] buttons to play the
desired preset.
While listening to a frequency you
want to save as a preset, press and
hold one of the [1] ~ [6] preset but-
tons to save the current frequency to
the selected preset.
Auto Store
Press the [Auto store] button to auto-
matically save receivable frequen-
cies to Preset buttons.
Scan
Press the [SCAN]button to preview
frequencies with superior reception
for 5 seconds each.
Press and hold the [SCAN]button to
preview presets for 5 seconds each.
Once scan is complete, the previous
frequency will be restored.
While Scan is operating, pressing
the [SCAN]button will cancel the
scan operation.
Media Mode
Media Mode Screen
Pressing the [MEDIA]buttonwill
change the operating mode in order
of CD ➟ USB(iPod
®) ➟ AUX ➟ My
Music ➟BT Audio.
If [Pop-up Mode] / [Mode Pop-up] is
turned on within [SETUP]�
[Display], then pressing the [MEDIA]
buttonwill display the Media Pop-up
Mode screen.
Turn the TUNEknob to move the
focus. Press the knob to select.
The media mode pop up screen can
be displayed only when there are two
or more media modes turned on.
Mode Display on the Status Bar
When a Bluetooth®Wireless
Technology, iPod®, USB or AUX
device is connected or a CD is
inserted, the corresponding mode
icon will be displayed.
IconTitle
Bluetooth®Wireless Technology
CD
iPod®
USB
AUX
Page 360 of 637
4-103
Multimedia System
4
Setup Mode
(Type B-1, Type B-2,Type B-3,
Type B-4)
Press the [SETUP]button to display
the Setup screen.
You can select and control options
related to [Display], [Sound], [Clock/
Day], [Phone] and [System].
With the Display Button
Press the [SETUP]button
�Select
[Display]
You can select and control options
related to [Brightness], [Pop-up
Mode], [Scroll text] and [Song Info].
Adjusting the Brightness
Use the [Left/Right] buttons to adjust
the screen brightness or set the
Brightness on Automatic, Day or
Night mode.
Press the [Default] button to reset.
• Automatic : Adjusts the brightness
automatically.
• Day : Always maintains the bright-
ness on high.
• Night : Always maintains the bright-
ness on low.
Page 362 of 637
4-105
Multimedia System
4
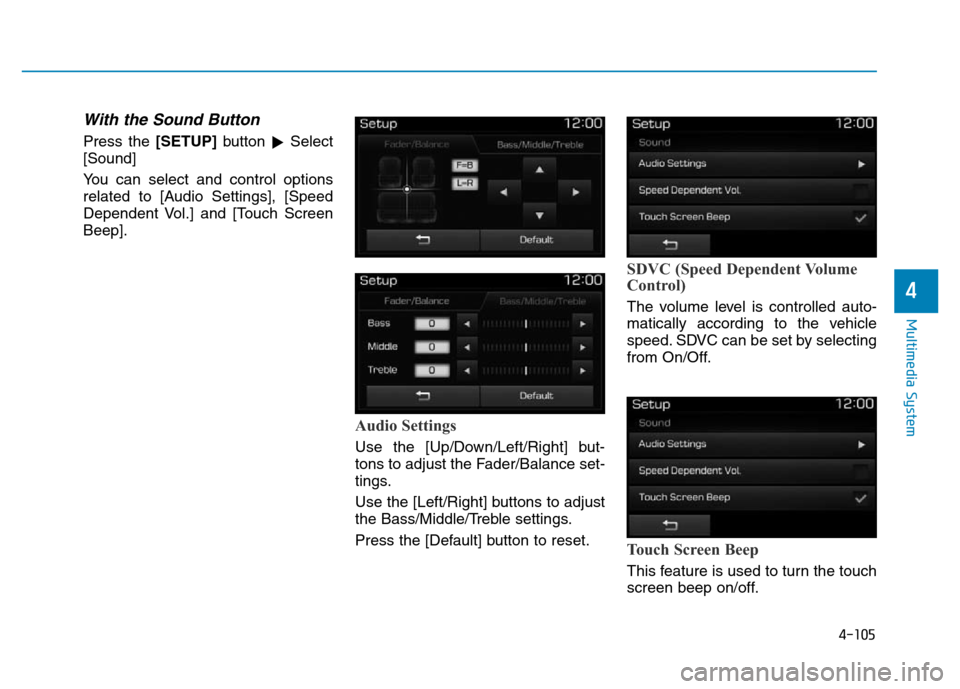
With the Sound Button
Press the [SETUP]button
�Select
[Sound]
You can select and control options
related to [Audio Settings], [Speed
Dependent Vol.] and [Touch Screen
Beep].
Audio Settings
Use the [Up/Down/Left/Right] but-
tons to adjust the Fader/Balance set-
tings.
Use the [Left/Right] buttons to adjust
the Bass/Middle/Treble settings.
Press the [Default] button to reset.
SDVC (Speed Dependent Volume
Control)
The volume level is controlled auto-
matically according to the vehicle
speed. SDVC can be set by selecting
from On/Off.
Touch Screen Beep
This feature is used to turn the touch
screen beep on/off.
Page 363 of 637
4-106
Multimedia System
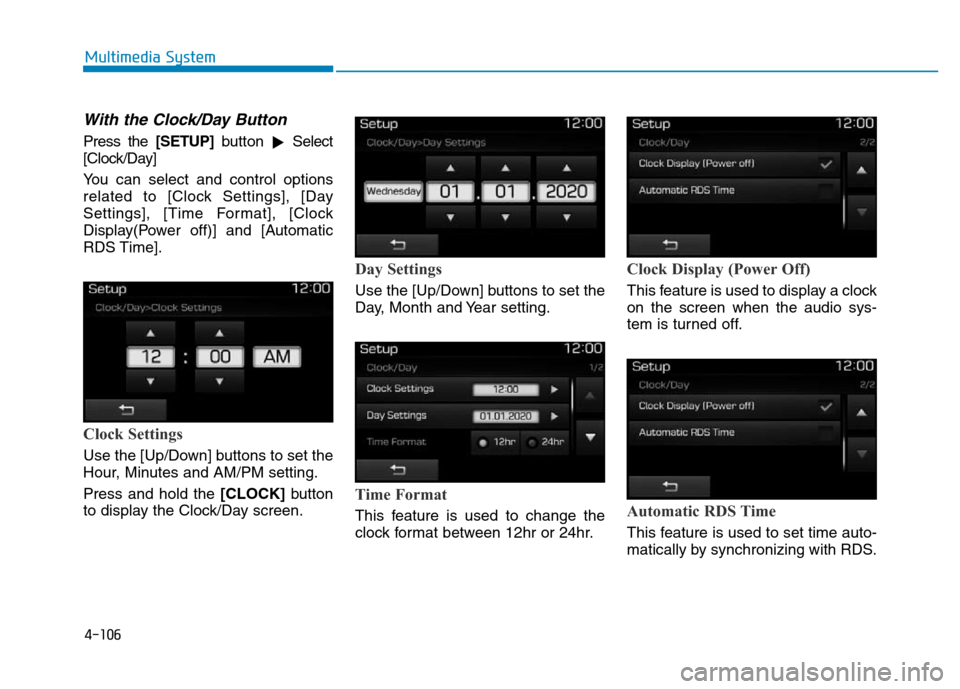
With the Clock/Day Button
Press the [SETUP]button
�Select
[Clock/Day]
You can select and control options
related to [Clock Settings], [Day
Settings], [Time Format], [Clock
Display(Power off)] and [Automatic
RDS Time].
Clock Settings
Use the [Up/Down] buttons to set the
Hour, Minutes and AM/PM setting.
Press and hold the [CLOCK]button
to display the Clock/Day screen.
Day Settings
Use the [Up/Down] buttons to set the
Day, Month and Year setting.
Time Format
This feature is used to change the
clock format between 12hr or 24hr.
Clock Display (Power Off)
This feature is used to display a clock
on the screen when the audio sys-
tem is turned off.
Automatic RDS Time
This feature is used to set time auto-
matically by synchronizing with RDS.
Page 365 of 637

4-108
Multimedia System
Downloading Phone books
As the Phone book is downloaded
from the mobile phone, downloading
Phone book number is displayed.
• Up to 1,000 phone book entries
can be copied into car phone book.
• Up to 1,000 phone book entries
can be saved for each paired
device.
• Upon downloading phone book
data, previously saved phone book
data will be deleted. However,
Phone book entries saved to other
paired phones are not deleted.
Auto Download (Phone Book)
This feature is used to automatically
download mobile phone book entries
once a
Bluetooth®Wireless Technology
phone is connected.
• The Auto Download feature will
download mobile phone book
entries every time the phone is
connected. The download time
may differ depending on the num-
ber of saved phone book entries
and the communication state.
• When downloading a phone book,
first check to see that your mobile
phone supports the phone book
download feature.
Outgoing Volume
Use the [-], [+] buttons to adjust the
outgoing volume level.

Radio Mode Display Controls
(1) Mode Display
Displays currently operating mode.
(2) Frequency
Displays the current frequency.
(3) Preset
Displays cur")

Radio Mode Display Controls
(1) Mode Display
Displays currently operating mode.
(2) Frequency
Displays the current frequency.
(3) Preset
Display")
![Hyundai Elantra 2017 Owners Manual 4-103
Multimedia System
4
Setup Mode
(Type B-1, Type B-2,Type B-3,
Type B-4)
Press the [SETUP]button to display
the Setup screen.
You can select and control options
related to [Display], [Sound], [Clo](/manual-img/35/14543/w960_14543-359.png "Hyundai Elantra 2017 Owners Manual 4-103
Multimedia System
4
Setup Mode
(Type B-1, Type B-2,Type B-3,
Type B-4)
Press the [SETUP]button to display
the Setup screen.
You can select and control options
related to [Display], [Sound], [Clo")