2017 Hyundai Elantra set clock
[x] Cancel search: set clockPage 140 of 571
3-48
Convenient features of your vehicle
Closing the fuel filler door
1. To install the fuel tank cap, turn it
clockwise until it “clicks” one time.
2. Close the fuel filler door until it is
latched securely.
Petrol is highly flammable and
explosive. Failure to follow
these guidelines may result in
SERIOUS INJURY or DEATH:
•Read and follow all warnings
posted at the service station.
•Before refuelling, note the
location of the Emergency
Petrol Shut-Off, if available, at
the service station.
•Before touching the fuel noz-
zle, you should eliminate the
potential build-up of static
electricity by touching a metal
part of the vehicle, a safe dis-
tance away from the fuel filler
neck, nozzle, or other fuel
source, with your bare hand.
(Continued)
WA R N I N G
(Continued)
•Do not use mobile phones
whilst refuelling. Electric cur-
rent and/or electronic interfer-
ence from mobile phones can
potentially ignite fuel vapours
and cause a fire.
•Do not get back into a vehicle
once you have begun refu-
elling. You can generate a
build-up of static electricity by
touching, rubbing or sliding
against any item or fabric
capable of producing static
electricity. Static electricity
discharge can ignite fuel
vapours causing a fire. If you
must re-enter the vehicle, you
should once again eliminate
potentially dangerous static
electricity discharge by touch-
ing a metal part of the vehicle,
away from the fuel filler neck,
nozzle or other fuel source,
with your bare hand.
(Continued)
(Continued)
•When refuelling, always move
the shift lever to the P (Park)
position (for automatic trans-
mission) or first gear or R
(Reverse, for manual trans-
mission), set the parking
brake, and place the ignition
switch to the LOCK/OFF posi-
tion. Sparks produced by
electrical components related
to the engine can ignite fuel
vapours causing a fire.
•When using an approved
portable fuel container, be
sure to place the container on
the ground prior to refuelling.
Static electricity discharge
from the container can ignite
fuel vapours causing a fire.
Once refuelling has begun,
contact between your bare
hand and the vehicle should
be maintained until the filling
is complete.
(Continued)
Page 260 of 571
4-11
Multimedia System
4
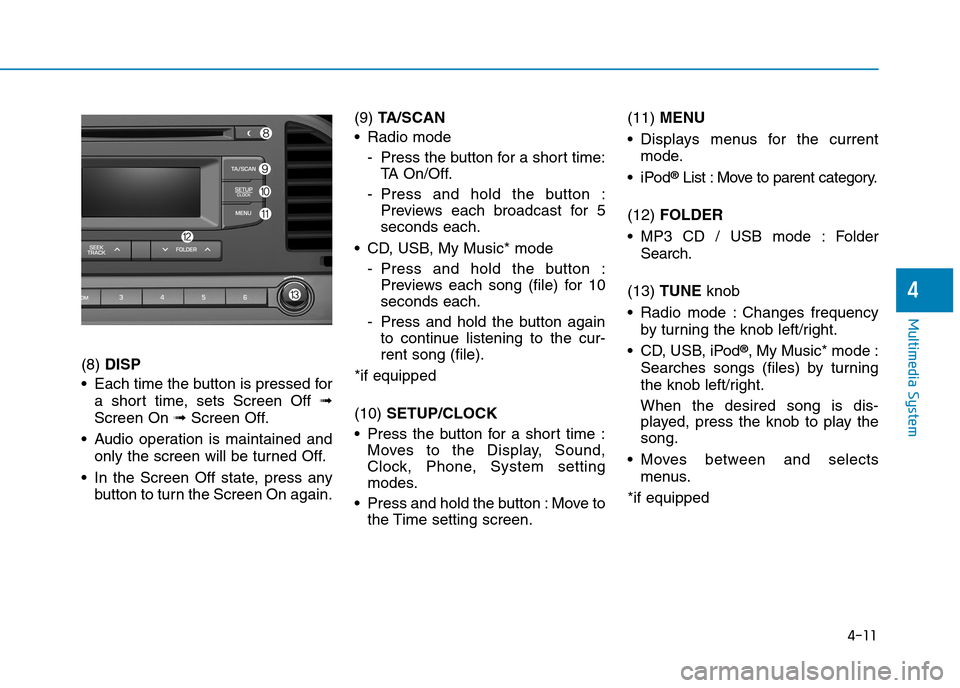
(8) DISP
•Each time the buttonis pressed for
a short time, sets Screen Off ➟
Screen On ➟Screen Off.
•Audio operation is maintained and
only the screen will be turned Off.
•In the Screen Off state, press any
button to turn the Screen On again.
(9) TA / S C A N
•Radio mode
-Press the button for a short time:
TA O n / O f f .
-Press and hold the button :
Previews each broadcast for 5
seconds each.
•CD, USB, My Music*mode
-Press and hold the button :
Previews each song (file) for 10
seconds each.
-Press and hold the buttonagain
to continue listening to the cur-
rent song (file).
*if equipped
(10) SETUP/CLOCK
•Press the button for a short time :
Moves to the Display, Sound,
Clock, Phone, System setting
modes.
•Press and hold the button:Move to
the Time setting screen.
(11) MENU
•Displays menus for the current
mode.
•iPod®List : Move to parent category.
(12) FOLDER
•MP3 CD / USB mode : Folder
Search.
(13) TUNE knob
•Radio mode :Changes frequency
by turning the knob left/right.
•CD, USB, iPod®, My Music* mode :
Searches songs (files) by turning
the knob left/right.
When the desired song is dis-
played, press the knob to play the
song.
•Moves between and selects
menus.
*if equipped
Page 264 of 571
4-15
Multimedia System
4
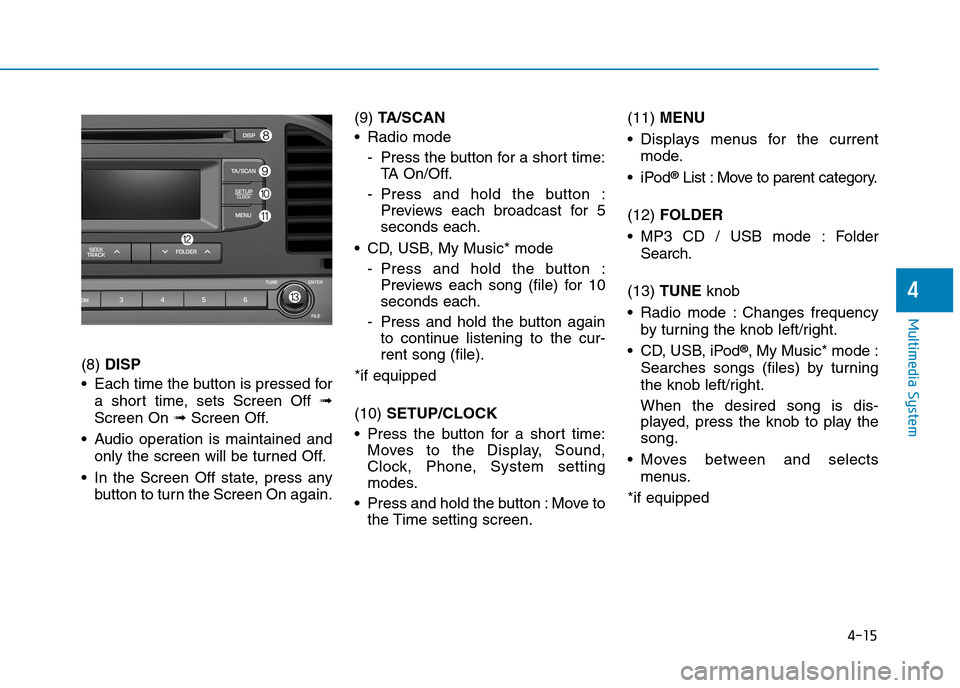
(8) DISP
•Each time the button is pressed for
a short time, sets Screen Off ➟
Screen On ➟Screen Off.
•Audio operation is maintained and
only the screen will be turned Off.
•In the Screen Off state, press any
button to turn the Screen On again.
(9) TA / S C A N
•Radio mode
-Press the button for a short time:
TA O n / O f f .
-Press and hold the button :
Previews each broadcast for 5
seconds each.
•CD, USB, My Music* mode
-Press and hold the button :
Previews each song (file) for 10
seconds each.
-Press and hold the button again
to continue listening to the cur-
rent song (file).
*if equipped
(10) SETUP/CLOCK
•Press the button for a short time:
Moves to the Display, Sound,
Clock, Phone, System setting
modes.
•Press and hold the button :Move to
the Time setting screen.
(11) MENU
•Displays menus for the current
mode.
•iPod®List : Move to parent category.
(12) FOLDER
•MP3 CD / USB mode : Folder
Search.
(13) TUNE knob
•Radio mode :Changes frequency
by turning the knob left/right.
•CD, USB, iPod®, My Music* mode :
Searches songs (files) by turning
the knob left/right.
When the desired song is dis-
played, press the knob to play the
song.
•Moves between and selects
menus.
*if equipped
Page 268 of 571
4-19
Multimedia System
4
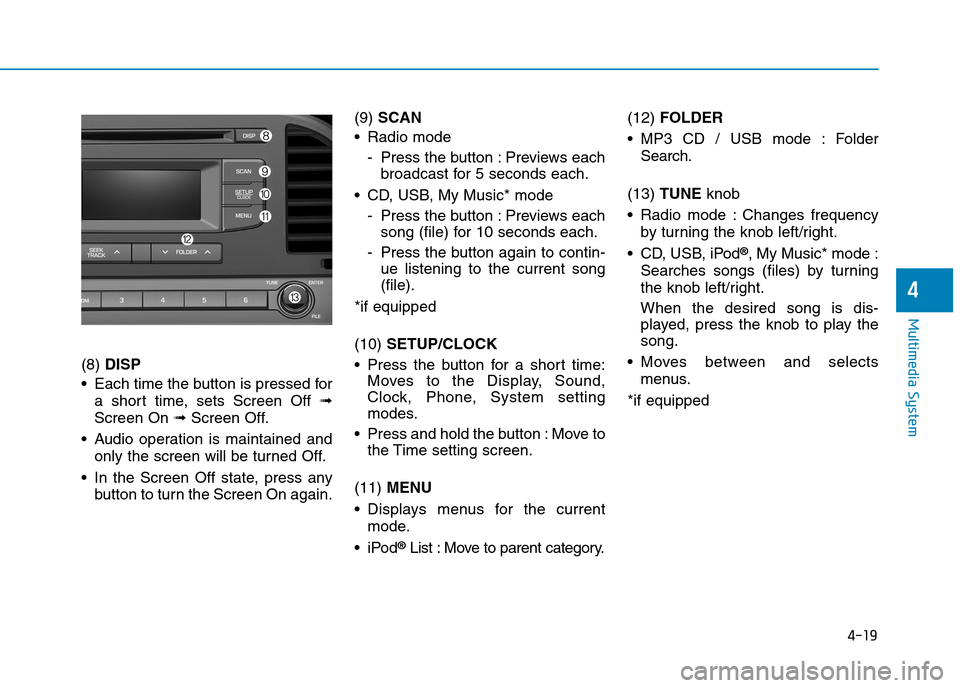
(8) DISP
•Each time the button is pressed for
a short time, sets Screen Off ➟
Screen On ➟Screen Off.
•Audio operation is maintained and
only the screen will be turned Off.
•In the Screen Off state, press any
button to turn the Screen On again.
(9) SCAN
•Radio mode
-Press the button :Previews each
broadcast for 5 seconds each.
•CD, USB, My Music* mode
-Press the button :Previews each
song (file) for 10 seconds each.
-Press the button again to contin-
ue listening to the current song
(file).
*if equipped
(10) SETUP/CLOCK
•Press the button for a short time:
Moves to the Display, Sound,
Clock, Phone, System setting
modes.
•Press and hold the button :Move to
the Time setting screen.
(11) MENU
•Displays menus for the current
mode.
•iPod®List : Move to parent category.
(12) FOLDER
•MP3 CD / USB mode : Folder
Search.
(13) TUNE knob
•Radio mode :Changes frequency
by turning the knob left/right.
•CD, USB, iPod®, My Music* mode :
Searches songs (files) by turning
the knob left/right.
When the desired song is dis-
played, press the knob to play the
song.
•Moves between and selects
menus.
*if equipped
Page 277 of 571
4-28
Multimedia System
(Continued)
•Do not use a mobile phone orper-
form Bluetooth®Wireless Technology
settings (e.g. pairing a phone) whilst
driving.
•Even if the phone supports
Bluetooth®Wireless Technology, the
phone will not be found during
device searches if the phone has
been set to hidden state or the
Bluetooth®Wireless Technology
power is turned off. Disable the hid-
den state or turn on the Bluetooth®
Wireless Technology power prior to
searching/connecting with the audio
system.
•You will not be able to use the
hands-free feature when your phone
(in the vehicle) is outside of the
mobile service area (e.g. in a tunnel,
underground, in a mountainous
area, etc.).
• If the mobile phone signal is poor or
the vehicle's interior noise is too
loud, it may be difficult to hear the
other person’s voice during a call.
(Continued)
(Continued)
•Do not place the phone near or
inside metallic objects, otherwise
communications with Bluetooth®
Wireless Technology system or
mobile service stations can be dis-
turbed.
• Placing the audio system within an
electromagnetic environment may
result in noise interference.
•Some mobile phones or other
devices may cause interference,
noise or malfunction to audio sys-
tem. In this case, storing the device
in a different location may resolve
the condition.
•Whilst a phone is connected through
Bluetooth®Wireless Technology your
phone may discharge quicker than
usual for additional Bluetooth®
Wireless Technology-related opera-
tions.
(Continued)
(Continued)
• If Priority is set upon vehicle igni-
tion (IGN/ACC ON), the Bluetooth®
Wireless Technology phone will be
automatically connected. Even if
you are outside, the Bluetooth®
Wireless Technology phone will be
automatically connected once you
are in the vicinity of the vehicle. If
you do not want to automatically
connect yourBluetooth®Wireless
Technology phone, try the following.
1) Turn off the Bluetooth®Wireless
Te c h n o l o g y f e a t u r e i n y o u r
mobile phone.
2) Turn off the Bluetooth®Wireless
Technology feature in your audio
system.
-To turn off the Bluetooth®
Wireless Technology feature in
your audio system, go to
[SETUP/CLOCK] > [Phone] and
[turn off] the Bluetooth®Wireless
Technology feature.
(Continued)
Page 291 of 571
![Hyundai Elantra 2017 Owners Manual - RHD (UK. Australia) 4-42
Multimedia System
Setup Mode
(Type A-1, Type A-2, Type A-3,
Ty p e A - 4 )
With the Display Button
Press the[SETUP/CLOCK]button to
select [Display]
Mode Pop up
[Mode Pop up] !Changes [On]
s Hyundai Elantra 2017 Owners Manual - RHD (UK. Australia) 4-42
Multimedia System
Setup Mode
(Type A-1, Type A-2, Type A-3,
Ty p e A - 4 )
With the Display Button
Press the[SETUP/CLOCK]button to
select [Display]
Mode Pop up
[Mode Pop up] !Changes [On]
s](/manual-img/35/14544/w960_14544-290.png)
4-42
Multimedia System
Setup Mode
(Type A-1, Type A-2, Type A-3,
Ty p e A - 4 )
With the Display Button
Press the[SETUP/CLOCK]button to
select [Display]
Mode Pop up
[Mode Pop up] !Changes [On]
selection mode
•During On state, press the
[RADIO]or [MEDIA] button to dis-
play the mode change pop up
screen.
Scroll text
[Scroll text] !Set [On/Off]
•[On]:Maintains scroll
•[Off]:Scrolls only one (1) time.
Song Info
When playing an MP3 file, select the
desired display info from ‘Folder/File’
or ‘Album/Artist/Song’.
Page 292 of 571
![Hyundai Elantra 2017 Owners Manual - RHD (UK. Australia) 4-43
Multimedia System
4
With the Sound Button
Press the [SETUP/CLOCK] button to
select [Sound]
Audio Settings
This menu allows you to set the
‘Bass, Middle, Treble’ and the Sound
Fader an Hyundai Elantra 2017 Owners Manual - RHD (UK. Australia) 4-43
Multimedia System
4
With the Sound Button
Press the [SETUP/CLOCK] button to
select [Sound]
Audio Settings
This menu allows you to set the
‘Bass, Middle, Treble’ and the Sound
Fader an](/manual-img/35/14544/w960_14544-291.png)
4-43
Multimedia System
4
With the Sound Button
Press the [SETUP/CLOCK] button to
select [Sound]
Audio Settings
This menu allows you to set the
‘Bass, Middle, Treble’ and the Sound
Fader and Balance.
Select [Audio Settings] !Select
menu
•Return :Whilst adjusting values,
re-pressing the TUNEknob will
restore the parent menu.
•Bass, Middle, Treble :Selects the
sound tone.
•Fader, Balance :Moves the sound
fader and balance.
•Default :Restores default settings.
Speed Dependent Volume Control
This feature is used to automatically
control the volume level according to
the speed of the vehicle.
Select [Speed Dependent Vol.] !
Set [Off/On]
Page 293 of 571
![Hyundai Elantra 2017 Owners Manual - RHD (UK. Australia) 4-44
Multimedia System
With the Clock Button
Press the [SETUP/CLOCK]button to
select [Clock]
Clock Settings
This menu is used to set the time.
Select [Clock Settings]
Adjust the number currently Hyundai Elantra 2017 Owners Manual - RHD (UK. Australia) 4-44
Multimedia System
With the Clock Button
Press the [SETUP/CLOCK]button to
select [Clock]
Clock Settings
This menu is used to set the time.
Select [Clock Settings]
Adjust the number currently](/manual-img/35/14544/w960_14544-292.png)
4-44
Multimedia System
With the Clock Button
Press the [SETUP/CLOCK]button to
select [Clock]
Clock Settings
This menu is used to set the time.
Select [Clock Settings]
Adjust the number currently dis-
played to set the [hour] and press the
TUNEknob to set the [minute].
Day Settings
This menu is used to set the date.
Select [Day Settings]
Adjust the number currently dis-
played to make the settings and
press the TUNEknob to move to the
next setting.
Time Format
This function is used to set the 12/24
hour time format of the audio system.
Select [Time Format] !Set 12hr/
24hr.
Clock Display when Power is OFF
Select [Clock Disp.(Pwr Off)] !Set
[On/Off]
•[On]:Displays time/date on screen
•[Off]:Turn off.
Automatic RDS Time (With RDS)
This option is used to automatically
set the time by synchronising with
RDS.
Select [Automatic RDS Time] !Set
[On/Off]
•[On]:Turn on Automatic Time
•[Off]:Turn off.
Information
Because some local radio stations do
not support an automatic RDS time
function, some RDS Transmitters may
not provide the correct time.
If incorrect time is displayed, set it
manually following the Step “Clock
Settings” previously.
i