2017 HONDA RIDGELINE change wheel
[x] Cancel search: change wheelPage 19 of 85

INSTRUMENT PANEL
30 || 31
V
EHICLE CONTROLS
Multi-Information Display (MID)
Consists of several displays that provide you with useful information.
RESET button
Info (/) buttons
Main display (also
shows odometer, gear
position, and outside
temperature)
Press the Info (/) buttons on the steering wheel to change displays. Press the
RESET button to enter menu selections when applicable.
Main display
Engine oil life Tire pressures Compass*
Turn-by-turn directions*
Distance, average fuel
economy, range, instant
fuel economy (Trip A)
Distance, average fuel
economy, range, instant
fuel economy (Trip B)
VEHICLE CONTROLS
Learn about the controls used for operating and driving the vehicle.
Using the Remote Transmitter
Lock or unlock the doors and trunk.
Models with remote engine start
Lock button: Press to
lock the doors and trunk.
Press again for audible
verification.
Engine button*: Press the
lock button, then press
and hold this button to
remotely start the engine
(see page 105). Unlock button: Press once to
unlock the driver’s door.
Press again to unlock all doors
and the trunk.
Panic button: Press to sound
the alarm for 30 seconds.
Press again to cancel.
Models without remote engine start
Lock button: Press to lock
the doors and tailgate.
Press again for audible
verification.
Unlock button: Press once to
unlock the driver’s door.
Press again to unlock all doors
and the tailgate.
Leaving the key or remote transmitter in the vehicle can result in theft\
or accidental
movement of the vehicle. Always take it with you whenever you leave the vehicle
unattended.
NOTICE
*if equipped
Panic button: Press to sound
the alarm for 30 seconds.
Press again to cancel.
Page 33 of 85
AUDIO AND CONNECTIVITY
58 || 59
A
UDIO AND CONNECTIVITY
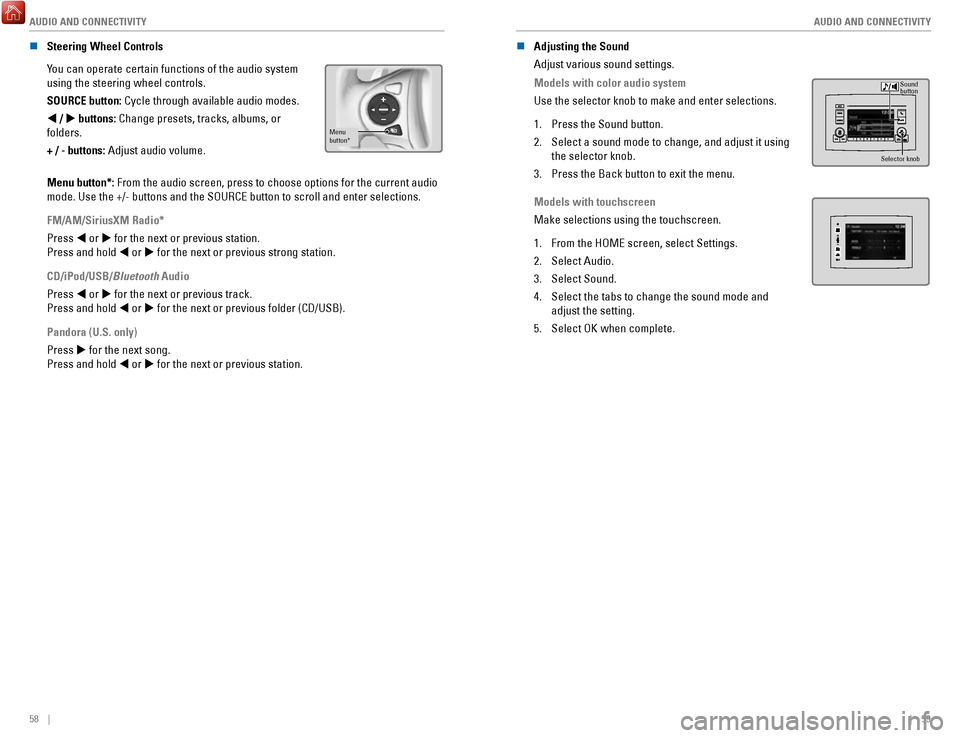
n Steering Wheel Controls
You can operate certain functions of the audio system
using the steering wheel controls.
SOURCE button: Cycle through available audio modes.
t / u
buttons: Change presets, tracks, albums, or
folders.
+ / - buttons: Adjust audio volume.
Menu
button*
Menu button*: From the audio screen, press to choose options for the current audio
mode. Use the +/- buttons and the SOURCE button to scroll and enter sele\
ctions.
FM/AM/SiriusXM Radio*
Press t or u for the next or previous station.
Press and hold t or u for the next or previous strong station.
CD/iPod/USB/Bluetooth Audio
Press t or u for the next or previous track.
Press and hold t or u for the next or previous folder (CD/USB).
Pandora (U.S. only)
Press u for the next song.
Press and hold t or u for the next or previous station. n
Adjusting the Sound
Adjust various sound settings.
Models with color audio system
Use the selector knob to make and enter selections.
1.
Press the Sound button.
2.
Select a sound mode to change, and adjust it using
the selector knob.
3.
Press the Back button to exit the menu.
Sound
button
Selector knob
Models with touchscreen
Make selections using the touchscreen.
1.
From the HOME screen, select Settings.
2.
Select Audio.
3.
Select Sound.
4.
Select the tabs to change the sound mode and
adjust the setting.
5.
Select OK when complete.
Page 38 of 85
AUDIO AND CONNECTIVITY
68 || 69
A
UDIO AND CONNECTIVITY
Models with touchscreen
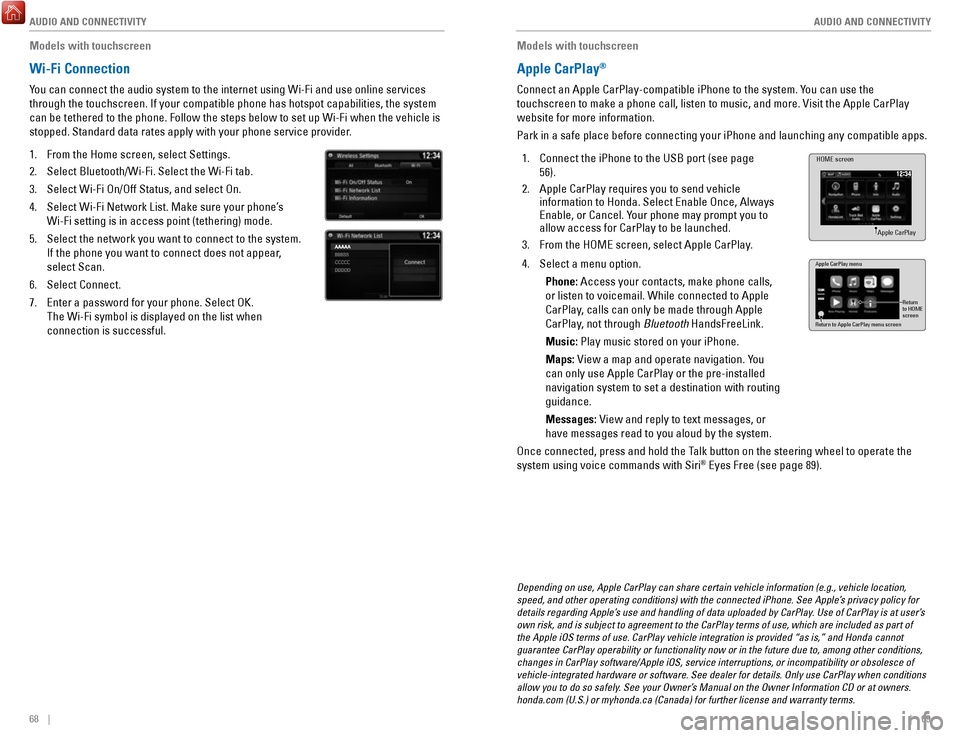
Wi-Fi Connection
You can connect the audio system to the internet using Wi-Fi and use onli\
ne services
through the touchscreen. If your compatible phone has hotspot capabiliti\
es, the system
can be tethered to the phone. Follow the steps below to set up Wi-Fi whe\
n the vehicle is
stopped. Standard data rates apply with your phone service provider.
1.
From the Home screen, select Settings.
2.
Select Bluetooth/Wi-Fi. Select the Wi-Fi tab.
3.
Select Wi-Fi On/Off Status, and select On.
4.
Select Wi-Fi Network List. Make sure your phone’s
Wi-Fi setting is in access point (tethering) mode.
5.
Select the network you want to connect to the system.
If the phone you want to connect does not appear,
select Scan.
6.
Select Connect.
7.
Enter a password for your phone. Select OK.
The Wi-Fi symbol is displayed on the list when
connection is successful.
Models with touchscreen
Apple CarPlay®
Connect an Apple CarPlay-compatible iPhone to the system. You can use the
touchscreen to make a phone call, listen to music, and more. Visit the A\
pple CarPlay
website for more information.
Park in a safe place before connecting your iPhone and launching any com\
patible apps.
1.
Connect the iPhone to the USB port (see page
56).
2.
Apple CarPlay requires you to send vehicle
information to Honda. Select Enable Once, Always
Enable, or Cancel. Your phone may prompt you to
allow access for CarPlay to be launched.
3.
From the HOME screen, select Apple CarPlay.
HOME screen
Apple CarPlay
4. Select a menu option.
Phone: Access your contacts, make phone calls,
or listen to voicemail. While connected to Apple
CarPlay, calls can only be made through Apple
CarPlay, not through Bluetooth
HandsFreeLink.
Music: Play music stored on your iPhone.
Maps: View a map and operate navigation. You
can only use Apple CarPlay or the pre-installed
navigation system to set a destination with routing
guidance.
Messages: View and reply to text messages, or
have messages read to you aloud by the system. Apple CarPlay menu
Return
to HOME
screen
Return to Apple CarPlay menu screen
Once connected, press and hold the Talk button on the steering wheel to operate the
system using voice commands with Siri® Eyes Free (see page 89).
Depending on use, Apple CarPlay can share certain vehicle information (\
e.g., vehicle location,
speed, and other operating conditions) with the connected iPhone. See A\
pple’s privacy policy for
details regarding Apple’s use and handling of data uploaded by CarPlay. Use of CarPlay is at user’s
own risk, and is subject to agreement to the CarPlay terms of use, which\
are included as part of
the Apple iOS terms of use. CarPlay vehicle integration is provided “\
as is,” and Honda cannot
guarantee CarPlay operability or functionality now or in the future due \
to, among other conditions,
changes in CarPlay software/Apple iOS, service interruptions, or incompa\
tibility or obsolesce of
vehicle-integrated hardware or software. See dealer for details. Only us\
e CarPlay when conditions
allow you to do so safely. See your Owner’s Manual on the Owner Information CD or at owners.
honda.com (U.S.) or myhonda.ca (Canada) for further license and warr\
anty terms.
Page 39 of 85
AUDIO AND CONNECTIVITY
70 || 71
A
UDIO AND CONNECTIVITY
Models with touchcreen
Android Auto™
Connect a compatible Android phone to the system. You can use the touchscreen to
make a phone call, listen to music, and more. Visit the Android Auto web\
site for more
information.
Park in a safe place before connecting your iPhone and
launching any compatible apps.
1.
Download the Android Auto app to your phone.
2.
Connect the phone to the USB port (see page 56).
The phone is automatically paired. A tutorial also
appears.
3.
From the HOME screen, select Android Auto.
4.
Android Auto requires you to send vehicle
information to Honda. Select Enable Once, Always
Enable, or Cancel.
HOME screen
Android Auto icon
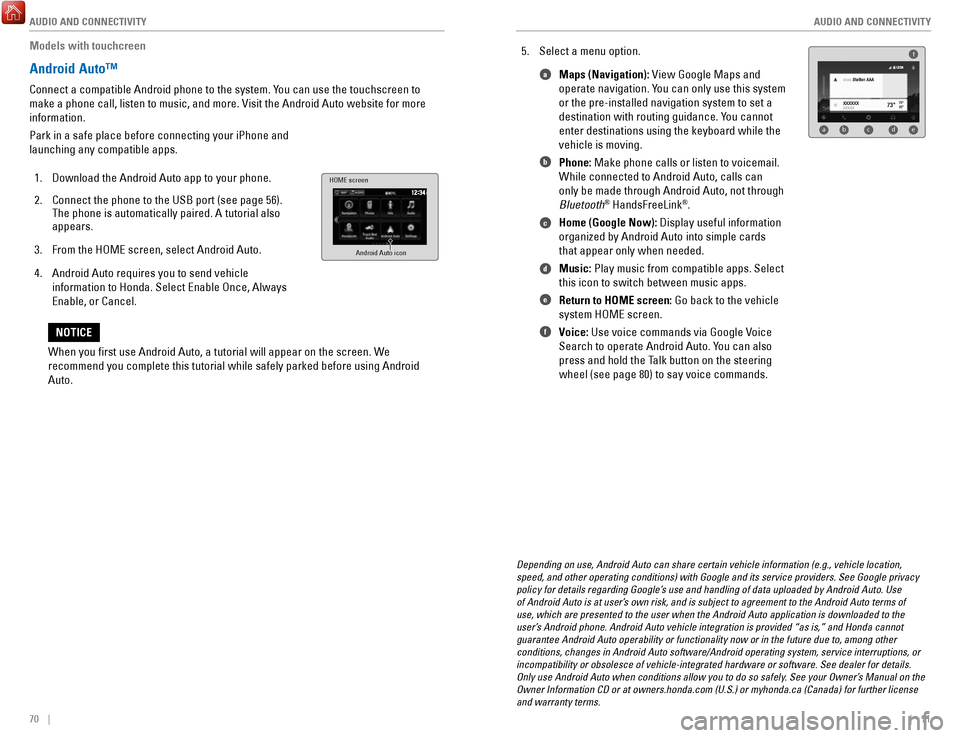
5. Select a menu option. Maps (Navigation): View Google Maps and
operate navigation. You can only use this system
or the pre-installed navigation system to set a
destination with routing guidance. You cannot
enter destinations using the keyboard while the
vehicle is moving.
Phone: Make phone calls or listen to voicemail.
While connected to Android Auto, calls can
only be made through Android Auto, not through
Bluetooth
® HandsFreeLink®.
Home (Google Now): Display useful information
organized by Android Auto into simple cards
that appear only when needed.
Music: Play music from compatible apps. Select
this icon to switch between music apps.
Return to HOME screen: Go back to the vehicle
system HOME screen.
Voice: Use voice commands via Google Voice
Search to operate Android Auto. You can also
press and hold the Talk button on the steering
wheel (see page 80) to say voice commands.
f
ab cde
a
b
c
d
e
f
Depending on use, Android Auto can share certain vehicle information (e\
.g., vehicle location,
speed, and other operating conditions) with Google and its service prov\
iders. See Google privacy
policy for details regarding Google’s use and handling of data uploaded by Android Auto. Use
of Android Auto is at user’s own risk, and is subject to agreement to the Android Auto terms of
use, which are presented to the user when the Android Auto application i\
s downloaded to the
user’s Android phone. Android Auto vehicle integration is provided “as is,\
” and Honda cannot
guarantee Android Auto operability or functionality now or in the future\
due to, among other
conditions, changes in Android Auto software/Android operating system, s\
ervice interruptions, or
incompatibility or obsolesce of vehicle-integrated hardware or software.\
See dealer for details.
Only use Android Auto when conditions allow you to do so safely. See your Owner’s Manual on the
Owner Information CD or at owners.honda.com (U.S.) or myhonda.ca (Can\
ada) for further license
and warranty terms.
When you first use Android Auto, a tutorial will appear on the screen.\
We
recommend you complete this tutorial while safely parked before using An\
droid
Auto.
NOTICE
Page 61 of 85
DRIVING
114 || 115
D
RIVING
*if equipped
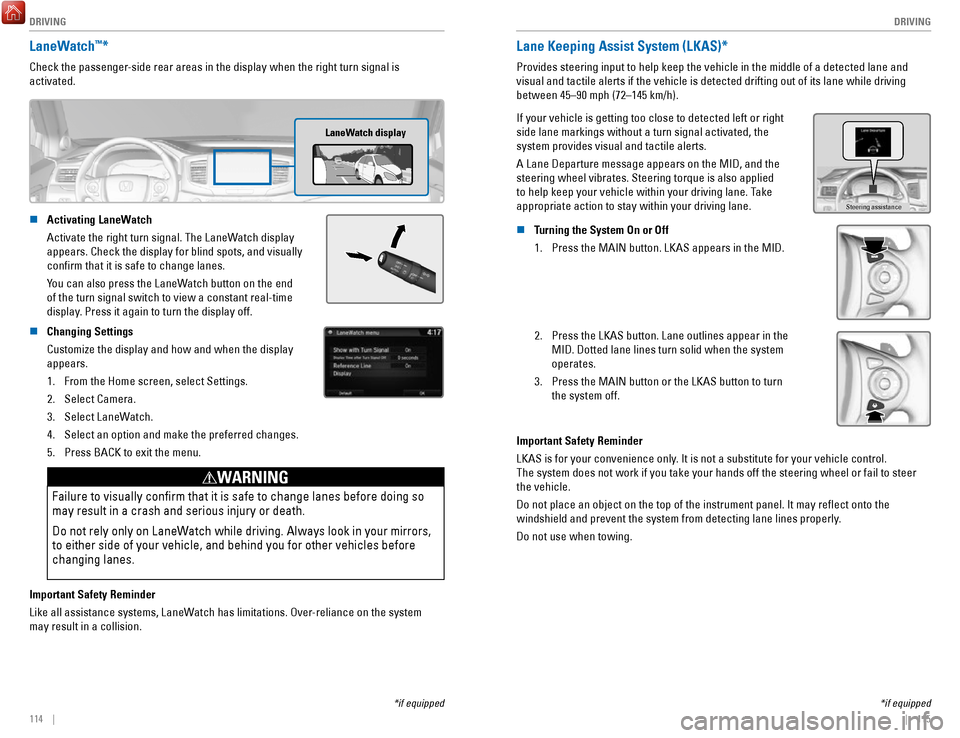
LaneWatch™*
Check the passenger-side rear areas in the display when the right turn signal is
activated.
LaneWatch display
n Activating LaneWatch
Activate the right turn signal. The LaneWatch display
appears. Check the display for blind spots, and visually
confirm that it is safe to change lanes.
You can also press the LaneWatch button on the end
of the turn signal switch to view a constant real-time
display
. Press it again to turn the display off.
n Changing Settings
Customize the display and how and when the display
appears.1.
From the Home screen, select Settings.
2.
Select Camera.
3.
Select LaneWatch.
4.
Select an option and make the preferred changes.
5.
Press BACK to exit the menu.
Failure to visually confirm that it is safe to change lanes before doi\
ng so
may result in a crash and serious injury or death.
Do not rely only on LaneWatch while driving. Always look in your mirrors,
to either side of your vehicle, and behind you for other vehicles before\
changing lanes.
WARNING
Important Safety Reminder
Like all assistance systems, LaneWatch has limitations. Over-reliance on the system
may result in a collision.
*if equipped
Lane Keeping Assist System (LKAS)*
Provides steering input to help keep the vehicle in the middle of a dete\
cted lane and
visual and tactile alerts if the vehicle is detected drifting out of its\
lane while driving
between 45–90 mph (72–145 km/h).
If your vehicle is getting too close to detected left or right
side lane markings without a turn signal activated, the
system provides visual and tactile alerts.
A Lane Departure message appears on the MID, and the
steering wheel vibrates. Steering torque is also applied
to help keep your vehicle within your driving lane. Take
appropriate action to stay within your driving lane.
Steering assistance
n Turning the System On or Off 1.
Press the MAIN button. LKAS appears in the MID.
2. Press the LKAS button. Lane outlines appear in the
MID. Dotted lane lines turn solid when the system
operates.
3.
Press the MAIN button or the LKAS button to turn
the system off.
Important Safety Reminder
LKAS is for your convenience only. It is not a substitute for your vehicle control.
The system does not work if you take your hands off the steering wheel or fail to steer
the vehicle.
Do not place an object on the top of the instrument panel. It may refl\
ect onto the
windshield and prevent the system from detecting lane lines properly.
Do not use when towing.
Page 63 of 85
DRIVING
118 || 119
D
RIVING
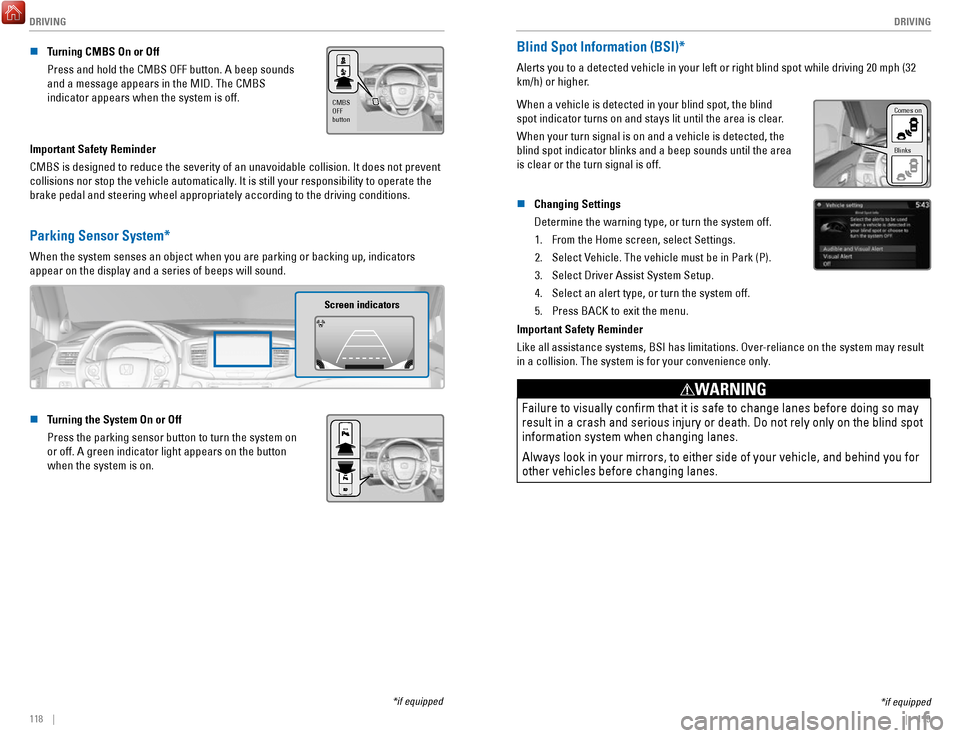
n Turning CMBS On or Off
Press and hold the CMBS OFF button. A beep sounds
and a message appears in the MID. The CMBS
indicator appears when the system is off.
CMBS
OFF
button
Important Safety Reminder
CMBS is designed to reduce the severity of an unavoidable collision. It \
does not prevent
collisions nor stop the vehicle automatically. It is still your responsibility to operate the
brake pedal and steering wheel appropriately according to the driving co\
nditions.
Parking Sensor System*
When the system senses an object when you are parking or backing up, ind\
icators
appear on the display and a series of beeps will sound.
Screen indicators
n Turning the System On or Off
Press the parking sensor button to turn the system on
or off. A green indicator light appears on the button
when the system is on.
*if equipped
*if equipped
Blind Spot Information (BSI)*
Alerts you to a detected vehicle in your left or right blind spot while \
driving 20 mph (32
km/h) or higher.
When a vehicle is detected in your blind spot, the blind
spot indicator turns on and stays lit until the area is clear.
When your turn signal is on and a vehicle is detected, the
blind spot indicator blinks and a beep sounds until the area
is clear or the turn signal is off.
Comes on
Blinks
n Changing Settings
Determine the warning type, or turn the system off.
1.
From the Home screen, select Settings.
2.
Select Vehicle. The vehicle must be in Park (P).
3.
Select Driver Assist System Setup.
4.
Select an alert type, or turn the system off.
5.
Press BACK to exit the menu.
Important Safety Reminder
Like all assistance systems, BSI has limitations. Over-reliance on the system may result
in a collision. The system is for your convenience only.
Failure to visually confirm that it is safe to change lanes before doi\
ng so may
result in a crash and serious injury or death. Do not rely only on the b\
lind spot
information system when changing lanes.
Always look in your mirrors, to either side of your vehicle, and behind \
you for
other vehicles before changing lanes.
WARNING
Page 65 of 85

DRIVING
122 || 123
D
RIVING
Models with touchscreen
1.
From the HOME screen, select Settings.
2.
Select Camera.
3.
Select one of the options.
Fixed Guidelines: Guidelines appear when you
change the gear to Reverse. Select On or Off.
Dynamic Guidelines: Guidelines move as you turn
the steering wheel. Select On or Off.
4.
Press BACK to exit the menu.
The rear camera view is restricted. You cannot see the corner ends of the bumper or what is
underneath the bumper. Its unique lens also makes objects appear closer or farther than they \
actually are.
Visually confirm that it is safe to drive before backing up. Certain c\
onditions (such as weather,
lighting, and high temperatures) may also restrict the rear view. Do not rely on the rearview display,
which does not give you all information about conditions at the rear of \
your vehicle.
Refueling
Use the proper fuel and refueling procedure to ensure the best performan\
ce and safety
of your vehicle.
n
Fuel Information
Use of unleaded gasoline of 87 octane or higher is recommended.
Honda recommends TOP TIER Detergent Gasoline where available.
Do NOT use gasoline containing more than 15% ethanol.
Do NOT use gasoline containing methanol.
Do NOT use gasoline containing MMT.
We recommend quality gasoline containing detergent additives that help pr\
event
fuel system and engine deposits. In addition, in order to maintain good \
performance,
fuel economy, and emissions control, we strongly recommend the use of
gasoline
that does NOT contain harmful manganese-based fuel additives such as MMT\
, if
such gasoline is available.
NOTICE n
How to Refuel
1.
The fuel fill door is located at the left rear of the
vehicle. Park next to the service pump that is most
accessible.
2.
Turn off the engine.
3.
Press the fuel fill door release button on the
driver’s door. The fuel fill door opens.
4.
Place the end of the filler nozzle on the lower part
of the filler opening, then insert it slowly and fully.
5.
After filling, wait about 5 seconds before removing
the filler nozzle. Close the fuel fill door by hand.
Gasoline is highly flammable and explosive. You can be burned or
seriously injured when handling fuel.
Stop the engine, and keep heat, sparks, and flame away.
Handle fuel only outdoors.
Wipe up spills immediately.
WARNING
NOTICE
The fuel filler opening is designed to accept only service station fi\
ller nozzles for
refueling. Use of smaller diameter tubes (e.g., to siphon fuel for othe\
r uses) or other
non-service station devices can damage the area in and around the fill\
er opening.
NOTICE
Page 68 of 85

HANDLING THE UNEXPECTED
128 || 129
H
ANDLING THE UNEXPECTED
Emergency Engine Stop
The ENGINE START/STOP button may be used to stop the engine due to an emergency
situation even while driving. If you must stop the engine, choose one of\
the following
operations:
•
Press and hold the ENGINE START/STOP button
for two seconds, or
•
Firmly press the ENGINE START/STOP button
three times.
If the vehicle is in Park (P), the power mode changes to VEHICLE OFF. Otherwise, the
power mode changes to ACCESSORY.
The steering wheel will not lock. Because turning off the engine also di\
sables the
power assist the engine provides to the steering and braking systems, it\
will require
significantly more physical effort and time to steer and slow the vehi\
cle. Use both feet
on the brake pedal, if necessary, to slow the vehicle and stop immediately in
a safe place.
Do not press the button while driving unless it is absolutely necessary \
for the engine to
be switched off.
Emergency Towing
Call a professional towing service if you need to tow your vehicle.
All models
Flat bed equipment: The operator loads your vehicle on the back of a tru\
ck.
This is the best way to transport your vehicle.
2WD models
Wheel lift equipment: The tow truck uses two pivoting arms that go under the front tires
and lift them off the ground. The rear tires remain on the ground.
This is an acceptable way to tow your vehicle.
Trying to lift or tow your vehicle by the bumpers will cause serious dama\
ge.
The bumpers are not designed to support the vehicle’s weight.
Improper towing such as towing behind a motorhome or other motor vehicle\
can
damage the transmission.
NOTICE
Tire Pressure Monitoring System (TPMS)
Monitors the tire pressure while you are driving.
If your vehicle’s tire pressure becomes significantly low,
the low tire pressure indicator comes on and a message
appears on the multi-information display. The specific tire
with low pressure is displayed.
n What to Do
Stop your vehicle in a safe place. Check the tire pressure and adjust th\
e pressure to
the specified level. The specified tire pressure is on a label on th\
e driver’s doorjamb.
n
Tire Fill Assist
Your vehicle gives you visual and audible alerts to help you adjust the t\
ire pressure to its appropriate level when the vehicle is on.
While inflating: The system beeps and the exterior lights flash once every 5 seconds.
When the correct pressure is reached:
The system beeps and the exterior lights
flash continuously for 5 seconds. Stop filling the tire.
If you overinflate: The system beeps and the exterior lights flash twice every
3 seconds.
Driving on an extremely underinflated tire can cause it to overheat. A\
n overheated
tire can fail. Always inflate your tires to the specified pressure.
NOTICE