2017 HONDA RIDGELINE display
[x] Cancel search: displayPage 58 of 85
DRIVING
108 || 109
D
RIVING
Braking
Slow down or stop your vehicle, and keep it from moving when parked.
n
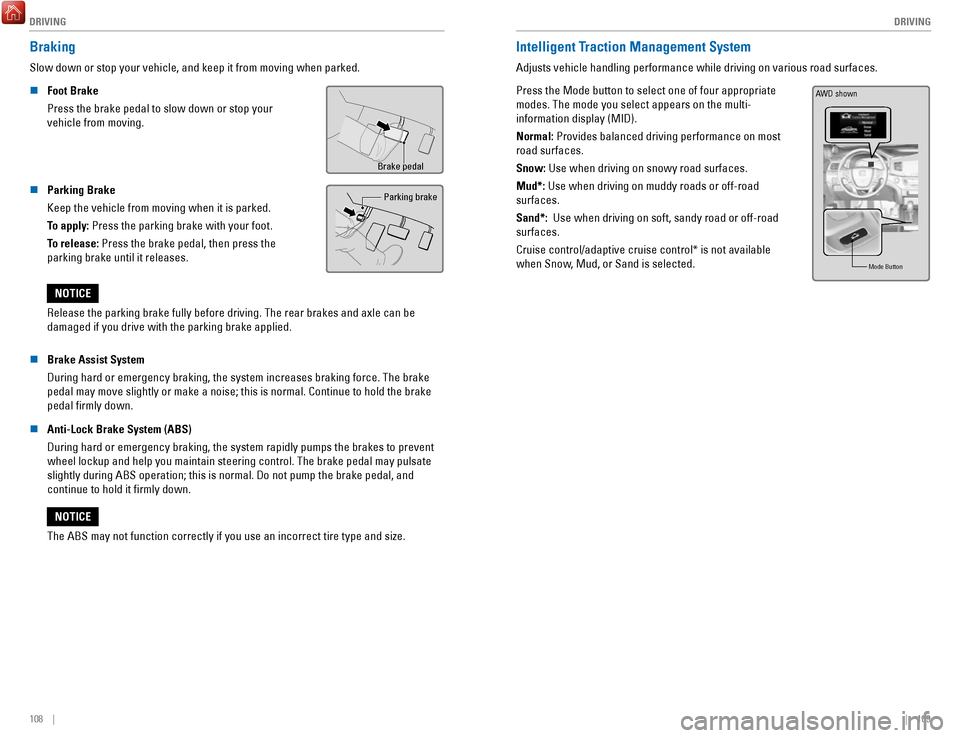
Foot Brake
Press the brake pedal to slow down or stop your
vehicle from moving.
Brake pedal
n Parking Brake
Keep the vehicle from moving when it is parked.
To apply: Press the parking brake with your foot.
To release: Press the brake pedal, then press the
parking brake until it releases. Parking brake
Release the parking brake fully before driving. The rear brakes and axle\
can be
damaged if you drive with the parking brake applied.
NOTICE
n
Brake Assist System
During hard or emergency braking, the system increases braking force. The brake
pedal may move slightly or make a noise; this is normal. Continue to hol\
d the brake
pedal firmly down.
n
Anti-Lock Brake System (ABS)
During hard or emergency braking, the system rapidly pumps the brakes to\
prevent wheel lockup and help you maintain steering control. The brake pedal may\
pulsate
slightly during ABS operation; this is normal. Do not pump the brake ped\
al, and
continue to hold it firmly down.
The ABS may not function correctly if you use an incorrect tire type and\
size.
NOTICE
Intelligent Traction Management System
Adjusts vehicle handling performance while driving on various road surfa\
ces.
Press the Mode button to select one of four appropriate
modes. The mode you select appears on the multi-
information display (MID).
Normal: Provides balanced driving performance on most
road surfaces.
Snow: Use when driving on snowy road surfaces.
Mud*: Use when driving on muddy roads or off-road
surfaces.
Sand*: Use when driving on soft, sandy road or off-road
surfaces.
Cruise control/adaptive cruise control* is not available
when Snow, Mud, or Sand is selected.
Mode Butto n
AWD shown
Page 60 of 85
DRIVING
112 || 113
D
RIVING
Adaptive Cruise Control (ACC)*
Helps maintain a constant vehicle speed and a set following interval beh\
ind a vehicle
detected ahead of yours.
Adaptive cruise control is not available when Snow, Mud*, or Sand* is selected for
Intelligent Traction Management (see page 109).
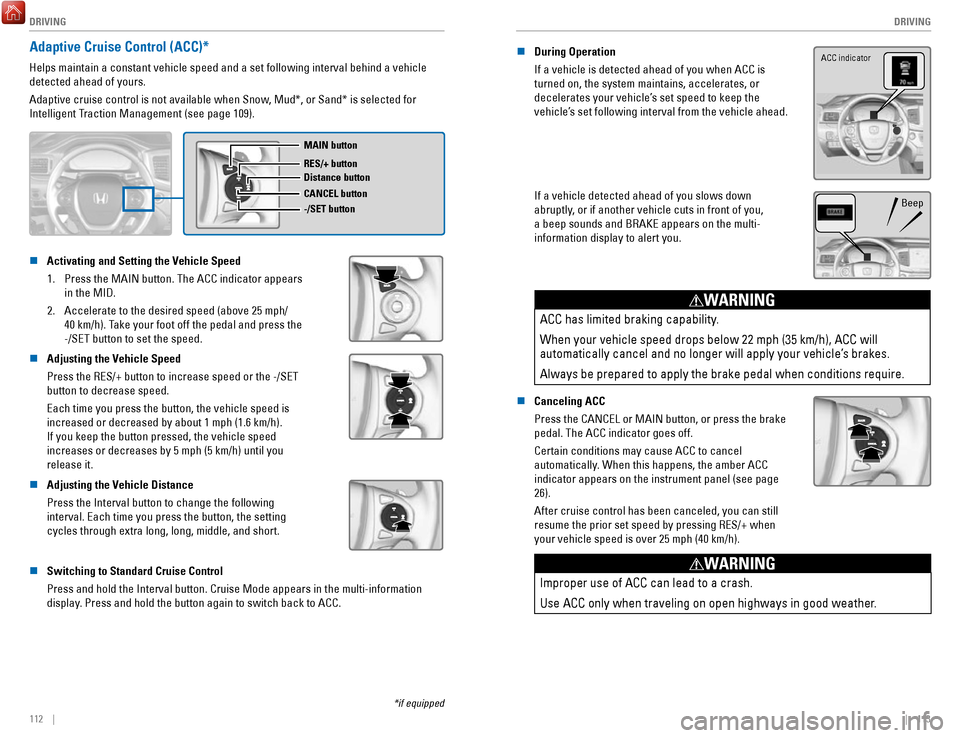
MAIN button
RES/+ button
CANCEL button
-/SET button Distance button
n Activating and Setting the Vehicle Speed
1.
Press the MAIN button. The ACC indicator appears
in the MID.
2.
Accelerate to the desired speed (above 25 mph/
40 km/h). Take your foot off the pedal and press the
-/SET button to set the speed.
n Adjusting the Vehicle Speed
Press the RES/+ button to increase speed or the -/SET
button to decrease speed.
Each time you press the button, the vehicle speed is
increased or decreased by about 1 mph (1.6 km/h).
If you keep the button pressed, the vehicle speed
increases or decreases by 5 mph (5 km/h) until you
release it.
n Adjusting the Vehicle Distance
Press the Interval button to change the following
interval. Each time you press the button, the setting
cycles through extra long, long, middle, and short.
n Switching to Standard Cruise Control
Press and hold the Interval button. Cruise Mode appears in the multi-inf\
ormation
display. Press and hold the button again to switch back to ACC.
*if equipped
n During Operation
If a vehicle is detected ahead of you when ACC is
turned on, the system maintains, accelerates, or
decelerates your vehicle’s set speed to keep the
vehicle’s set following interval from the vehicle ahead. ACC indicator
If a vehicle detected ahead of you slows down
abruptly, or if another vehicle cuts in front of you,
a beep sounds and BRAKE appears on the multi-
information display to alert you.Beep
ACC has limited braking capability.
When your vehicle speed drops below 22 mph (35 km/h), ACC will
automatically cancel and no longer will apply your vehicle’s brakes.
Always be prepared to apply the brake pedal when conditions require.
WARNING
n Canceling ACC
Press the CANCEL or MAIN button, or press the brake
pedal. The ACC indicator goes off.
Certain conditions may cause ACC to cancel
automatically. When this happens, the amber ACC
indicator appears on the instrument panel (see page
26).
After cruise control has been canceled, you can still
resume the prior set speed by pressing RES/+ when
your vehicle speed is over 25 mph (40 km/h).
Improper use of ACC can lead to a crash.
Use ACC only when traveling on open highways in good weather.
WARNING
Page 61 of 85
DRIVING
114 || 115
D
RIVING
*if equipped
LaneWatch™*
Check the passenger-side rear areas in the display when the right turn signal is
activated.
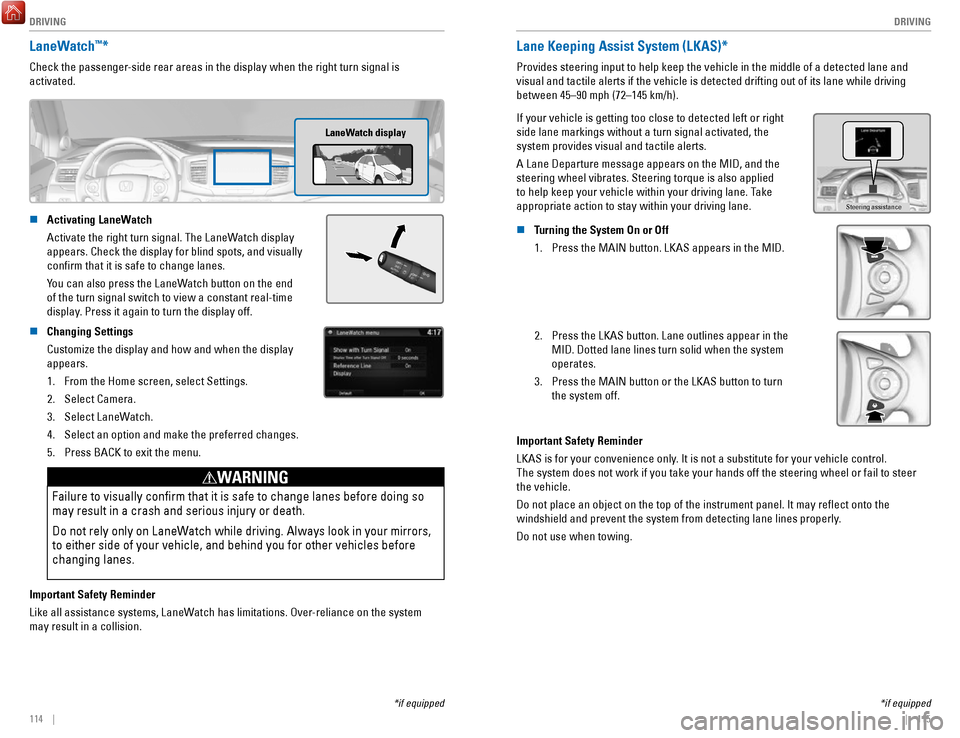
LaneWatch display
n Activating LaneWatch
Activate the right turn signal. The LaneWatch display
appears. Check the display for blind spots, and visually
confirm that it is safe to change lanes.
You can also press the LaneWatch button on the end
of the turn signal switch to view a constant real-time
display
. Press it again to turn the display off.
n Changing Settings
Customize the display and how and when the display
appears.1.
From the Home screen, select Settings.
2.
Select Camera.
3.
Select LaneWatch.
4.
Select an option and make the preferred changes.
5.
Press BACK to exit the menu.
Failure to visually confirm that it is safe to change lanes before doi\
ng so
may result in a crash and serious injury or death.
Do not rely only on LaneWatch while driving. Always look in your mirrors,
to either side of your vehicle, and behind you for other vehicles before\
changing lanes.
WARNING
Important Safety Reminder
Like all assistance systems, LaneWatch has limitations. Over-reliance on the system
may result in a collision.
*if equipped
Lane Keeping Assist System (LKAS)*
Provides steering input to help keep the vehicle in the middle of a dete\
cted lane and
visual and tactile alerts if the vehicle is detected drifting out of its\
lane while driving
between 45–90 mph (72–145 km/h).
If your vehicle is getting too close to detected left or right
side lane markings without a turn signal activated, the
system provides visual and tactile alerts.
A Lane Departure message appears on the MID, and the
steering wheel vibrates. Steering torque is also applied
to help keep your vehicle within your driving lane. Take
appropriate action to stay within your driving lane.
Steering assistance
n Turning the System On or Off 1.
Press the MAIN button. LKAS appears in the MID.
2. Press the LKAS button. Lane outlines appear in the
MID. Dotted lane lines turn solid when the system
operates.
3.
Press the MAIN button or the LKAS button to turn
the system off.
Important Safety Reminder
LKAS is for your convenience only. It is not a substitute for your vehicle control.
The system does not work if you take your hands off the steering wheel or fail to steer
the vehicle.
Do not place an object on the top of the instrument panel. It may refl\
ect onto the
windshield and prevent the system from detecting lane lines properly.
Do not use when towing.
Page 63 of 85
DRIVING
118 || 119
D
RIVING
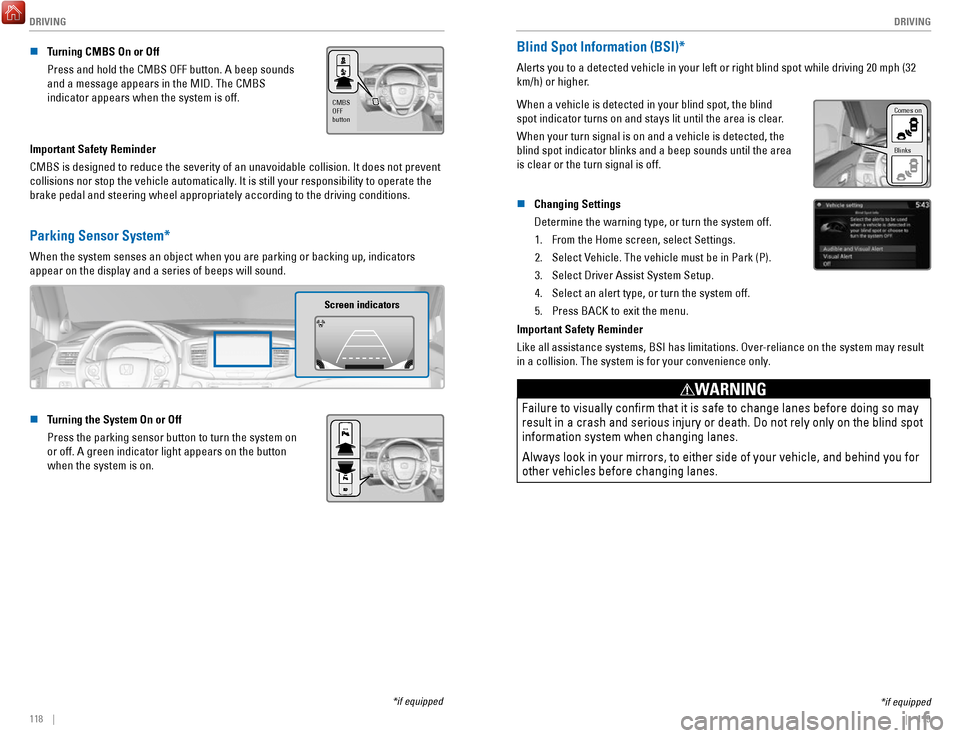
n Turning CMBS On or Off
Press and hold the CMBS OFF button. A beep sounds
and a message appears in the MID. The CMBS
indicator appears when the system is off.
CMBS
OFF
button
Important Safety Reminder
CMBS is designed to reduce the severity of an unavoidable collision. It \
does not prevent
collisions nor stop the vehicle automatically. It is still your responsibility to operate the
brake pedal and steering wheel appropriately according to the driving co\
nditions.
Parking Sensor System*
When the system senses an object when you are parking or backing up, ind\
icators
appear on the display and a series of beeps will sound.
Screen indicators
n Turning the System On or Off
Press the parking sensor button to turn the system on
or off. A green indicator light appears on the button
when the system is on.
*if equipped
*if equipped
Blind Spot Information (BSI)*
Alerts you to a detected vehicle in your left or right blind spot while \
driving 20 mph (32
km/h) or higher.
When a vehicle is detected in your blind spot, the blind
spot indicator turns on and stays lit until the area is clear.
When your turn signal is on and a vehicle is detected, the
blind spot indicator blinks and a beep sounds until the area
is clear or the turn signal is off.
Comes on
Blinks
n Changing Settings
Determine the warning type, or turn the system off.
1.
From the Home screen, select Settings.
2.
Select Vehicle. The vehicle must be in Park (P).
3.
Select Driver Assist System Setup.
4.
Select an alert type, or turn the system off.
5.
Press BACK to exit the menu.
Important Safety Reminder
Like all assistance systems, BSI has limitations. Over-reliance on the system may result
in a collision. The system is for your convenience only.
Failure to visually confirm that it is safe to change lanes before doi\
ng so may
result in a crash and serious injury or death. Do not rely only on the b\
lind spot
information system when changing lanes.
Always look in your mirrors, to either side of your vehicle, and behind \
you for
other vehicles before changing lanes.
WARNING
Page 64 of 85
DRIVING
120 || 121
D
RIVING
*if equipped
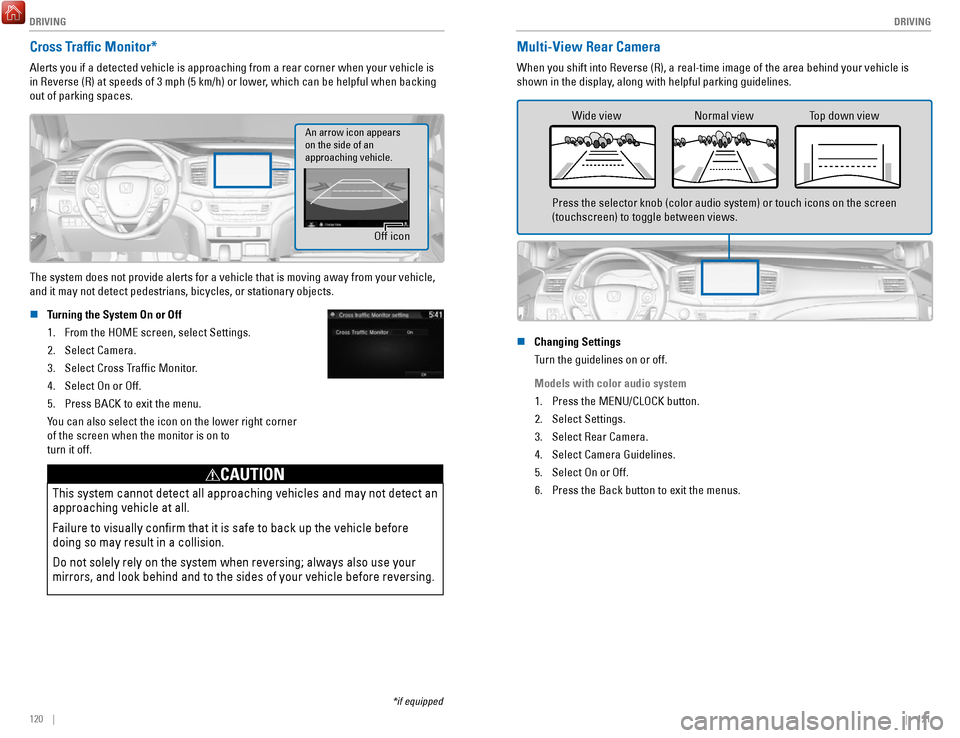
Cross Traffic Monitor*
Alerts you if a detected vehicle is approaching from a rear corner when \
your vehicle is
in Reverse (R) at speeds of 3 mph (5 km/h) or lower, which can be helpful when backing
out of parking spaces.
Off icon
An arrow icon appears
on the side of an
approaching vehicle.
The system does not provide alerts for a vehicle that is moving away fro\
m your vehicle,
and it may not detect pedestrians, bicycles, or stationary objects.
n
Turning the System On or Off
1.
From the HOME screen, select Settings.
2.
Select Camera.
3.
Select Cross Traffic Monitor.
4.
Select On or Off.
5.
Press BACK to exit the menu.
You can also select the icon on the lower right corner
of the screen when the monitor is on to
turn it off.
This system cannot detect all approaching vehicles and may not detect an\
approaching vehicle at all.
Failure to visually confirm that it is safe to back up the vehicle bef\
ore
doing so may result in a collision.
Do not solely rely on the system when reversing; always also use your
mirrors, and look behind and to the sides of your vehicle before reversi\
ng.
CAUTION
Multi-View Rear Camera
When you shift into Reverse (R), a real-time image of the area behind \
your vehicle is
shown in the display, along with helpful parking guidelines.
Wide view Normal view Top down view
Press the selector knob (color audio system) or touch icons on the scr\
een
(touchscreen) to toggle between views.
n
Changing Settings
Turn the guidelines on or off.
Models with color audio system 1.
Press the MENU/CLOCK button.
2.
Select Settings.
3.
Select Rear Camera.
4.
Select Camera Guidelines.
5.
Select On or Off.
6.
Press the Back button to exit the menus.
Page 65 of 85

DRIVING
122 || 123
D
RIVING
Models with touchscreen
1.
From the HOME screen, select Settings.
2.
Select Camera.
3.
Select one of the options.
Fixed Guidelines: Guidelines appear when you
change the gear to Reverse. Select On or Off.
Dynamic Guidelines: Guidelines move as you turn
the steering wheel. Select On or Off.
4.
Press BACK to exit the menu.
The rear camera view is restricted. You cannot see the corner ends of the bumper or what is
underneath the bumper. Its unique lens also makes objects appear closer or farther than they \
actually are.
Visually confirm that it is safe to drive before backing up. Certain c\
onditions (such as weather,
lighting, and high temperatures) may also restrict the rear view. Do not rely on the rearview display,
which does not give you all information about conditions at the rear of \
your vehicle.
Refueling
Use the proper fuel and refueling procedure to ensure the best performan\
ce and safety
of your vehicle.
n
Fuel Information
Use of unleaded gasoline of 87 octane or higher is recommended.
Honda recommends TOP TIER Detergent Gasoline where available.
Do NOT use gasoline containing more than 15% ethanol.
Do NOT use gasoline containing methanol.
Do NOT use gasoline containing MMT.
We recommend quality gasoline containing detergent additives that help pr\
event
fuel system and engine deposits. In addition, in order to maintain good \
performance,
fuel economy, and emissions control, we strongly recommend the use of
gasoline
that does NOT contain harmful manganese-based fuel additives such as MMT\
, if
such gasoline is available.
NOTICE n
How to Refuel
1.
The fuel fill door is located at the left rear of the
vehicle. Park next to the service pump that is most
accessible.
2.
Turn off the engine.
3.
Press the fuel fill door release button on the
driver’s door. The fuel fill door opens.
4.
Place the end of the filler nozzle on the lower part
of the filler opening, then insert it slowly and fully.
5.
After filling, wait about 5 seconds before removing
the filler nozzle. Close the fuel fill door by hand.
Gasoline is highly flammable and explosive. You can be burned or
seriously injured when handling fuel.
Stop the engine, and keep heat, sparks, and flame away.
Handle fuel only outdoors.
Wipe up spills immediately.
WARNING
NOTICE
The fuel filler opening is designed to accept only service station fi\
ller nozzles for
refueling. Use of smaller diameter tubes (e.g., to siphon fuel for othe\
r uses) or other
non-service station devices can damage the area in and around the fill\
er opening.
NOTICE
Page 68 of 85

HANDLING THE UNEXPECTED
128 || 129
H
ANDLING THE UNEXPECTED
Emergency Engine Stop
The ENGINE START/STOP button may be used to stop the engine due to an emergency
situation even while driving. If you must stop the engine, choose one of\
the following
operations:
•
Press and hold the ENGINE START/STOP button
for two seconds, or
•
Firmly press the ENGINE START/STOP button
three times.
If the vehicle is in Park (P), the power mode changes to VEHICLE OFF. Otherwise, the
power mode changes to ACCESSORY.
The steering wheel will not lock. Because turning off the engine also di\
sables the
power assist the engine provides to the steering and braking systems, it\
will require
significantly more physical effort and time to steer and slow the vehi\
cle. Use both feet
on the brake pedal, if necessary, to slow the vehicle and stop immediately in
a safe place.
Do not press the button while driving unless it is absolutely necessary \
for the engine to
be switched off.
Emergency Towing
Call a professional towing service if you need to tow your vehicle.
All models
Flat bed equipment: The operator loads your vehicle on the back of a tru\
ck.
This is the best way to transport your vehicle.
2WD models
Wheel lift equipment: The tow truck uses two pivoting arms that go under the front tires
and lift them off the ground. The rear tires remain on the ground.
This is an acceptable way to tow your vehicle.
Trying to lift or tow your vehicle by the bumpers will cause serious dama\
ge.
The bumpers are not designed to support the vehicle’s weight.
Improper towing such as towing behind a motorhome or other motor vehicle\
can
damage the transmission.
NOTICE
Tire Pressure Monitoring System (TPMS)
Monitors the tire pressure while you are driving.
If your vehicle’s tire pressure becomes significantly low,
the low tire pressure indicator comes on and a message
appears on the multi-information display. The specific tire
with low pressure is displayed.
n What to Do
Stop your vehicle in a safe place. Check the tire pressure and adjust th\
e pressure to
the specified level. The specified tire pressure is on a label on th\
e driver’s doorjamb.
n
Tire Fill Assist
Your vehicle gives you visual and audible alerts to help you adjust the t\
ire pressure to its appropriate level when the vehicle is on.
While inflating: The system beeps and the exterior lights flash once every 5 seconds.
When the correct pressure is reached:
The system beeps and the exterior lights
flash continuously for 5 seconds. Stop filling the tire.
If you overinflate: The system beeps and the exterior lights flash twice every
3 seconds.
Driving on an extremely underinflated tire can cause it to overheat. A\
n overheated
tire can fail. Always inflate your tires to the specified pressure.
NOTICE
Page 73 of 85

MAINTENANCE
138 || 139
M
AINTENANCE
Maintenance Minder™
When maintenance is due, the system message indicator comes on and a mes\
sage
appears on the display every time you turn the vehicle on. See page 139 to check what
maintenance is due indicated by the codes that appear.
Press the Info (
/) button on the steering wheel to change displays.
System message
indicator
Maintenance Minder message
Main
items Sub items
• Independent of the Maintenance Minder information, replace the brake fl\
uid every
3 years.
•
Inspect idle speed every 160,000 miles (256,000 km).
•
Adjust the valves during services A, B, 1, 2, or 3 if they are noisy.
U.S. models
Maintenance, replacement, or repair of emissions control devices and sys\
tems may
be done by any automotive repair establishment or individuals using part\
s that are
certified to EPA standards.
According to state and federal regulations, failure to perform maintenan\
ce on the
maintenance main items marked with # will not void your emissions warranties.
However
, all maintenance services should be performed in accordance with the
intervals indicated by the multi-information display. n
Maintenance Minder Service Codes
These codes indicate what services are due on your vehicle.
*1: If the message Maintenance Due Now does not appear more than 12 months after the display
is reset, change the engine oil every year.
#: See information on maintenance and emissions warranty.
*2: If you drive in dusty conditions, replace the air cleaner element every \
15,000 miles (24,000 km).
*3: If you drive primarily in urban areas that have high concentrations of s\
oot in the air from industry and diesel-powered vehicles, replace every 15,000 miles (24,000 km).
CODEMaintenance Main Items
A
�Replace engine oi l*1
B�Replace engine oil*1 and oil �lter
�Inspect front and rear brakes
�Check parking brake adjustment
�Inspect tie rod ends, steering gearbox, and boots
�Inspect suspension components
�Inspect driveshaft boots
�Inspect brake hoses and lines (Including ABS/VSA)
�Inspect all �uid levels and condition of �uids
�Inspect exhaust system#
�Inspect fuel lines and connection s#
*4: If you drive regularly in very high temperatures (over 110°F, 43°\
C), in very low temperatures
(under -20°F, -29°C), or towing a trailer, replace every 60,000 \
miles/100,000 km.
*5: Driving in mountainous areas at very low vehicle speeds or trailer towin\
g results in higher level
of mechanical (Shear) stress to �uid. This requires differential �\
uid changes more frequently
than recommended by the Maintenance Minder. If you regularly drive your \
vehicle under these
conditions, have the differential �uid changed at 7,500 miles (12,00\
0 km), then every 15,000 miles
(24,000 km).
CODEMaintenance Sub Item s
1
�Rotate tires
2�Replace air cleaner element*2
�Replace dust and pollen �lte r*3
�Inspect drive belt
3
�Replace transfer-case �uid and transmission �ui d
4�Replace spark plugs
�Replace timing belt and inspect water pump*4
�Inspect valve clearance
5
�Replace engine coolant
6�Replace rear differential �ui d*, *5
*
*if equipped