2017 HONDA RIDGELINE dashboard
[x] Cancel search: dashboardPage 46 of 85

84 || 85
n Talk Button Tips
For a list of available phone commands, see page 159.
•
When using the Talk button, wait until you hear a beep before speaking.
•
To bypass the system prompts, simply press the Talk button again to say
your command.
•
When the Talk button is pressed, all available voice commands are highlighted in yellow.
•
Speak in a clear, natural voice.
•
Reduce all background noise.
•
Adjust the dashboard vents away from the microphone on the ceiling.
•
Close the windows and moonroof*.
AAAAA012-3456789AAAAA
012-3456789
HFL display
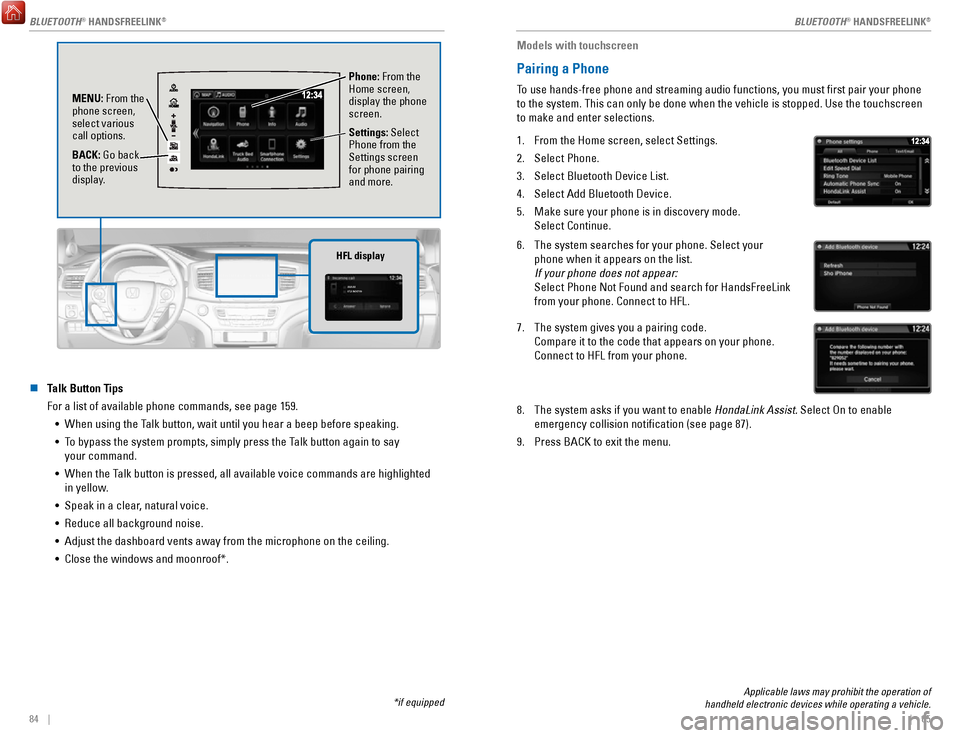
Phone: From the
Home screen,
display the phone
screen.
MENU: From the
phone screen,
select various
call options.
BACK: Go back
to the previous
display. Settings: Select
Phone from the
Settings screen
for phone pairing
and more.
*if equipped
Applicable laws may prohibit the operation of
handheld electronic devices while operating a vehicle.
Models with touchscreen
Pairing a Phone
To use hands-free phone and streaming audio functions, you must first p\
air your phone
to the system. This can only be done when the vehicle is stopped. Use th\
e touchscreen
to make and enter selections.
1.
From the Home screen, select Settings.
2.
Select Phone.
3.
Select Bluetooth Device List.
4.
Select Add Bluetooth Device.
5.
Make sure your phone is in discovery mode.
Select Continue.
6. The system searches for your phone. Select your
phone when it appears on the list.
If your phone does not appear:
Select Phone Not Found and search for HandsFreeLink
from your phone. Connect to HFL.
7. The system gives you a pairing code.
Compare it to the code that appears on your phone.
Connect to HFL from your phone.
8. The system asks if you want to enable HondaLink Assist. Select On to enable
emergency collision notification (see page 87).
9.
Press BACK to exit the menu.
BLUETOOTH® HANDSFREELINK®
BLUETOOTH® HANDSFREELINK®
BLUETOOTH® HANDSFREELINK®
Page 49 of 85

NAVIGATION
90 || 91
N
AVIGATION
NAVIGATION*
Learn how to enter a destination and operate the navigation system.
Basic Navigation Operation
A real-time navigation system uses GPS and a map database to show your current
location and help guide you to a desired destination. You can operate the system using
voice commands or the system controls.
To reduce the potential for driver distraction, certain manual functions \
may be
inoperable or grayed out while the vehicle is moving. Voice commands are always
available.
n
Steering Wheel Controls
Use the steering wheel controls to say voice commands.
BACK button: Press to cancel
a command or operation.
TALK button: Press to say
navigation commands.
n Talk Button Tips
•
When using the Talk button, wait for a beep before saying a command.
•
To bypass the system prompts, simply press the Talk button again to say
your command.
•
Speak in a clear, natural voice.
•
Reduce all background noise.
•
Adjust the dashboard vents away from the microphone in the ceiling.
•
Close the windows and moonroof*.
n
System Guidance Volume
Adjust the navigation system volume.
1.
From the Home screen, select Settings.
2.
Select System.
3.
Select the Sound/Beep tab.
4.
Adjust the Guidance Volume level.
5.
Press BACK to exit the menus.
*if equipped
n Navigation Display and Controls
Touch icons on the screen to enter information and make selections.
Navi: Display the
navigation screen.
BACK: Go back to
the previous display. MENU: Display
navigation options. Traffic flow
Current vehicle
position Traffic incident
icon Search icon
Map menu
MAP: Display the
map screen.
Page 71 of 85

HANDLING THE UNEXPECTED
134 || 135
H
ANDLING THE UNEXPECTED
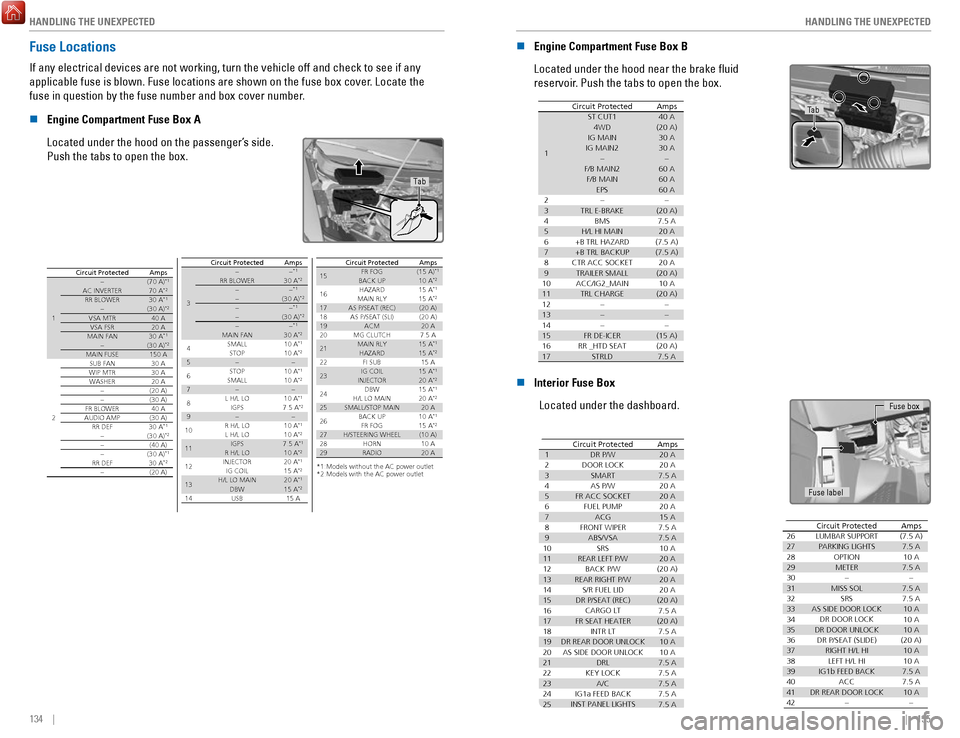
Fuse Locations
If any electrical devices are not working, turn the vehicle off and chec\
k to see if any
applicable fuse is blown. Fuse locations are shown on the fuse box cover\
. Locate the
fuse in question by the fuse number and box cover number.
n
Engine Compartment Fuse Box A
Located under the hood on the passenger’s side.
Push the tabs to open the box.
Tab
Circuit ProtectedAmps
1
�(70 A)*1AC INVERTER70
A*2RR BLOWER30 A*1�(30 A)*2VSA MTR40 A
VSA FSR20 AMAIN FAN30 A*1�(30 A)*2MAIN FUSE 150 A
2
SUB FAN30 A
WIP MTR30 AWASHER20 A
�(20 A)�(30 A)FR BLOWER 40 AAUDIO AMP(30 A)
RR DEF30 A*1�(30 A)*2�(40 A)
�(30 A)*1RR DEF30 A*2�(20 A)
3
��*1RR BLOWER30 A*2��*1�(30 A)*2��*1�(30 A)*2��*1MAIN FAN
4 SMALL 30
A
*2
STOP 10
A*110 A*25��
6 STOP
SMALL 10
A*110 A*27��
8 L H/L LO
10 A*1IGPS9 7.5
A*2��
10 R H/L LO
10 A*1L H/L LO
11 10
A
*2IGPS7.5 A*1R H/L LO
12 10
A
*2INJECTO R2 0 A*1IG COIL15 A*2
13H/L LO MAIN20 A*1DBW14 15
A*2USB15 A
AmpsCircuit Protecte d
15
*1:Models without the AC power outlet
*2:Models with the AC power outle t
(15 A)*1
16 10
A
*215 A*115 A*217(20 A)
18(20 A)
1920 A
20 7.5 A
2115 A*1
22 15
A*215 A
2315 A*120 A*2
24 15
A*120 A*22520 A
26 10
A*115 A*22728 (10 A)10
A
2920 A
Circuit Protecte dAmpsFR FOG
BACK UP HAZARD
MAIN RL Y
AS P/SEAT (REC) AS P/SEAT (SLI) ACM
MG CLUTCH MAIN RL Y
HAZARD FI SUB
IG COIL
INJECTOR DBW
H/L LO MAIN
SMALL/STOP MAIN BACK UPFR FOG
H/STEERING WHEEL HORN
RADIO
n Engine Compartment Fuse Box B
Located under the hood near the brake fluid
reservoir. Push the tabs to open the box.
Circuit Protected Amps
1
ST CUT140 A4WD (20 A)IG MAIN30 AIG MAIN230 A
��F/B MAIN 260 AF/B MAIN60 A
EPS60 A
2��3TRL E-BRAKE(20 A)
4 7.5 A
BM S
5H/L HI MAIN6 20
A(7.5 A)
7
8 (7.5 A)
20 A9(20 A)
10 10 A
11TRL CHARGE
+B TRL HAZARD
+B TRL BACKUP
CTR ACC SOCKE T
TRAILER SMAL L
ACC/IG2_MAIN (20 A)
12��13��14��15FR DE-ICER(15 A)16RR _HTD SEAT(20 A)17STRLD7.5 A
Tab
n Interior Fuse Box
Located under the dashboard.
AmpsCircuit Protected
120 A
220 A
37.5 A
420 A
520 A620 A715 A
87.5 A
97.5 A
1010 A
1120 A
12(20 A)
1320 A
1420 A
15(20 A)
167.5 A
17(20 A)
187.5 A
19DR REAR DOOR UNLOCK10 A
2010 A
21
DR P/W
DOOR LOCK SMAR T
AS P/W
FR ACC SOCKET FUEL PUMP ACG
FRONT WIPER ABS/VSA SRS
REAR LEFT P/W BACK P/W
REAR RIGHT P/ W
S/R FUEL LID
DR P/SEAT (REC) CARGO LT
FR SEAT HEATER INTR LT
7.5 A
227.5 A
237.5 A
247.5 A
257.5 A
AS SIDE DOOR UNLOCK
DRL
KEY LOCK A/C
IG1a FEED BACK
INST PANEL LIGHTS
26(7.5 A)277.5 A2810 A297.5 A30�317.5 A327.5 A3310 A3410 A3510 A36(20 A)3710 A3810 A397.5 A407.5 A4110 A42�
Circuit ProtectedAmpsLUMBAR SUPPORT
PARKING LIGHTS OPTIONMETER �
MISS SOL SRS
AS SIDE DOOR LOCK DR DOOR LOCK
DR DOOR UNLOCK DR P/SEAT (SLIDE) RIGHT H/L HILEFT H/L HI
IG1b FEED BACK ACC
DR REAR DOOR LOCK �
Fuse label Fuse box
Page 74 of 85

MAINTENANCE
140 || 141
M
AINTENANCE
Under the Hood
Brake Fluid
(Black Cap)
Washer Fluid
Radiator Cap
Engine Coolant
Reserve Tan
k
Engine Oil Dipstick
(Orange)
Battery
Engine Oil Fill Ca p
Automatic Transmission Fluid Dipstick
n Opening the Hood
1.
Park the vehicle on a level surface, and set the
parking brake.
2.
Pull the hood release handle under the lower left
corner of the dashboard.
3.
Push up the hood latch lever in the center of the
hood to release the lock mechanism, and open the
hood.
4.
Remove the support rod from the clamp using the
grip. Mount the support rod in the hood.
When closing, remove the support rod, and stow it
in the clamp, then gently lower the hood. Remove
your hand at a height of approximately 12 inches
(30 cm) and let the hood close.
Pull
Lever
Support Ro d
Grip
Clamp
Do not open the hood when the wiper arms are raised. The hood will strik\
e the
wipers, and may damage either the hood or the wipers.
NOTICE
*if equipped
n Engine Compartment Cover
The component parts in the engine compartment are protected by a cover. You may
need to remove the cover when you perform certain maintenance work.
Starting at either side, lift the outermost edge of the
engine compartment cover. Pull up on the cover, and
remove it from the pins. Move towards the opposite
side while applying uniform upward pressure.
Engine Compartment Cove r