2017 HONDA RIDGELINE ECO mode
[x] Cancel search: ECO modePage 39 of 85

AUDIO AND CONNECTIVITY
70 || 71
A
UDIO AND CONNECTIVITY
Models with touchcreen
Android Auto™
Connect a compatible Android phone to the system. You can use the touchscreen to
make a phone call, listen to music, and more. Visit the Android Auto web\
site for more
information.
Park in a safe place before connecting your iPhone and
launching any compatible apps.
1.
Download the Android Auto app to your phone.
2.
Connect the phone to the USB port (see page 56).
The phone is automatically paired. A tutorial also
appears.
3.
From the HOME screen, select Android Auto.
4.
Android Auto requires you to send vehicle
information to Honda. Select Enable Once, Always
Enable, or Cancel.
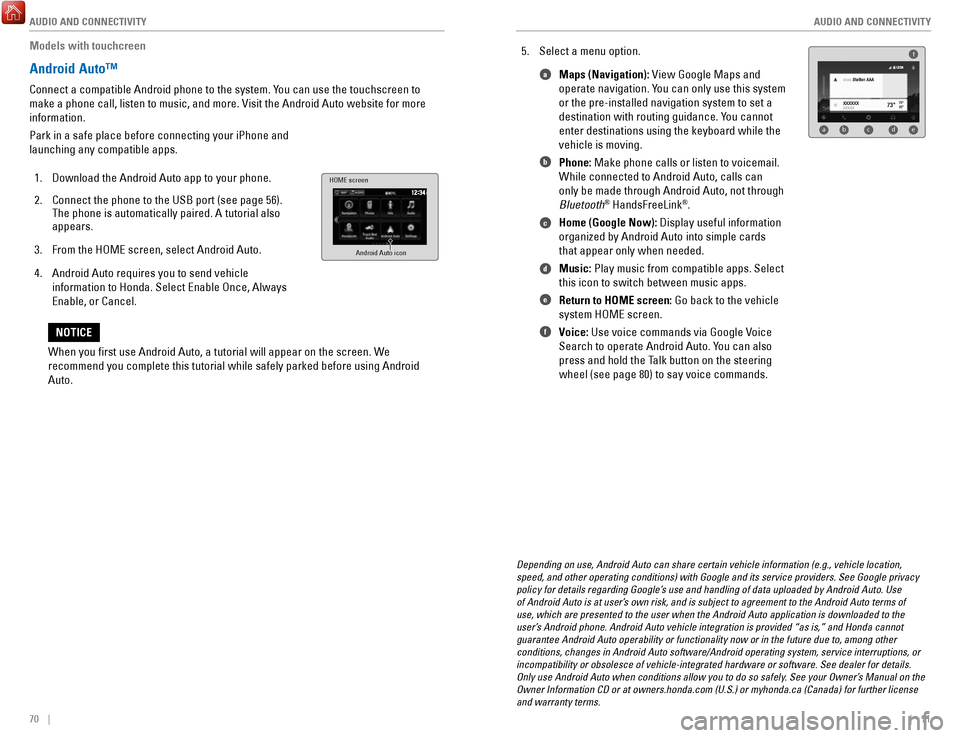
HOME screen
Android Auto icon
5. Select a menu option. Maps (Navigation): View Google Maps and
operate navigation. You can only use this system
or the pre-installed navigation system to set a
destination with routing guidance. You cannot
enter destinations using the keyboard while the
vehicle is moving.
Phone: Make phone calls or listen to voicemail.
While connected to Android Auto, calls can
only be made through Android Auto, not through
Bluetooth
® HandsFreeLink®.
Home (Google Now): Display useful information
organized by Android Auto into simple cards
that appear only when needed.
Music: Play music from compatible apps. Select
this icon to switch between music apps.
Return to HOME screen: Go back to the vehicle
system HOME screen.
Voice: Use voice commands via Google Voice
Search to operate Android Auto. You can also
press and hold the Talk button on the steering
wheel (see page 80) to say voice commands.
f
ab cde
a
b
c
d
e
f
Depending on use, Android Auto can share certain vehicle information (e\
.g., vehicle location,
speed, and other operating conditions) with Google and its service prov\
iders. See Google privacy
policy for details regarding Google’s use and handling of data uploaded by Android Auto. Use
of Android Auto is at user’s own risk, and is subject to agreement to the Android Auto terms of
use, which are presented to the user when the Android Auto application i\
s downloaded to the
user’s Android phone. Android Auto vehicle integration is provided “as is,\
” and Honda cannot
guarantee Android Auto operability or functionality now or in the future\
due to, among other
conditions, changes in Android Auto software/Android operating system, s\
ervice interruptions, or
incompatibility or obsolesce of vehicle-integrated hardware or software.\
See dealer for details.
Only use Android Auto when conditions allow you to do so safely. See your Owner’s Manual on the
Owner Information CD or at owners.honda.com (U.S.) or myhonda.ca (Can\
ada) for further license
and warranty terms.
When you first use Android Auto, a tutorial will appear on the screen.\
We
recommend you complete this tutorial while safely parked before using An\
droid
Auto.
NOTICE
Page 43 of 85

AUDIO AND CONNECTIVITY
78 || 79
A
UDIO AND CONNECTIVITY
Models with touchscreen
Pandora®*
Play and operate Pandora from your compatible phone through the vehicle’\
s audio
system. Visit handsfreelink.com to check phone compatibility. Standard data rates apply
with your phone service provider. Available in the U.S. only.
Connect your phone when the vehicle is stopped.
For iPhone:
•
Connect via Bluetooth HandsFreeLink (see page 85) or USB port
(see page 56).
•
A pop-up may appear on your phone requesting you to allow access for Pan\
dora
to be launched.
•
If you cannot operate Pandora through the audio system, it may be stream\
ing
through Bluetooth Audio. Make sure Pandora is selected on the audio system.
•
If Pandora still does not operate, try rebooting the phone and reconnect\
ing the
cable if necessary.
For other compatible smartphones: •
Connect via Bluetooth HandsFreeLink (see page 85).
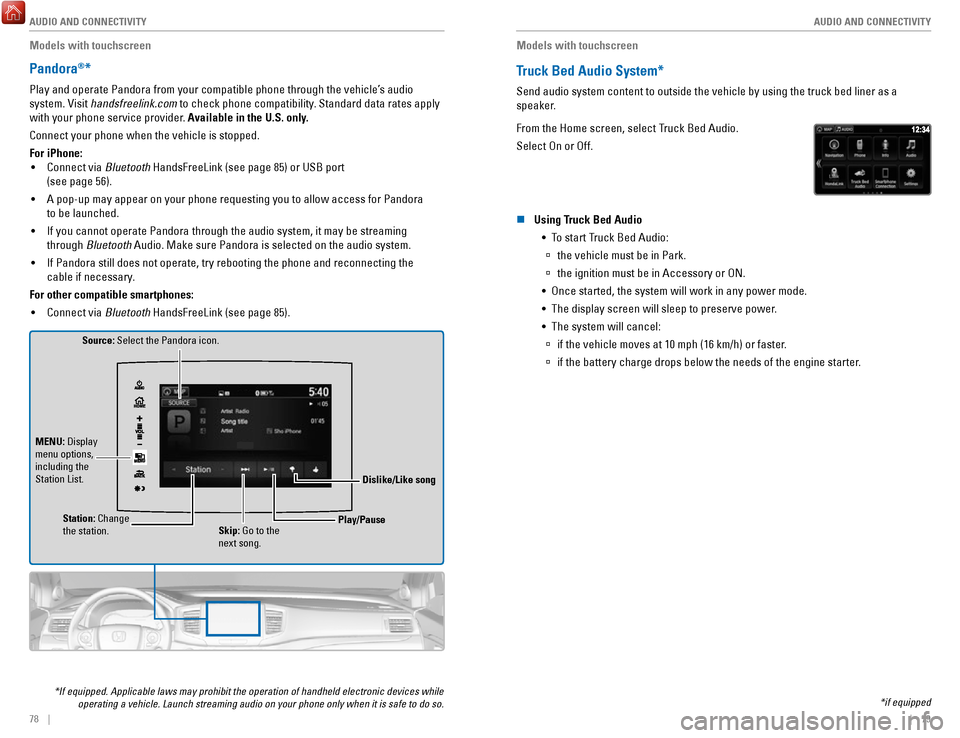
Source: Select the Pandora icon.
Station: Change
the station. Skip: Go to the
next song.
MENU: Display
menu options,
including the
Station List.
Dislike/Like song
Play/Pause
*If equipped. Applicable laws may prohibit the operation of handheld ele\
ctronic devices while operating a vehicle. Launch streaming audio on your phone only when it i\
s safe to do so.
Models with touchscreen
Truck Bed Audio System*
Send audio system content to outside the vehicle by using the truck bed \
liner as a
speaker.
From the Home screen, select Truck Bed Audio.
Select On or Off.
n Using Truck Bed Audio
•
To start Truck Bed Audio:
à the vehicle must be in Park.
àthe ignition must be in Accessory or ON.
•
Once started, the system will work in any power mode.
•
The display screen will sleep to preserve power.
•
The system will cancel:
à if the vehicle moves at 10 mph (16 km/h) or faster.
àif the battery charge drops below the needs of the engine starter.
*if equipped
Page 47 of 85

86 || 87
Models with touchscreen
Making a Call
You can make a call using several methods.
n
Dialing a Number
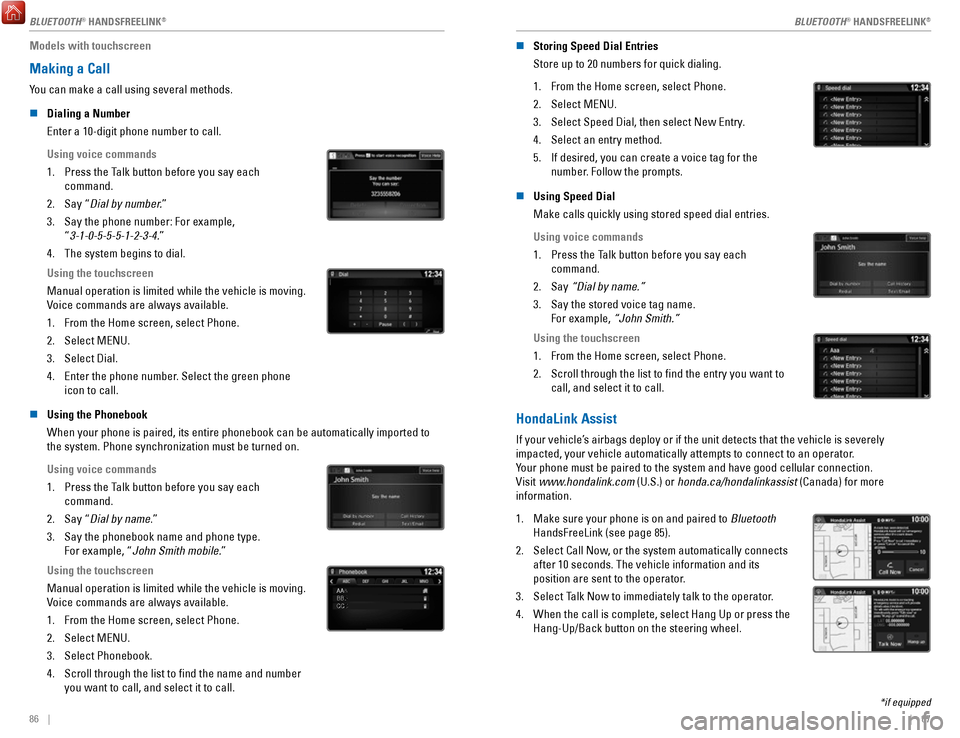
Enter a 10-digit phone number to call.
Using voice commands
1.
Press the Talk button before you say each
command.
2.
Say “Dial by number.”
3.
Say the phone number: For example,
“3-1-0-5-5-5-1-2-3-4.”
4.
The system begins to dial.
Using the touchscreen
Manual operation is limited while the vehicle is moving.
Voice commands are always available.
1.
From the Home screen, select Phone.
2.
Select MENU.
3.
Select Dial.
4.
Enter the phone number. Select the green phone
icon to call.
n Using the Phonebook
When your phone is paired, its entire phonebook can be automatically imp\
orted to
the system. Phone synchronization must be turned on.
Using voice commands
1.
Press the Talk button before you say each
command.
2.
Say “Dial by name.”
3.
Say the phonebook name and phone type.
For example, “John Smith mobile.”
Using the touchscreen
Manual operation is limited while the vehicle is moving.
Voice commands are always available.
1.
From the Home screen, select Phone.
2.
Select MENU.
3.
Select Phonebook.
4.
Scroll through the list to find the name and number
you want to call, and select it to call.
AAAAAABBBBBBCCCCCC
n Storing Speed Dial Entries
Store up to 20 numbers for quick dialing.
1.
From the Home screen, select Phone.
2.
Select MENU.
3.
Select Speed Dial, then select New Entry.
4.
Select an entry method.
5.
If desired, you can create a voice tag for the
number. Follow the prompts.
n Using Speed Dial
Make calls quickly using stored speed dial entries.
Using voice commands
1.
Press the Talk button before you say each
command.
2.
Say “Dial by name.”
3.
Say the stored voice tag name.
For example, “John Smith.”
Using the touchscreen
1.
From the Home screen, select Phone.
2.
Scroll through the list to find the entry you want to
call, and select it to call.
HondaLink Assist
If your vehicle’s airbags deploy or if the unit detects that the vehicle is severely
impacted, your vehicle automatically attempts to connect to an operator.
Your phone must be paired to the system and have good cellular connection\
.
Visit www.hondalink.com (U.S.) or honda.ca/hondalinkassist (Canada) for more
information.
1.
Make sure your phone is on and paired to Bluetooth
HandsFreeLink (see page 85).
2.
Select Call Now, or the system automatically connects
after 10 seconds. The vehicle information and its
position are sent to the operator.
3.
Select Talk Now to immediately talk to the operator.
4.
When the call is complete, select Hang Up or press the
Hang-Up/Back button on the steering wheel.
*if equipped
BLUETOOTH® HANDSFREELINK
Page 55 of 85

DRIVING
102 || 103
D
RIVING
Tongue load
The weight of the tongue with a fully loaded trailer on
the hitch should be approximately:
•
Boat trailers: 5 – 15% of the total trailer weight
•
Other trailers: 10 – 15% of total trailer weight
Total load
Tongue load
Number of AWD models
occupant s2WD models
2600 lbs (272 kg)420 lbs (190 kg )
4570 lbs (259 kg)
5 390 lbs (177 kg
)
495 lbs (224 kg )3 60 lbs (163 kg)
To estimate the tongue load
Excessive tongue load reduces front tire traction and steering control. \
Too little
tongue load can make the trailer unstable and cause it to sway.
You can estimate the tongue load by measuring the trailer hitch height fr\
om the
ground in the following steps:
1.
Park the vehicle on level ground.
2.
Measure the distance between the ground and the bottom of the trailer hi\
tch.
3.
Connect the fully loaded trailer to the hitch.
4.
Measure the distance between the ground and the bottom of the trailer
hitch again.
5.
Subtract the second measurement from the first measurement, then refer\
to the
following table.
If the difference isAWD model s2WD models
1 inches (2.5 cm)150 lbs (68 kg)
1 1/2 inches (3.8 cm )250 lbs (114 kg)
2 inches (5.1 cm)350 lbs (159 kg)
2 3/8 inches (6.0 cm )450 lbs (205 kg)—
2 5/8 inches (6.7 cm )500 lbs (227 kg)—
If the difference becomes more than indicated in the table, distribute t\
he load or
remove cargo as needed. How to weigh the trailer loads using a public scale
Check each weight in the order indicated as shown. Refer to the table be\
low for
each weight’s limit except for the tongue load.
1. Front gross axle weight.
4.Gross combined weight.
2. Gr oss vehicle weight.
3. Rear gross axle weight.
5. Hitched trailer weight.
6. Unhitched trailer weight.
• If you cannot weigh the rear axle, subtract 1 from 2.
•
The maximum gross combined weight (4) decreases by 2% for every 1,000 feet
(305 m) of elevation.
•
To calculate the tongue load, subtract 5 from 6.
•
Refer to the trailer owner’s manual for additional information.
Fully load the vehicle and trailer. An attendant who watches the scale is needed as
all occupants should stay in the vehicle.
If a public scale is not available,
add the estimated weight of
your cargo load to the weight
of your trailer (as quoted by
the manufacturer), and then
measure the tongue load with
an appropriate scale or tongue
gauge or estimate it based on
cargo distribution.
Weight limit for2WD models AWD models
Front gross axle 2,734 lbs
(1,240 kg)(1,295 kg) 2,855 lbs
5,545 lbs
Gross vehicle (2,515 kg) (2,650 kg)
5,842 lbs
2,921 lbs
Rear gross axl e
(1,325 kg)(1,405 kg)3,097 lbs
8,025 lbs
Gross combined (3,640 kg) (4,425 kg)
9,755 lbs
Page 59 of 85

DRIVING
110 || 111
D
RIVING
*if equipped
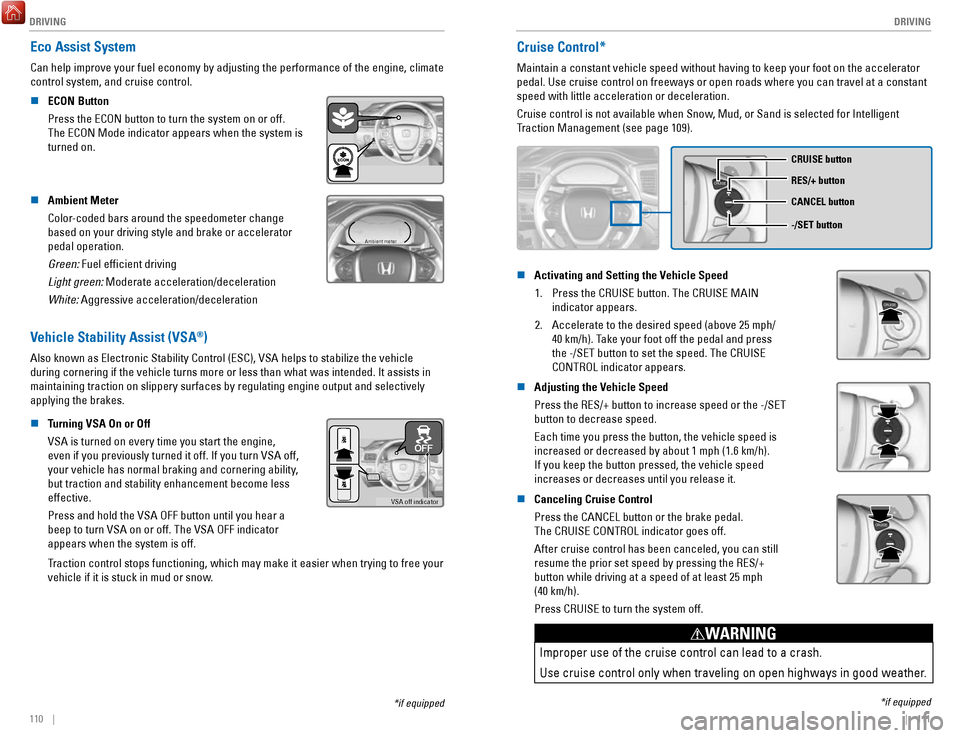
Eco Assist System
Can help improve your fuel economy by adjusting the performance of the e\
ngine, climate
control system, and cruise control.
n
ECON Button
Press the ECON button to turn the system on or off.
The ECON Mode indicator appears when the system is
turned on.
n Ambient Meter
Color-coded bars around the speedometer change
based on your driving style and brake or accelerator
pedal operation.
Green: Fuel efficient driving
Light green: Moderate acceleration/deceleration
White: Aggressive acceleration/deceleration
Ambient meter
Vehicle Stability Assist (VSA®)
Also known as Electronic Stability Control (ESC), VSA helps to stabili\
ze the vehicle
during cornering if the vehicle turns more or less than what was intende\
d. It assists in
maintaining traction on slippery surfaces by regulating engine output an\
d selectively
applying the brakes.
n
Turning VSA On or Off
VSA is turned on every time you start the engine,
even if you previously turned it off. If you turn VSA off,
your vehicle has normal braking and cornering ability,
but traction and stability enhancement become less
effective.
Press and hold the VSA OFF button until you hear a
beep to turn VSA on or off. The VSA OFF indicator
appears when the system is off.
VSA off indicator
Traction control stops functioning, which may make it easier when trying to free your
vehicle if it is stuck in mud or snow.
Cruise Control*
Maintain a constant vehicle speed without having to keep your foot on th\
e accelerator
pedal. Use cruise control on freeways or open roads where you can travel\
at a constant
speed with little acceleration or deceleration.
Cruise control is not available when Snow, Mud, or Sand is selected for Intelligent
Traction Management (see page 109).
CRUISE
CRUISE button
RES/+ button
-/SET button CANCEL button
n Activating and Setting the Vehicle Speed
1.
Press the CRUISE button. The CRUISE MAIN
indicator appears.
2.
Accelerate to the desired speed (above 25 mph/
40 km/h). Take your foot off the pedal and press
the -/SET button to set the speed. The CRUISE
CONTROL indicator appears.
CRUISE
n Adjusting the Vehicle Speed
Press the RES/+ button to increase speed or the -/SET
button to decrease speed.
Each time you press the button, the vehicle speed is
increased or decreased by about 1 mph (1.6 km/h).
If you keep the button pressed, the vehicle speed
increases or decreases until you release it.
n Canceling Cruise Control
Press the CANCEL button or the brake pedal.
The CRUISE CONTROL indicator goes off.
After cruise control has been canceled, you can still
resume the prior set speed by pressing the RES/+
button while driving at a speed of at least 25 mph
(40 km/h).
Press CRUISE to turn the system off.
CRUISE
Improper use of the cruise control can lead to a crash.
Use cruise control only when traveling on open highways in good weather.
WARNING
*if equipped
Page 65 of 85

DRIVING
122 || 123
D
RIVING
Models with touchscreen
1.
From the HOME screen, select Settings.
2.
Select Camera.
3.
Select one of the options.
Fixed Guidelines: Guidelines appear when you
change the gear to Reverse. Select On or Off.
Dynamic Guidelines: Guidelines move as you turn
the steering wheel. Select On or Off.
4.
Press BACK to exit the menu.
The rear camera view is restricted. You cannot see the corner ends of the bumper or what is
underneath the bumper. Its unique lens also makes objects appear closer or farther than they \
actually are.
Visually confirm that it is safe to drive before backing up. Certain c\
onditions (such as weather,
lighting, and high temperatures) may also restrict the rear view. Do not rely on the rearview display,
which does not give you all information about conditions at the rear of \
your vehicle.
Refueling
Use the proper fuel and refueling procedure to ensure the best performan\
ce and safety
of your vehicle.
n
Fuel Information
Use of unleaded gasoline of 87 octane or higher is recommended.
Honda recommends TOP TIER Detergent Gasoline where available.
Do NOT use gasoline containing more than 15% ethanol.
Do NOT use gasoline containing methanol.
Do NOT use gasoline containing MMT.
We recommend quality gasoline containing detergent additives that help pr\
event
fuel system and engine deposits. In addition, in order to maintain good \
performance,
fuel economy, and emissions control, we strongly recommend the use of
gasoline
that does NOT contain harmful manganese-based fuel additives such as MMT\
, if
such gasoline is available.
NOTICE n
How to Refuel
1.
The fuel fill door is located at the left rear of the
vehicle. Park next to the service pump that is most
accessible.
2.
Turn off the engine.
3.
Press the fuel fill door release button on the
driver’s door. The fuel fill door opens.
4.
Place the end of the filler nozzle on the lower part
of the filler opening, then insert it slowly and fully.
5.
After filling, wait about 5 seconds before removing
the filler nozzle. Close the fuel fill door by hand.
Gasoline is highly flammable and explosive. You can be burned or
seriously injured when handling fuel.
Stop the engine, and keep heat, sparks, and flame away.
Handle fuel only outdoors.
Wipe up spills immediately.
WARNING
NOTICE
The fuel filler opening is designed to accept only service station fi\
ller nozzles for
refueling. Use of smaller diameter tubes (e.g., to siphon fuel for othe\
r uses) or other
non-service station devices can damage the area in and around the fill\
er opening.
NOTICE
Page 68 of 85

HANDLING THE UNEXPECTED
128 || 129
H
ANDLING THE UNEXPECTED
Emergency Engine Stop
The ENGINE START/STOP button may be used to stop the engine due to an emergency
situation even while driving. If you must stop the engine, choose one of\
the following
operations:
•
Press and hold the ENGINE START/STOP button
for two seconds, or
•
Firmly press the ENGINE START/STOP button
three times.
If the vehicle is in Park (P), the power mode changes to VEHICLE OFF. Otherwise, the
power mode changes to ACCESSORY.
The steering wheel will not lock. Because turning off the engine also di\
sables the
power assist the engine provides to the steering and braking systems, it\
will require
significantly more physical effort and time to steer and slow the vehi\
cle. Use both feet
on the brake pedal, if necessary, to slow the vehicle and stop immediately in
a safe place.
Do not press the button while driving unless it is absolutely necessary \
for the engine to
be switched off.
Emergency Towing
Call a professional towing service if you need to tow your vehicle.
All models
Flat bed equipment: The operator loads your vehicle on the back of a tru\
ck.
This is the best way to transport your vehicle.
2WD models
Wheel lift equipment: The tow truck uses two pivoting arms that go under the front tires
and lift them off the ground. The rear tires remain on the ground.
This is an acceptable way to tow your vehicle.
Trying to lift or tow your vehicle by the bumpers will cause serious dama\
ge.
The bumpers are not designed to support the vehicle’s weight.
Improper towing such as towing behind a motorhome or other motor vehicle\
can
damage the transmission.
NOTICE
Tire Pressure Monitoring System (TPMS)
Monitors the tire pressure while you are driving.
If your vehicle’s tire pressure becomes significantly low,
the low tire pressure indicator comes on and a message
appears on the multi-information display. The specific tire
with low pressure is displayed.
n What to Do
Stop your vehicle in a safe place. Check the tire pressure and adjust th\
e pressure to
the specified level. The specified tire pressure is on a label on th\
e driver’s doorjamb.
n
Tire Fill Assist
Your vehicle gives you visual and audible alerts to help you adjust the t\
ire pressure to its appropriate level when the vehicle is on.
While inflating: The system beeps and the exterior lights flash once every 5 seconds.
When the correct pressure is reached:
The system beeps and the exterior lights
flash continuously for 5 seconds. Stop filling the tire.
If you overinflate: The system beeps and the exterior lights flash twice every
3 seconds.
Driving on an extremely underinflated tire can cause it to overheat. A\
n overheated
tire can fail. Always inflate your tires to the specified pressure.
NOTICE
Page 73 of 85

MAINTENANCE
138 || 139
M
AINTENANCE
Maintenance Minder™
When maintenance is due, the system message indicator comes on and a mes\
sage
appears on the display every time you turn the vehicle on. See page 139 to check what
maintenance is due indicated by the codes that appear.
Press the Info (
/) button on the steering wheel to change displays.
System message
indicator
Maintenance Minder message
Main
items Sub items
• Independent of the Maintenance Minder information, replace the brake fl\
uid every
3 years.
•
Inspect idle speed every 160,000 miles (256,000 km).
•
Adjust the valves during services A, B, 1, 2, or 3 if they are noisy.
U.S. models
Maintenance, replacement, or repair of emissions control devices and sys\
tems may
be done by any automotive repair establishment or individuals using part\
s that are
certified to EPA standards.
According to state and federal regulations, failure to perform maintenan\
ce on the
maintenance main items marked with # will not void your emissions warranties.
However
, all maintenance services should be performed in accordance with the
intervals indicated by the multi-information display. n
Maintenance Minder Service Codes
These codes indicate what services are due on your vehicle.
*1: If the message Maintenance Due Now does not appear more than 12 months after the display
is reset, change the engine oil every year.
#: See information on maintenance and emissions warranty.
*2: If you drive in dusty conditions, replace the air cleaner element every \
15,000 miles (24,000 km).
*3: If you drive primarily in urban areas that have high concentrations of s\
oot in the air from industry and diesel-powered vehicles, replace every 15,000 miles (24,000 km).
CODEMaintenance Main Items
A
�Replace engine oi l*1
B�Replace engine oil*1 and oil �lter
�Inspect front and rear brakes
�Check parking brake adjustment
�Inspect tie rod ends, steering gearbox, and boots
�Inspect suspension components
�Inspect driveshaft boots
�Inspect brake hoses and lines (Including ABS/VSA)
�Inspect all �uid levels and condition of �uids
�Inspect exhaust system#
�Inspect fuel lines and connection s#
*4: If you drive regularly in very high temperatures (over 110°F, 43°\
C), in very low temperatures
(under -20°F, -29°C), or towing a trailer, replace every 60,000 \
miles/100,000 km.
*5: Driving in mountainous areas at very low vehicle speeds or trailer towin\
g results in higher level
of mechanical (Shear) stress to �uid. This requires differential �\
uid changes more frequently
than recommended by the Maintenance Minder. If you regularly drive your \
vehicle under these
conditions, have the differential �uid changed at 7,500 miles (12,00\
0 km), then every 15,000 miles
(24,000 km).
CODEMaintenance Sub Item s
1
�Rotate tires
2�Replace air cleaner element*2
�Replace dust and pollen �lte r*3
�Inspect drive belt
3
�Replace transfer-case �uid and transmission �ui d
4�Replace spark plugs
�Replace timing belt and inspect water pump*4
�Inspect valve clearance
5
�Replace engine coolant
6�Replace rear differential �ui d*, *5
*
*if equipped