Page 24 of 606
Quick Reference Guide
23
Handling the Unexpected (P551)
Flat Tire (P553)
● Park in a safe location and replace the
flat tire with the compact spare tire
located in the trunk.
Indicators Come On (P571)
● Identify the indica tor and consult the
owner’s manual.
Engine Won’t Start (P562)
● If the battery is dead, jump start using a
booster battery.
Blown Fuse (P575)
● Check for a blown fuse if an electrical
device does not operate.
Overheating (P569)
● Park in a safe location. If you do not see
steam under the hood, open the hood,
and let the engine cool down.
Emergency Towing (P580)
● Call a professional towing service if you
need to tow your vehicle.
Page 447 of 606

uuWhen Driving uAdaptive Cruise Control (ACC)*
446
Driving
The system may automatically shut off and the ACC indicator will come on under
certain conditions. Some examples of th ese conditions are listed below. Other
conditions may reduce some of the ACC functions.
2 Front Sensor Camera* P. 434
■Environmental conditions
Driving in bad weather (r ain, fog, snow, etc.).
■Roadway conditions
Driving on a snowy or wet roadway (obscure d lane marking, vehicle tracks, reflected
lights, road spray, high contrast).
■Vehicle conditions
• The outside of the windshie ld is blocked by dirt, mud, leaves, wet snow, etc.
• An abnormal tire or wheel condition (wro ng sized, varied size or construction,
improperly inflated, comp act spare tire, etc.).
• The camera temperature gets too high.
• The parking brake is applied.
• When the radar sensor cover is dirty.
• When the front of the vehicle tilts up due to heavy cargo in the trunk or rear seats.
• When tire chains are installed.
■ACC Conditions and Limitations1ACC Conditions and Limitations
The radar sensor for ACC is shared with the collision
mitigation braking system
TM (CMBSTM).
2 Collision Mitigation Braking SystemTM
(CMBSTM)* P. 478
Do not put a sticker on the radar sensor cover or
replace the radar sensor cover.
Have your vehicle checked by a dealer if you find any
unusual behavior of the system (e.g., the warning
message appears too frequently).
If the front of the vehicle is impacted in any of the
following situations, the ra dar sensor may not work
properly. Have your vehi cle checked by a dealer:
•The vehicle mounted onto a bump, curb, chock,
embankment, etc.
•You drive the vehicle where the water is deep.
•Your vehicle has a frontal collision.
You can read about handling information for the
camera equipped with this system. 2 Front Sensor Camera
* P. 434
* Not available on all models
Page 555 of 606
uuIf a Tire Goes Flat uChanging a Flat Tire
554
Handling the Unexpected
1. Open the trunk.
2. Remove the two tire tray holding bolts.
3. Pull out the tire tray with the handles, and
hook the rear of the ti re tray to the guides
on the back edge of the trunk.
4. Loosen the strap, then take the jack out.
■Getting Ready to Replace the Flat Tire1Changing a Flat Tire
NOTICE
Do not use the jack if it doesn’t work properly. Call
your dealer or a prof essional towing service.
Tire Tray
Tire Tray Holding Bolts
Handles
StrapJack
Page 558 of 606

Continued557
uuIf a Tire Goes Flat uChanging a Flat Tire
Handling the Unexpected
1. Place the jack under the jacking point
closest to the tire to be changed.
2. Turn the end bracket cl ockwise as shown in
the image until the top of the jack contacts
the jacking point.
u Make sure that the jacking point tab is
resting in the jack notch.
3. Raise the vehicle, using the jack handle bar
and the jack handle, until the tire is off the
ground.
■How to Set Up the Jack1How to Set Up the Jack
Do not use the jack with people or luggage in the
vehicle.
Use the jack provided in your vehicle.
Other jacks may not support the weight (“load”) or
their shape may not match.
The following instructions must be followed to use
the jack safely:
•Do not use while the engine is running.
•Use only where the ground is firm and level.
•Use only at the jacking points.•Do not get in the vehicl e while using the jack.
•Do not put anything on top of or underneath the
jack.
3WARNING
The vehicle can easily roll off the jack,
seriously injuring anyone underneath.
Follow the directions for changing a tire
exactly, and never get under the vehicle
when it is supported only by the jack.
Jacking Points
Jack Handle Bar
Wheel Nut Wrench as Jack Handle
Page 560 of 606

Continued559
uuIf a Tire Goes Flat uChanging a Flat Tire
Handling the Unexpected
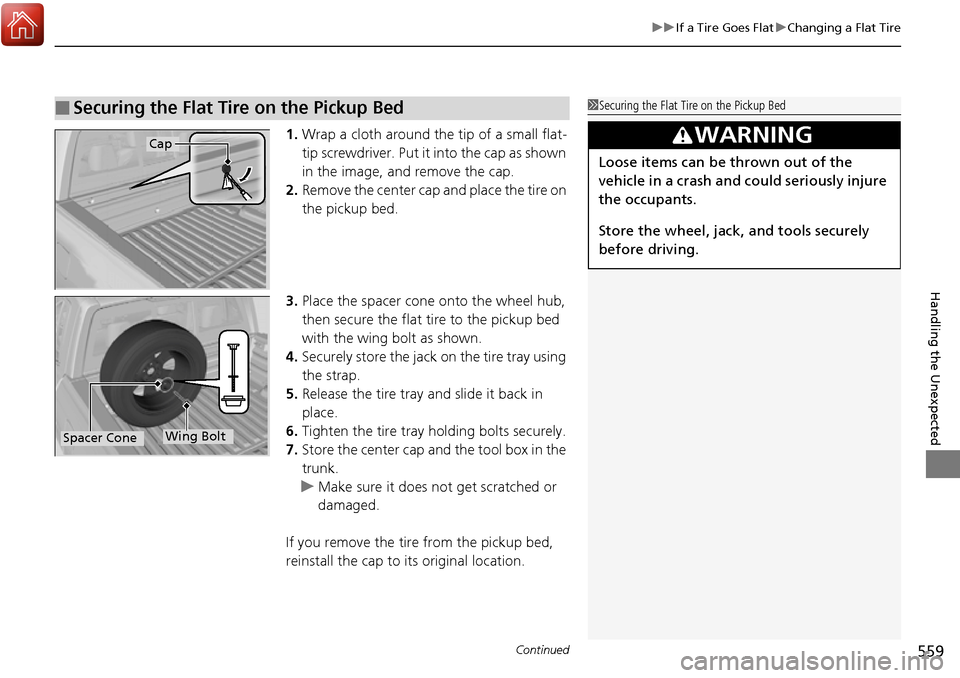
1. Wrap a cloth around the tip of a small flat-
tip screwdriver. Put it into the cap as shown
in the image, and remove the cap.
2. Remove the center cap and place the tire on
the pickup bed.
3. Place the spacer cone onto the wheel hub,
then secure the flat tire to the pickup bed
with the wing bolt as shown.
4. Securely store the jack on the tire tray using
the strap.
5. Release the tire tray and slide it back in
place.
6. Tighten the tire tray holding bolts securely.
7. Store the center cap and the tool box in the
trunk.
u Make sure it does not get scratched or
damaged.
If you remove the tire from the pickup bed,
reinstall the cap to its original location.
■Securing the Flat Tire on the Pickup Bed1 Securing the Flat Tire on the Pickup Bed
3WARNING
Loose items can be thrown out of the
vehicle in a crash and could seriously injure
the occupants.
Store the wheel, jack, and tools securely
before driving.
Cap
Wing BoltSpacer Cone
Page 583 of 606

582
Handling the Unexpected
Refueling
Refueling From a Portable Fuel Container
If you have run out of fuel and need to refuel your vehicle from a portable fuel
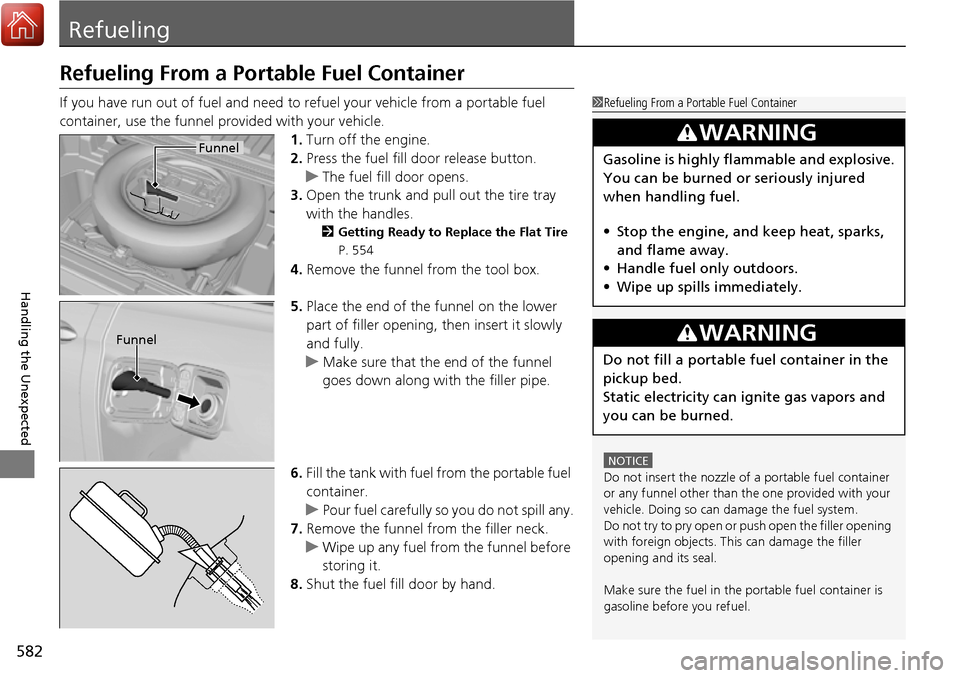
container, use the funnel provided with your vehicle.1.Turn off the engine.
2. Press the fuel fill door release button.
u The fuel fill door opens.
3. Open the trunk and pull out the tire tray
with the handles.
2 Getting Ready to Replace the Flat Tire
P. 554
4. Remove the funnel from the tool box.
5. Place the end of the funnel on the lower
part of filler opening, then insert it slowly
and fully.
u Make sure that the end of the funnel
goes down along with the filler pipe.
6. Fill the tank with fuel from the portable fuel
container.
u Pour fuel carefully so you do not spill any.
7. Remove the funnel from the filler neck.
u Wipe up any fuel from the funnel before
storing it.
8. Shut the fuel fill door by hand.
1Refueling From a Portable Fuel Container
NOTICE
Do not insert the nozzle of a portable fuel container
or any funnel other than the one provided with your
vehicle. Doing so can damage the fuel system.
Do not try to pry open or push open the filler opening
with foreign objects. This can damage the filler
opening and its seal.
Make sure the fuel in the portable fuel container is
gasoline before you refuel.
3WARNING
Gasoline is highly flammable and explosive.
You can be burned or seriously injured
when handling fuel.
• Stop the engine, and keep heat, sparks,
and flame away.
• Handle fuel only outdoors.
• Wipe up spills immediately.
3WARNING
Do not fill a portable fuel container in the
pickup bed.
Static electricity can ignite gas vapors and
you can be burned.
Funnel
Funnel