2017 HONDA RIDGELINE change wheel
[x] Cancel search: change wheelPage 150 of 606

149
uuOperating the Switches Around the Steering Wheel uAuto High-Beam (High Beam Support System)*
Continued
Controls
Auto High-Beam (High Beam Support System)*
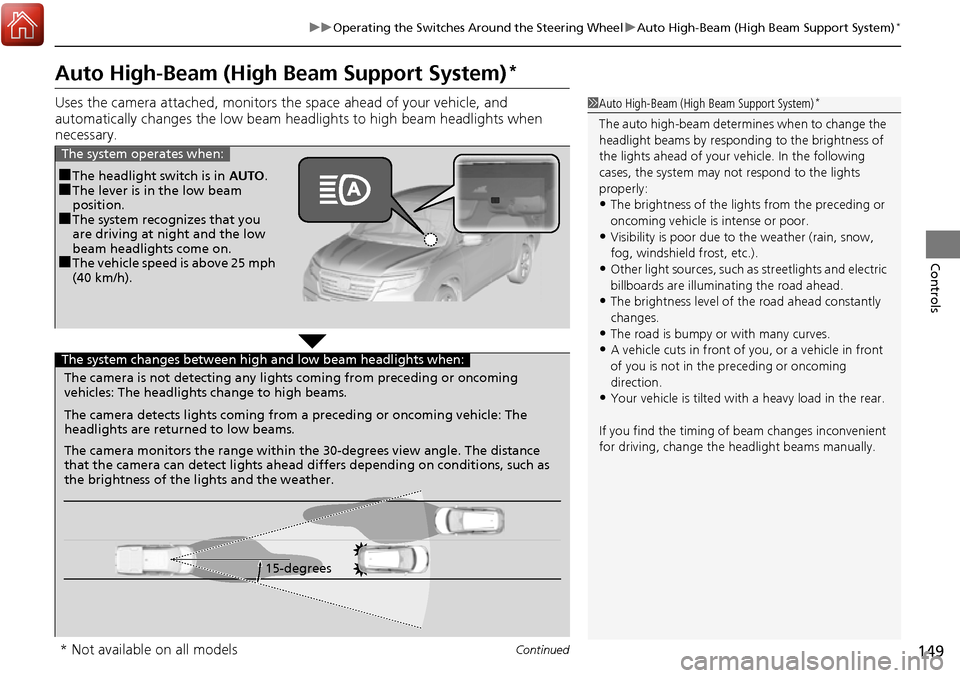
Uses the camera attached, monitors th e space ahead of your vehicle, and
automatically changes the low beam h eadlights to high beam headlights when
necessary.1 Auto High-Beam (High Beam Support System)*
The auto high-beam determines when to change the
headlight beams by responding to the brightness of
the lights ahead of your vehicle. In the following
cases, the system may not respond to the lights
properly:
•The brightness of the lights from the preceding or
oncoming vehicle is intense or poor.
•Visibility is poor due to the weather (rain, snow,
fog, windshield frost, etc.).
•Other light sources, such as streetlights and electric
billboards are illumina ting the road ahead.
•The brightness level of th e road ahead constantly
changes.
•The road is bumpy or with many curves.
•A vehicle cuts in front of you, or a vehicle in front
of you is not in the preceding or oncoming
direction.
•Your vehicle is tilted with a heavy load in the rear.
If you find the timing of beam changes inconvenient
for driving, change the headlight beams manually.
■The headlight switch is in AUTO.■The lever is in the low beam
position.
■The system recognizes that you
are driving at night and the low
beam headlights come on.
■The vehicle speed is above 25 mph
(40 km/h).
The system operates when:
The camera is not detecting any lights coming from preceding or oncoming
vehicles: The headlights change to high beams.
15-degrees
The camera detects lights coming from a preceding or oncoming vehicle: The
headlights are return
ed to low beams.
The camera monitors the range within the 30-degrees view angle. The distance
that the camera can detect lights ahead differs depending on conditions, such as
the brightness of the lights and the weather.
The system changes between high and low beam headlights when:
* Not available on all models
Page 152 of 606

151
uuOperating the Switches Around the Steering Wheel uAuto High-Beam (High Beam Support System)*
Controls
■To manually cancel th e system temporarily
You can cancel the operation when you manually change the headlights to high
beams. Push the lever forward until you hear a click, or lightly pull the lever towards
you to flash high beams. The auto high-beam indicator goes off.
If you want the auto high-beam operation to resume at once, pull the lever towards
you.
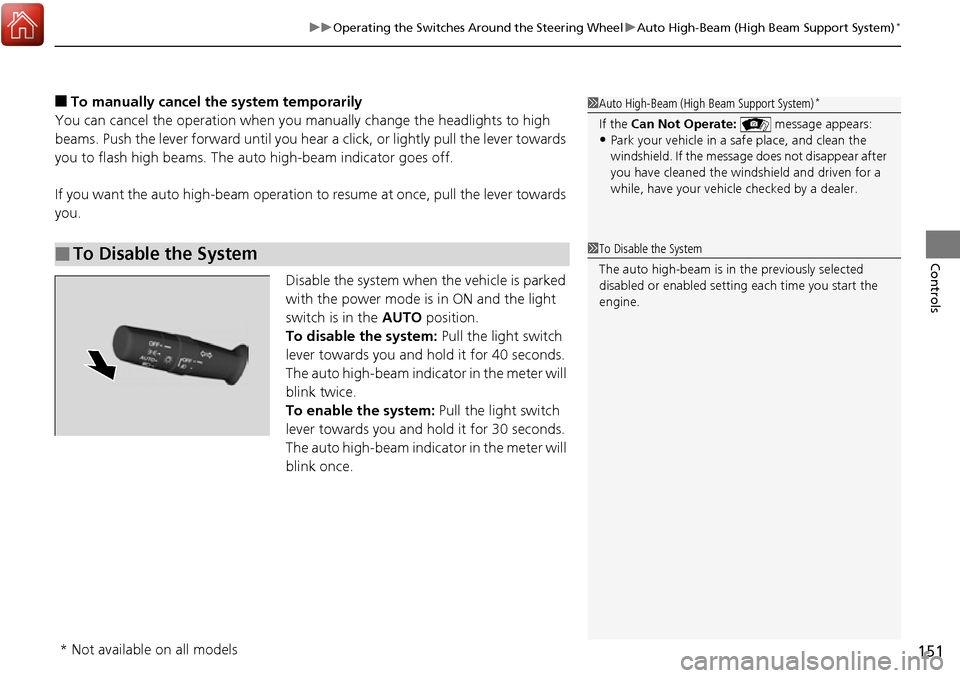
Disable the system when the vehicle is parked
with the power mode is in ON and the light
switch is in the AUTO position.
To disable the system: Pull the light switch
lever towards you and hold it for 40 seconds.
The auto high-beam indicator in the meter will
blink twice.
To enable the system: Pull the light switch
lever towards you and hold it for 30 seconds.
The auto high-beam indicator in the meter will
blink once.
■To Disable the System
1 Auto High-Beam (High Beam Support System)*
If the Can Not Operate: message appears:•Park your vehicle in a safe place, and clean the
windshield. If the message does not disappear after
you have cleaned the winds hield and driven for a
while, have your vehicle checked by a dealer.
1 To Disable the System
The auto high-beam is in the previously selected
disabled or enabled setti ng each time you start the
engine.
* Not available on all models
Page 153 of 606

152
uuOperating the Switches Around the Steering Wheel uWipers and Washers
Controls
Wipers and Washers
The windshield wipers and washers can be
used when the power mode is in ON.
■MIST
The wipers run at high speed until you release
the lever.
■Wiper switch (OFF, INT*, LO, HI)
Change the wiper switch setting according to
the amount of rain.
■AUTO*
2 Automatic Intermittent Wipers* P. 153
■Adjusting wiper operation*
Turn the adjustment ri ng to adjust wiper
operation.
■Washer
Sprays while you pull the lever toward you.
When you release the lever for more than one
second, the spray stops, the wipers sweep two
or three more times to clear the windshield,
then stop.
■Windshield Wipers/Washers1 Wipers and Washers
NOTICE
Do not use the wipers when the windshield is dry.
The windshield will get sc ratched, or the rubber
blades will get damaged.
Turn the washers off if no washer fluid comes out.
The pump may get damaged.
The wiper motor may stop motor operation
temporarily to prevent an overload. Wiper operation
will return to normal within a few minutes, once the
circuit has returned to normal.
If the vehicle speeds up while the wipers are
operating intermittently, the length of the wipe
interval shortens.
When the vehicle speeds up, the wiper operation’s
shortest delay setting ( ) and the LO setting become
the same.
NOTICE
In cold weather, the blades may freeze to the
windshield, becoming stuck.
Operating the wipers in th is condition may damage
the wipers. Use the defrost er and heated windshield
*
to warm the windshield, then turn the wipers on.
If the wipers st op operating due to an obstacle such
as the build-up of snow, pa rk the vehicle in a safe
place as soon as possible.
Rotate the wiper switch to OFF, and set the power
mode to ACCESSORY or VEHICLE OFF (LOCK), then
remove the obstacle.
Intermittent Time
Adjustment Ring
MIST
INT
*: Low speed with
intermittent
AUTO
*: Automatic intermittent
operation OFF
LO: Low speed wipe
HI: High speed wipe Pull to
use
washer.
Lower speed, fewer sweeps
Higher speed, more sweeps
* Not available on all models
Page 205 of 606

204
Features
Audio System Basic Operation
To use the audio system, the power mode must be in ACCESSORY or ON.
Use the selector knob or MENU/CLOCK
button to access some audio functions.
Selector knob: Rotate left or right to scroll
through the available ch oices. Press to set
your selection.
MENU/CLOCK button: Press to select any
mode.
The available modes include the wallpaper,
display, clock, langu age setup, and play
modes. Play modes can be also selected from
scan, random, repeat, and so on.
(Back) button: Press to go back to the previous display.
(Sound) button: Press to select the sound setting mode.
(Day/Night) button: Press to change the audio/information screen brightness.
Press , then adjust th e brightness using .
u Each time you press , the mode switches between the daytime mode,
nighttime mode and OFF mode.
Models with color audio system1Audio System Basic Operation
These indications are used to show how to operate
the selector knob.
Rotate to select.
Press to enter.
Menu Items 2 Wallpaper Setup P. 207
2 Display Setup P. 210
2 Scan P. 212, 218
2 Play Mode P. 215, 218
2 RDS Settings P. 212
One of the operating system s used in this unit is
eCos.
For software license terms and condition, visit their
website (eCos license URL:
http://ecos.sourceware.org/license-overview.html )
For source code disclo sure and other details
regarding eCos, visit:
http://www.hondaopensource2.com
Press the SOURCE, , , or button on the
steering wheel to cha nge any audio setting.
2 Audio Remote Controls P. 202
(Back)
Button
Selector
Knob
MENU/
CLOCK
Button
(Day/Night)
Button
(Sound)
Button
Menu Display
Page 213 of 606

uuAudio System Basic Operation uPlaying AM/FM Radio
212
Features
Provides text data information related to your selected RDS capable FM station.
■To find an RDS station from Station List
1. Press while listening to an FM station.
2. Rotate to select the station, then press .
■Update List
Updates your available station list at any time.
1. Press while listening to an FM station.
2. Rotate to select Update List, then press .
■Radio text
Displays the radio text informat ion of the selected RDS station.
1. Press the MENU/CLOCK button.
2. Rotate to select Settings, then press .
3. Rotate to select RDS Settings, then press .
4. Rotate to select Radio Text, then press .
■Scan
Samples each of the strongest stations on the selected band for 10 seconds.
1. Press the MENU/CLOCK button.
2. Rotate to select Scan, then press .
To turn off scan, press .
■Radio Data System (RDS)1 Playing AM/FM Radio
The ST indicator appears on the display indicating
stereo FM broadcasts.
Stereo reproduction in AM is not available.
You can store 6 AM stations and 12 FM stations into
reset button memory. FM1 and FM2 let you store 6
stations each.
Switching the Audio Mode
Press the SOURCE button on the steering wheel.
2 Audio Remote Controls P. 202
1Radio Data System (RDS)
When you select an RDS-capable FM station, the RDS
automatically turns on, and the frequency display
changes to the station name. However, when the
signals of that station become weak, the display
changes from the statio n name to the frequency.
Page 253 of 606

uuAudio System Basic Operation uPlaying SiriusXM ® Radio*
252
Features
1. Select .
2. Select Tune Mode .
3. Select Channel Mode or Category Mode .
■To Change the Tune Mode1Playing SiriusXM ® Radio*
In the channel mode, all available channels are
selectable. In the categor y mode, you can select a
channel within a ca tegory (Jazz, Rock, Classical, etc.).
There may be instances when SiriusXM ® Radio does
not broadcast all the data fi elds (artist name, title).
This does not indicate a problem with your audio
system.
SiriusXM ® Radio stations load in ascending order,
which can take about a minute. Once they have
loaded you will be able to scroll up or down to make
your selections.
Switching the Audio Mode
Press the SOURCE button on the steering wheel or
select SOURCE on the screen.
2 Audio Remote Controls P. 202
Tune Start:
When you change to a preset channel, a song being
played on that channel restarts from the beginning
with this function. This can be turned on or off from
the Audio settings screen.
2 Customized Features P. 309
* Not available on all models
Page 284 of 606

283
uuAudio System Basic Operation uSiri Eyes Free
Features
Siri Eyes Free
You can talk to Siri using the (Talk) button on the steering wheel when your
iPhone is paired to the Bluetooth® HandsFreeLink ® (HFL) system.
2Phone Setup P. 370
■Using Siri Eyes Free
1Siri Eyes Free
Siri is a trademark of Apple Inc.
Check Apple Inc. website for features available for
Siri.
While driving we recomme nd only using Siri through
the button on the steering wheel (Siri Eyes Free).
1 Using Siri Eyes Free
Some commands work only on specific phone
features or apps.
(Talk) Button
Press and hold until the display
changes as shown.
(Hang-up/back) Button
Press to deactivate Siri.
While in Siri Eyes Free:
The display remains the same.
No feedback or commands
appears. Appears when Siri is
activated in Siri Eyes Free
Page 338 of 606

337Continued
Features
Bluetooth® HandsFreeLink ®
Bluetooth® HandsFreeLink ® (HFL) allows you to place and receive phone calls using
your vehicle’s audio system, without handling your cell phone.
Using HFL
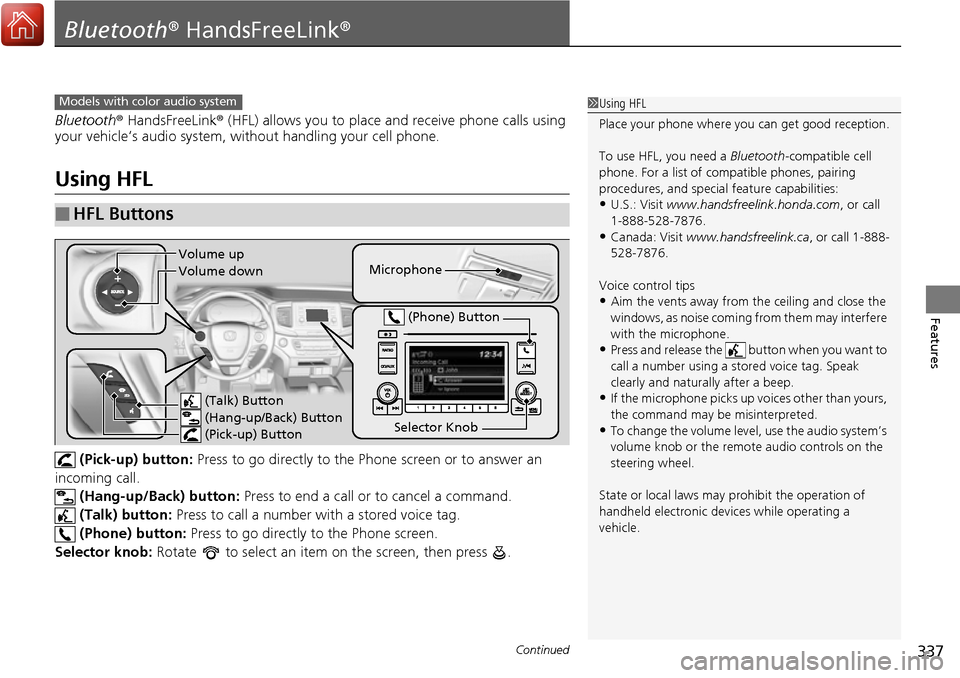
(Pick-up) button: Press to go directly to the Phone screen or to answer an
incoming call. (Hang-up/Back) button: Press to end a call or to cancel a command.
(Talk) button: Press to call a number with a stored voice tag.
(Phone) button: Press to go directly to the Phone screen.
Selector knob: Rotate to select an item on the screen, then press .
■HFL Buttons
1Using HFL
Place your phone where y ou can get good reception.
To use HFL, you need a Bluetooth-compatible cell
phone. For a list of compatible phones, pairing
procedures, and special feature capabilities:
•U.S.: Visit www.handsfreelink.honda.com , or call
1-888-528-7876.
•Canada: Visit www.handsfreelink.ca , or call 1-888-
528-7876.
Voice control tips
•Aim the vents away from the ceiling and close the
windows, as noise coming fr om them may interfere
with the microphone.
•Press and release the button when you want to
call a number using a st ored voice tag. Speak
clearly and naturally after a beep.
•If the microphone picks up vo ices other than yours,
the command may be misinterpreted.
•To change the volume level, use the audio system’s
volume knob or the remote audio controls on the
steering wheel.
State or local laws may pr ohibit the operation of
handheld electronic devi ces while operating a
vehicle.
Models with color audio system
Microphone
(Talk) Button
(Hang-up/Back) Button
(Pick-up) Button
Selector Knob (Phone) Button
Volume up
Volume down