Page 7 of 606
Visual Index
6
Quick Reference Guide❙Power Window Switches (P134)
❙Power Door Lock Master Switch (P121)
❙Memory Buttons* (P157)
❙SET Button* (P157)
❙Fuel Fill Door Release Button
(P499)
❙Rearview Mirror (P159)
❙Driver’s Front Airbag (P43)
❙Shift Lever (P426)
❙Glove Box (P171)
❙Auxiliary Input Jack (P200)
❙Intelligent Traction Management
Button
(P429)
❙Parking Brake (P474)
❙Interior Fuse Box (P578)
❙Hood Release Handle (P512)
❙Door Mirror Controls (P160)
❙USB Ports* (P199)
❙Accessory Power Socket (P175)
❙USB Port (P199)
❙Trunk Main Switch (P129)
❙Accessory Power Socket (P175)
❙USB Port* (P199)
❙Passenger’s Front Airbag (P43)
Page 23 of 606
22
Quick Reference Guide
Maintenance (P503)
Under the Hood (P511)
● Check engine oil, engine coolant, and windshield washer
fluid. Add when necessary.
● Check brake fluid.
● Check the battery condition monthly.
aPull the hood release handle under the corner of the
dashboard.
bLocate the hood latch lever, pull the lever up, and lift up
the hood.
cWhen finished, close the hood and make sure it is firmly
locked in place.
Lights (P523)
● Inspect all lights regularly.
Wiper Blades (P529)
● Replace blades if they leave streaks
across the windshield.
Tires (P531)
● Inspect tires and wheels regularly.
● Check tire pressures regularly.
● Install snow tires for winter
driving.
Page 133 of 606

uuSecurity System uSecurity System Alarm
132
Controls
■To deactivate the security system alarm
Unlock the vehicle using the key, remote transmitter, or smart entry with push
button start system. The system, along with the horn and fl ashing lights, is
deactivated.
■Setting the security system alarm
The security system alarm automatically sets when the following conditions have
been met:
• The power mode is set to VEHICLE OFF (LOCK).
• The hood and trunk are closed.
• All doors are locked from outside with the key, remote transmitter, or smart entry
system.
■When the security system alarm sets
The security system alarm indicator in the instrument panel blinks. When the
blinking interval changes after about 15 se conds, the security system alarm is set.
■To cancel the security system alarm
The security system alarm is canceled when the vehicle is unlocked using the key,
remote transmitter, smart entry system, or th e power mode is set to ON. The security
system alarm indicator goe s off at the same time.
1Security System Alarm
Do not set the security system alarm when someone
is in the vehicle or a window is open. The system can
accidentally activate when:
•Unlocking the door with the lock tab.•Opening the trunk with the trunk release or the
emergency trunk opener.
•Opening the hood with the hood release.•Moving the shift lever out of ( P.
If the battery goes dead after you have set the
security system alarm, the security alarm may go off
once the battery is re charged or replaced.
If this occurs, deactivate the security system alarm by
unlocking a door using the ke y, remote transmitter,
or smart entry system.
Page 167 of 606

166
uuAdjusting the Seats uHead Restraints
Controls
Head Restraints
Your vehicle is equipped with head restraints in all seating positions.
Your vehicle is equipped with head restraints
in all seating positions.
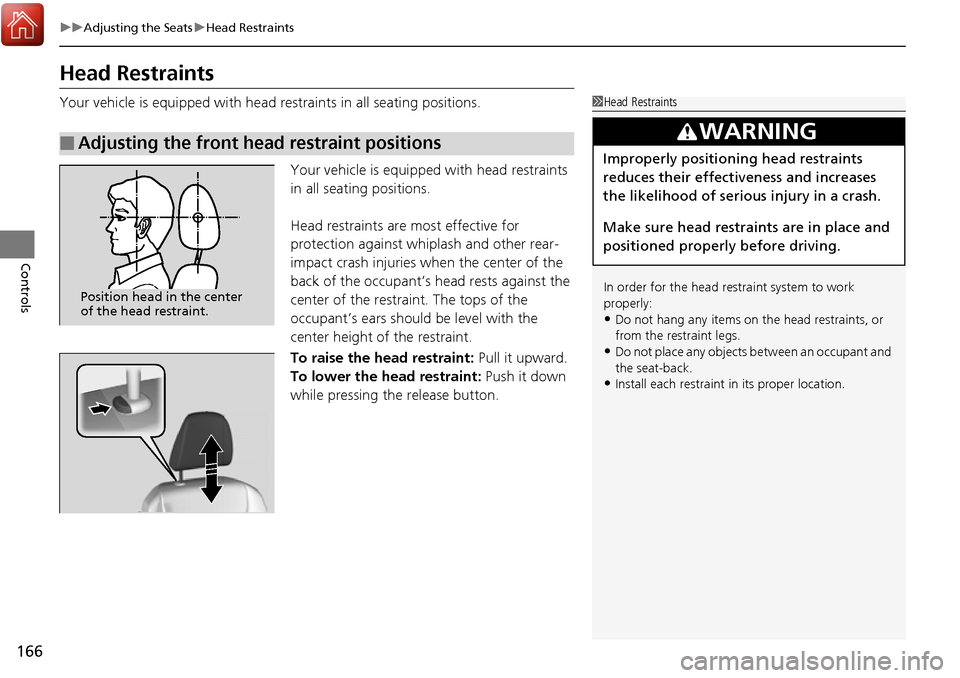
Head restraints are most effective for
protection against whiplash and other rear-
impact crash injuries when the center of the
back of the occupant’s head rests against the
center of the restraint. The tops of the
occupant’s ears should be level with the
center height of the restraint.
To raise the head restraint: Pull it upward.
To lower the head restraint: Push it down
while pressing the release button.
■Adjusting the front head restraint positions
1 Head Restraints
In order for the head restraint system to work
properly:
•Do not hang any items on the head restraints, or
from the restraint legs.
•Do not place any objects between an occupant and
the seat-back.
•Install each restraint in its proper location.
3WARNING
Improperly positioning head restraints
reduces their effectiveness and increases
the likelihood of serious injury in a crash.
Make sure head restraints are in place and
positioned properly before driving.
Position head in the center
of the head restraint.
Page 513 of 606

512
uuMaintenance Under the Hood uOpening the Hood
Maintenance
Opening the Hood
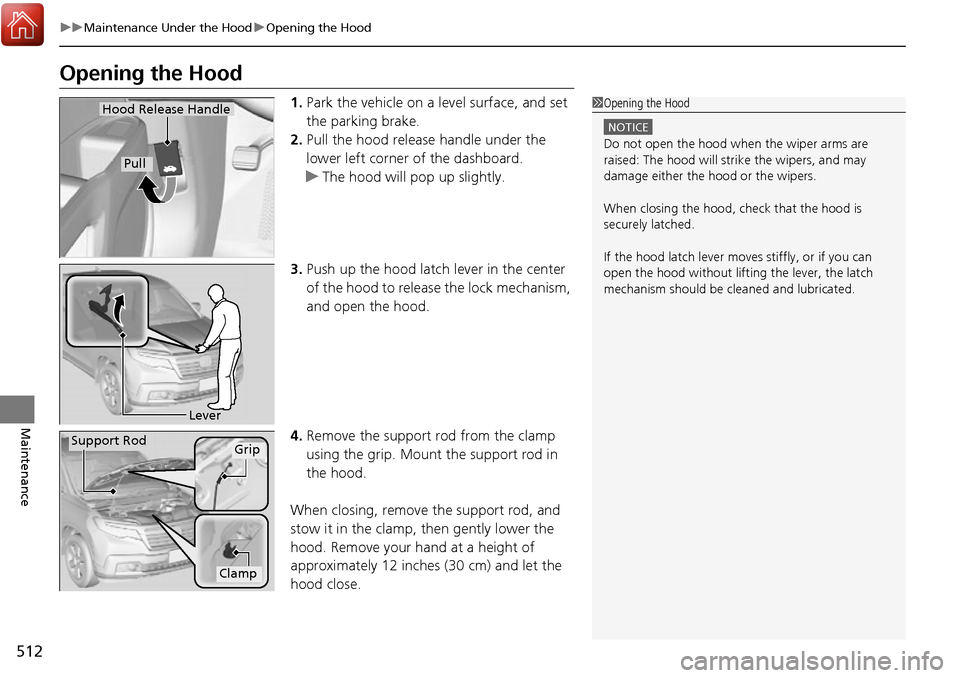
1. Park the vehicle on a level surface, and set
the parking brake.
2. Pull the hood release handle under the
lower left corner of the dashboard.
u The hood will pop up slightly.
3. Push up the hood latch lever in the center
of the hood to release the lock mechanism,
and open the hood.
4. Remove the support rod from the clamp
using the grip. Mount the support rod in
the hood.
When closing, remove the support rod, and
stow it in the clamp, then gently lower the
hood. Remove your hand at a height of
approximately 12 inches (30 cm) and let the
hood close.1 Opening the Hood
NOTICE
Do not open the hood when the wiper arms are
raised: The hood will stri ke the wipers, and may
damage either the hood or the wipers.
When closing the hood, check that the hood is
securely latched.
If the hood latch lever moves stiffly, or if you can
open the hood without lifti ng the lever, the latch
mechanism should be cleaned and lubricated.
Hood Release Handle
Pull
Lever
Support RodGrip
Clamp