2017 HONDA ODYSSEY tail door
[x] Cancel search: tail doorPage 136 of 565
135Continued
Controls
Security System
Immobilizer System
The immobilizer system prevents a key that has not been pre-registered from
starting the engine. Each key contains electronic transmitters that use electronic
signals to verify the key.
Pay attention to the following when insert ing the key into the ignition switch or
pressing the ENGINE START/STOP button:
• Do not allow objects that emit strong ra dio waves near the ignition switch or the
ENGINE START/STOP button.
• Make sure the key is not covered by or touching a metal object.
• Do not bring a key from another vehicle's immobilizer system near the ignition
switch.
Security System Alarm*
The security system alarm activates when the tailgate, hood, or doors are opened
without the key, remote transmitter, or smart entry system*.
■When the security system alarm activates
The horn sounds intermittently, an d all of the exterior lights flash.
■To deactivate the security system alarm
Unlock the vehicle using the key, remote transmitter, or smart entry system. The
system, along with the horn and flashing lights, is deactivated.
1 Immobilizer System
NOTICE
Leaving the ignition key in the vehicle can result in
theft or accidental move ment of the vehicle.
Always take the ignition key with you whenever you
leave the vehicle unattended.
Do not alter the system or add other devices to it.
Doing so may damage the system and make your
vehicle inoperable.
1 Security System Alarm*
The security alarm continues for a maximum of two
minutes until the security system deactivates.
* Not available on all models
17 US ODYSSEY (KA KC)-31TK86600.book 135 ページ 2016年10月24日 月曜日 午後4時2分
Page 137 of 565
uuSecurity System uSecurity System Alarm*
136
Controls
■Setting the security system alarm
The security system alarm automatically sets when the following conditions have
been met:
• The ignition switch is in LOCK
(0*1, and the key has been removed from the
ignition switch.
• The hood is closed.
• All doors and the tailgate are locked with the key, the remote transmitter or smart
entry system.
■When the security system alarm sets
The security system alarm indicator in the instrument panel blinks. When the
blinking interval changes after about 15 seconds, the security system alarm is set.
■To cancel the security system alarm
The security system alarm is canceled when the vehicle is unlocked using the key,
remote transmitter, or smart entry system, or the ignition switch is turned to ON
(w*1. The security system alarm indica tor goes off at the same time.
*1: Models with the smart entry system have an ENGINE START/STOP button instead of an
ignition switch.
1 Security System Alarm*
Do not set the security system alarm when someone
is in the vehicle or a window is open. The system can
accidentally activate when:
•Unlocking the door with the lock tab.
•Opening the tailgate with the power tailgate
button on the dashboard.
If the battery goes dead after you have set the
security system alarm, the security alarm may go off
once the battery is re charged or replaced.
If this occurs, deactivate the security system alarm by
unlocking a door using the ke y or remote transmitter.
Do not attempt to alter th is system or add another
device to it.
Models with power tailgate
* Not available on all models
17 US ODYSSEY (KA KC)-31TK86600.book 136 ページ 2016年10月24日 月曜日 午後4時2分
Page 148 of 565

147
uuOperating the Switches Around the Steering Wheel uTurn Signals
Continued
Controls
Turn Signals
The turn signals can be used when the ignition
switch is in ON
(w*1.
■One-touch turn signal
When you lightly push up or down and release
the turn signal lever, th e exterior turn signals
and turn signal indicator blink three times.
The feature can be used when signaling for a
lane change.
Light Switches
Rotating the light switch turns the lights on
and off, regardless of the position of the
ignition switch
*1.
■High beams
Push the lever forward until you hear a click.
■Low beams
When in high beams, pull the lever back to
return to low beams.
■Flashing the high beams
Pull the lever back, and release it.
*1: Models with the smart entry system have an ENGINE START/STOP button instead of an
ignition switch.
Right Turn
Left Turn
■Manual Operation
1 Light Switches
If you leave the power mode in VEHICLE OFF (LOCK)
with the lights on, a light on reminder chime sounds
when you open the driver’s door.
If you remove the key from the ignition switch while
the lights are on, a chime sounds when the driver’s
door is opened.
When the lights are on, the lights on indicator in the
instrument pane l will be on.
2 Lights On Indicator P. 77
Repeatedly turning the he adlights on and off reduces
the life of the HID headlight bulbs. If you sense that
the level of the headlight s is abnormal, have the
vehicle inspected by a dealer.
Do not leave the lights on when the engine is off
because it will cause the battery to discharge.
Models with smart entry system
Models without smart entry system
Models with high voltage discharge tube bulb
High Beams
Flashing the high beams Low Beams
Turns on parking, side marker,
tail, and rear license plate lights
Turns on headlights, parking, side
marker, tail, and rear license plate
lights
17 US ODYSSEY (KA KC)-31TK86600.book 147 ページ 2016年10月24日 月曜日
午後4時2分
Page 177 of 565
176
Controls
Interior Lights/Interior Convenience Items
Interior Lights
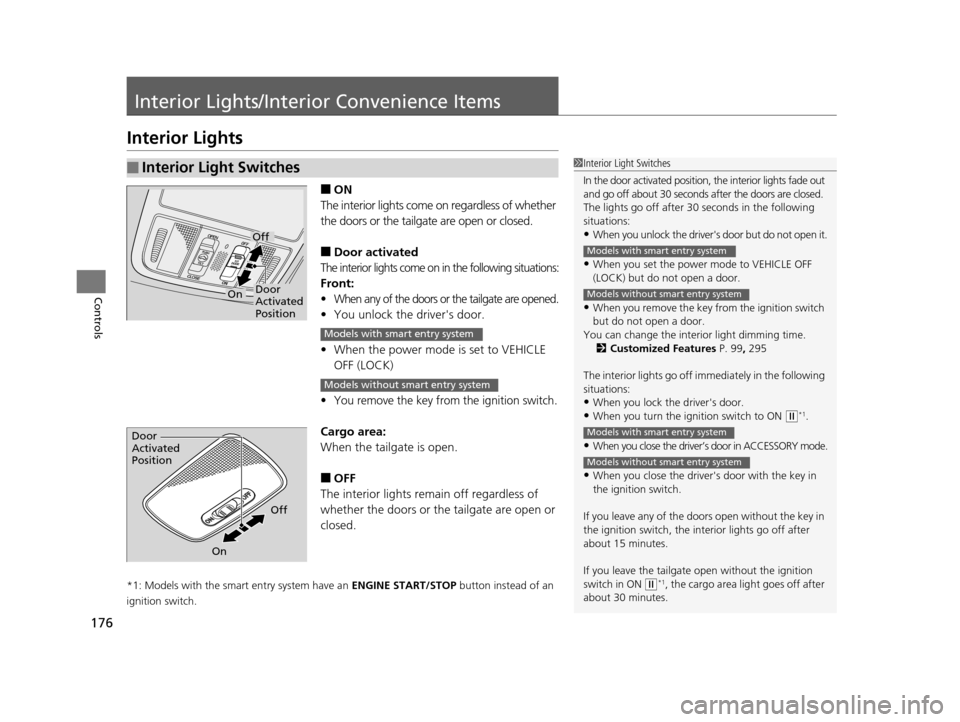
■ON
The interior lights come on regardless of whether
the doors or the tailgat e are open or closed.
■Door activated
The interior lights come on in the following situations:
Front:
•When any of the doors or the tailgate are opened.
•You unlock the driver's door.
• When the power mode is set to VEHICLE
OFF (LOCK)
•You remove the key from the ignition switch.
Cargo area:
When the tailg ate is open.
■OFF
The interior lights remain off regardless of
whether the doors or the tailgate are open or
closed.
*1: Models with the smart entry system have an ENGINE START/STOP button instead of an
ignition switch.
■Interior Light Switches1 Interior Light Switches
In the door activated position, the interior lights fade out
and go off about 30 seconds after the doors are closed.
The lights go off after 30 seconds in the following
situations:
•When you unlock the driver's door but do not open it.
•When you set the power mode to VEHICLE OFF
(LOCK) but do not open a door.
•When you remove the key from the ignition switch
but do not open a door.
You can change the inte rior light dimming time.
2 Customized Features P. 99, 295
The interior lights go off i mmediately in the following
situations:
•When you lock the driver's door.
•When you turn the ignition switch to ON ( w*1.
•When you close the driver’s door in ACCESSORY mode.
•When you close the driver's door with the key in
the ignition switch.
If you leave any of the doors open without the key in
the ignition switch, the interior lights go off after
about 15 minutes.
If you leave the tailgate open without the ignition
switch in ON
( w*1, the cargo area light goes off after
about 30 minutes.
Models with smart entry system
Models without smart entry system
Models with smart entry system
Models without smart entry system
Door
Activated
Position
Off
On
Models with smart entry system
Models without smart entry system
Door
Activated
Position
Off
On
17 US ODYSSEY (KA KC)-31TK86600.book 176 ページ 2016年10月24日 月曜日 午後4時2分
Page 310 of 565
309
uuCustomized Features u
Continued
Features
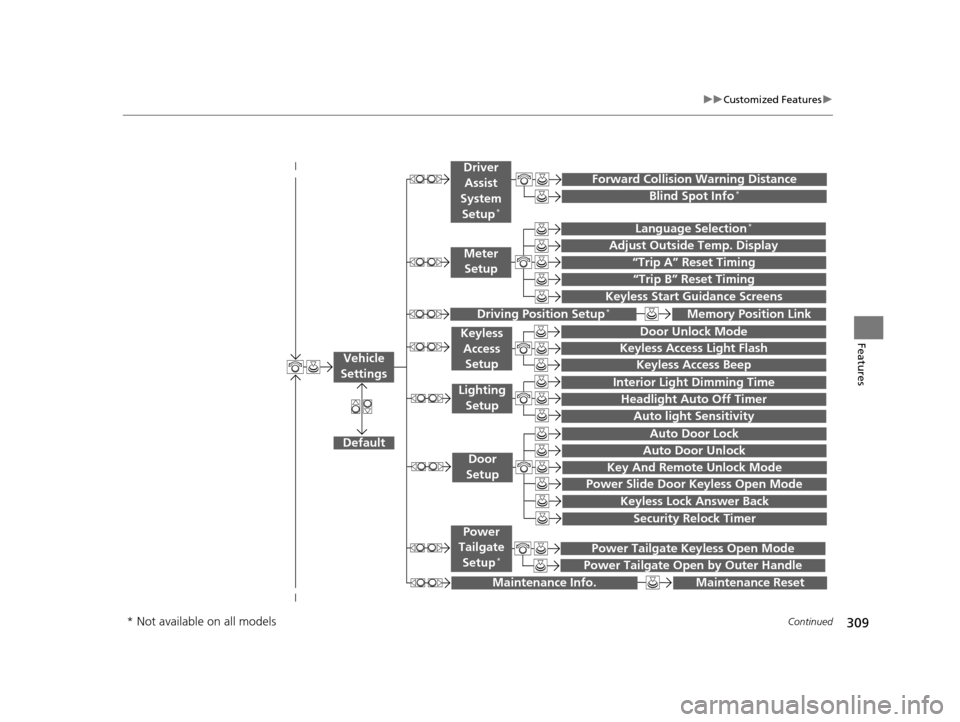
“Trip A” Reset Timing
“Trip B” Reset Timing
Language Selection*
Adjust Outside Temp. Display
Forward Collision Warning Distance
Keyless Start Guidance Screens
Default
Memory Position Link
Door Unlock Mode
Keyless Access Light Flash
Interior Light Dimming Time
Headlight Auto Off Timer
Auto light Sensitivity
Key And Remote Unlock Mode
Keyless Lock Answer Back
Security Relock Timer
Auto Door Lock
Auto Door Unlock
Maintenance Reset
Meter
Setup
Driver
Assist
System
Setup
*
Driving Position Setup*
Keyless Access Setup
Lighting Setup
Door
Setup
Maintenance Info.
Keyless Access Beep
Blind Spot Info*
Power Slide Door Keyless Open Mode
Power Tailgate Keyless Open Mode
Power Tailgate Open by Outer Handle
Power
Tailgate
Setup
*
Vehicle
Settings
* Not available on all models
17 US ODYSSEY (KA KC)-31TK86600.book 309 ページ 2016年10月24日 月曜日 午後4時2分
Page 398 of 565
Continued397
uuBefore Driving uDriving Preparation
Driving
• Store or secure all items on board properly.
u Carrying too much cargo, or improperly storing it, can affect your vehicle's
handling, stability, sto pping distance, and tires, and make it unsafe.
2Maximum Load Limit P. 399
•Do not pile items higher than the seat height.
u They can block your view and may be thrown forward in the event of sudden
braking.
• Do not place anything in the front seat footwells. Make sure to secure the floor
mat.
u An object or unsecured floor mat can in terfere with your brake and accelerator
pedal operation while driving.
• If you have any animals on board, do not let them move around in the vehicle.
u They may interfere with driv ing and a crash could occur.
• Securely close and lock al l doors and the tailgate.
2Locking/Unlocking the Doors from the Inside P. 118
•Adjust your seating position properly.
u Adjust the head restraint, too.
2Adjusting the Seats P. 161
2 Adjusting the Head Restraints P. 164
•Adjust the mirrors and steering wh eel properly for your driving.
u Adjust them while sitting in the proper driving position.
2 Adjusting the Mirrors P. 158
2 Adjusting the Steering Wheel P. 157
■Interior Checks1Interior Checks
The headlight aim is set by the factory, and does not
need to be adjusted. Howeve r, if you regularly carry
heavy items in the cargo area or tow a trailer, have
the aiming readjusted at a dealer or by a qualified
technician.
17 US ODYSSEY (KA KC)-31TK86600.book 397 ページ 2016年10月24日 月曜日 午後4時2分
Page 448 of 565
Continued447
uuRefueling uHow to Refuel
Driving
Qualifying gasoline retailers will, in most cases, identify their gasoline as having met
“TOP TIER Detergent Gasoline” standards at the retail location. This fuel is
guaranteed to contain the proper level of de tergent additives and be free of metallic
additives. The proper level of detergent ad ditives, and absence of harmful metallic
additives in gasoline, help avoid build-up of deposits in your engine and emission
control system.
For further important fuel-related information for your vehicle, or on information on
gasoline that does not contain MMT, visit www.hondacars.com. In Canada, visit
www.honda.ca for additional information on gaso line. For more information on top
tier gasoline, visit www.toptiergas.com .
■Fuel tank capacity: 21 US gal (79.5 liters)
How to Refuel
1.Stop your vehicle with the service station
pump on the left side of the vehicle in the
rear.
2. Turn off the engine.
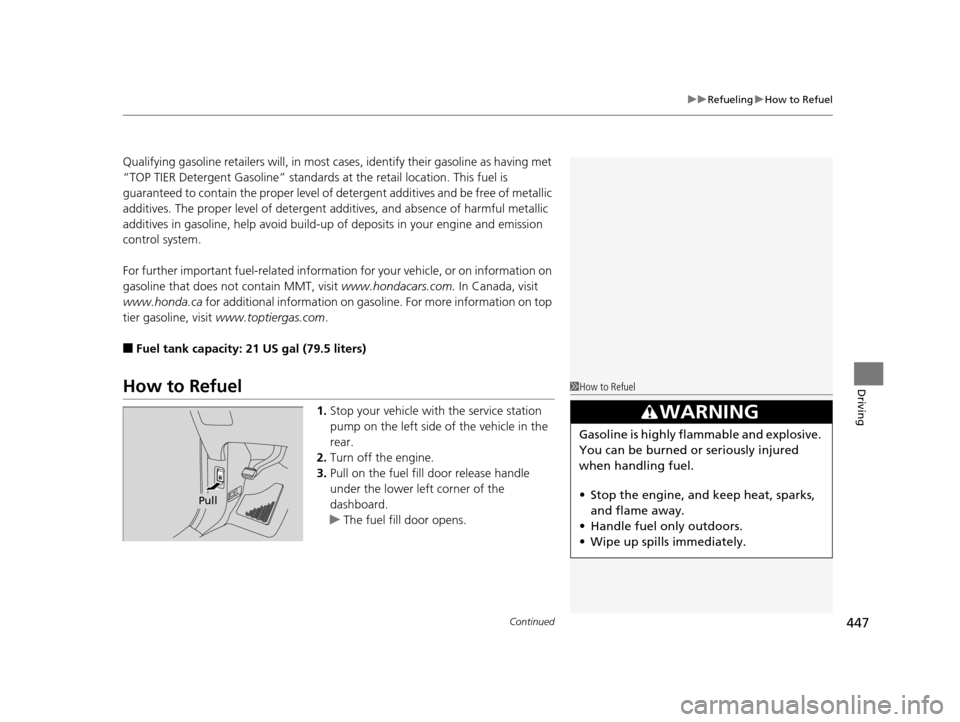
3. Pull on the fuel fill door release handle
under the lower left corner of the
dashboard.
u The fuel fill door opens.
1How to Refuel
3WARNING
Gasoline is highly flammable and explosive.
You can be burned or seriously injured
when handling fuel.
• Stop the engine, and keep heat, sparks,
and flame away.
• Handle fuel only outdoors.
• Wipe up spills immediately.
Pull
17 US ODYSSEY (KA KC)-31TK86600.book 447 ページ 2016年10月24日 月曜日 午後4時2分
Page 538 of 565
537
uuFuses uFuse Locations
Handling the Unexpected
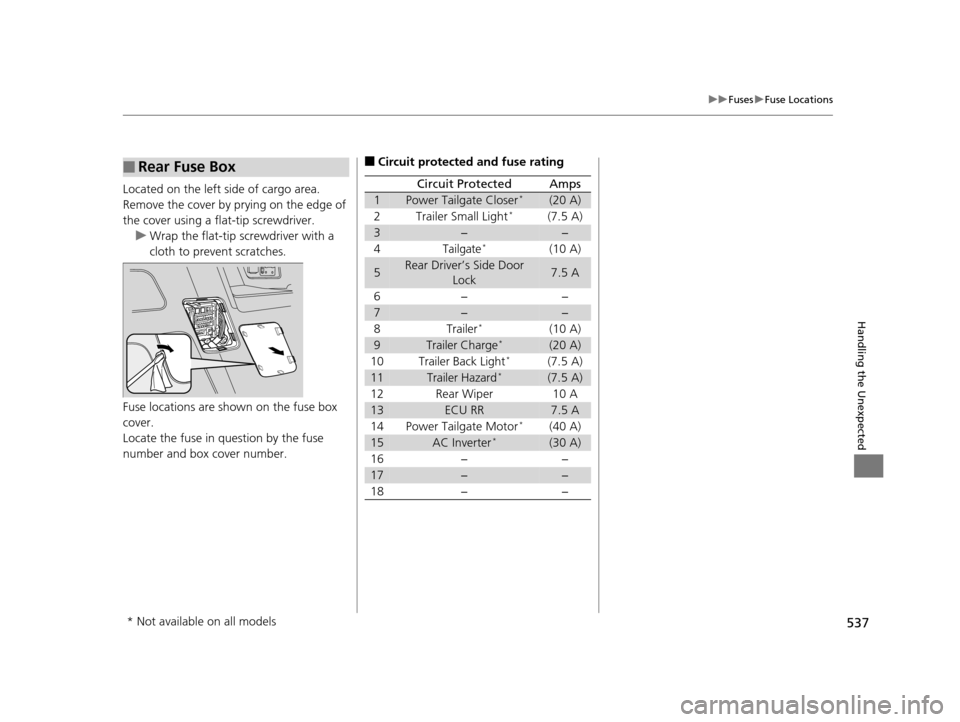
Located on the left side of cargo area.
Remove the cover by prying on the edge of
the cover using a flat-tip screwdriver.
u Wrap the flat-tip screwdriver with a
cloth to prevent scratches.
Fuse locations are shown on the fuse box
cover.
Locate the fuse in question by the fuse
number and box cover number.
■Rear Fuse Box■Circuit protected and fuse rating
Circuit ProtectedAmps
1Power Tailgate Closer*(20 A)
2Trailer Small Light*(7.5 A)
3−−
4Tailgate*(10 A)
5Rear Driver’s Side Door Lock7.5 A
6−−
7−−
8Trailer*(10 A)
9Trailer Charge*(20 A)
10 Trailer Back Light*(7.5 A)
11Trailer Hazard*(7.5 A)
12 Rear Wiper 10 A
13ECU RR7.5 A
14 Power Tailgate Motor*(40 A)
15AC Inverter*(30 A)
16 − −
17−−
18 − −
* Not available on all models
17 US ODYSSEY (KA KC)-31TK86600.book 537 ページ 2016年10月24日 月曜日 午後4時2分