2017 HONDA ODYSSEY rear view mirror
[x] Cancel search: rear view mirrorPage 3 of 565
Contents
This owner’s manual should be considered a permanent part of the
vehicle and should remain with the vehicle when it is sold.
This owner’s manual covers all models of your vehicle. You may find
descriptions of equipment and features that are not on your
particular model.
Images throughout this owner’s manu al (including the front cover)
represent features and equipment that are available on some, but
not all, models. Your particular mo del may not have some of these
features.
This owner’s manual is for vehicles sold in the United States and
Canada.
The information and specifications in cluded in this publication were
in effect at the time of approval for printing. Honda Motor Co., Ltd.
reserves the right, however, to discontinue or change specifications
or design at any time without notice and without incurring any
obligation.2 Safe Driving P. 25
For Safe Driving P. 26 Seat Belts P. 30 Airbags P. 39
2Instrument Panel P. 69
Indicators P. 70 Gauges and Displays P. 92
2Controls P. 107
Clock P. 108 Locking and Unlocking the Doors P. 110
Security System P. 135 Opening and Closing the Windows P. 138
Adjusting the Mirrors P. 158
Heating and Cooling
* P. 194
2 Features P. 205
Audio System P. 206 Audio System Basic Operation P. 211, 234
Rear Entertainment System* P. 276 Customized Features P. 295
2 Driving P. 395
Before Driving P. 396 Towing a Trailer P. 401
Rearview Camera P. 445 Refueling P. 446
2Maintenance P. 451
Before Performing Maintenance P. 452 Maintenance MinderTM P. 455
Checking and Maintaining Wiper Blades P. 486
Remote Control and Wireless Headphone Care
* P. 502
2 Handling the Unexpected P. 509
Tools P. 510 If a Tire Goes Flat P. 511
Overheating P. 526 Indicator, Coming On/Blinking P. 528
When You Cannot Open or Close the Tailgate P. 540
2 Information P. 541
Specifications P. 542 Identification Numbers P. 544
Warranty Coverages P. 549 Authorized Manuals P. 551
17 US ODYSSEY (KA KC)-31TK86600.book 2 ページ 2016年10月24日 月曜日 午後4時2分
Page 7 of 565
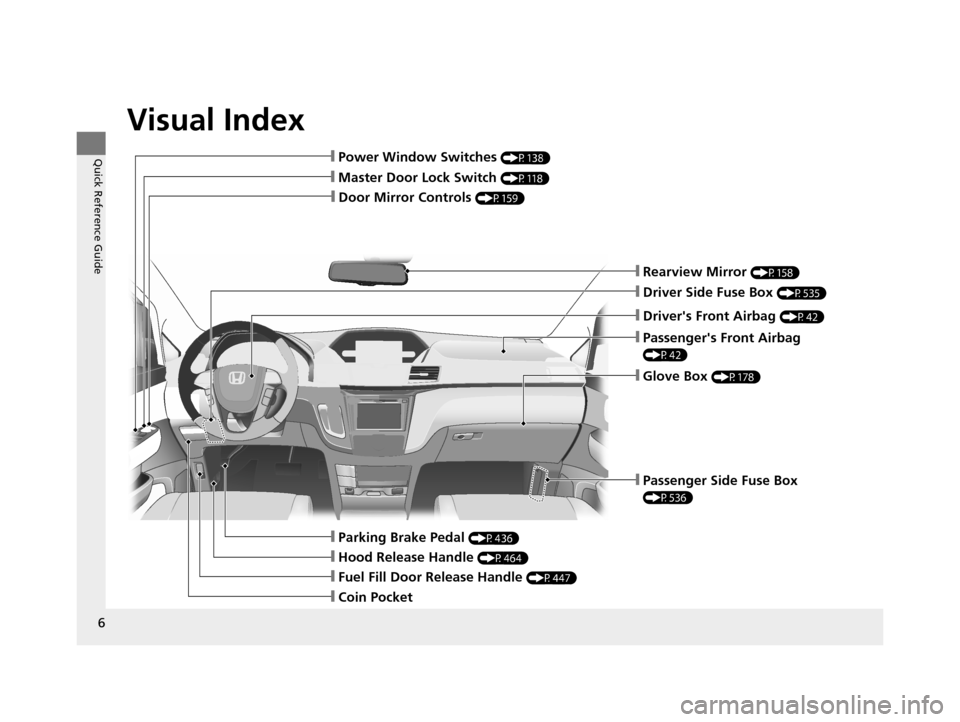
Visual Index
6
Quick Reference Guide
❙Door Mirror Controls (P159)
❙Master Door Lock Switch (P118)
❙Hood Release Handle (P464)
❙Fuel Fill Door Release Handle (P447)
❙Coin Pocket
❙Parking Brake Pedal (P436)
❙Power Window Switches (P138)
❙Rearview Mirror (P158)
❙Driver Side Fuse Box (P535)
❙Passenger's Front Airbag
(P42)
❙Glove Box (P178)
❙Driver's Front Airbag (P42)
❙Passenger Side Fuse Box
(P536)
17 US ODYSSEY (KA KC)-31TK86600.book 6 ページ 2016年10月24日 月曜日 午後4時2分
Page 9 of 565
Visual Index
8
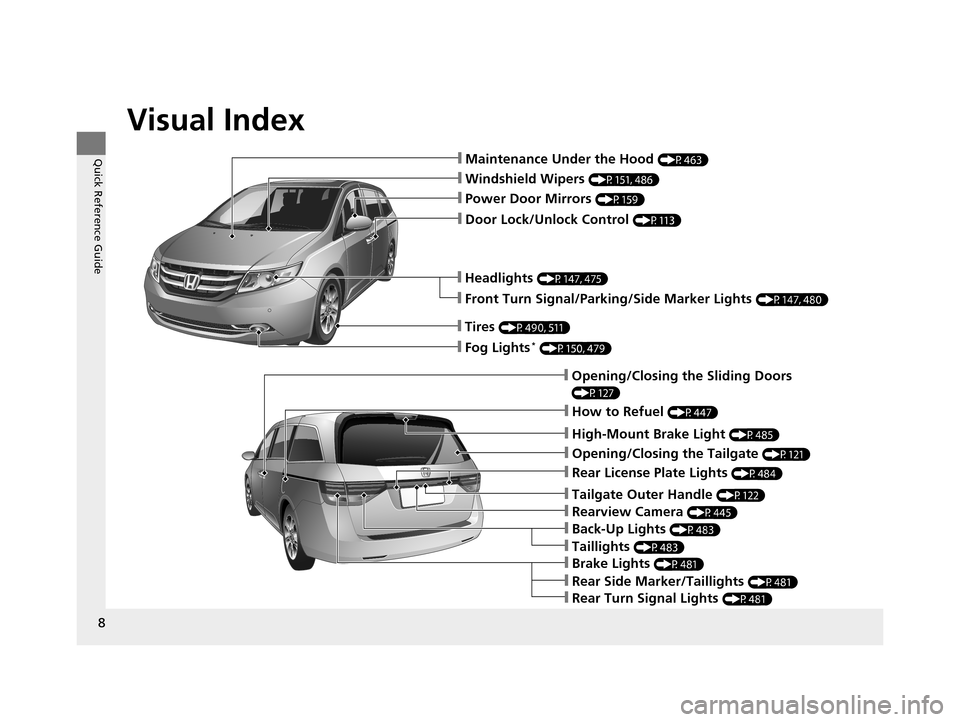
Quick Reference Guide❙Maintenance Under the Hood (P463)
❙Windshield Wipers (P151, 486)
❙Door Lock/Unlock Control (P113)
❙Power Door Mirrors (P159)
❙Headlights (P147, 475)
❙Front Turn Signal/Parking/Side Marker Lights (P147, 480)
❙Tires (P490, 511)
❙Fog Lights* (P150, 479)
❙How to Refuel (P447)
❙Rearview Camera (P445)
❙Opening/Closing the Tailgate (P121)
❙Back-Up Lights (P483)
❙Opening/Closing the Sliding Doors
(P127)
❙Taillights (P483)
❙Tailgate Outer Handle (P122)
❙Brake Lights (P481)
❙Rear Side Marker/Taillights (P481)
❙Rear Turn Signal Lights (P481)
❙High-Mount Brake Light (P485)
❙Rear License Plate Lights (P484)
17 US ODYSSEY (KA KC)-31TK86600.book 8 ページ 2016年10月24日 月曜日 午後4時2分
Page 108 of 565

107
Controls
This chapter explains how to operate the various controls necessary for driving.
Clock.................................................. 108
Locking and Unlocking the Doors Key Types and Functions .................. 110
Low Smart Entry Remote Signal Strength*..... 112Locking/Unlocking the Doors from the Outside..... 113Locking/Unlocking the Doors from the Inside... 118Childproof Door Locks ..................... 119
Auto Door Locking/Unlocking .......... 120
Opening and Closing the Tailgate ... 121
Opening and Closing the Sliding Doors...... 127Security System
Immobilizer System .......................... 135
Security System Alarm
*.................... 135Opening and Closing the Windows ..... 138Opening and Closing the Moonroof*..... 141
Operating the Switches Around the
Steering Wheel Ignition Switch
*............................... 142
ENGINE START/STOP Button*........... 143
Ignition Switch and Power Mode Comparison ................................... 146
Turn Signals ..................................... 147
Light Switches.................................. 147
Fog Lights
*...................................... 150
Daytime Running Lights ................... 150
Wipers and Washers ........................ 151
Brightness Control ........................... 153
Rear Defogger/Heated Door Mirror* Button .. 154Driving Position Memory System*.... 155
Adjusting the Steering Wheel........... 157 Adjusting the Mirrors
....................... 158
Interior Rearview Mirror ................... 158
Power Door Mirrors ......................... 159
Adjusting the Seats Adjusting the Seat Positions ............. 161
Interior Lights/Interior Convenience Items ................................................ 176
Interior Lights .................................. 176
Interior Convenience Items .............. 178
Heating and Cooling
*
Using Vents, Heating and A/C.......... 194
Climate Control System*
Using Automatic Climate Control .... 198
Automatic Climate Control Sensors ... 203
* Not available on all models
17 US ODYSSEY (KA KC)-31TK86600.book 107 ページ 2016年10月24日 月曜日 午後4時2分
Page 159 of 565

158
Controls
Adjusting the Mirrors
Interior Rearview Mirror
Adjust the angle of the rearview mirror when you are sitting in the correct driving
position.
Flip the tab to switch the position.
The night position will help to reduce the glare
from headlights behind you when driving
after dark.
When driving after dark, the automatic
dimming rearview mirror reduces the glare
from headlights behind you, based in inputs
from the mirror sensor. This feature is always
active.
■Rearview Mirror with Day and Night Positions*
1Adjusting the Mirrors
Keep the inside and out side mirrors clean and
adjusted for best visibility.
Adjust the mirrors befo re you start driving.
2 Adjusting the Seat Positions P. 161
Tab
Daytime
Position
Night PositionUp
Down
■Automatic Dimming Rearview Mirror*1 Automatic Dimming Rearview Mirror*
The auto dimming function cancels when the shift
position is in
(R.
Sensor
* Not available on all models
17 US ODYSSEY (KA KC)-31TK86600.book 158 ページ 2016年10月24日 月曜日 午後4時2分
Page 189 of 565
uuInterior Lights/Interior Convenience Items uInterior Convenience Items
188
Controls
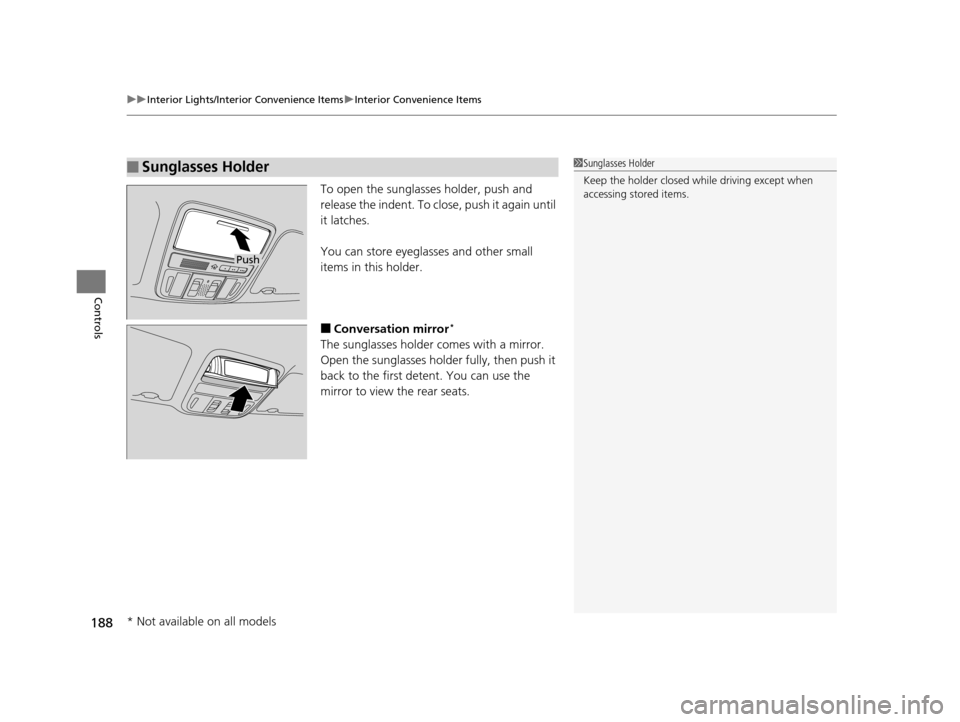
To open the sunglasses holder, push and
release the indent. To clos e, push it again until
it latches.
You can store eyeglasses and other small
items in this holder.
■Conversation mirror*
The sunglasses holder comes with a mirror.
Open the sunglasses holder fully, then push it
back to the first detent. You can use the
mirror to view the rear seats.
■Sunglasses Holder1 Sunglasses Holder
Keep the holder closed wh ile driving except when
accessing stored items.
Push
* Not available on all models
17 US ODYSSEY (KA KC)-31TK86600.book 188 ページ 2016年10月24日 月曜日 午後4時2分
Page 420 of 565

Continued419
uuWhen Driving uForward Collision Warning (FCW)*
Driving
1Forward Collision Warning (FCW)*
Never apply a film or attach any objects to the
windshield that could obs truct the FCW camera's
field of vision.
Scratches, nicks, and othe r damage to the windshield
within the FCW camera's fi eld of vision can cause the
system to operate abnormall y. If this occurs, we
recommend that you replac e the windshield with a
genuine Honda replacem ent windshield. Making
even minor repairs within th e camera's field of vision
or installing an aftermarket replacement windshield
may also cause the system to operate abnormally.
After replacing the winds hield, have a dealer
recalibrate the camera. Prop er calibration of the FCW
camera is necessary for the system to operate
properly.
Beep
Camera-based system
The camera is located
behind the rearview mirror.
The beeper sounds
and the FCW
indicator blinks until
a possible collision is
avoided.
The beeper sounds and the
BRAKE
message appears until a possible
collision is avoided.
Models with multi-information
displayModels with
information display
* Not available on all models
17 US ODYSSEY (KA KC)-31TK86600.book 419 ページ 2016年10月24日 月曜日 午後4時2分
Page 425 of 565
uuWhen Driving uLane Departure Warning (LDW)*
424
Driving
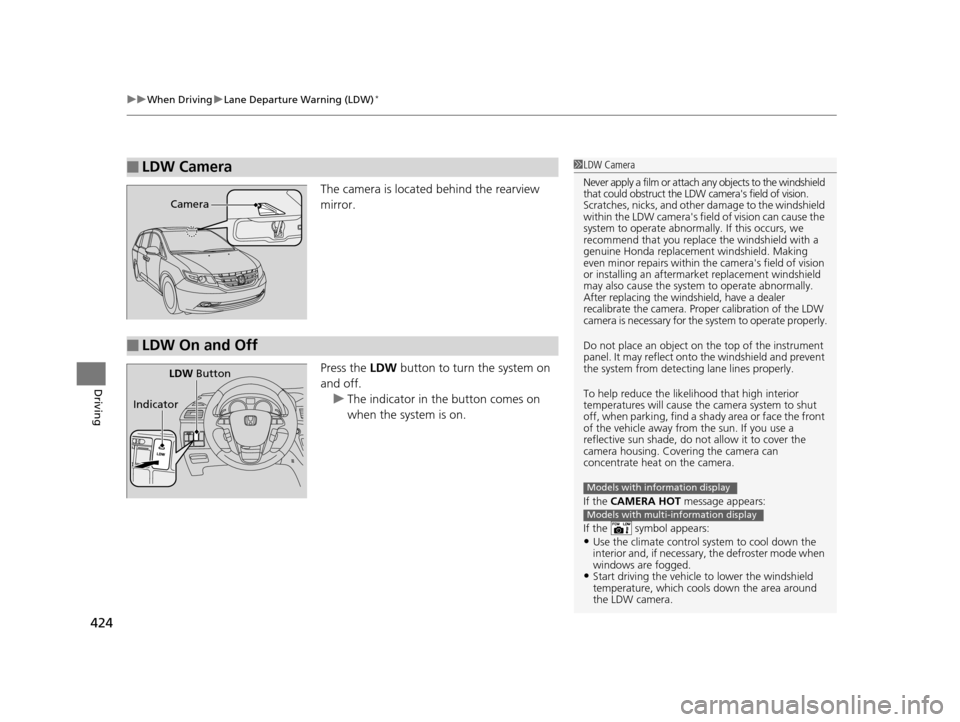
The camera is located behind the rearview
mirror.
Press the LDW button to turn the system on
and off. u The indicator in the button comes on
when the system is on.
■LDW Camera1LDW Camera
Never apply a film or attach any objects to the windshield
that could obstruct the LDW camera's field of vision.
Scratches, nicks, and othe r damage to the windshield
within the LDW camera's fi eld of vision can cause the
system to operate abnormall y. If this occurs, we
recommend that you replac e the windshield with a
genuine Honda replacem ent windshield. Making
even minor repairs within th e camera's field of vision
or installing an aftermarket replacement windshield
may also cause the system to operate abnormally.
After replacing the winds hield, have a dealer
recalibrate the camera. Proper calibration of the LDW
camera is necessary for the system to operate properly.
Do not place an object on the top of the instrument
panel. It may reflect onto the windshield and prevent
the system from detecting lane lines properly.
To help reduce the likel ihood that high interior
temperatures will cause the camera system to shut
off, when parking, find a sh ady area or face the front
of the vehicle away from the sun. If you use a
reflective sun shade, do not allow it to cover the
camera housing. Covering the camera can
concentrate heat on the camera.
If the CAMERA HOT message appears:
If the symbol appears:
•Use the climate control system to cool down the
interior and, if necessary , the defroster mode when
windows are fogged.
•Start driving the vehicle to lower the windshield
temperature, which cool s down the area around
the LDW camera.
Models with information display
Models with multi-information display
Camera
■LDW On and Off
LDW Button
Indicator
17 US ODYSSEY (KA KC)-31TK86600.book 424 ページ 2016年10月24日 月曜日 午後4時2分