2017 HONDA ODYSSEY low beam
[x] Cancel search: low beamPage 11 of 565

10
Quick Reference Guide
Instrument Panel (P69)
System Indicators
Malfunction
Indicator Lamp
Low Oil Pressure
Indicator
Charging System
IndicatorAnti-lock Brake System
(ABS ) Indicator
Vehicle Stability Assist
(VSA
®) System Indicator
VSA ® OFF Indicator Low Tire Pressure
Indicator*/
Low Tire Pressure/
TPMS Indicator
*
Security System Alarm
Indicator*
Lights Indicators
Lights On Indicator
High Beam Indicator
Fog Light Indicator
*
Immobilizer System
Indicator Seat Belt Reminder
Indicator
System Indicators
Starter System
Indicator*
System Message
Indicator*
Parking Brake
and Brake System
Indicator (Red)
Supplemental
Restraint System
Indicator
Door and Tailgate Open Indicator/
Parking Sensor Indicator
*
CRUISE MAIN
Indicator
Tachometer
Information Display
*/
Multi-Information Display*
Speedometer
Fuel Gauge
Shift Lever
Position Indicator Power Sliding Door
Indicator
*
Gauges (P92)/Information Display* (P93)/
Multi-Information Display
* (P96)/System Indicators (P70)
Power Tailgate Indicator
*
Fuel Economy
Indicator
TPMS Indicator
*
Turn Signal and
Hazard Warning
Indicators
Maintenance Minder
Indicator
*
Daytime Running
Lights Indicator*
Washer Level
Indicator*Blind spot information
(BSI) Indicator*
CRUISE CONTROL
Indicator
Temperature
Gauge
Low Fuel
Indicator
Smart Entry System
Indicator*
Forward Collision Warning
( FCW ) Indicator*
Lane Departure Warning
( LDW ) Indicator*
Brake System Indicator
(Amber)
U.S.
Canada
U.S.
Canada
System Indicators
U.S.
Canada
U.S.
Canada
U.S.
Canada
17 US ODYSSEY (KA KC)-31TK86600.book 10 ページ 2016年10月24日 月曜日 午後4時2分
Page 12 of 565

11
Quick Reference Guide
Controls (P107)
Clock (P108)
aEnter the Clock Adjustment screen.
2 Adjusting the Clock (P108)
bRotate to change hour, then press
.
cRotate to change minute, then
press .
The navigation system receives signals from
GPS satellites, updating the clock
automatically.
Models with navigation system
ENGINE START/STOP
Button
* (P143)
Press the button to ch ange the vehicle’s
power mode.
Turn Signals (P147)
Turn Signal Control Lever
Right
Left
Lights (P147)
Wipers and Washers (P151)
Light Control Switches
Low Beam High Beam
Flashing
Wiper/Washer Control Lever Adjustment Ring: Lower speed, fewer sweeps
: Higher speed, more sweeps
MIST
OFF
INT: Low speed with intermittent
LO: Low speed wipe
HI : High speed wipe Pull toward
you to spray
washer fluid.
*
Not available on all models
17 US ODYSSEY (KA KC)-31TK86600.book 11 ページ 2016年10月24日 月曜日 午後4時2分
Page 78 of 565

77
uuIndicators u
Continued
Instrument Panel
*1:Models with the smart entry system have an ENGINE START/STOP button instead of an ignition switch.
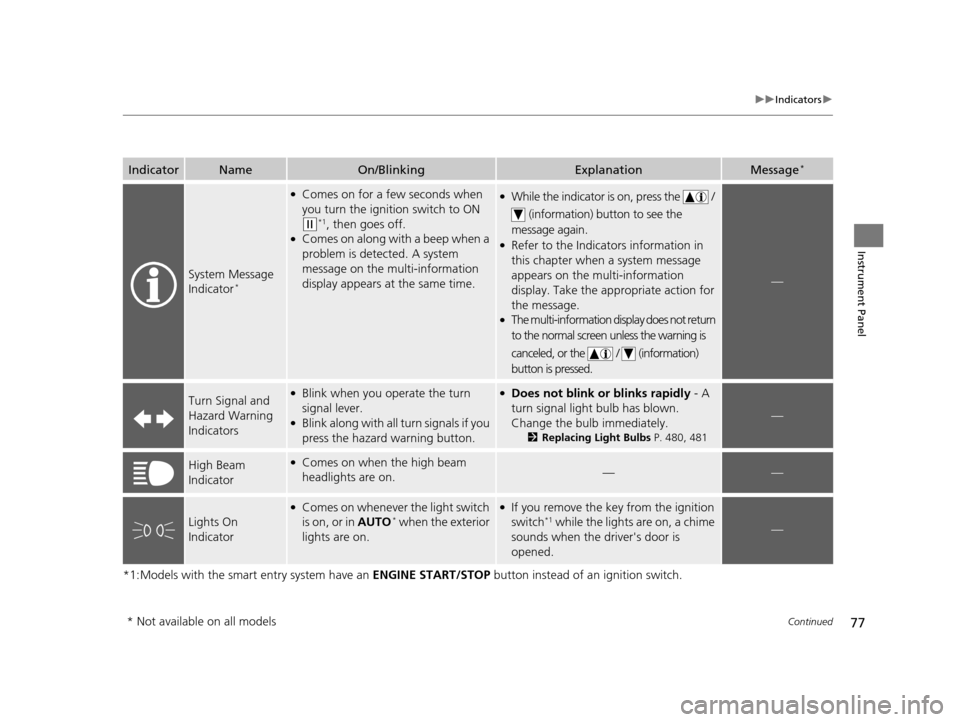
IndicatorNameOn/BlinkingExplanationMessage*
System Message
Indicator*
●Comes on for a few seconds when
you turn the ignition switch to ON
(w*1, then goes off.●Comes on along with a beep when a
problem is detected. A system
message on the multi-information
display appears at the same time.
●While the indicator is on, press the /
(information) button to see the
message again.
●Refer to the Indicators information in
this chapter when a system message
appears on the multi-information
display. Take the ap propriate action for
the message.
●The multi-information display does not return
to the normal screen unless the warning is
canceled, or the / (information)
button is pressed.
—
Turn Signal and
Hazard Warning
Indicators●Blink when you operate the turn
signal lever.
●Blink along with all turn signals if you
press the hazard warning button.
●Does not blink or blinks rapidly - A
turn signal light bulb has blown.
Change the bulb immediately.
2 Replacing Light Bulbs P. 480, 481
—
High Beam
Indicator●Comes on when the high beam
headlights are on.——
Lights On
Indicator
●Comes on whenever the light switch
is on, or in AUTO* when the exterior
lights are on.
●If you remove the key from the ignition
switch*1 while the lights are on, a chime
sounds when the driver's door is
opened.—
* Not available on all models
17 US ODYSSEY (KA KC)-31TK86600.book 77 ページ 2016年10月24日 月曜日 午後4時2分
Page 148 of 565

147
uuOperating the Switches Around the Steering Wheel uTurn Signals
Continued
Controls
Turn Signals
The turn signals can be used when the ignition
switch is in ON
(w*1.
■One-touch turn signal
When you lightly push up or down and release
the turn signal lever, th e exterior turn signals
and turn signal indicator blink three times.
The feature can be used when signaling for a
lane change.
Light Switches
Rotating the light switch turns the lights on
and off, regardless of the position of the
ignition switch
*1.
■High beams
Push the lever forward until you hear a click.
■Low beams
When in high beams, pull the lever back to
return to low beams.
■Flashing the high beams
Pull the lever back, and release it.
*1: Models with the smart entry system have an ENGINE START/STOP button instead of an
ignition switch.
Right Turn
Left Turn
■Manual Operation
1 Light Switches
If you leave the power mode in VEHICLE OFF (LOCK)
with the lights on, a light on reminder chime sounds
when you open the driver’s door.
If you remove the key from the ignition switch while
the lights are on, a chime sounds when the driver’s
door is opened.
When the lights are on, the lights on indicator in the
instrument pane l will be on.
2 Lights On Indicator P. 77
Repeatedly turning the he adlights on and off reduces
the life of the HID headlight bulbs. If you sense that
the level of the headlight s is abnormal, have the
vehicle inspected by a dealer.
Do not leave the lights on when the engine is off
because it will cause the battery to discharge.
Models with smart entry system
Models without smart entry system
Models with high voltage discharge tube bulb
High Beams
Flashing the high beams Low Beams
Turns on parking, side marker,
tail, and rear license plate lights
Turns on headlights, parking, side
marker, tail, and rear license plate
lights
17 US ODYSSEY (KA KC)-31TK86600.book 147 ページ 2016年10月24日 月曜日
午後4時2分
Page 151 of 565

150
uuOperating the Switches Around the Steering Wheel uFog Lights*
Controls
Fog Lights*
When the low beam headlights are on, turn
the fog light switch on to use the fog lights.
Daytime Running Lights
The high beam headlights come on slightly dimmer than normal when the following
conditions have been met:
• The ignition switch is in ON
(w*1.
• The headlight switch is off.
• The parking brake is released.
The lights remain on even if you set th e parking brake. Turning off the ignition
switch or setting the power mode to VEHICLE OFF will turn off the daytime running
lights.
The high beam headlights re turn to the original brightness once the headlight
switch is turned on.
*1: Models with the smart entry system have an ENGINE START/STOP button instead of an
ignition switch.
1 Fog Lights*
When the fog lights are on, the indicator in the
instrument pane l will be on.
2 Fog Light Indicator
* P. 78
Fog Light Switch
* Not available on all models
17 US ODYSSEY (KA KC)-31TK86600.book 150 ページ 2016年10月24日 月曜日 午後4時2分
Page 476 of 565

475Continued
Maintenance
Replacing Light Bulbs
Headlight Bulbs
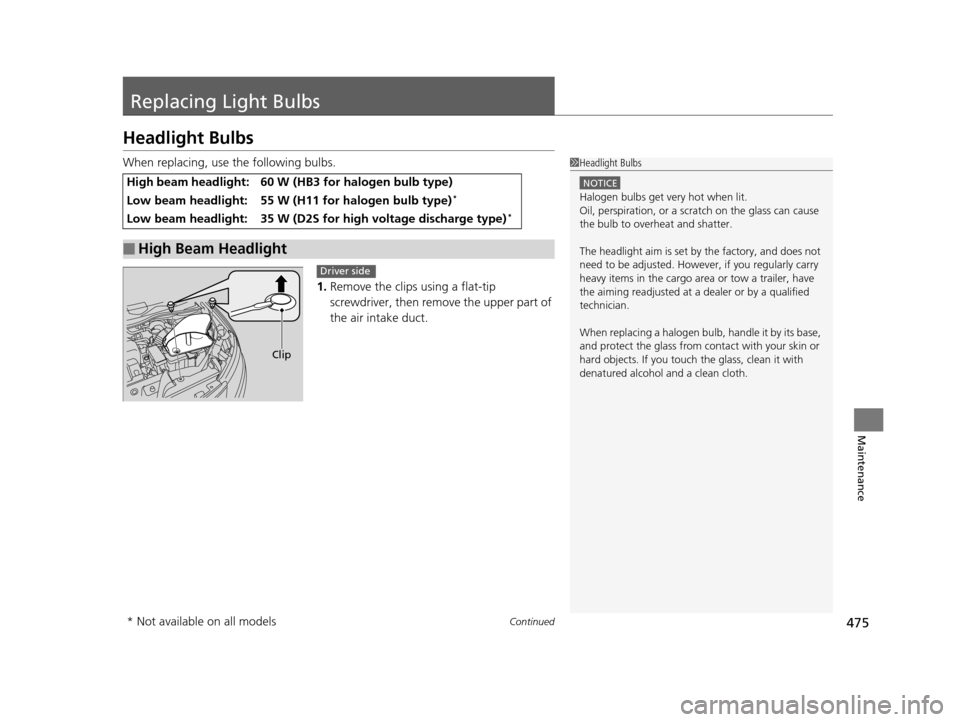
When replacing, use the following bulbs.1.Remove the clips using a flat-tip
screwdriver, then remo ve the upper part of
the air intake duct.
High beam headlight: 60 W (HB3 for halogen bulb type)
Low beam headlight: 55 W (H11 for halogen bulb type)*
Low beam headlight: 35 W (D2S for high voltage discharge type)*
■High Beam Headlight
1 Headlight Bulbs
NOTICE
Halogen bulbs get very hot when lit.
Oil, perspiration, or a scratch on the glass can cause
the bulb to overhe at and shatter.
The headlight aim is set by the factory, and does not
need to be adjusted. Howeve r, if you regularly carry
heavy items in the cargo area or tow a trailer, have
the aiming readjusted at a dealer or by a qualified
technician.
When replacing a halogen bulb, handle it by its base,
and protect the glass from c ontact with your skin or
hard objects. If you touch the glass, clean it with
denatured alcohol and a clean cloth.
Clip
Driver side
* Not available on all models
17 US ODYSSEY (KA KC)-31TK86600.book 475 ページ 2016年10月24日 月曜日 午後4時2分
Page 479 of 565

uuReplacing Light Bulbs uHeadlight Bulbs
478
Maintenance
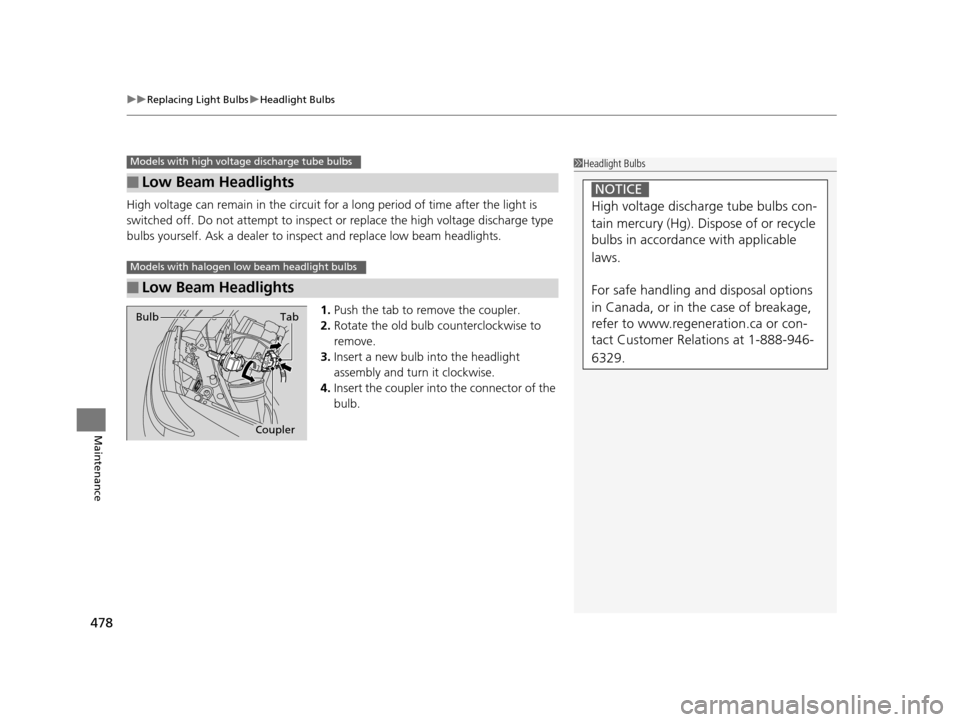
High voltage can remain in the circuit for a long period of time after the light is
switched off. Do not attemp t to inspect or replace the high voltage discharge type
bulbs yourself. Ask a dealer to insp ect and replace low beam headlights.
1. Push the tab to remove the coupler.
2. Rotate the old bulb counterclockwise to
remove.
3. Insert a new bulb into the headlight
assembly and turn it clockwise.
4. Insert the coupler into the connector of the
bulb.
■Low Beam Headlights
■Low Beam Headlights
Models with high voltage discharge tube bulbs1Headlight Bulbs
High voltage discharge tube bulbs con-
tain mercury (Hg). Dispose of or recycle
bulbs in accordance with applicable
laws.
For safe handling and disposal options
in Canada, or in the case of breakage,
refer to www.regeneration.ca or con-
tact Customer Relations at 1-888-946-
6329.
NOTICE
Models with halogen low beam headlight bulbs
Tab
Coupler
Bulb
17 US ODYSSEY (KA KC)-31TK86600.book 478 ページ 2016年10月24日 月曜日
午後4時2分
Page 534 of 565

533Continued
Handling the Unexpected
Fuses
Fuse Locations
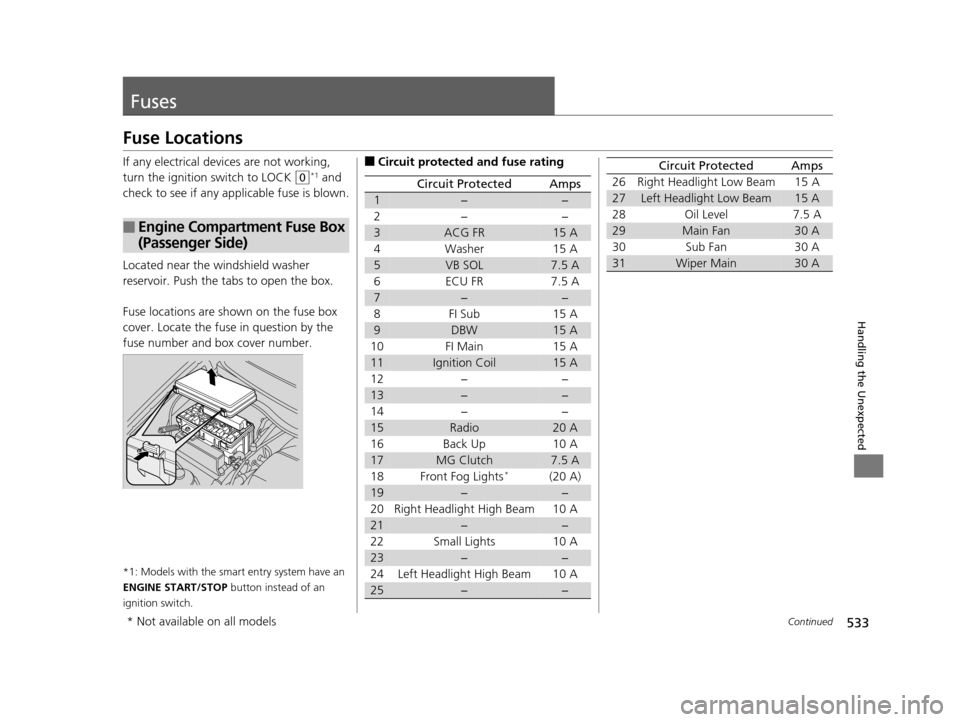
If any electrical devices are not working,
turn the ignition switch to LOCK
(0*1 and
check to see if any appl icable fuse is blown.
Located near the windshield washer
reservoir. Push the tabs to open the box.
Fuse locations are shown on the fuse box
cover. Locate the fuse in question by the
fuse number and box cover number.
*1: Models with the smart entry system have an
ENGINE START/STOP button instead of an
ignition switch.
■Engine Compartment Fuse Box
(Passenger Side)
■Circuit protected and fuse rating
Circuit ProtectedAmps
1−−
2− −
3ACG FR15 A
4Washer 15 A
5VB SOL7.5 A
6 ECU FR 7.5 A
7−−
8FI Sub 15A
9DBW15 A
10 FI Main 15 A
11Ignition Coil15 A
12− −
13−−
14− −
15Radio20 A
16 Back Up 10 A
17MG Clutch7.5 A
18 Front Fog Lights*(20 A)
19−−
20 Right Headlight High Beam 10 A
21−−
22 Small Lights 10 A
23−−
24 Left Headlight High Beam 10 A
25−−
26 Right Headlight Low Beam 15 A
27Left Headlight Low Beam15 A
28 Oil Level 7.5 A
29Main Fan30 A
30 Sub Fan 30 A
31Wiper Main30 A
Circuit ProtectedAmps
* Not available on all models
17 US ODYSSEY (KA KC)-31TK86600.book 533 ページ 2016年10月24日 月曜日 午後4時2分