2017 HONDA CLARITY FUEL CELL clock
[x] Cancel search: clockPage 291 of 527
289
uuCustomized Features u
Continued
Features
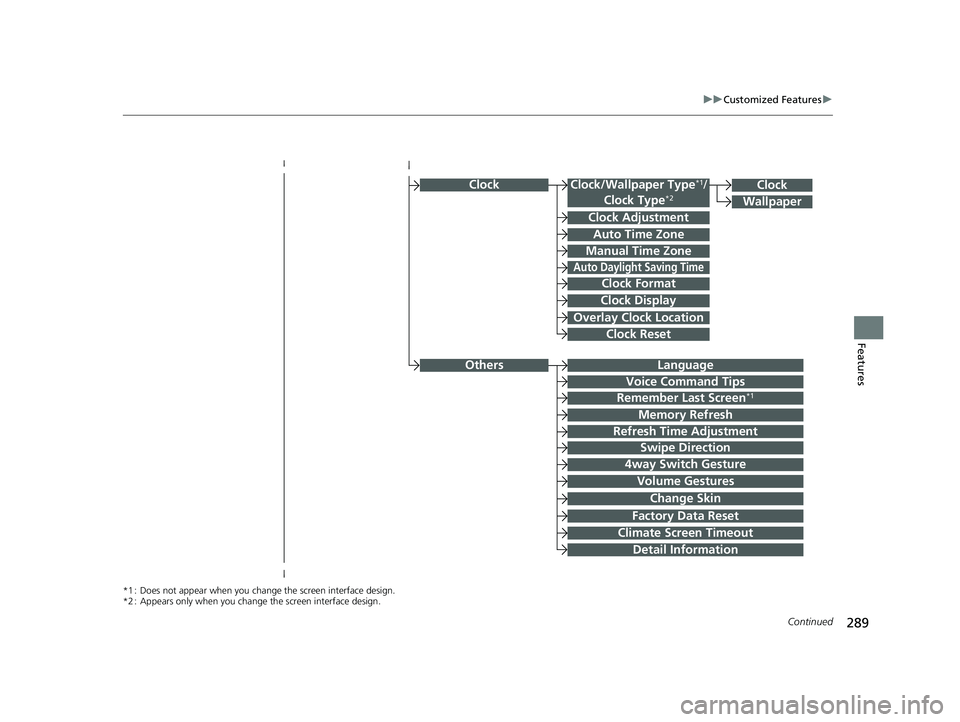
ClockClock/Wallpaper Type*1/
Clock Type*2
Clock Adjustment
Clock Format
Auto Time Zone
Manual Time Zone
Auto Daylight Saving Time
Clock Display
Overlay Clock Location
Clock Reset
Clock
Wallpaper
*1 : Does not appear when you chan ge the screen interface design.
*2 : Appears only when you change the screen interface design.
OthersLanguage
Voice Command Tips
Remember Last Screen*1
Memory Refresh
Refresh Time Adjustment
Swipe Direction
Change Skin
Factory Data Reset
Climate Screen Timeout
4way Switch Gesture
Volume Gestures
Detail Information
17 CLARITY FCV PPO-31TRT6000.book 289 ページ 2016年10月27日 木曜日 午後3 時11分
Page 294 of 527
292
uuCustomized Features u
Features
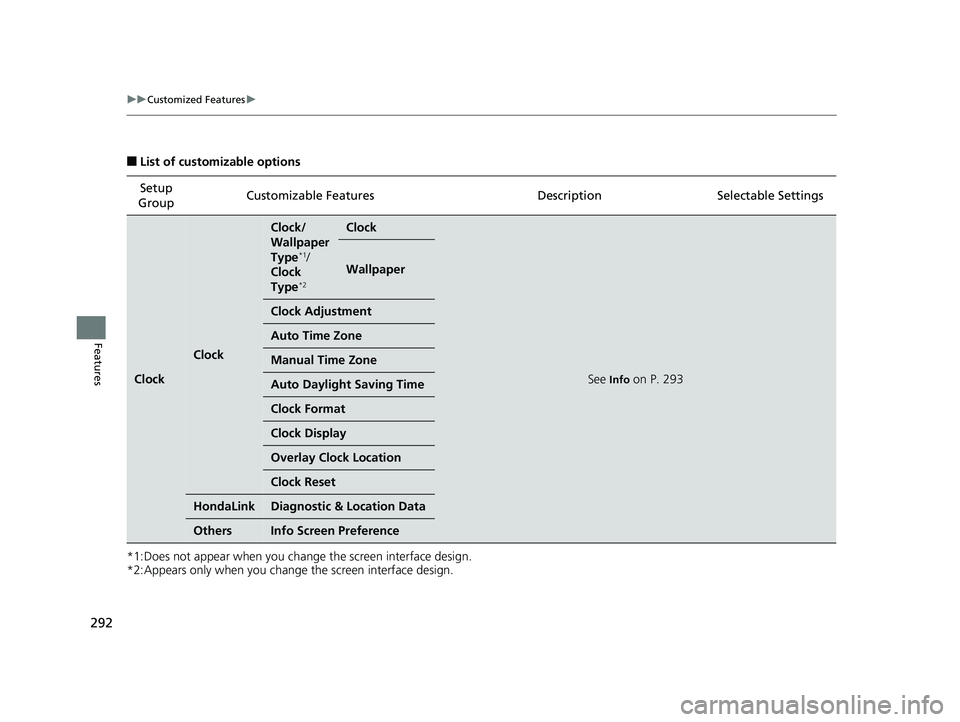
■List of customizable options
*1:Does not appear when you change the screen interface design.
*2:Appears only when you change the screen interface design. Setup
Group Customizable Features Descri
ption Selectable Settings
Clock
Clock
Clock/
Wallpaper
Type
*1/
Clock
Type
*2
Clock
See Info on P. 293
Wallpaper
Clock Adjustment
Auto Time Zone
Manual Time Zone
Auto Daylight Saving Time
Clock Format
Clock Display
Overlay Clock Location
Clock Reset
HondaLinkDiagnostic & Location Data
OthersInfo Screen Preference
17 CLARITY FCV PPO-31TRT6000.book 292 ページ 2016年10月27日 木曜日 午後3 時11分
Page 295 of 527
293
uuCustomized Features u
Continued
Features
*1:Default Setting
*2:Does not appear when you chan ge the screen interface design.
*3:Appears only when you change the screen interface design.
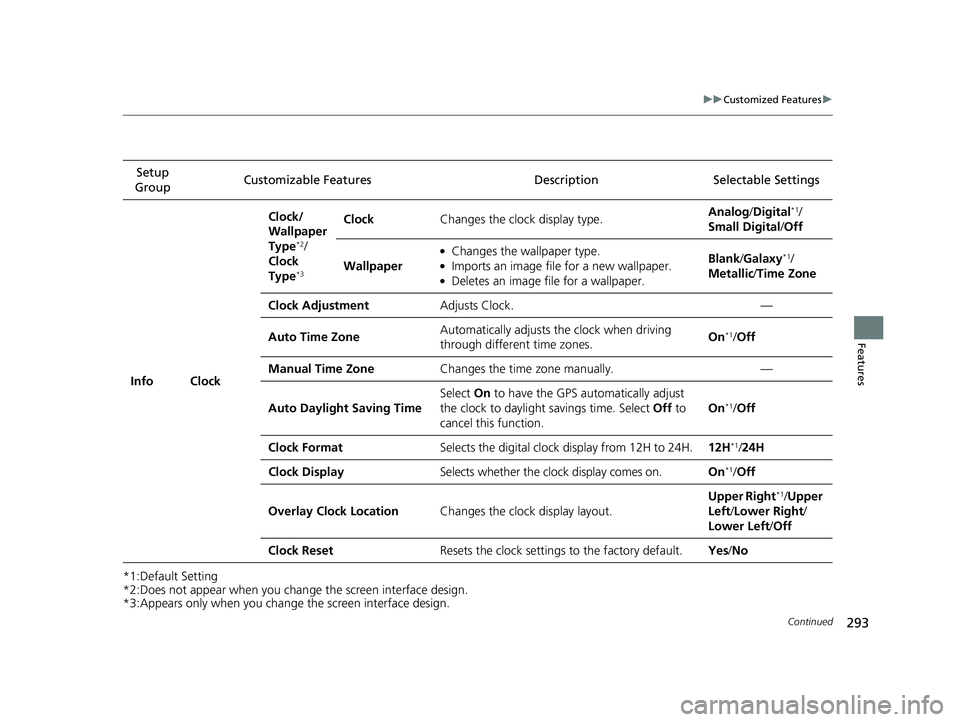
Setup
Group Customizable Features Description Selectable Settings
Info Clock Clock/
Wallpaper
Type
*2/
Clock
Type
*3
Clock Changes the clock display type. Analog
/Digital*1/
Small Digital /Off
Wallpaper
●Changes the wallpaper type.●Imports an image file for a new wallpaper.●Deletes an image file for a wallpaper. Blank
/Galaxy
*1/
Metallic /Time Zone
Clock Adjustment Adjusts Clock. —
Auto Time Zone Automatically adjusts the clock when driving
through different time zones. On
*1/
Off
Manual Time Zone Changes the time zone manually. —
Auto Daylight Saving Time Select
On to have the GPS automatically adjust
the clock to daylight savings time. Select Off to
cancel this function. On
*1/
Off
Clock Format Selects the digital clock display from 12H to 24H. 12H
*1/24H
Clock Display Selects whether the clock display comes on. On
*1/Off
Overlay Clock Location Changes the clock display layout. Upper Right
*1/
Upper
Left/ Lower Right/
Lower Left /Off
Clock Reset Resets the clock settings to the factory default. Yes/No
17 CLARITY FCV PPO-31TRT6000.book 293 ページ 2016年10月27日 木曜日 午後3 時11分
Page 303 of 527
301
uuCustomized Features u
Continued
Features
*1:Default Setting
*2:Does not appear when you chan ge the screen interface design.
*3:Appears only when you change the screen interface design.
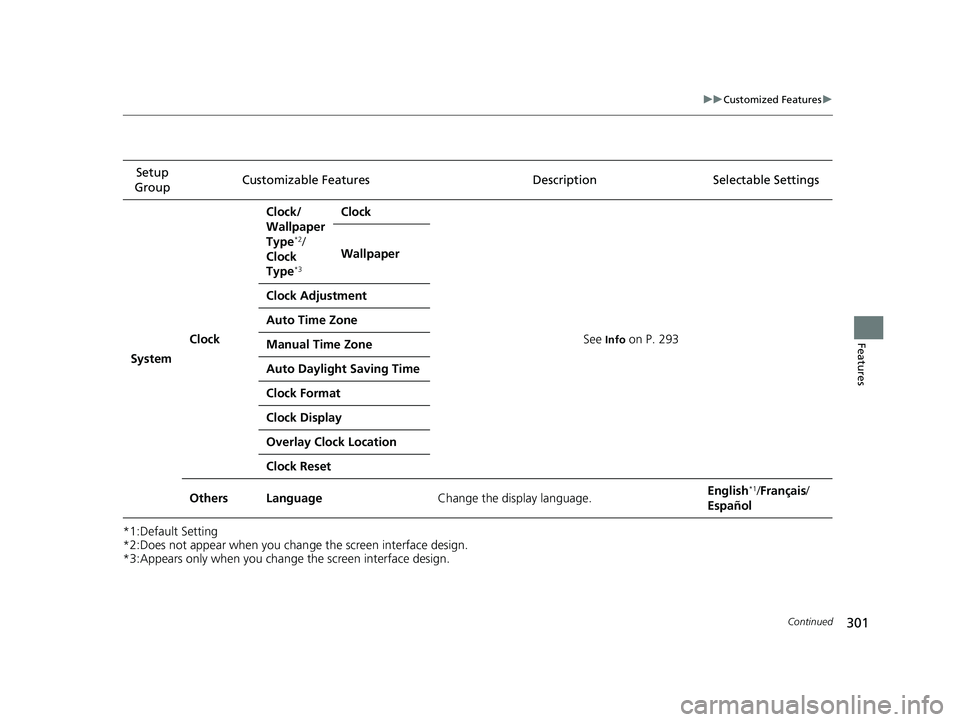
Setup
Group Customizable Features
Description Selectable Settings
System Clock Clock/
Wallpaper
Type
*2/
Clock
Type
*3
Clock
See
Info on P. 293
Wallpaper
Clock Adjustment
Auto Time Zone
Manual Time Zone
Auto Daylight Saving Time
Clock Format
Clock Display
Overlay Clock Location
Clock Reset
Others Language Change the display language. English
*1/
Français /
Español
17 CLARITY FCV PPO-31TRT6000.book 301 ページ 2016年10月27日 木曜日 午後3 時11分
Page 440 of 527
uuMaintenance Under the Hood uInverter Coolant
438
Maintenance
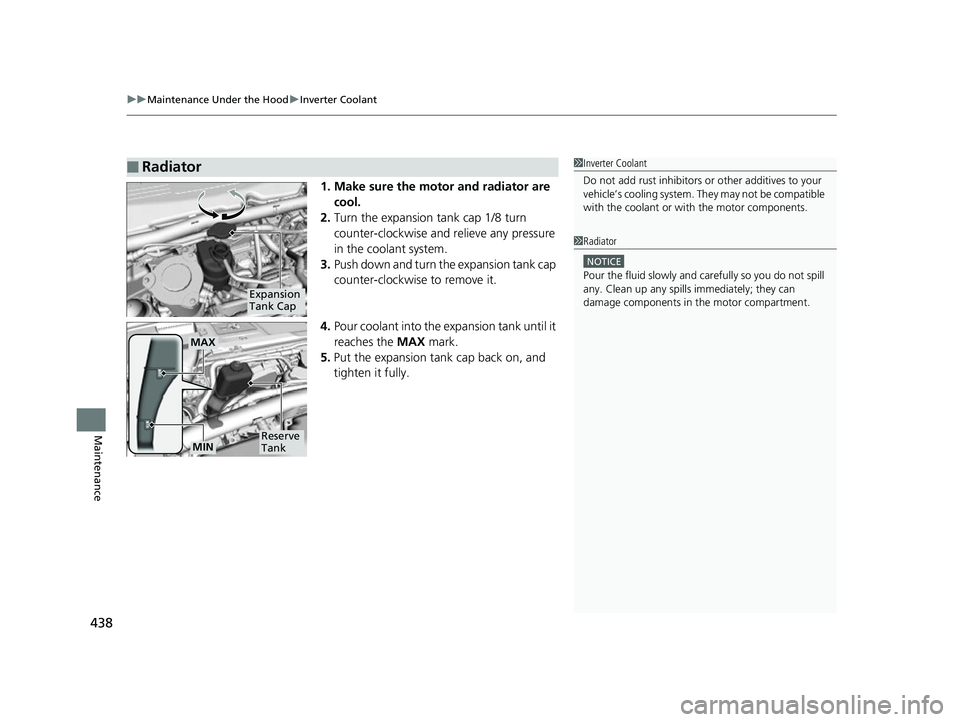
1. Make sure the motor and radiator are
cool.
2. Turn the expansion tank cap 1/8 turn
counter-clockwise and relieve any pressure
in the coolant system.
3. Push down and turn the expansion tank cap
counter-clockwise to remove it.
4. Pour coolant into the expansion tank until it
reaches the MAX mark.
5. Put the expansion tank cap back on, and
tighten it fully.
■Radiator 1Inverter Coolant
Do not add rust inhibitors or other additives to your
vehicle’s cooling system. They may not be compatible
with the coolant or with the motor components.
1Radiator
NOTICE
Pour the fluid slowly and ca refully so you do not spill
any. Clean up any spills immediately; they can
damage components in the motor compartment.
Expansion
Tank Cap
MAX
Reserve
TankMIN
17 CLARITY FCV PPO-31TRT6000.book 438 ページ 2016年10月27日 木曜日 午後3 時11分
Page 457 of 527
455
Maintenance
12-Volt Battery
Checking the 12-Volt Battery
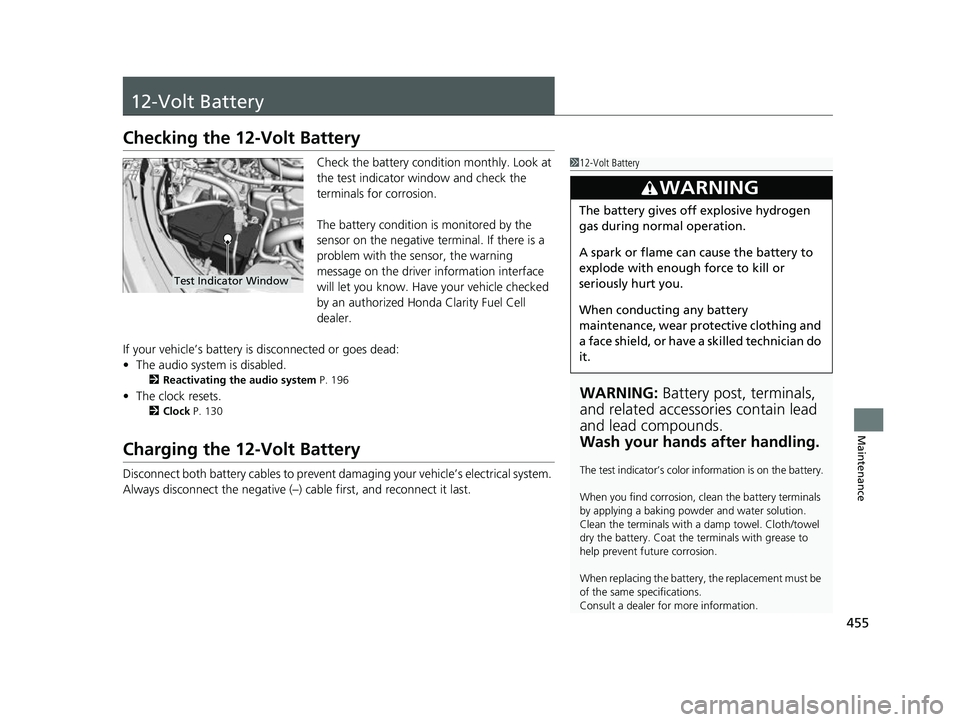
Check the battery condition monthly. Look at
the test indicator window and check the
terminals for corrosion.
The battery condition is monitored by the
sensor on the negative terminal. If there is a
problem with the sensor, the warning
message on the driver information interface
will let you know. Have your vehicle checked
by an authorized Honda Clarity Fuel Cell
dealer.
If your vehicle’s battery is disconnected or goes dead:
• The audio system is disabled.
2 Reactivating the audio system P. 196
•The clock resets.
2 Clock P. 130
Charging the 12-Volt Battery
Disconnect both battery cables to prevent damaging your vehicle’s electrical system.
Always disconnect the negative (–) cable first, and reconnect it last.
112-Volt Battery
WARNING: Battery post, terminals,
and related accessories contain lead
and lead compounds.
Wash your hands after handling.
The test indicator’s color in formation is on the battery.
When you find corrosion, cl ean the battery terminals
by applying a baking powder and water solution.
Clean the terminals with a damp towel. Cloth/towel
dry the battery. Coat the terminals with grease to
help prevent future corrosion.
When replacing the battery, the replacement must be
of the same specifications.
Consult a dealer for more information.
3WARNING
The battery gives off explosive hydrogen
gas during normal operation.
A spark or flame can cause the battery to
explode with enough force to kill or
seriously hurt you.
When conducting any battery
maintenance, wear prot ective clothing and
a face shield, or have a skilled technician do
it.
Test Indicator Window
17 CLARITY FCV PPO-31TRT6000.book 455 ページ 2016年10月27日 木曜日 午後3 時11分
Page 506 of 527
504
Handling the Unexpected
When You Cannot Open the Trunk
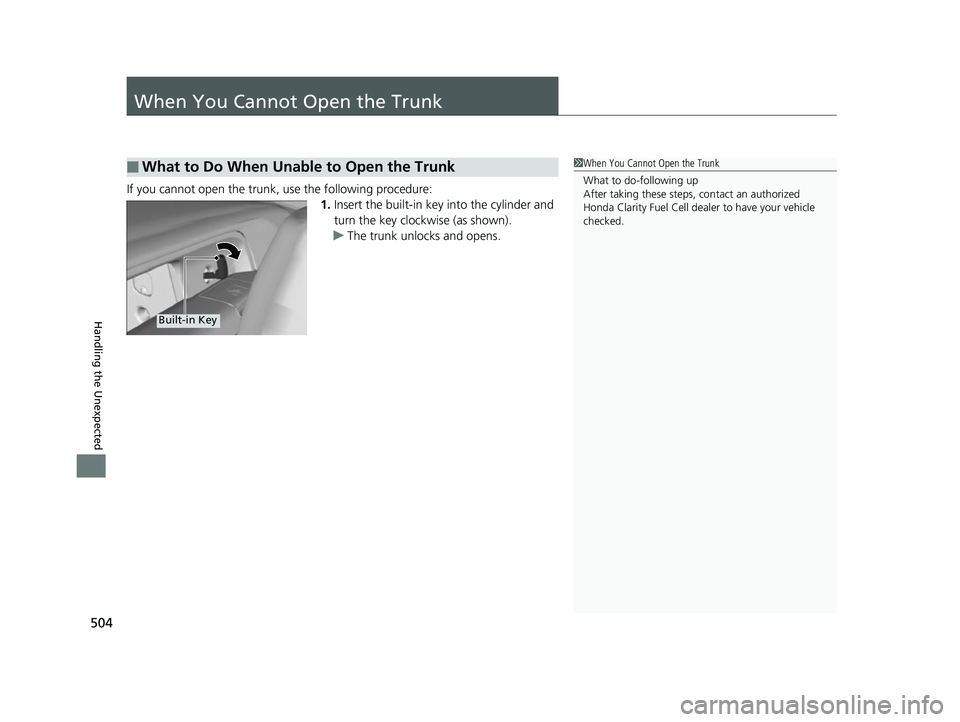
If you cannot open the trunk, use the following procedure:1.Insert the built-in key into the cylinder and
turn the key clockwise (as shown).
u The trunk unlocks and opens.
■What to Do When Unable to Open the Trunk1When You Cannot Open the Trunk
What to do-following up
After taking these steps, contact an authorized
Honda Clarity Fuel Cell dealer to have your vehicle
checked.
Built-in Key
17 CLARITY FCV PPO-31TRT6000.book 504 ページ 2016年10月27日 木曜日 午後3 時11分
Page 519 of 527
517
Index
12-Volt Battery Charging System
Indicator ......................................... 88, 489
Charging (12-Volt Battery) ...................... 455
High Voltage........................................... 399
Jump Starting ......................................... 482
Maintenance (Checking the 12-Volt Battery) ................................................. 455
Maintenance (Replacing) ......................... 456
Belts (Seat) .................................................. 46
Beverage Holders ..................................... 179
Bluetooth ® Audio ..................................... 256
Bluetooth ® HandsFreeLink ®.................... 312
Booster Seats (For Children) ...................... 80
Brake System ............................................ 404
Anti-lock Brake System (ABS) .................. 409
Automatic Brake Hold ............................. 407
Brake Assist System................................. 410
Fluid ....................................................... 439
Foot Brake .............................................. 406
Indicator (Red) ........................................ 491
Parking Brake.......................................... 404
Brake System (Amber)
Indicator ................................................... 86
Brake System (Red) Indicator ..................................... 84, 85, 490
Brightness Control (Head-Up Display) .... 162
Brightness Control (Instrument Panel) ... 161
Bulb Replacement .................................... 441
Brake/Taillights and Rear Side Marker
Lights .................................................... 442 Front Turn Signal and
Front Side Marker
Lights .................................................... 441
Headlights ............................................... 441
High-Mount Brake Light .......................... 442
Parking/Daytime Running Lights .............. 441
Rear License Plate Lights .......................... 442
Taillights and Back-Up Lights ................... 442
Taillights/Rear Side Marker, Brake and Rear
Turn Signal Lights .................................. 442
Bulb Specifications ................................... 506
C
Carrying Cargo.................................. 347, 349
Certification Label .................................... 508
Changing Bulbs ......................................... 441
Characteristics of Fuel Cell Vehicles ............ 9
Charging System Indicator ....................... 489
Child Safety ................................................. 68
Childproof Door Locks ............................. 141
Child Seat .................................................... 68
Booster Seats ............................................. 80
Child Seat for Infants ................................. 70
Child Seat for Small Children ..................... 71
Installing a Child Seat with a Lap/Shoulder Seat Belt .................................................. 75
Larger Children .......................................... 79
Rear-facing Child Seat ............................... 70
Selecting a Child Seat ................................ 72
Using a Tether ........................................... 77
Childproof Door Locks ............................. 141 Cleaning the Exterior
............................... 460
Cleaning the Interior ................................ 458
Climate Control System ............................ 185
Changing the Mode ................................ 187
Defrosting the Windshield and
Windows ............................................... 189
Dust and Pollen Filter............................... 457
Sensors ................................................... 192
Using Automatic Climate Control ............ 185
Clock .......................................................... 130
CMBS
TM (Collision Mitigation Braking
SystemTM) ................................................. 411
Coat Hook ................................................. 182
Collision Mitigation Braking System
TM
(CMBSTM) ................................................. 411
Console Compartment ............................. 178
Controls ..................................................... 129
Coolant ..................................................... 437
Adding to the Radiator ............................ 438
Adding to the Reserve Tank..................... 437
Overheating ............................................ 485
Creeping (Transmission) ........................... 356
Cup Holders .............................................. 179
Customer Service Information ................. 514
Customized Features ........................ 124, 284
D
Daytime Running Lights .......................... 158
Dead Battery (12-Volt) ............................. 482
17 CLARITY FCV PPO-31TRT6000.book 517 ページ 2016年10月27日 木曜日 午後3 時11分