2017 HONDA CLARITY ELECTRIC audio
[x] Cancel search: audioPage 319 of 543
Continued317
uuBluetooth ® HandsFreeLink ®u HFL Menus
Features
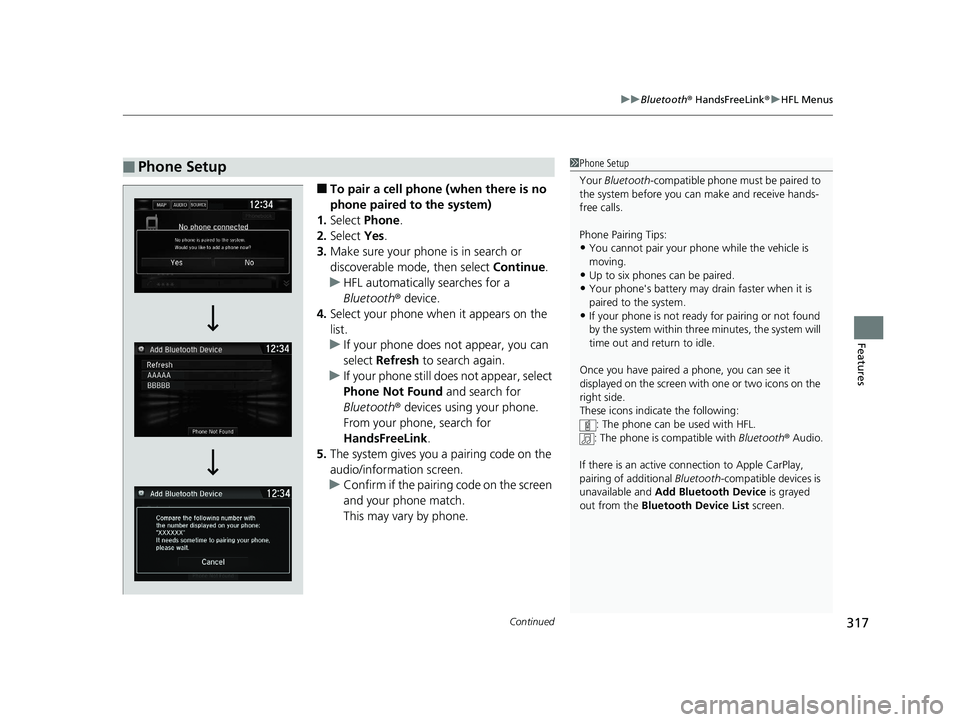
■To pair a cell phone (when there is no
phone paired to the system)
1. Select Phone.
2. Select Yes.
3. Make sure your phone is in search or
discoverable mode, then select Continue.
u HFL automatically searches for a
Bluetooth ® device.
4. Select your phone when it appears on the
list.
u If your phone does not appear, you can
select Refresh to search again.
u If your phone still do es not appear, select
Phone Not Found and search for
Bluetooth ® devices using your phone.
From your phone, search for
HandsFreeLink .
5. The system gives you a pairing code on the
audio/information screen.
u Confirm if the pairing code on the screen
and your phone match.
This may vary by phone.
■Phone Setup1Phone Setup
Your Bluetooth -compatible phone must be paired to
the system before you ca n make and receive hands-
free calls.
Phone Pairing Tips:
•You cannot pair your phone while the vehicle is
moving.
•Up to six phones can be paired.
•Your phone's battery may dr ain faster when it is
paired to the system.
•If your phone is not ready for pairing or not found
by the system within three minutes, the system will
time out and return to idle.
Once you have paired a phone, you can see it
displayed on the screen with one or two icons on the
right side.
These icons indicate the following: : The phone can be used with HFL.
: The phone is compatible with Bluetooth® Audio.
If there is an active c onnection to Apple CarPlay,
pairing of additional Bluetooth-compatible devices is
unavailable and Add Bluetooth Device is grayed
out from the Bluetooth Device List screen.
17 CLARITY BEV CSS-31TRV6000.book 317 ページ 2017年4月14日 金曜日 午前11 時8分
Page 332 of 543
uuBluetooth ® HandsFreeLink ®u HFL Menus
330
Features
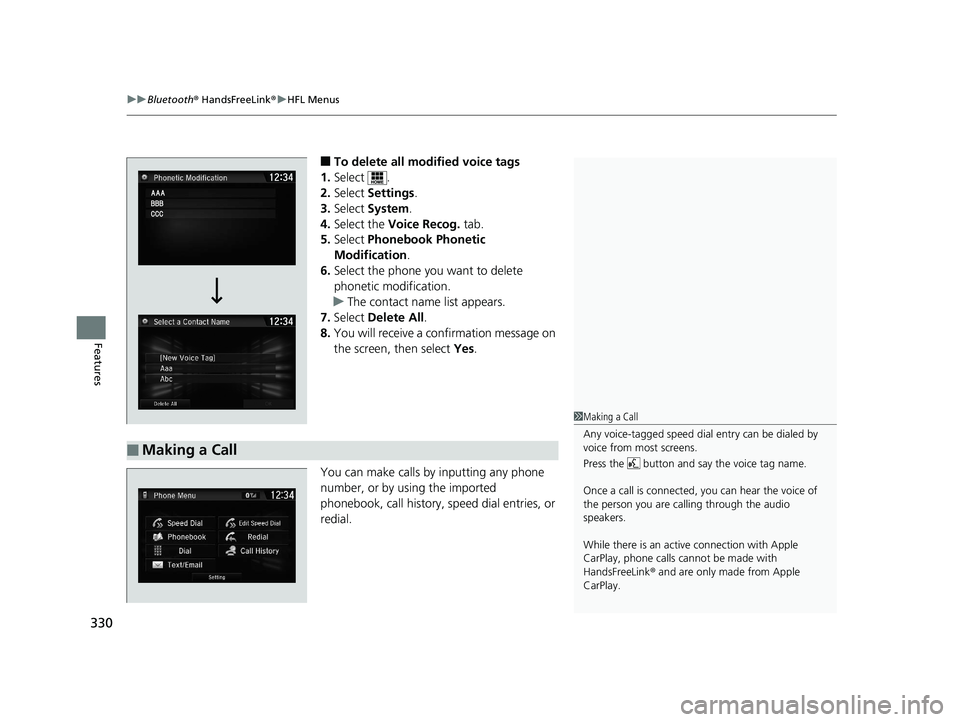
■To delete all modified voice tags
1. Select .
2. Select Settings .
3. Select System .
4. Select the Voice Recog. tab.
5. Select Phonebook Phonetic
Modification .
6. Select the phone you want to delete
phonetic modification.
u The contact name list appears.
7. Select Delete All .
8. You will receive a confirmation message on
the screen, then select Yes.
You can make calls by inputting any phone
number, or by using the imported
phonebook, call history, speed dial entries, or
redial.
■Making a Call
1 Making a Call
Any voice-tagged speed dial entry can be dialed by
voice from most screens.
Press the button and say the voice tag name.
Once a call is connected, you can hear the voice of
the person you are call ing through the audio
speakers.
While there is an active connection with Apple
CarPlay, phone calls ca nnot be made with
HandsFreeLink ® and are only made from Apple
CarPlay.
17 CLARITY BEV CSS-31TRV6000.book 330 ページ 2017年4月14日 金曜日 午前11 時8分
Page 335 of 543
Continued333
uuBluetooth ® HandsFreeLink ®u HFL Menus
Features
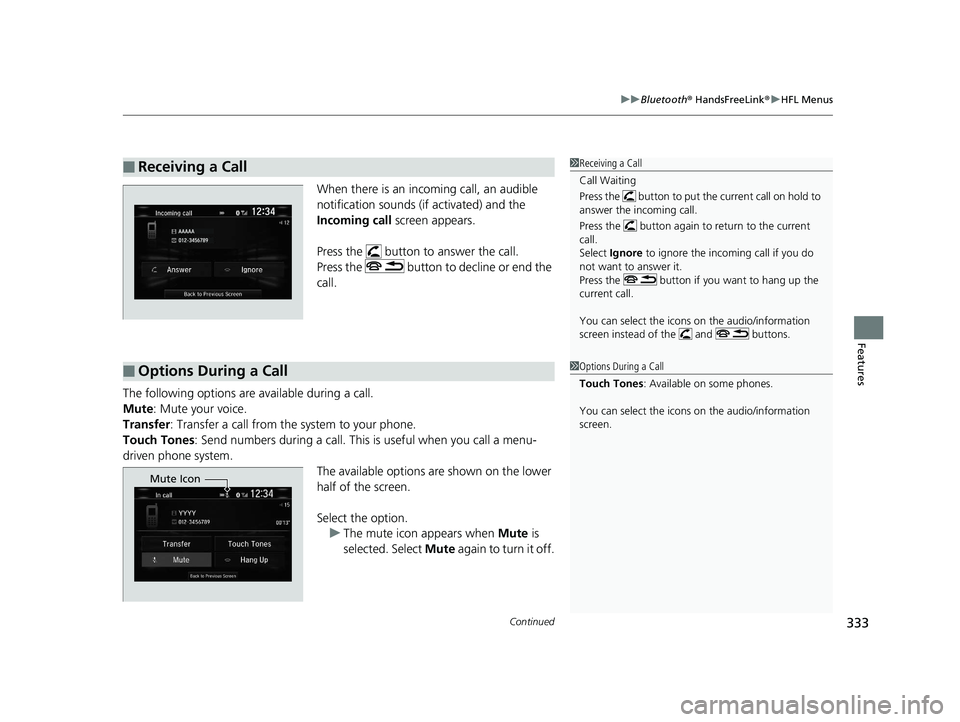
When there is an inco ming call, an audible
notification sounds (if activated) and the
Incoming call screen appears.
Press the button to answer the call.
Press the button to decline or end the
call.
The following options are available during a call.
Mute : Mute your voice.
Transfer: Transfer a call from the system to your phone.
Touch Tones : Send numbers during a call. This is useful when you call a menu-
driven phone system. The available options are shown on the lower
half of the screen.
Select the option. u The mute icon appears when Mute is
selected. Select Mute again to turn it off.
■Receiving a Call1Receiving a Call
Call Waiting
Press the button to put the current call on hold to
answer the incoming call.
Press the button again to return to the current
call.
Select Ignore to ignore the incoming call if you do
not want to answer it.
Press the button if you want to hang up the
current call.
You can select the icons on the audio/information
screen instead of the and buttons.
■Options During a Call1 Options During a Call
Touch Tones : Available on some phones.
You can select the icons on the audio/information
screen.
Mute Icon
17 CLARITY BEV CSS-31TRV6000.book 333 ページ 2017年4月14日 金曜日 午前11 時8分
Page 372 of 543
uuWhen Driving uRoad Departure Mitigation (RDM) System
370
Driving
The system becomes ready to start sear ching for lane markings when all the
following conditions are met:
• The vehicle is traveling between about 45 and 90 mph (72 and 145 km/h).
• The vehicle is on a straight or slightly curved road.
• The turn signals are off.
• The brake pedal is not depressed.
• The wipers are not in continuous operation.
• The vehicle is not accelerating or braking, and the steering wheel is not being
turned.
• The system makes a determination that the driver is not actively accelerating,
braking or steering.
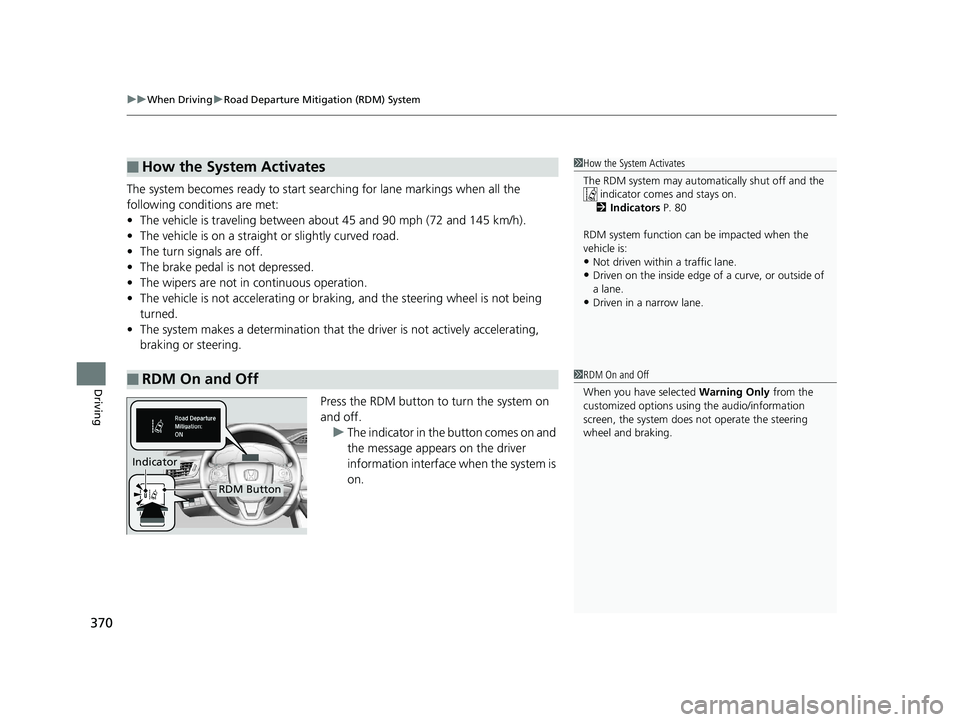
Press the RDM button to turn the system on
and off.u The indicator in the button comes on and
the message appears on the driver
information interface when the system is
on.
■How the System Activates
■RDM On and Off
1How the System Activates
The RDM system may automa tically shut off and the
indicator comes and stays on.
2 Indicators P. 80
RDM system function can be impacted when the
vehicle is:
•Not driven within a traffic lane.•Driven on the inside edge of a curve, or outside of
a lane.
•Driven in a narrow lane.
1 RDM On and Off
When you have selected Warning Only from the
customized options using the audio/information
screen, the system does not operate the steering
wheel and braking.
RDM Button
Indicator
17 CLARITY BEV CSS-31TRV6000.book 370 ページ 2017年4月14日 金曜日 午前11 時8分
Page 401 of 543
399
uuWhen Driving uTire Pressure Monitoring System (TPMS)
Driving
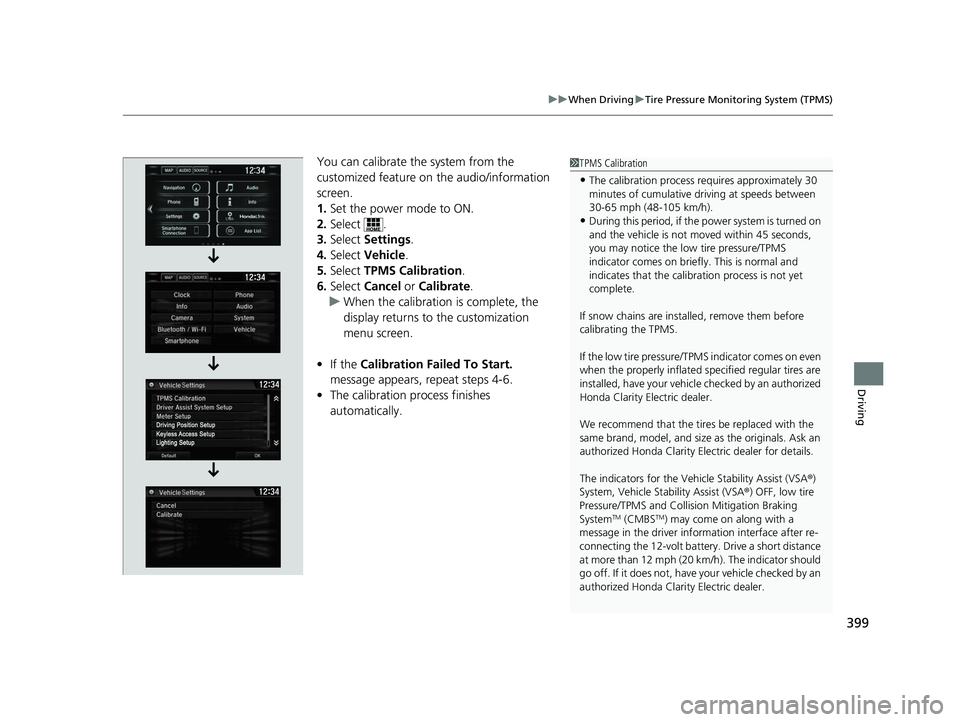
You can calibrate the system from the
customized feature on the audio/information
screen.
1. Set the power mode to ON.
2. Select .
3. Select Settings .
4. Select Vehicle .
5. Select TPMS Calibration .
6. Select Cancel or Calibrate .
u When the calibration is complete, the
display returns to the customization
menu screen.
• If the Calibration Failed To Start.
message appears, repeat steps 4-6.
• The calibration process finishes
automatically.1TPMS Calibration
•The calibration process requires approximately 30
minutes of cumulative dr iving at speeds between
30-65 mph (48-105 km/h).
•During this period, if the power system is turned on
and the vehicle is not moved within 45 seconds,
you may notice the low tire pressure/TPMS
indicator comes on briefl y. This is normal and
indicates that the calibr ation process is not yet
complete.
If snow chains are instal led, remove them before
calibrating the TPMS.
If the low tire pressure/TPMS indicator comes on even
when the properly inflated specified regular tires are
installed, have your vehicl e checked by an authorized
Honda Clarity Electric dealer.
We recommend that the tires be replaced with the
same brand, model, and size as the originals. Ask an
authorized Honda Clarity El ectric dealer for details.
The indicators for the Vehicle Stability Assist (VSA ®)
System, Vehicle Stability Assist (VSA ®) OFF, low tire
Pressure/TPMS and Collision Mitigation Braking
System
TM (CMBSTM) may come on along with a
message in the driver information interface after re-
connecting the 12-volt battery. Drive a short distance
at more than 12 mph (20 km/h). The indicator should
go off. If it does not, have your vehicle checked by an
authorized Honda Clarity Electric dealer.
17 CLARITY BEV CSS-31TRV6000.book 399 ページ 2017年4月14日 金曜日 午前11 時8分
Page 404 of 543
402
uuWhen Driving uLaneWatchTM
Driving
LaneWatchTM
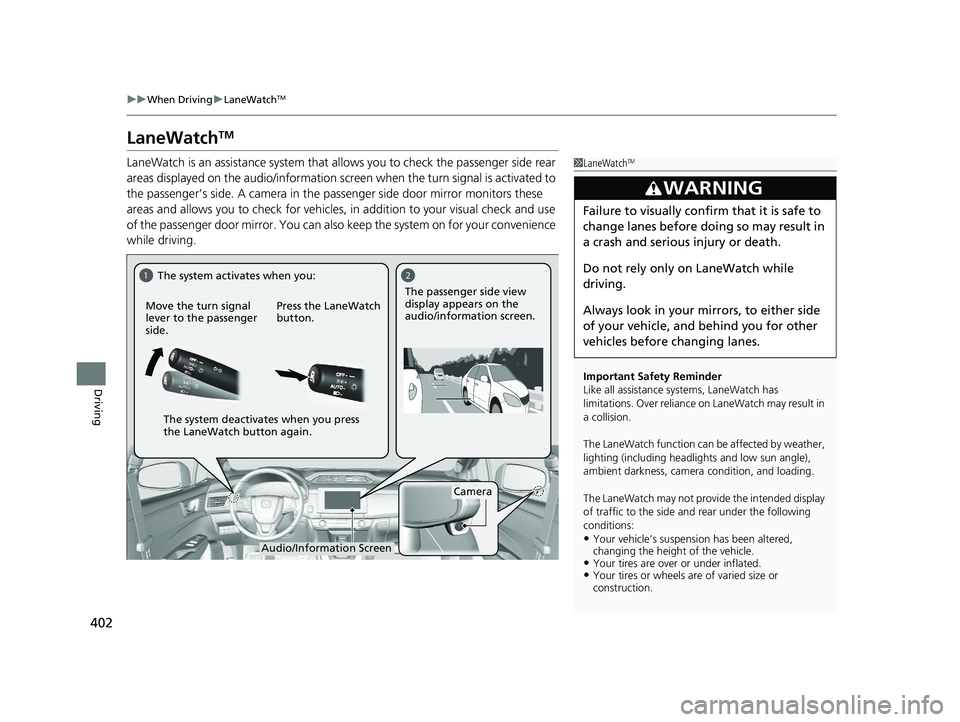
LaneWatch is an assistance system that allows you to check the passenger side rear
areas displayed on the audio/in formation screen when the turn signal is activated to
the passenger’s side. A camera in the passenger side door mirror monitors these
areas and allows you to check for vehicles, in addition to your visual check and use
of the passenger door mirror. You can also keep the system on for your convenience
while driving.1 LaneWatchTM
Important Safety Reminder
Like all assistance systems, LaneWatch has
limitations. Over reliance on LaneWatch may result in
a collision.
The LaneWatch func tion can be affected by weather,
lighting (including headli ghts and low sun angle),
ambient darkness, camera condition, and loading.
The LaneWatch may not prov ide the intended display
of traffic to the side and rear under the following
conditions:
•Your vehicle’s suspension has been altered,
changing the height of the vehicle.
•Your tires are over or under inflated.•Your tires or wheels are of varied size or
construction.
3WARNING
Failure to visually confirm that it is safe to
change lanes before doing so may result in
a crash and serious injury or death.
Do not rely only on LaneWatch while
driving.
Always look in your mirrors, to either side
of your vehicle, and behind you for other
vehicles before changing lanes.
12
Camera
Move the turn signal
lever to the passenger
side.
Press the LaneWatch
button.The passenger side view
display appears on the
audio/information screen.
The system activates when you:
The system deactivates when you press
the LaneWatch button again.
Audio/Information Screen
17 CLARITY BEV CSS-31TRV6000.book 402 ページ 2017年4月14日 金曜日 午前11 時8分
Page 405 of 543
403
uuWhen Driving uLaneWatchTM
Driving
■Customizing the La neWatch settings
You can customize the following items using the audio/information screen.
• Show with Turn Signal : Selects whether LaneWatch monitor comes on when
you operate the turn signal light lever.
• Display Time after Turn Signal Off : Changes the length of time the LaneWatch
display stays on after you pull the turn signal lever back.
• Reference Line : Selects whether the reference lines appear on the LaneWatch
monitor.
• Display : Allows for display adjustments of item s, such as brightness, contrast and
black level. This setting is part of the System setup group.
2Customized Features P. 280
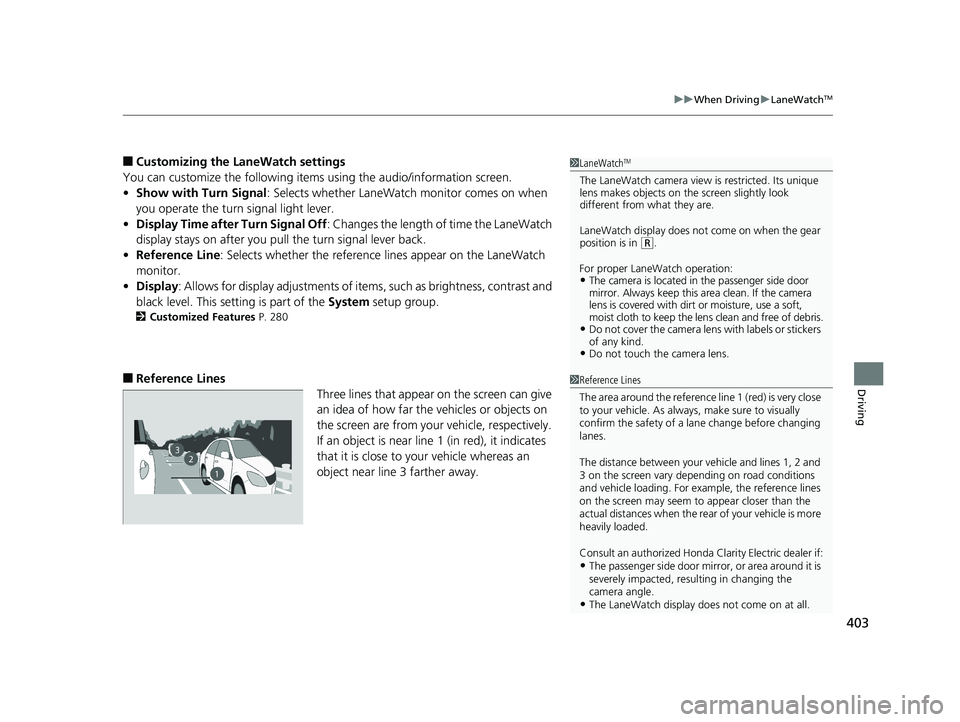
■Reference Lines
Three lines that appear on the screen can give
an idea of how far the vehicles or objects on
the screen are from your vehicle, respectively.
If an object is near line 1 (in red), it indicates
that it is close to your vehicle whereas an
object near line 3 farther away.
1LaneWatchTM
The LaneWatch camera view is restricted. Its unique
lens makes objects on the screen slightly look
different from what they are.
LaneWatch display does not come on when the gear
position is in
( R.
For proper LaneWatch operation:
•The camera is located in the passenger side door
mirror. Always keep this area clean. If the camera
lens is covered with dirt or moisture, use a soft,
moist cloth to keep the lens clean and free of debris.
•Do not cover the camera lens with labels or stickers
of any kind.
•Do not touch the camera lens.
23
1
1Reference Lines
The area around the reference line 1 (red) is very close
to your vehicle. As always, make sure to visually
confirm the safety of a la ne change before changing
lanes.
The distance betwee n your vehicle and lines 1, 2 and
3 on the screen vary depending on road conditions
and vehicle loading. For ex ample, the reference lines
on the screen may seem to appear closer than the
actual distances when the rear of your vehicle is more
heavily loaded.
Consult an authorized Honda Clarity Electric dealer if:
•The passenger side door mirr or, or area around it is
severely impacted, resulting in changing the
camera angle.
•The LaneWatch display doe s not come on at all.
17 CLARITY BEV CSS-31TRV6000.book 403 ページ 2017年4月14日 金曜日 午前11 時8分
Page 414 of 543
uuBraking uCollision Mitigation Braking SystemTM (CMBSTM)
412
Driving
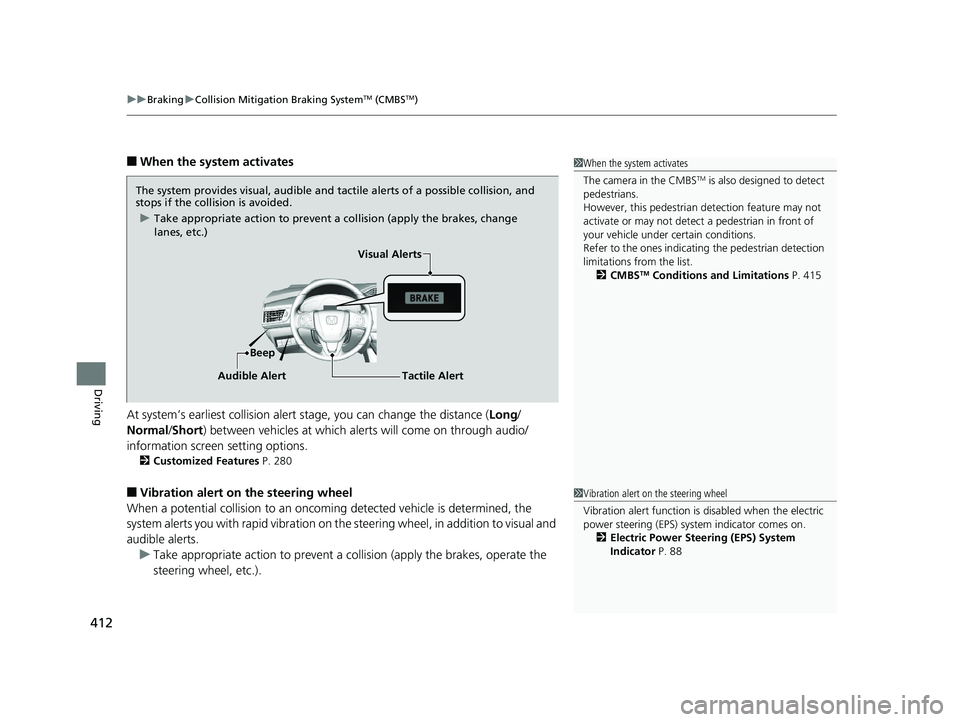
■When the system activates
At system’s earliest collision alert stage, you can change the distance ( Long/
Normal /Short) between vehicles at which aler ts will come on through audio/
information screen setting options.
2 Customized Features P. 280
■Vibration alert on the steering wheel
When a potential collision to an oncoming detected vehicle is determined, the
system alerts you with rapid vibration on th e steering wheel, in addition to visual and
audible alerts. u Take appropriate action to prevent a co llision (apply the brakes, operate the
steering wheel, etc.).
1 When the system activates
The camera in the CMBS
TM is also designed to detect
pedestrians.
However, this pedestrian detection feature may not
activate or may not detect a pedestrian in front of
your vehicle under certain conditions.
Refer to the ones indicating the pedestrian detection
limitations from the list. 2 CMBS
TM Conditions and Limitations P. 415
The system provides visual, audible and tactile alerts of a possible collision, and
stops if the collision is avoided.
u Take appropriate action to prevent a collision (apply the brakes, change
lanes, etc.)
Beep Visual Alerts
Audible Alert
Tactile Alert
1 Vibration alert on the steering wheel
Vibration alert function is disabled when the electric
power steering (EPS) system indicator comes on. 2 Electric Power Steering (EPS) System
Indicator P. 88
17 CLARITY BEV CSS-31TRV6000.book 412 ページ 2017年4月14日 金曜日 午前11 時8分