2017 HONDA CLARITY ELECTRIC light
[x] Cancel search: lightPage 423 of 543
421Continued
Driving
Multi-View Rear Camera
About Your Multi-View Rear Camera
The audio/information screen can display your vehicle’s rear view. The display
automatically changes to the rear view when the transmission is put into
(R.
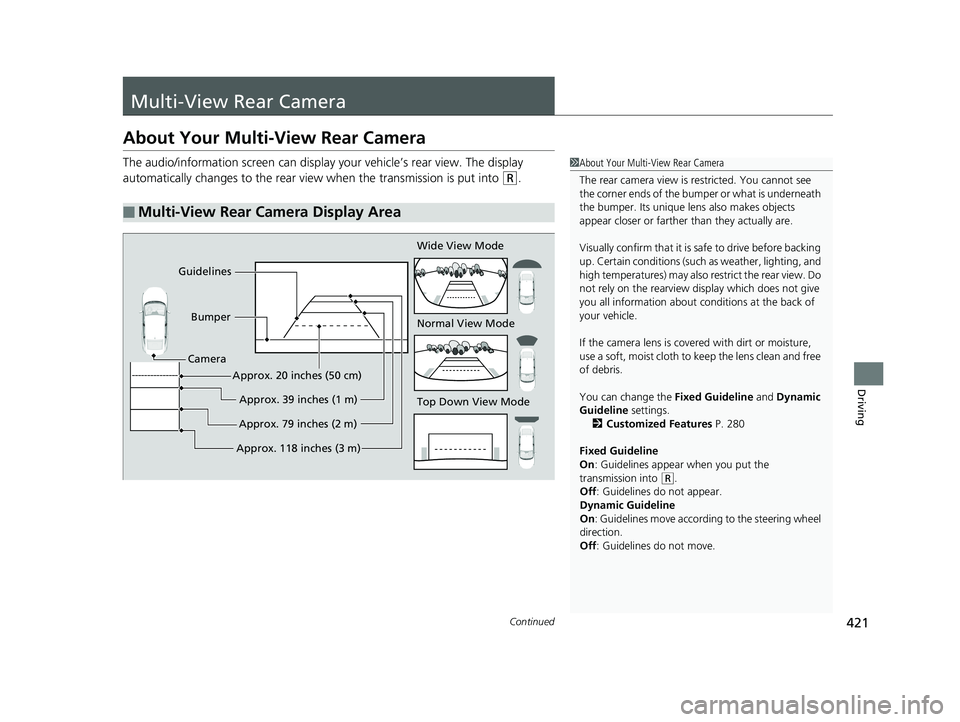
■Multi-View Rear Camera Display Area
1About Your Multi-View Rear Camera
The rear camera view is restricted. You cannot see
the corner ends of the bum per or what is underneath
the bumper. Its unique le ns also makes objects
appear closer or farther than they actually are.
Visually confirm that it is safe to drive before backing
up. Certain conditions (such as weather, lighting, and
high temperatures) may also re strict the rear view. Do
not rely on the rearview display which does not give
you all information about conditions at the back of
your vehicle.
If the camera lens is cove red with dirt or moisture,
use a soft, moist cloth to keep the lens clean and free
of debris.
You can change the Fixed Guideline and Dynamic
Guideline settings. 2 Customized Features P. 280
Fixed Guideline
On : Guidelines appear when you put the
transmission into
( R.
Off : Guidelines do not appear.
Dynamic Guideline
On : Guidelines move according to the steering wheel
direction.
Off : Guidelines do not move.
Top Down View Mode Normal View Mode Wide View Mode
Guidelines
Bumper
Camera
Approx. 118 inches (3 m)Approx. 79 inches (2 m)Approx. 39 inches (1 m)
Approx. 20 inches (50 cm)
17 CLARITY BEV CSS-31TRV6000.book 421 ページ 2017年4月14日 金曜日 午前11
時8分
Page 443 of 543
441
Maintenance
This chapter discusses basic maintenance.
Before Performing MaintenanceInspection and Maintenance ............ 442
Safety When Performing Maintenance...443
Parts and Fluids Used in Maintenance Service ........................................... 444
Maintenance Minder
TM..................... 445
Maintenance Under the Hood Maintenance Items Under the Hood .. 449
Opening the Hood ........................... 450
Cooling System ................................ 451
Transmission Fluid ............................ 452
Brake Fluid ....................................... 452 Refilling Window Washer Fluid......... 453
Replacing Light Bulbs ....................... 454
Checking and Maintaining Wiper
Blades .......................................... 456
Checking and Maintaining Tires
Checking Tires ................................. 459
Tire and Loading Information Label .. 460
Tire Labeling .................................... 460
DOT Tire Quality Grading (U.S. Vehicles).. 462
Wear Indicators................................ 464
Tire Service Life ................................ 464
Tire and Wheel Replacement............ 465 Tire Rotation .................................... 466
Winter Tires ..................................... 467
12-Volt Battery ................................. 468
Remote Transmitter Care Replacing the Button Battery ........... 470
Climate Control System Maintenance.. 471
CleaningInterior Care .................................... 472
Exterior Care.................................... 474
Accessories and Modifications ........ 478
17 CLARITY BEV CSS-31TRV6000.book 441 ページ 2017年4月14日 金曜日 午前11 時8分
Page 444 of 543
442
Maintenance
Before Performing Maintenance
Inspection and Maintenance
For your safety, perform all listed inspections and maintenance to keep your vehicle
in good condition. If you become aware of any abnormality (noise, smell, insufficient
brake fluid, fluid residue on the ground, etc. ), have your vehicle inspected by an
authorized Honda Clarity Electric dealer. (Note, however, that service at an
authorized Honda Clarity Elec tric dealer is not mandatory to keep your warranties in
effect.)
■Daily inspections
Perform inspections before long distance trips, when washing the vehicle, or when
charging.
■Periodic inspections
• Check the brake fluid level monthly.
2 Brake Fluid P. 452
•Check the tire pressure monthly. Examin e the tread for wear and foreign objects.
2Checking and Maintaining Tires P. 459
•Check the operation of the exterior lights monthly.
2 Replacing Light Bulbs P. 454
•Check the condition of the wiper bl ades at least every six months.
2Checking and Maintaining Wiper Blades P. 456
■Types of Inspection and Maintenance
1Inspection and Maintenance
At this time, maintenance involving the high-voltage
system should only be perf ormed at an authorized
Honda Clarity Electric dealer.
All maintenance services should be performed in
accordance with the intervals indicated by the driver
information interface. 2 Maintenance Service Items P. 447
If you want to perform ba sic maintenance yourself,
make sure that you have th e necessary tools and skills
first.
After performing ma intenance, update the records in
the separate maintenance booklet.
17 CLARITY BEV CSS-31TRV6000.book 442 ページ 2017年4月14日 金曜日 午前11 時8分
Page 452 of 543
450
uuMaintenance Under the Hood uOpening the Hood
Maintenance
Opening the Hood
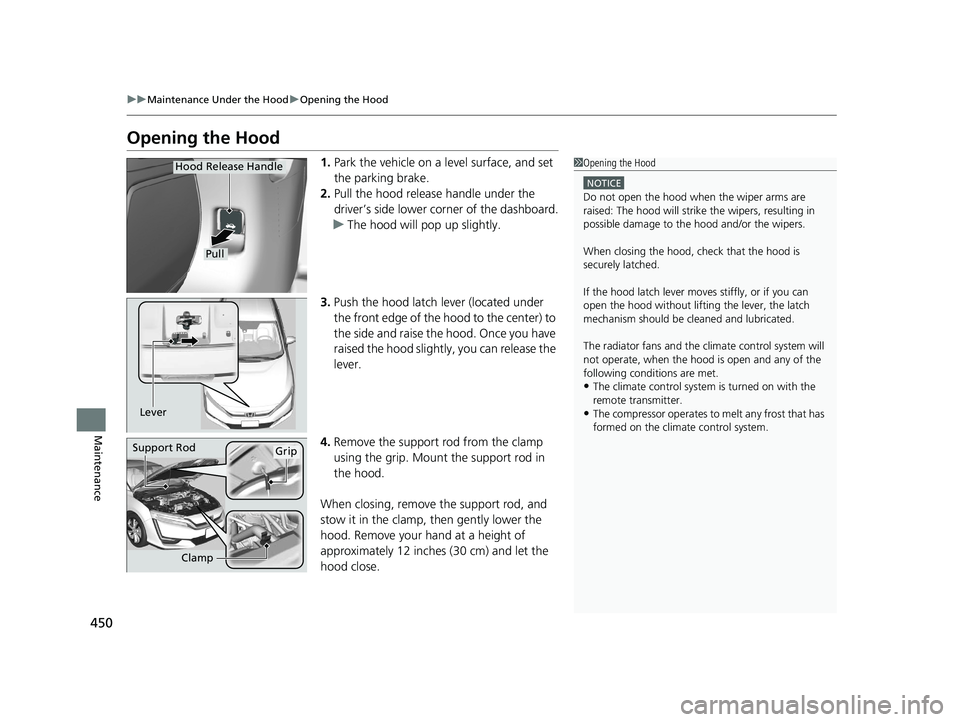
1. Park the vehicle on a level surface, and set
the parking brake.
2. Pull the hood release handle under the
driver’s side lower co rner of the dashboard.
u The hood will pop up slightly.
3. Push the hood latch lever (located under
the front edge of the hood to the center) to
the side and raise the hood. Once you have
raised the hood slight ly, you can release the
lever.
4. Remove the support rod from the clamp
using the grip. Mount the support rod in
the hood.
When closing, remove the support rod, and
stow it in the clamp, then gently lower the
hood. Remove your hand at a height of
approximately 12 inches (30 cm) and let the
hood close.1 Opening the Hood
NOTICE
Do not open the hood when the wiper arms are
raised: The hood will strike the wipers, resulting in
possible damage to the hood and/or the wipers.
When closing the hood, check that the hood is
securely latched.
If the hood latch lever moves stiffly, or if you can
open the hood without lifti ng the lever, the latch
mechanism should be cleaned and lubricated.
The radiator fans and the climate control system will
not operate, when the hood is open and any of the
following conditions are met.
•The climate control system is turned on with the
remote transmitter.
•The compressor operates to melt any frost that has
formed on the climate control system.
Pull
Hood Release Handle
Lever
Support RodGrip
Clamp
17 CLARITY BEV CSS-31TRV6000.book 450 ページ 2017年4月14日 金曜日 午前11 時8分
Page 456 of 543
454
Maintenance
Replacing Light Bulbs
Headlights
Headlights are LED type. Have an authorized Honda Clarity Electric dealer inspect
and replace the light assembly.
Front Turn Signal and Front Side Marker Lights
Front turn signal and front side marker lights are LED type. Have an authorized
Honda Clarity Electric dealer inspec t and replace the light assembly.
Parking/Daytime Running Lights
Parking/daytime running lights are LED type . Have an authorized Honda Clarity
Electric dealer inspect and replace the light assembly.
1Headlights
The headlight aim is set by the factory, and does not
need to be adjusted. Howeve r, if you regularly carry
heavy items in the trunk, have the aiming readjusted
at an authorized Honda Clar ity Electric dealer or by a
qualified technician.
17 CLARITY BEV CSS-31TRV6000.book 454 ページ 2017年4月14日 金曜日 午前11 時8分
Page 457 of 543
455
uuReplacing Light Bulbs uTaillights/Rear Side Marker, Brake and Rear Turn Signal Lights
Maintenance
Taillights/Rear Side Marker , Brake and Rear Turn
Signal Lights
Taillights/rear side marker, brake and rear turn signal lights are LED type. Have an
authorized Honda Clarity Electric dealer inspect and replace the light assembly.
Taillights and Back-Up Lights
Taillights and back-up lights are LED type. Have an authorized Honda Clarity Electric
dealer inspect and replace the light assembly.
Rear License Plate Light
Rear license plate light is LED type. Have an authorized Honda Clarity Electric dealer
inspect and replace the light assembly.
High-Mount Brake Light
High-mount brake light is LED type. Have an authorized Honda Clarity Electric dealer
inspect and replace the light assembly.
17 CLARITY BEV CSS-31TRV6000.book 455 ページ 2017年4月14日 金曜日 午前11 時8分
Page 475 of 543
473
uuCleaning uInterior Care
Maintenance
Wipe using a glass cleaner.
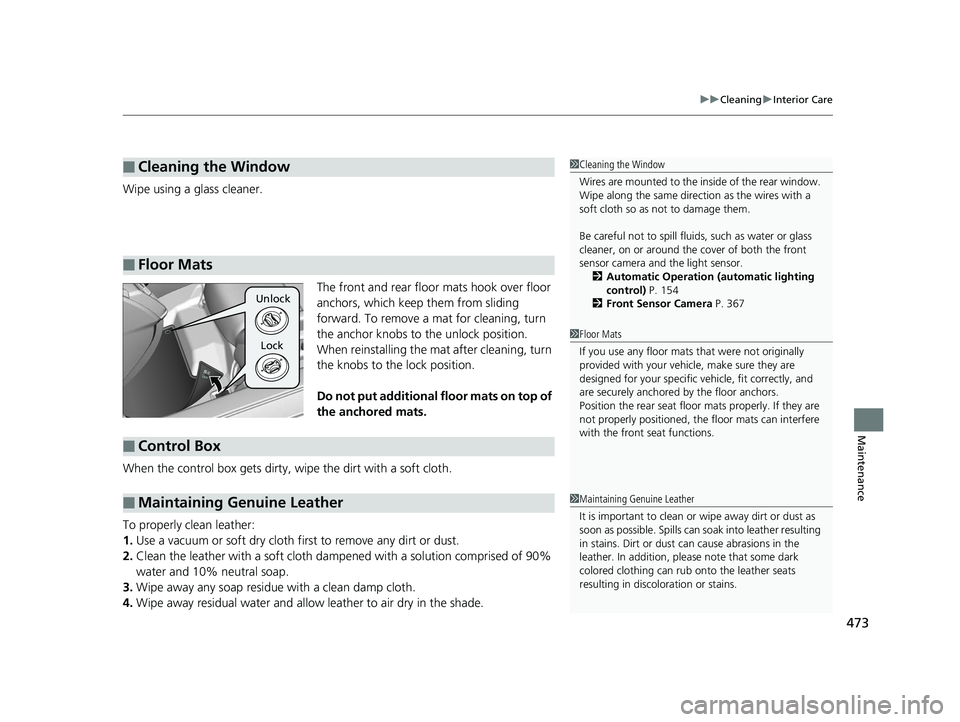
The front and rear floor mats hook over floor
anchors, which keep them from sliding
forward. To remove a mat for cleaning, turn
the anchor knobs to the unlock position.
When reinstalling the mat after cleaning, turn
the knobs to the lock position.
Do not put additional floor mats on top of
the anchored mats.
When the control box gets dirty, wipe the dirt with a soft cloth.
To properly clean leather:
1. Use a vacuum or soft dry cloth first to remove any dirt or dust.
2. Clean the leather with a soft cloth dampen ed with a solution comprised of 90%
water and 10% neutral soap.
3. Wipe away any soap residu e with a clean damp cloth.
4. Wipe away residual water and allo w leather to air dry in the shade.
■Cleaning the Window
■Floor Mats
1Cleaning the Window
Wires are mounted to the in side of the rear window.
Wipe along the same direct ion as the wires with a
soft cloth so as not to damage them.
Be careful not to spill flui ds, such as water or glass
cleaner, on or around the co ver of both the front
sensor camera and the light sensor.
2 Automatic Operation (automatic lighting
control) P. 154
2 Front Sensor Camera P. 367
1Floor Mats
If you use any floor mats that were not originally
provided with your vehicle, make sure they are
designed for your specific ve hicle, fit correctly, and
are securely anchored by the floor anchors.
Position the rear seat floor mats properly. If they are
not properly positioned, the floor mats can interfere
with the front seat functions.
Unlock
Lock
■Control Box
■Maintaining Genuine Leather1 Maintaining Genuine Leather
It is important to clean or wipe away dirt or dust as
soon as possible. Spills can soak into leather resulting
in stains. Dirt or dust ca n cause abrasions in the
leather. In addition, pl ease note that some dark
colored clothing can rub onto the leather seats
resulting in discol oration or stains.
17 CLARITY BEV CSS-31TRV6000.book 473 ページ 2017年4月14日 金曜日 午前11 時8分
Page 478 of 543
476
uuCleaning uExterior Care
Maintenance
Aluminum is susceptible to deterioration caused by salt and other road
contaminants. When necessary, as early as possible use a sponge and mild detergent
to wipe away these contaminants. Do no t use a stiff brush or harsh chemicals
(including some commercial wheel cleaners). These can damage the protective finish
on aluminum alloy wheels, resulting in corrosion. Depending on the type of finish,
the wheels also may lose their luster or appear burnished. To avoid water stains,
wipe the wheels dry with a clot h while they are still wet.
The inside lenses of exterior lights (headlig hts, brake lights, etc.) may fog temporarily
if you have driven in the rain, or after the vehicle has been run through a car wash.
Dew condensation also may build up inside the lenses when there is a significant
enough difference between the ambient and inside lens temperatures (similar to
vehicle windows fogging up in rainy conditions). These conditions are natural
processes, not structural design problems in the exterior lights.
Lens design characteristics may result in mo isture developing on the light lens frame
surfaces. This also is not a malfunction.
However, if you see large amounts of wa ter accumulation, or large water drops
building up inside the lenses, have your vehicle inspected by an authorized Honda
Clarity Electric dealer.
■Maintaining Aluminum Wheels
■Fogged Exterior Light Lenses
17 CLARITY BEV CSS-31TRV6000.book 476 ページ 2017年4月14日 金曜日 午前11 時8分