2017 HONDA ACCORD HYBRID navigation system
[x] Cancel search: navigation systemPage 3 of 80
INTRODUCTIONTABLE OF CONTENTS
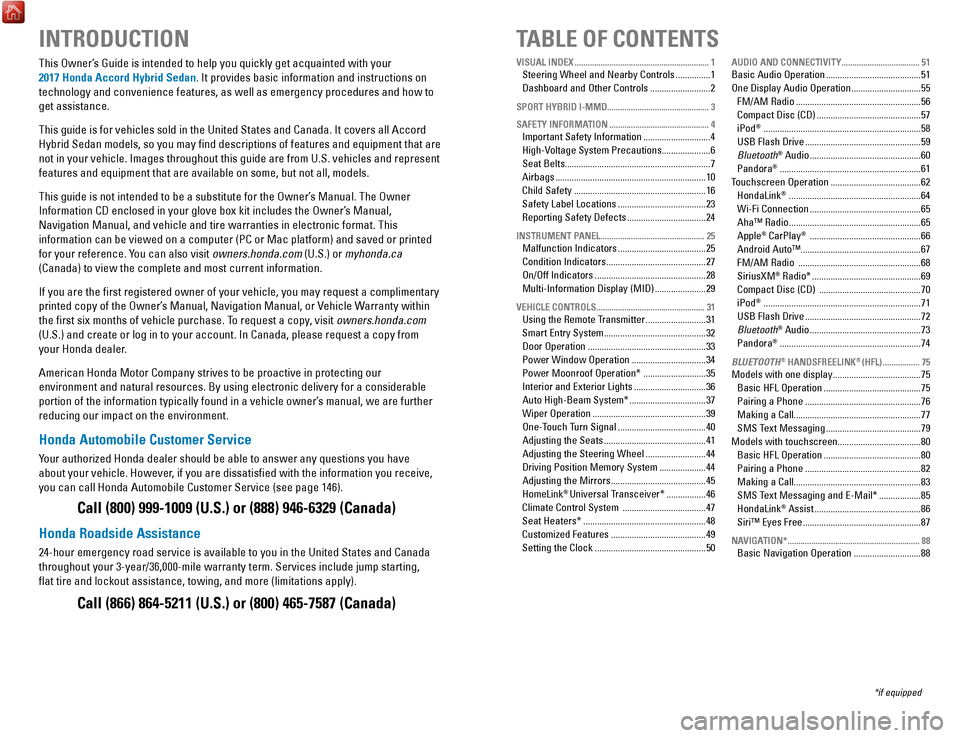
This owner’s Guide is intended to help you quickly get acquainted with your
2017 Honda Accord Hybrid Sedan. It provides basic information and instructions on
technology and convenience features, as well as emergency procedures and\
how to
get assistance.
This guide is for vehicles sold in the United States and Canada. It cove\
rs all Accord Hybrid Sedan models, so you may find descriptions of features and equi\
pment that are
not in your vehicle. Images throughout this guide are from U.S. vehicles\
and r
epresent
features and equipment that are available on some, but not all, models.
This guide is not intended to be a substitute for the
owner’s Manual. The owner
Information CD enclosed in your glove box kit includes the
owner’s Manual,
Navigation Manual, and vehicle and tire warranties in electronic format.\
This
information can be viewed on a computer (PC
or Mac platform) and saved or printed
for your reference. You can also visit
owners.honda.com (U.S.) or myhonda.ca
(Canada) to view the complete and most current information.
If you are the first registered owner of your vehicle, you may request\
a complimentary
printed copy of the
owner’s Manual, Navigation Manual, or vehicle Warranty within
the first six months of vehicle purchase. To request a copy
, visit owners.honda.com
(U.S.) and create or log in to your account. In Canada, please request\
a copy from
your Honda dealer.
American Honda Motor Company strives to be proactive in protecting our
environment and natural resources. By using electronic delivery for a co\
nsiderable
portion of the information typically found in a vehicle owner’s manual, we are further
reducing our impact on the environment.
Honda Automobile Customer Service
Your authorized Honda dealer should be able to answer any questions you h\
ave
about your vehicle. However, if you are dissatisfied with the information you receive,
you can call Honda Automobile Customer Service (see page 146).
Call (800) 999-1009 (U.S.) or (888) 946-6329 (Canada)
Honda Roadside Assistance
24-hour emergency road service is available to you in the United States \
and Canada
throughout your 3-year/36,000-mile warranty term. Services include jump starting,
flat tire and lockout assistance, towing, and more (limitations apply\
).
Call (866) 864-5211 (U.S.) or (800) 465-7587 (Canada)
*if equipped
VISUAL INDEX
..............................................................
1Steering Wheel and Nearby Controls ...............1
Dashboard and
other Controls .......................... 2
SPORT HYBRID I-MMD............................................... 3
SAFETY INFORMATION
.............................................. 4Important Safety Information .............................4
High-
voltage System Precautions ..................... 6
Seat Belts...............................................................
7
Airbags
................................................................. 10
Child Safety
......................................................... 16
Safety Label Locations
...................................... 23
reporting Safety Defects ..................................24
INSTRUMENT PANEL ................................................ 25Malfunction Indicators ......................................25
Condition Indicators
........................................... 27
on/off Indicators ................................................ 28
Multi-Information Display (MID)
...................... 29
VEHICLE CONTROLS .................................................. 31Using the remote Transmitter ..........................31
Smart
entry System ............................................ 32
Door
operation ................................................... 33
Power Window
operation ................................ 34
Power Moonroof
operation* ........................... 35
Interior and
exterior Lights ............................... 36
Auto High-Beam System*
................................. 37
Wiper
operation ................................................. 39
one-Touch T
urn Signal
...................................... 40
Adjusting the Seats
............................................ 41
Adjusting the Steering Wheel
.......................... 44
Driving Position Memory System
.................... 44
Adjusting the Mirrors
......................................... 45
HomeLink® Universal Transceiver* ................. 46
Climate Control System
.................................... 47
Seat Heaters*
..................................................... 48
Customized Features
......................................... 49
Setting the Clock
................................................ 50
AUDIO AND CONNECTIVITY ....................................51Basic Audio operation ......................................... 51
one Display Audio operation ..............................55
FM/AM
radio ...................................................... 56
Compact Disc (CD)
............................................. 57
iPod® .................................................................... 58
USB Flash Drive
.................................................. 59
Bluetooth® Audio ................................................ 60
Pandora® ............................................................. 61
Touchscreen
operation ....................................... 62
HondaLink® ......................................................... 64
Wi-Fi Connection
................................................ 65
Aha™
radio ......................................................... 65
Apple® CarPlay® ................................................ 66
Android Auto™....................................................67
FM/AM
radio ..................................................... 68
SiriusXM® radio* ............................................... 69
Compact Disc (CD)
............................................ 70
iPod® .................................................................... 71
USB Flash Drive
.................................................. 72
Bluetooth® Audio ................................................ 73
Pandora® ............................................................. 74
BLUETOOTH® HANDSFREELINK® (HFL) .................75Models with one display ...................................... 75
Basic HFL
operation .......................................... 75
Pairing a Phone
.................................................. 76
Making a Call.......................................................
77
SMS Text Messaging
......................................... 79
Models with touchscreen....................................
80
Basic HFL
operation .......................................... 80
Pairing a Phone
.................................................. 82
Making a Call.......................................................
83
SMS Text Messaging and
e-Mail* .................. 85
HondaLink® Assist .............................................. 86
Siri™
eyes Free ................................................... 87
NAVIGATION* ............................................................. 88Basic Navigation operation .............................88
Page 5 of 80

2 || 3
V
ISUAL INDEXVISUAL INDEX
Dashboard and Other Controls
1 Audio system/touchscreen*/
navigation* system p. 55,
p. 62,
p. 80,
p. 88
2 Hazard warning button
3 Climate control system p. 47
4 Seat heater switches* p. 48
5 USB port p. 51Wireless charger* p. 52
Accessory power socket p. 51
6 rearview mirror p. 45
7 Power window switches p. 34
Door lock switches p. 33
Door mirror controls p. 45
8 Fuel fill door release handle
p. 113
Trunk release p. 33
9 Shift lever p. 101
10 Hood release handle p. 129
11 Driving Position Memory System
buttons* p. 44
12 SPorT mode button p. 104
ev mode button p. 104
*if equipped
2
4
71
8
6
35910
11
SPORT HYBRID I-MMD
This Accord with SPorT HYBrID i-MMD uses both an electric motor and a gasoline
engine. A High
voltage battery powers the electric motor. The High voltage battery
is recharged by an engine-driven generator and regenerative braking.
i-MMD automatically manages the engine and motor, switching between them or
blending them as appropriate. Under certain circumstances, you can selec\
t
ev
mode (driving on electricity only) by pressing the
ev button (see page 104).
In addition to the High
voltage battery, this vehicle includes a standard 12-volt
battery to power the airbags, the interior and exterior lights, and othe\
r 12-volt systems.
Y
our driving style heavily impacts fuel efficiency and driving range. S\
pirited
acceleration, high-speed driving, or heavy climate-control use can quick\
ly reduce
the High
voltage battery’s charge. That can trigger the system to switch to the
gasoline-powered engine.
High
Batter y
voltage
Generator & electric Motor
Gasoline engin
e
12
Page 29 of 80
50 || 51
AUDIO AND CONNECTIVITY
V
EHICLE CONTROLS
Setting the Clock
Adjust the time using the steps described for your vehicle type.
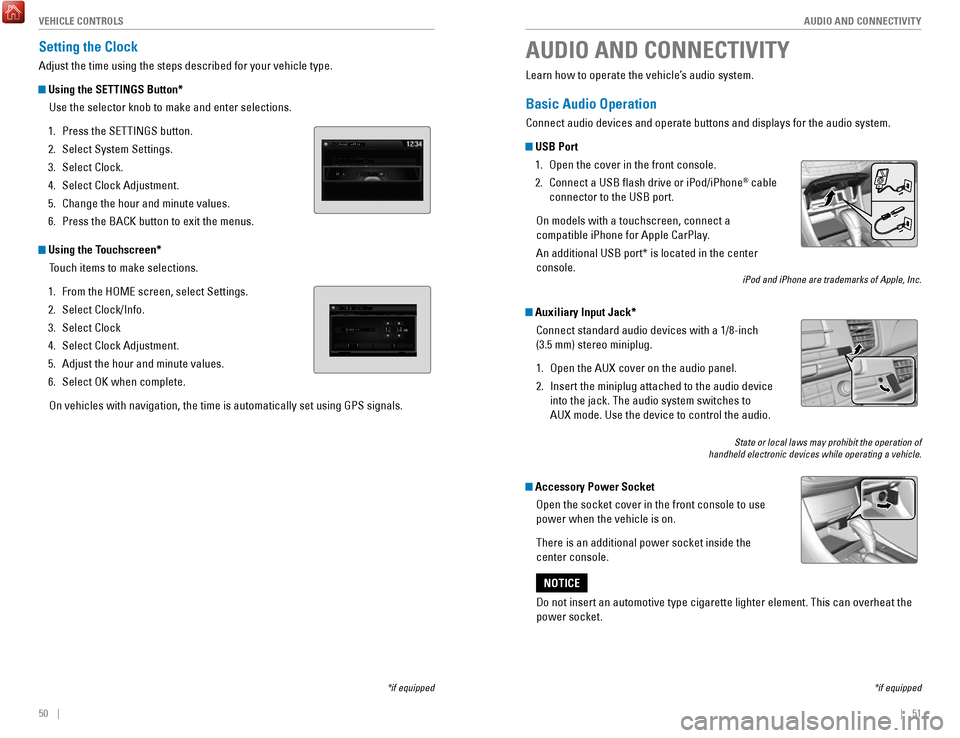
Using the SETTINGS Button*
Use the selector knob to make and enter selections.
1.
Press the SeTTINGS button.
2.
Select System Settings.
3.
Select Clock.
4.
Select Clock Adjustment.
5.
Change the hour and minute values.
6.
Press the BACK button to exit the menus.
Using the Touchscreen* Touch items to make selections.
1.
From the HoMe screen, select Settings.
2.
Select Clock/Info.
3.
Select Clock
4.
Select Clock Adjustment.
5.
Adjust the hour and minute values.
6.
Select oK when complete.
on vehicles with navigation, the time is automatically set using GPS sign\
als.
*if equipped
AUDIO AND CONNECTIVITY
*if equipped
Learn how to operate the vehicle’s audio system.
Basic Audio Operation
Connect audio devices and operate buttons and displays for the audio sys\
tem.
USB Port 1.
open the cover in the front console.
2.
Connect a USB flash drive or iPod/iPhone® cable
connector to the USB port.
on models with a touchscreen, connect a
compatible iPhone for Apple CarPlay.
An additional USB port* is located in the center
console.
iPod and iPhone are trademarks of Apple, Inc.
Auxiliary Input Jack*
Connect standard audio devices with a 1/8-inch
(3.5 mm) stereo miniplug.
1.
open the AUX cover on the audio panel.
2.
Insert the miniplug attached to the audio device
into the jack. The audio system switches to
AUX
mode. Use the device to control the audio.
State or local laws may prohibit the operation of
handheld electronic devices while operating a vehicle.
Accessory Power Socket
open the socket cover in the front console to use
power when the vehicle is on.
There is an additional power socket inside the
center console.
Do not insert an automotive type cigarette lighter element. This can ove\
rheat the
power socket.
NOTICE
Page 36 of 80
64 || 65
AUDIO AND CONNECTIVITY
AUDIO AND CONNECTIVITY
Models with touchscreen
HondaLink®
Provides you with useful information about your vehicle directly from Ho\
nda.
To check phone compatibility, visit handsfreelink.com (U.S.) or handsfreelink.ca
(Canada). Standard data rates may apply with your phone service provid\
er.
To get more information on HondaLink, visit www.hondalink.com (U.S.) or honda.ca/
hondalink (Canada).
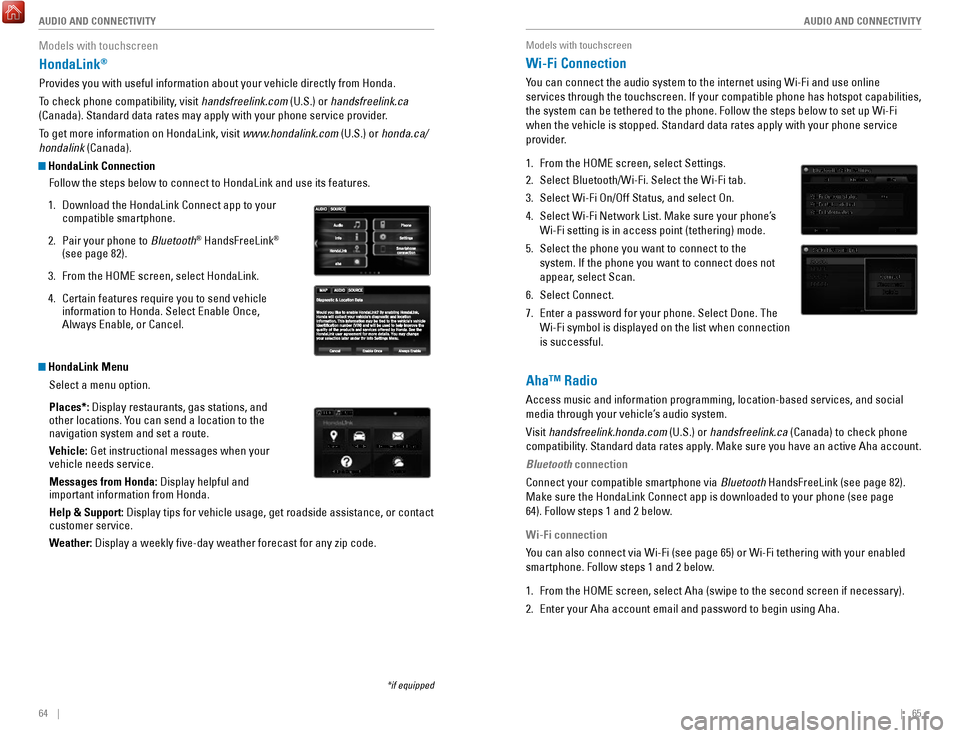
HondaLink Connection
Follow the steps below to connect to HondaLink and use its features.
1.
Download the HondaLink Connect app to your
compatible smartphone.
2.
Pair your phone to Bluetooth® HandsFreeLink®
(see page 82).
3.
From the HoMe screen, select HondaLink.
4.
Certain features require you to send vehicle
information to Honda. Select enable once,
Always enable, or Cancel.
HondaLink Menu
Select a menu option.
Places*: Display restaurants, gas stations, and
other locations. You can send a location to the
navigation system and set a route.
Vehicle: Get instructional messages when your
vehicle needs service.
Messages from Honda: Display helpful and
important information from Honda.
Help & Support: Display tips for vehicle usage, get roadside assistance, or contact
customer service.
Weather: Display a weekly five-day weather forecast for any zip code.
*if equipped
Models with touchscreen
Wi-Fi Connection
You can connect the audio system to the internet using Wi-Fi and use onli\
ne
services through the touchscreen. If your compatible phone has hotspot c\
apabilities,
the system can be tethered to the phone. Follow the steps below to set u\
p Wi-Fi
when the vehicle is stopped. Standard data rates apply with your phone s\
ervice
provider.
1.
From the HoMe screen, select Settings.
2.
Select Bluetooth/Wi-Fi. Select the Wi-Fi tab.
3.
Select Wi-Fi on/off Status, and select on.
4.
Select Wi-Fi Network List. Make sure your phone’s
Wi-Fi setting is in access point (tethering) mode.
5.
Select the phone you want to connect to the
system. If the phone you want to connect does not
appear, select Scan.
6.
Select Connect.
7.
enter a password for your phone. Select Done. The
Wi-Fi symbol is displayed on the list when connection
is successful.
Aha™ Radio
Access music and information programming, location-based services, and social
media through your vehicle’s audio system.
visit handsfreelink.honda.com
(U.S.) or handsfreelink.ca (Canada) to check phone
compatibility. Standard data rates apply. Make sure you have an active Aha account.
Bluetooth connection
Connect your compatible smartphone via Bluetooth HandsFreeLink (see page 82).
Make sure the HondaLink Connect app is downloaded to your phone (see pa\
ge
64). Follow steps 1 and 2 below.
Wi-Fi connection
You can also connect via Wi-Fi (see page 65) or Wi-Fi tethering with yo\
ur enabled
smartphone. Follow steps 1 and 2 below.
1.
From the HoMe screen, select Aha (swipe to the second screen if necessary).
2.
enter your Aha account email and password to begin using Aha.
Page 37 of 80
66 || 67
AUDIO AND CONNECTIVITY
AUDIO AND CONNECTIVITY
Models with touchscreen
Apple® CarPlay®
Connect a compatible iPhone to the system. You can use the touchscreen to make
a phone call, listen to music, and more.
visit the Apple CarPlay website for more
infromation.
Park in a safe place before connecting your iPhone
and launching any compatible apps.
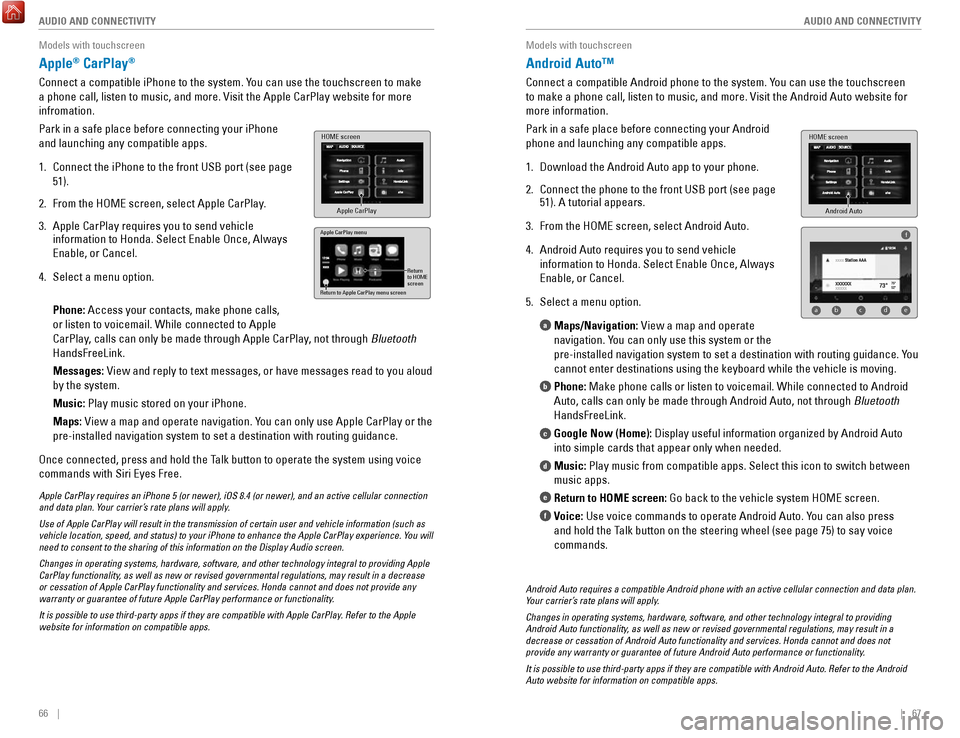
1.
Connect the iPhone to the front USB port (see page
51).
2.
From the HoMe screen, select Apple CarPlay.
3.
Apple CarPlay requires you to send vehicle
information to Honda. Select enable once, Always
enable, or Cancel.
4.
Select a menu option.
Phone: Access your contacts, make phone calls,
or listen to voicemail. While connected to Apple
CarPlay, calls can only be made through Apple CarPlay
, not through Bluetooth
HandsFreeLink.
Messages:
view and reply to text messages, or have messages read to you aloud
by the system.
Music: Play music stored on your iPhone.
Maps:
view a map and operate navigation. You can only use Apple CarPlay or the
pre-installed navigation system to set a destination with routing guidan\
ce.
once connected, press and hold the Talk button to operate the system using voice
commands with Siri
eyes Free.
HOME screen
Apple CarPlay
Apple CarPlay menu
Return
to HOME
screen
Return to Apple CarPlay menu screen
Apple CarPlay requires an iPhone 5 (or newer), iOS 8.4 (or newer), a\
nd an active cellular connection
and data plan. Your carrier’s rate plans will apply.
Use of Apple CarPlay will result in the transmission of certain user and\
vehicle information (such as
vehicle location, speed, and status) to your iPhone to enhance the Appl\
e CarPlay experience. You will
need to consent to the sharing of this information on the Display Audio \
screen.
Changes in operating systems, hardware, software, and other technology i\
ntegral to providing Apple
CarPlay functionality, as well as new or revised governmental regulations, may result in a de\
crease
or cessation of Apple CarPlay functionality and services. Honda cannot a\
nd does not provide any
warranty or guarantee of future Apple CarPlay performance or functionali\
ty.
It is possible to use third-party apps if they are compatible with Apple\
CarPlay. Refer to the Apple
website for information on compatible apps.
Models with touchscreen
Android Auto™
Connect a compatible Android phone to the system. You can use the touchscreen
to make a phone call, listen to music, and more.
visit the Android Auto website for
more information.
Park in a safe place before connecting your Android
phone and launching any compatible apps.
1.
Download the Android Auto app to your phone.
2.
Connect the phone to the front USB port (see page
51). A tutorial appears.
3.
From the HoMe screen, select Android Auto.
4.
Android Auto requires you to send vehicle
information to Honda. Select
enable once, Always
enable, or Cancel.
5.
Select a menu option. Maps/Navigation:
view a map and operate
navigation. You can only use this system or the
pre-installed navigation system to set a destination with routing guidan\
c
e. You
cannot enter destinations using the keyboard while the vehicle is moving\
.
Phone: Make phone calls or listen to voicemail. While connected to Android
Auto, calls can only be made through Android Auto, not through Bluetooth
HandsFreeLink.
Google Now (Home): Display useful information organized by Android Auto
into simple cards that appear only when needed.
Music: Play music from compatible apps. Select this icon to switch between
music apps.
Return to HOME screen: Go back to the vehicle system H
oMe screen.
Voice:
Use voice commands to operate Android Auto. You can also press
and hold the Talk button on the steering wheel (see page 75) to say voice
commands.
a
b
c
d
e
f
Android Auto
HOME screen
f
ab cde
Android Auto requires a compatible Android phone with an active cellular\
connection and data plan.
Your carrier’s rate plans will apply.
Changes in operating systems, hardware, software, and other technology i\
ntegral to providing
Android Auto functionality, as well as new or revised governmental regulations, may result in a
decrease or cessation of Android Auto functionality and services. Honda \
cannot and does not
provide any warranty or guarantee of future Android Auto performance or \
functionality.
It is possible to use third-party apps if they are compatible with Andro\
id Auto. Refer to the Android
Auto website for information on compatible apps.
Page 39 of 80
70 || 71
AUDIO AND CONNECTIVITY
AUDIO AND CONNECTIVITY
Models with touchscreen
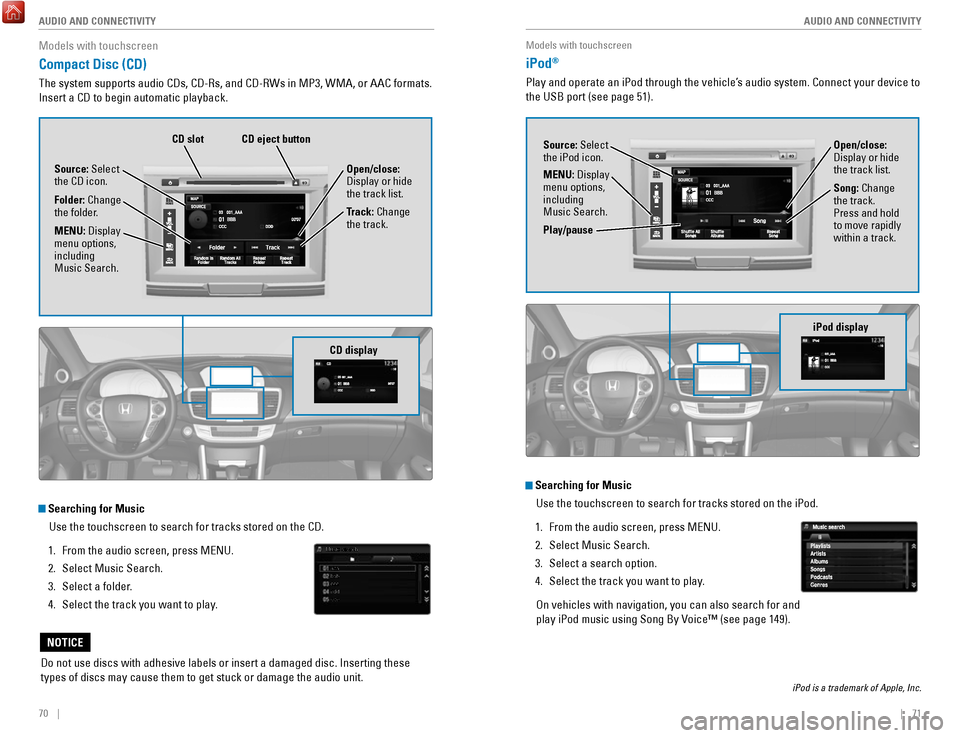
Compact Disc (CD)
The system supports audio CDs, CD-rs, and CD-rWs in MP3, WMA, or AAC formats.
Insert a CD to begin automatic playback.
Do not use discs with adhesive labels or insert a damaged disc. Insertin\
g these
types of discs may cause them to get stuck or damage the audio unit.
NOTICE
Searching for Music
Use the touchscreen to search for tracks stored on the CD.
1.
From the audio screen, press MeNU.
2.
Select Music Search.
3.
Select a folder.
4.
Select the track you want to play.
CD display
Source: Select
the CD icon.
Folder: Change
the folder. Open/close:
Display or hide
the track list.
Track: Change
the track.
MENU: Display
menu options,
including
Music Search.
CD eject buttonCD slot
Models with touchscreen
iPod®
Play and operate an iPod through the vehicle’s audio system. Connect your device to
the USB port (see page 51).
Searching for Music
Use the touchscreen to search for tracks stored on the iPod.
1.
From the audio screen, press MeNU.
2.
Select Music Search.
3.
Select a search option.
4.
Select the track you want to play.
on vehicles with navigation, you can also search for and
play iPod music using Song By
voice™ (see page 149).
iPod is a trademark of Apple, Inc.
iPod display
Source: Select
the iPod icon. Open/close:
Display or hide
the track list.
MENU: Display
menu options,
including
Music Search. Song: Change
the track.
Press and hold
to move rapidly
within a track.
Play/pause
Page 48 of 80
88 || 89
NAVIGATION
NAVIGATION
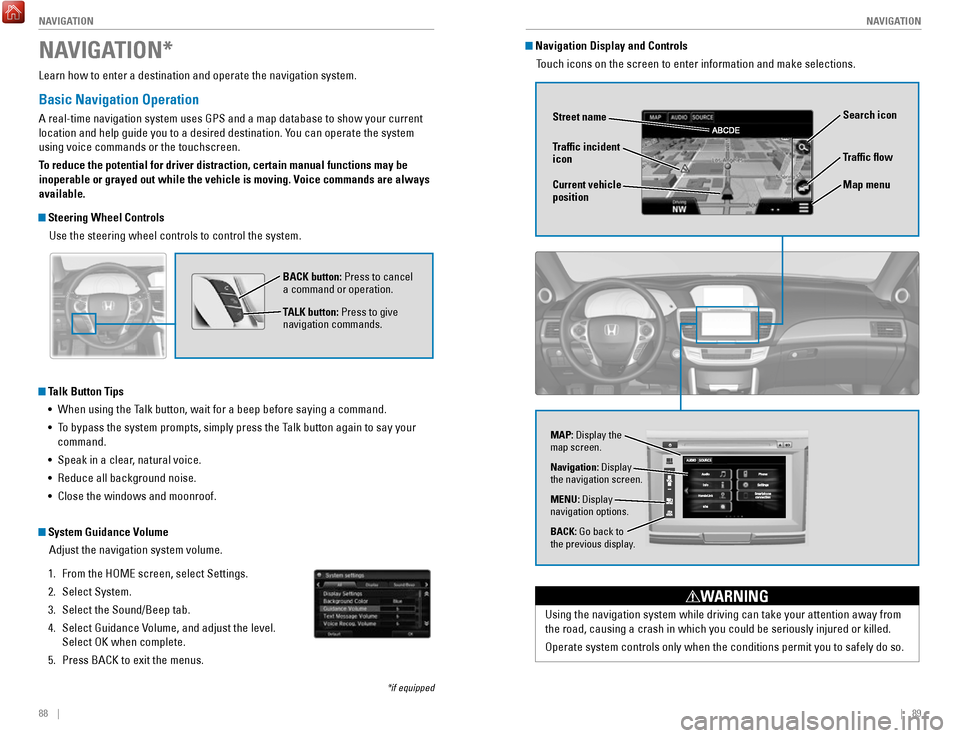
Learn how to enter a destination and operate the navigation system.
Basic Navigation Operation
A real-time navigation system uses GPS and a map database to show your current
location and help guide you to a desired destination. You can operate the system
using voice commands or the touchscreen.
To reduce the potential for driver distraction, certain manual functions \
may be
inoperable or grayed out while the vehicle is moving. Voice commands are always
available.
Steering Wheel Controls
Use the steering wheel controls to control the system.
NAVIGATION*
*if equipped
BACK button: Press to cancel
a command or operation.
TALK button: Press to give
navigation commands.
Talk Button Tips•
When using the Talk button, wait for a beep before saying a command.
•
To bypass the system prompts, simply press the Talk button again to say your
command.
•
Speak in a clear, natural voice.
•
reduce all background noise.
•
Close the windows and moonroof.
System Guidance Volume Adjust the navigation system volume.
1.
From the HoMe screen, select Settings.
2.
Select System.
3.
Select the Sound/Beep tab.
4.
Select Guidance volume, and adjust the level.
Select
oK when complete.
5.
Press BACK to exit the menus.
Using the navigation system while driving can take your attention away f\
rom
the road, causing a crash in which you could be seriously injured or kil\
led.
operate system controls only when the conditions permit you to safely do \
so.
WARNING
Navigation Display and Controls Touch icons on the screen to enter information and make selections.
Navigation: Display
the navigation screen.
BACK: Go back to
the previous display. MENU: Display
navigation options.
Traffic flow
Current vehicle
position Traffic incident
icon
Search icon
Map menu
MAP: Display the
map screen.
Street name
Page 49 of 80

90 || 91
NAVIGATION
NAVIGATION
Entering a Destination
Use several methods to enter a destination.
Home Address
Store your home address in the system so you can easily route to it.
1.
From the map screen, select the Search icon.
2.
Select MeNU.
3.
Select Set Home Location.
4.
Select enter My Address.
5.
Select Search All.
6.
enter the street number and select Done.
7.
enter the street name and select Done. Select
the street from the list.
8.
Select the address from the list. A map of the
address is shown. Select Select.
When your home address is stored, you can press the Talk
button and say
“Navigation
” and then “Go home” at any time. You can also select Go Home from
the Where To? menu.
Street Address
enter a street address.
1.
From the map screen, select the Search icon.
2.
Select Address.
3.
Select Search All.
4.
enter the street number and select Done.
5.
enter the street name and select Done. Select
the street from the list.
6.
Select the address from the list.
7.
Select Go!.
You can also enter a street address using
voice commands. Press the Talk button and say
“
Navigation” and then “Find Address.” Follow the
prompts.
Place Category
enter a destination using a point of interest or landmark.
1.
From the map screen, press MeNU.
2.
Select Where To?.
3.
Select Categories.
4.
Select a category (and a subcategory if
necessary).
5.
Select a place from the list.
6.
Select Go!.
You can also enter a street address using
voice commands. Press the Talk button and say
“
Navigation” and then “Find Place.” Follow the
prompts.
Recent Places
Select an address from a list of your 50 most recent destinations.
1.
From the map screen, press MeNU.
2.
Select Where To?.
3.
Select recent.
4.
Select a place from the list.
5.
Select Go!.