Page 225 of 330

GMC Terrain/Terrain Denali Owner Manual (GMNA-Localizing-U.S./Canada/
Mexico-9919509) - 2017 - crc - 8/16/16
224 Vehicle Care
Infrequent Usage: Remove the
black, negative (−) cable from the
battery to keep the battery from
running down.
Extended Storage: Remove the
black, negative (−) cable from the
battery or use a battery trickle
charger.
All-Wheel Drive
Transfer Case
Under normal driving conditions,
transfer case fluid does not require
maintenance unless there is a fluid
leak or unusual noise. If required,
have the transfer case serviced by
your dealer.
Starter Switch Check
{Warning
When you are doing this
inspection, the vehicle could
move suddenly. If the vehicle
moves, you or others could be
injured.
1. Before starting this check, be sure there is enough room
around the vehicle.
2. Apply both the parking brake and the regular brake.
Do not use the accelerator
pedal, and be ready to turn off
the engine immediately if it
starts.
3. Try to start the engine in each gear. The vehicle should start
only in P (Park) or N (Neutral).
If the vehicle starts in any other
position, contact your dealer for
service.
Automatic Transmission
Shift Lock Control
Function Check
{Warning
When you are doing this
inspection, the vehicle could
move suddenly. If the vehicle
moves, you or others could be
injured.
1. Before starting this check, be sure there is enough room
around the vehicle. It should be
parked on a level surface.
2. Apply the parking brake. Be ready to apply the regular
brake immediately if the vehicle
begins to move.
3. With the engine off, turn the ignition on, but do not start the
engine. Without applying the
regular brake, try to move the
shift lever out of P (Park) with
normal effort. If the shift lever
moves out of P (Park), contact
your dealer for service.
Page 226 of 330

GMC Terrain/Terrain Denali Owner Manual (GMNA-Localizing-U.S./Canada/
Mexico-9919509) - 2017 - crc - 8/16/16
Vehicle Care 225
Ignition Transmission
Lock Check
While parked and with the parking
brake set, try to turn the ignition to
LOCK/OFF in each shift lever
position.
.The ignition should turn to
LOCK/OFF only when the shift
lever is in P (Park).
. The ignition key should come
out only in LOCK/OFF.
Contact your dealer if service is
required.
Park Brake and P (Park)
Mechanism Check
{Warning
When you are doing this check,
the vehicle could begin to move.
You or others could be injured
and property could be damaged.
Make sure there is room in front
of the vehicle in case it begins to (Continued)
Warning (Continued)
roll. Be ready to apply the regular
brake at once should the vehicle
begin to move.
Park on a fairly steep hill, with the
vehicle facing downhill. Keeping
your foot on the regular brake, set
the parking brake.
. To check the parking brake's
holding ability: With the engine
running and the transmission in
N (Neutral), slowly remove foot
pressure from the regular brake
pedal. Do this until the vehicle is
held by the parking brake only.
. To check the P (Park)
mechanism's holding ability:
With the engine running, shift to
P (Park). Then release the
parking brake followed by the
regular brake.
Contact your dealer if service is
required.
Wiper Blade Replacement
Windshield wiper blades should be
inspected for wear and cracking.
See Maintenance Schedule 0280.
Replacement blades come in
different types and are removed in
different ways. For proper type and
length, see Maintenance
Replacement Parts 0290.
Caution
Allowing the wiper arm to touch
the windshield when no wiper
blade is installed could damage
the windshield. Any damage that
occurs would not be covered by
the vehicle warranty. Do not allow
the wiper arm to touch the
windshield.
Front Wiper Blade
Replacement
To replace the front wiper blades:
1. Lift the wiper arm from the windshield until no further
movement is possible.
Page 227 of 330

GMC Terrain/Terrain Denali Owner Manual (GMNA-Localizing-U.S./Canada/
Mexico-9919509) - 2017 - crc - 8/16/16
226 Vehicle Care
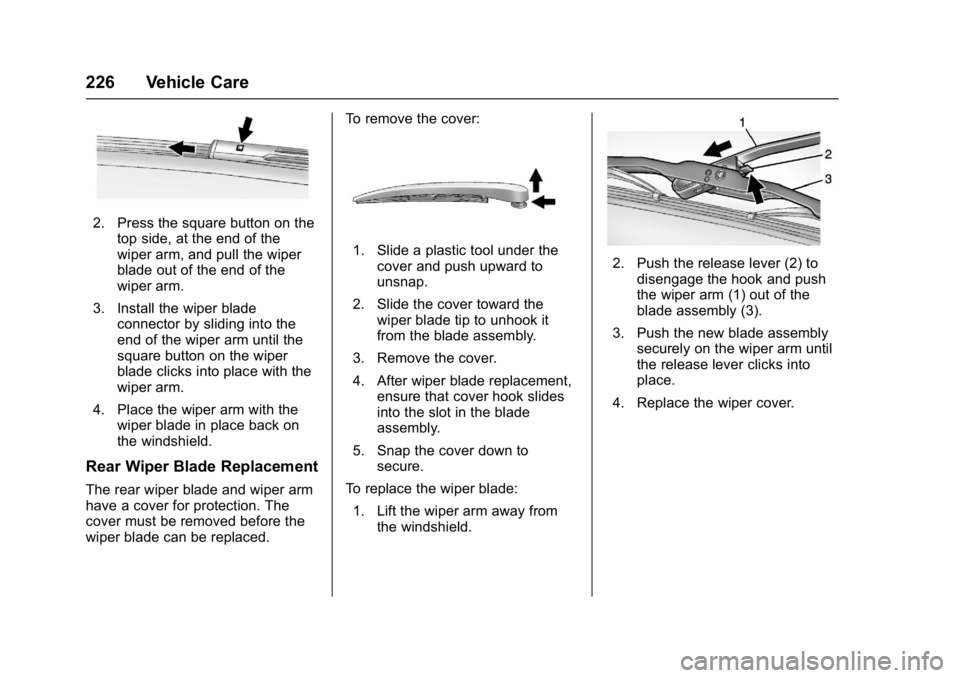
2. Press the square button on thetop side, at the end of the
wiper arm, and pull the wiper
blade out of the end of the
wiper arm.
3. Install the wiper blade connector by sliding into the
end of the wiper arm until the
square button on the wiper
blade clicks into place with the
wiper arm.
4. Place the wiper arm with the wiper blade in place back on
the windshield.
Rear Wiper Blade Replacement
The rear wiper blade and wiper arm
have a cover for protection. The
cover must be removed before the
wiper blade can be replaced. To remove the cover:
1. Slide a plastic tool under the
cover and push upward to
unsnap.
2. Slide the cover toward the wiper blade tip to unhook it
from the blade assembly.
3. Remove the cover.
4. After wiper blade replacement, ensure that cover hook slides
into the slot in the blade
assembly.
5. Snap the cover down to secure.
To replace the wiper blade:
1. Lift the wiper arm away from the windshield.2. Push the release lever (2) todisengage the hook and push
the wiper arm (1) out of the
blade assembly (3).
3. Push the new blade assembly securely on the wiper arm until
the release lever clicks into
place.
4. Replace the wiper cover.
Page 228 of 330

GMC Terrain/Terrain Denali Owner Manual (GMNA-Localizing-U.S./Canada/
Mexico-9919509) - 2017 - crc - 8/16/16
Vehicle Care 227
Headlamp Aiming
Headlamp aim has been preset and
should need no further adjustment.
If the vehicle is damaged in a crash,
the headlamp aim may be affected.
If adjustment to the headlamps is
necessary, see your dealer.
Bulb Replacement
For the proper type of replacement
bulbs, seeReplacement
Bulbs 0230.
For any bulb changing procedure
not listed in this section, contact
your dealer.
Halogen Bulbs
{Warning
Halogen bulbs have pressurized
gas inside and can burst if you
drop or scratch the bulb. You or
others could be injured. Be sure
to read and follow the instructions
on the bulb package.
Taillamps, Turn Signal,
Sidemarker, Stoplamps,
and Back-Up Lamps
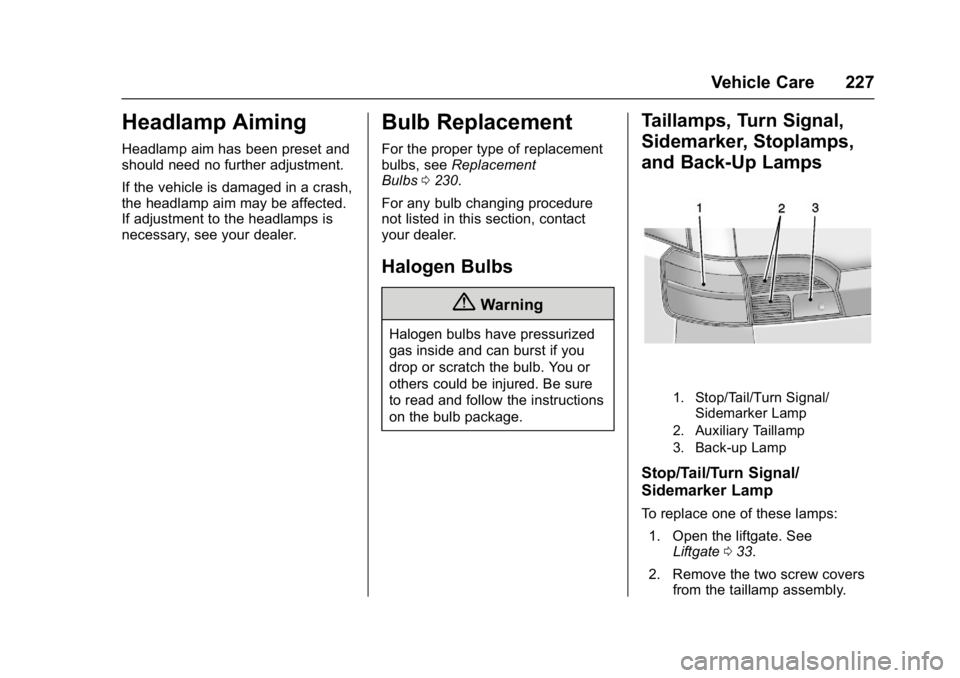
1. Stop/Tail/Turn Signal/ Sidemarker Lamp
2. Auxiliary Taillamp
3. Back-up Lamp
Stop/Tail/Turn Signal/
Sidemarker Lamp
To replace one of these lamps:
1. Open the liftgate. See Liftgate 033.
2. Remove the two screw covers from the taillamp assembly.
Page 229 of 330
GMC Terrain/Terrain Denali Owner Manual (GMNA-Localizing-U.S./Canada/
Mexico-9919509) - 2017 - crc - 8/16/16
228 Vehicle Care
3. Remove the two screwssecuring the taillamp assembly.
4. Pull the taillamp assembly out of the vehicle body.
5. Disconnect the lamp wiring harness.6. Turn the bulb socket
counterclockwise and pull
it out.
7. Pull the bulb straight out of the socket.
8. Install the new bulb.
9. Push the bulb socket in and turn it clockwise.
10. Reverse Steps 2–5 to reinstall the lamp assembly.11. Verify that the taillamp
assembly tab, located at the
bottom of the taillamp
assembly, is aligned to the
fascia bracket before securing
with screws.
Auxiliary Taillamp
To replace one of these lamps:
1. Open the liftgate. See Liftgate 033.
2. Remove the interior trim access panel.
Page 230 of 330

GMC Terrain/Terrain Denali Owner Manual (GMNA-Localizing-U.S./Canada/
Mexico-9919509) - 2017 - crc - 8/16/16
Vehicle Care 229
3. Remove the five attachmentnuts (1) securing the taillamp
assembly to the liftgate.
4. Disengage the retaining hook (2) and pull the taillamp
assembly out of the vehicle
liftgate.
5. Disconnect the lamp wiring harness.6. Turn the bulb socketcounterclockwise and pull
it out.
7. Pull the bulb straight out of the socket.
8. Install the new bulb.
9. Push the bulb socket in and turn it clockwise.
10. Reverse Steps 2–5 to reinstall lamp assembly.
Back–Up Lamp
Removal of the lamp assembly is
not required to replace the back-up
lamp bulb.
To replace one of these lamps: 1. Open the liftgate. See
Liftgate 033.
2. Remove the interior trim access panel.
3. Turn the bulb socketcounterclockwise and pull
it out.
4. Pull the bulb straight out of the socket.
5. Install the new bulb.
6. Push the bulb socket in and turn it clockwise.
7. Reinstall the interior trim access panel.
Page 231 of 330

GMC Terrain/Terrain Denali Owner Manual (GMNA-Localizing-U.S./Canada/
Mexico-9919509) - 2017 - crc - 8/16/16
230 Vehicle Care
License Plate Lamp
Lamp Assembly
Bulb Assembly
1. Bulb Socket2. Bulb
3. Lamp Assembly
To replace one of these bulbs:
1. Open the liftgate partway. See Liftgate 033.
2. Push the left end of the lamp assembly toward the right.
3. Pull the lamp assembly down to remove it from the liftgate.
4. Turn the bulb socket (1) counterclockwise to remove it
from the lamp assembly (3).
5. Pull the bulb (2) straight out of the bulb socket (1).
6. Push the replacement bulb straight into the bulb socket
and turn the bulb socket
clockwise to install it into the
lamp assembly.
7. Push the lamp assembly into the liftgate engaging the clip
side first.
8. Push on the lamp side opposite the clip until the lamp assembly
snaps into place.
Replacement Bulbs
Exterior Lamp Bulb
Number
Auxiliary Taillamp 161
Back-Up Lamp 921
License Plate Lamp W5WLL
Taillamp/Turn Signal
Lamp/Stop Lamp/
Sidemarker 3057K RD
For replacement bulbs not listed
here, contact your dealer.
Page 232 of 330

GMC Terrain/Terrain Denali Owner Manual (GMNA-Localizing-U.S./Canada/
Mexico-9919509) - 2017 - crc - 8/16/16
Vehicle Care 231
Electrical System
Fuses
The wiring circuits in the vehicle are
protected from short circuits by
fuses. This greatly reduces the
chance of damage caused by
electrical problems.
Look at the silver-colored band
inside the fuse. If the band is broken
or melted, replace the fuse. Be sure
to replace a bad fuse with a new
one of the identical size and rating.
Replace a bad fuse with a new one
of the identical size and rating.
If there is a problem on the road and
a fuse needs to be replaced, the
same amperage fuse can be
borrowed. Choose some feature of
the vehicle that is not needed to use
and replace it as soon as possible.
There are two fuse blocks in the
vehicle: one in the engine
compartment and one in the
instrument panel.There is a fuse puller located in the
engine compartment fuse block.
See
Engine Compartment Fuse
Block 0231. It can be used to easily
remove fuses from the fuse block.
Engine Compartment
Fuse Block
To remove the fuse block cover,
squeeze the clips on the cover and
lift it straight up. See Engine
Compartment Overview 0206.
Caution
Spilling liquid on any electrical
component on the vehicle may
damage it. Always keep the
covers on any electrical
component.