Scheduled MaintenanceNormal UsageSevere Usage*
Engine Oil & Filter (5.0 GDI)Replace7,500 or 12 mos.Replace3,750 or 6 mos.
Engine Oil & Filter (3.3 T-GDI)Replace6,000 or 6 mos.Replace3,000 or 6 mos.
Tire RotationPerform7,500Perform7,500
Air Cleaner FilterInspectReplace7,50030,000ReplaceMore Frequently
Vacuum HoseInspect7,500InspectSame As Normal
Climate Control Air Filter(For Evaporator and Blower Unit)Replace15,000ReplaceMore Frequently
Air Conditioning RefrigerantInspect15,000InspectSame As Normal
Brake Hoses & LinesInspect15,000InspectSame As Normal
Drive Shafts & BootsInspect15,000Inspect7,500
Exhaust Pipe & MufflerInspect15,000InspectSame As Normal
Front Disc Brake/Pads, Calipers & RotorsInspect15,000InspectMore Frequently
Propeller Shaft Inspect15,000Inspect7,500 or 6 mos.
Steering Gear Box, Linkage & Boots, Lower Arm Ball Joint, Upper Arm Ball JointInspect15,000InspectMore Frequently
Suspension Mounting BoltsInspect15,000InspectSame As Normal
Brake FluidInspect30,000InspectSame As Normal
Fuel FilterInspect30,000InspectSame As Normal
Fuel Lines, Fuel Hoses & ConnectionsInspect30,000InspectSame As Normal
Fuel Tank Air FilterInspect30,000InspectSame As Normal
Rear Disc Brake/Pads, Parking BrakeInspect30,000InspectMore Frequently
Vapor Hose, Fuel Tank & Fuel Filler CapInspect30,000InspectSame As Normal
Valve Clearance (3.3 T-GDI)Inspect60,000 or 72 mos.InspectSame As Normal
Drive Belts (Alt, A/C)1st 60,000 or 72 mos.Addl. Inspect 15,000 or 24 mos.InspectSame As Normal
Spark Plugs (5.0 GDI)Replace105,000ReplaceMore Frequently
Spark Plugs (3.3 T-GDI)Replace45,000ReplaceMore Frequently
Coolant1st Replace 120,000 or 120 mos.Addl. Replace 30,000 or 24 mos.ReplaceSame As Normal
Automatic Transmission FluidNo check, No service requiredReplace60,000
*See Owner’s Manual for details.
MAINTENANCE
NP150-G2017-B(Rev 10/28/16)Printing 12/29//16
Looking for more detailed information? This Quick Reference Guide does not replace your vehicle’s Owner’s Manual. If you require additional information or are unsure of a specific item, you should always refer to the vehicle’s Owner’s Manual or contact your authorized Dealer of Genesis Brand Products.
The information contained in this Quick Reference Guide was correct at the time of printing; however, specifications and equipment can change without notice. No warranty or g\
uarantee is being extended in this Quick Reference Guide, and Genesis Motors USA reserves the right to change product specifications and equipment at any time without incurring obligations. Some vehicles are shown with optional equipment. Specifications apply to U.S. vehicles only. Please contact your Dealer of Genesis Brand Products for current vehicle specifications.
☐ Tire Pressure Monitoring System (TPMS) - Page 33
☐ Genesis Connected Services - Page 15-16
☐ Explain Smart Drive Mode Function including SMART Icon
Color Changes - Page 37
☐ Wiper / Washer - Page 09
• To activate wipers move the switch down to one of three positions (AUTO, LO, HI)
• To adjust “AUTO” speed rotate dial
• To spray washer fluid, pull lever toward you
• Push lever up for a single wiper pass
- Assist with creating a Genesis Owners account- Assist with Genesis Connected Services enrollment- Show Genesis Connected Services Users Manual
- Encourage customers to press the Genesis Connected Services button
LOW TIRE PRESSURE INDICATOR: Illuminates if one or more of your tires is significantly under-inflated. Safely park the vehicle and check your tires as soon as possible, and inflate them to proper pressure.
NOTE: Tire pressure may vary in colder temperatures causing the
low tire pressure light to illuminate. Inflate tires according to the tire
pressure label located on the driver’s side door pillar.
TPMS MALFUNCTION INDICATOR: Illuminates when there is a
malfunction with the TPMS system. Have the system checked by an
authorized Dealer of Genesis Brand Products as soon as possible.
LOW TIRE PRESSURE POSITION INDICATOR: lndicates which tire is
significantly under-inflated by illuminating the corresponding position.
NOTE: TPMS is not a substitute for proper tire maintenance. It is the
driver’s responsibility to maintain correct tire pressure, even if under-
inflation has not reached the level to trigger illumination of the low tire
pressure indicator. Refer to the Owner’s Manual for further information.
WALK THE CUSTOMER THROUGH EACH OF
THE FOLLOWING KEY DELIVERY FEATURES
AUTO
LO
HI
MIST
OFF
Roadside Assistance: 1-844-340-9742
SiriusXM®Radio: 1-800-967-2346
Genesis Customer Care &Connected Services:
GENESIS G90
Quick Reference Guide
1-844-340-9741
www.GenesisMotorsUSA.com
Quick Reference Guide I 32 I Quick Reference Guide
A
GETTING STARTED
SMART KEY
Lock
Unlock
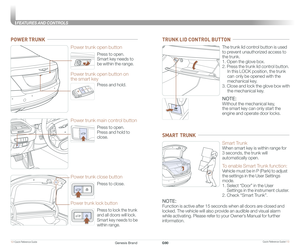
Trunk Open
Panic
Mechanical key
Press and hold the release button
A and remove the key.
NOTE:
User-selectable option; see the
Owner’s Manual for more details.
Vehicle must be in Park.
Setting seat position 1. Adjust the position of the driver’s
seat, outer side view mirror,
steering wheel, instrument panel
illumination and head-up display.
2. Press the SET button.
The system will beep once.
3. Press one of the memory buttons
(1, 2 or 3) within 4 seconds.
Recalling Press the desired memory button
(1,2 or 3). The system will beep once.
DRIVER MEMORY SYSTEM
Door Lock/Unlock
Smart key must be within range
Insert hand into door handle:
Once – Unlock driver’s door
Twice – Unlock all doors
Press the button to lock all doors.
SEAT BELT ADJUSTMENT (Front seat)
Pull up to raise.
Press button and
push down to
lower.
A
Genesis BrandG90
Quick Reference Guide I 54 I Quick Reference Guide
GETTING STARTED
FRONT SEAT ADJUSTMENT
Forward and rearward 1
Seat cushion length (for driver's seat) 2
Seatback angle 3
Seat cushion height and tilt 1
Lumbar support 4
Seat bolster adjustment 5
(for driver's seat, if equipped)
Rotate outer ring to adjust seat bolster
Seat shoulder adjustment 6
(for driver's seat, if equipped)
HEAD RESTRAINTS (Front seat)
HEAD RESTRAINTS (Rear seat)
Forward and rearward adjustmentUp and down adjustment
1
2
3
46
5
Folding the center head restraint (if equipped)
To fold the center head restraint:
• When the rear-center head restraint is not used, manually fold
back the rear-center head restraint while pressing the button (1)
on the side. To use the rear-center head restraint again, manually
pull up the rear-center head restraint, until it is securely latched.
• You can remove the rear-center head restraint by manually pulling
up the rear-center head restraint, while pressing the release button.
Genesis BrandG90
Quick Reference Guide I 76 I Quick Reference Guide
FEATURES AND CONTROLS
FUEL FILLER DOOR
NOTE:
After adding fuel, always reinstall
the fuel cap onto the filler neck
by rotating it clockwise until it
clicks one time.
STEERING WHEEL ADJUSTMENTS
Tilt
NOTE:
Do not adjust while driving.
Toggle switch A to adjust
steering wheel.
Telescope
A
Folding outside mirrors
Press to fold/unfold mirrors.
Press the lock or unlock button
on the smart key, and the mirrors
will be folded or unfolded.
Outer side view mirror
• Press the L or R button.
• Adjust the mirror by using
the directional switch.
Power window lock switch
Disables the power window
switches on the passenger doors.
Door lock
Locks/unlocks all doors.
Window switches
• Front doors power window switches.
• Rear doors power window switches.
DRIVER’S MAIN CONTROLS
With windows closed, pull up to
raise or push down to lower the
rear door window curtain.
(Driver’s door)(Rear doors)
REAR DOOR WINDOW CURTAIN
Press to raise and lower the rear
window curtain.
Heated steering wheel button.
Pressing the heated steering wheel
button warms the steering wheel.
The indicator on the button is
illuminated.
HEATED STEERING WHEEL
NOTE:
Heated steering wheel includes Smart Logic that automatically adjust
setting. Please refer to your Owner’s Manual for further information.
REAR WINDOW CURTAIN
NOTE:
When Reverse is engaged, curtain will lower automatically.
Curtain will raise automatically when (forward) speeds reach 12 mph.
Genesis BrandG90


Replace7,500 or 12 mos.Replace3,750 or 6 mos.
Engine Oil & Filter (3.3 T-GDI)Replace6,000 or 6 mos.Replace3,000 or 6 mos.
Ti")


 2
Seatback angle 3
Seat cushion height and")


