2017 GENESIS G90 brake light
[x] Cancel search: brake lightPage 320 of 524

5-59
05
When the temperature of the rearbumper is high.
When the sensors are blocked by other vehicles, walls or parking-lot
pillars.
When the detected vehicle also moves back, as your vehicle drives
back.
If there are small objects in the detecting area such as a shopping
cart or a baby stroller.
If there is a low height vehicle such as a sports car.
When other vehicles are close to your vehicle.
The lanes ahead are not visible due to rain, snow, water on the
road, damaged or stained road
surface, or other factors.
The brightness outside changes suddenly such as when entering or
exiting a tunnel.
The brightness outside is too low such as when the headlamps are
not on at night or the vehicle is
going through a tunnel.
It is difficult to distinguish the lane marking from the road surface or
the lane marking is faded or not
clearly marked.
Driving on a steep grade, over a hill, or when driving on a curved
road.
When light coming from a street light or an oncoming vehicle is
reflected on a wet road surface
such as a puddle in the road.
The field of view in front is obstructed by sun glare.
The lanes are incomplete or the area is in a construction zone.
There are more than two lane lines on the road in front of you. The lane markings are not clearly
visible from the road.
The lane width is too wide or too narrow.
The windshield glass is fogged up; a clear view of the road is obstruct-
ed.
There are markings on the road surface that look like a lane line
that is inadvertently being detected
by the camera.
There is a boundary structure in the roadway such as a concrete
barrier that is inadvertently being
detected by the camera.
There is not enough distance between you and the vehicle in
front to be able to detect the lane
line or the vehicle ahead is driving
on the lane line.
The road pavement (or the periph- eral ground) abnormally contains
metallic components (i.e. possibly
due to subway construction).
The brake pedal is depressed.
ESC (Electronic Stability Control) is activated.
The tire pressure is low or a tire is damaged.
The brake is reworked.
The vehicle is driven near a guardrail or near the boundary line
of a road.
The windshield or the camera lens is blocked with dirt or debris.
The vehicle drives on a small- radius curve.
The vehicle drives in the opposite direction from the designated lane
direction.
The lane sensing operation is inter- rupted by another vehicle in front.
Page 338 of 524

5-77
05
Information
• Even though the steering is assistedby the system, the driver can still
steer to control the steering wheel.
• The steering wheel may feel heavier when the steering wheel is assisted
by the system than when it is not.
The LKAS system will not be in the
ENABLED state and the steering
wheel will not be assisted when:
Vehicle speed is below 40 mph (64 km/h) and over 110 mph (177
km/h).
Only one lane line is detected.
The turn signal is turned on before changing a lane. If you change
lanes without the turn signal on, the
steering wheel might be controlled.
The hazard warning flasher is on.
The width of the lane is below 10 feet (3.1 m) and over 15 feet
(4.5 m).
ESC (Electronic Stability Control) or VSM (Vehicle Stability Management)
is activated.
The vehicle is driven on a sharp curve.
The vehicle brakes suddenly.
The vehicle makes sharp lane changes.
There are more than two lane lines on the road. (e.g. construction area)
The vehicle is driven on a steep incline.
Information
When the system is turned on or right
after changing a lane, drive in the
middle of the lane. If not, the system
will not provide steering assist func-
tion.
Warning light and message
Check LKAS
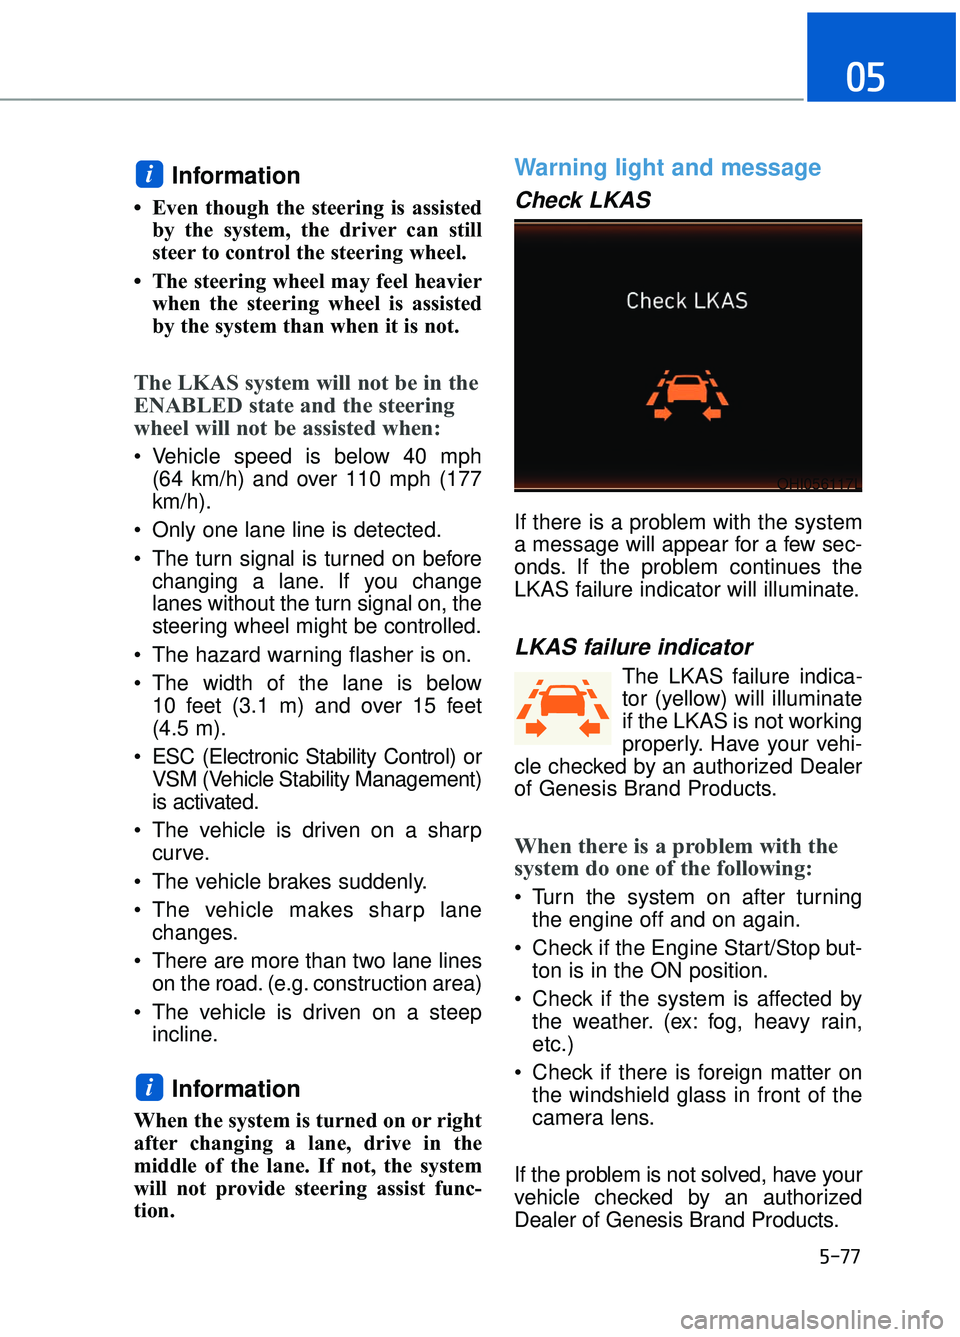
If there is a problem with the system
a message will appear for a few sec-
onds. If the problem continues the
LKAS failure indicator will illuminate.
LKAS failure indicator
The LKAS failure indica-
tor (yellow) will illuminate
if the LKAS is not working
properly. Have your vehi-
cle checked by an authorized Dealer
of Genesis Brand Products.
When there is a problem with the
system do one of the following:
Turn the system on after turning the engine off and on again.
Check if the Engine Start/Stop but- ton is in the ON position.
Check if the system is affected by the weather. (ex: fog, heavy rain,
etc.)
Check if there is foreign matter on the windshield glass in front of the
camera lens.
If the problem is not solved, have your
vehicle checked by an authorized
Dealer of Genesis Brand Products.
i
i
OHI056117L
Page 341 of 524

5-80
Driving your vehicle
(
(I
IF
F
E
E Q
Q U
UI
IP
P P
PE
ED
D )
)
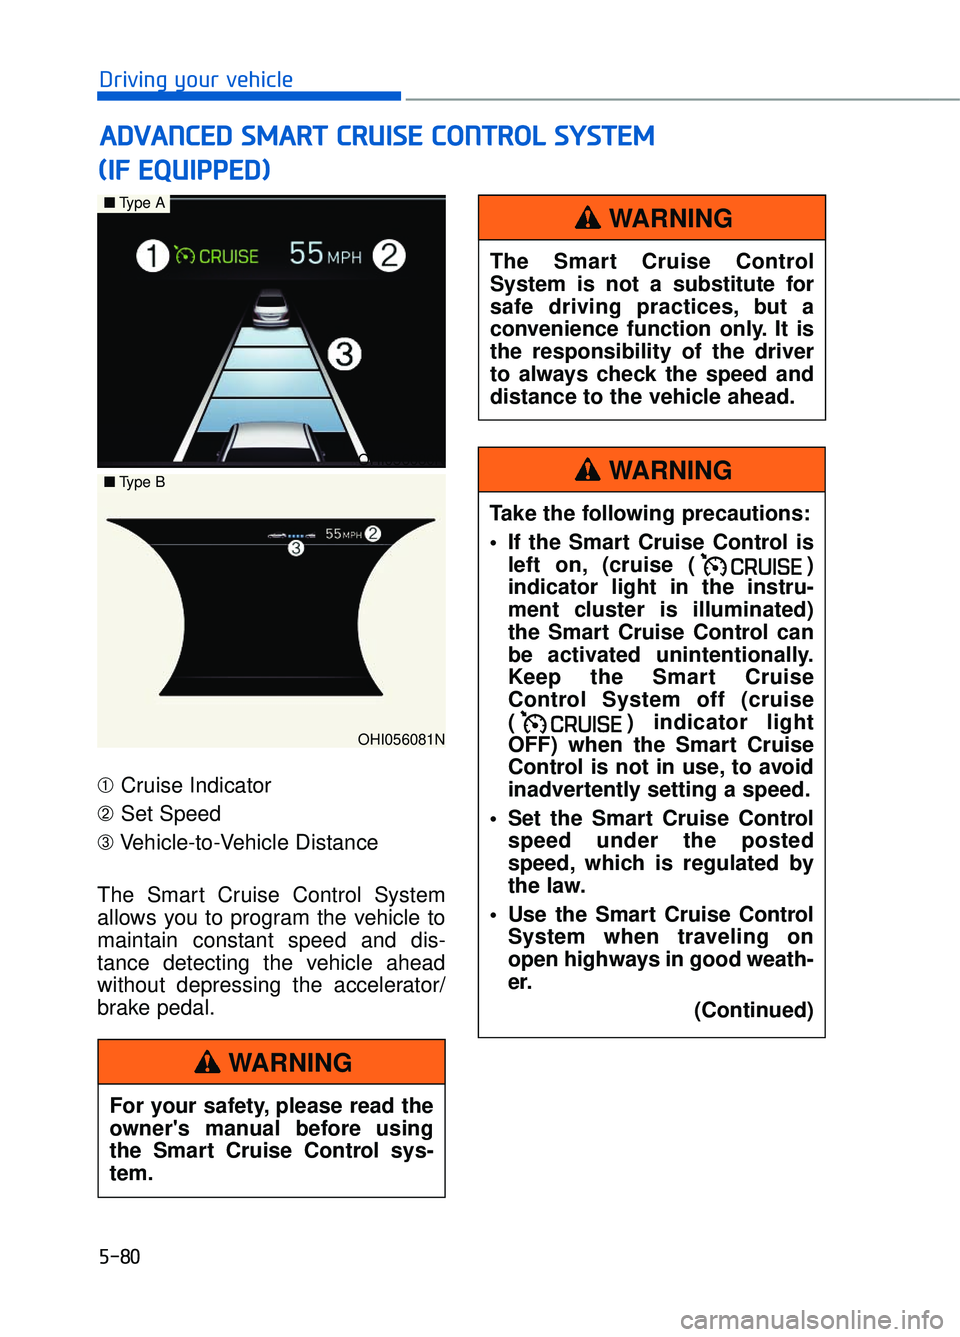
➀ Cruise Indicator
➁ Set Speed
➂ Vehicle-to-Vehicle Distance
The Smart Cruise Control System
allows you to program the vehicle to
maintain constant speed and dis-
tance detecting the vehicle ahead
without depressing the accelerator/
brake pedal.
A A D
DV
VA
A N
N C
CE
E D
D
S
S M
M A
AR
RT
T
C
C R
R U
U I
IS
S E
E
C
C O
O N
NT
TR
R O
O L
L
S
S Y
Y S
ST
T E
EM
M
OHI056080N
OHI056081N
■ Type A
■Type B
For your safety, please read the
owner's manual before using
the Smart Cruise Control sys-
tem.
WARNING
The Smart Cruise Control
System is not a substitute for
safe driving practices, but a
convenience function only. It is
the responsibility of the driver
to always check the speed and
distance to the vehicle ahead.
WARNING
Take the following precautions:
If the Smart Cruise Control is
left on, (cruise ( )
indicator light in the instru-
ment cluster is illuminated)
the Smart Cruise Control can
be activated unintentionally.
Keep the Smart Cruise
Control System off (cruise
( ) indicator light
OFF) when the Smart Cruise
Control is not in use, to avoid
inadvertently setting a speed.
Set the Smart Cruise Control speed under the posted
speed, which is regulated by
the law.
Use the Smart Cruise Control System when traveling on
open highways in good weath-
er.
(Continued)
WARNING
Page 364 of 524

5-103
05
Information
The ESC system must be turned OFF
before rocking the vehicle.
If you are still stuck after rocking
the vehicle a few times, have the
vehicle pulled out by a tow vehicle
to avoid engine overheating, pos-
sible damage to the transmission,
and tire damage. See "Towing" in
chapter 6.
Smooth Cornering
Avoid braking or gear changing in
corners, especially when roads are
wet. Ideally, corners should always
be taken under gentle acceleration.
Driving at Night
Night driving presents more hazards
than driving in the daylight. Here are
some important tips to remember:
Slow down and keep more dis-tance between you and other vehi-
cles, as it may be more difficult to
see at night, especially in areas
where there may not be any street
lights.
Adjust your mirrors to reduce the glare from other driver's head-
lamps.
Keep your headlamps clean and properly aimed. Dirty or improperly
aimed headlamps will make it
much more difficult to see at night.
Avoid staring directly at the head- lamps of oncoming vehicles. You
could be temporarily blinded, and it
will take several seconds for your
eyes to readjust to the darkness.
Driving in the Rain
Rain and wet roads can make driving
dangerous. Here are a few things to
consider when driving in the rain or
on slick pavement:
Slow down and allow extra follow-ing distance. A heavy rainfall
makes it harder to see and increas-
es the distance needed to stop
your vehicle.
Turn OFF your Cruise Control.
Replace your windshield wiper blades when they show signs of
streaking or missing areas on the
windshield.
Be sure your tires have enough tread. If your tires do not have
enough tread, making a quick stop
on wet pavement can cause a skid
and possibly lead to an accident.
See "Tire Tread" in chapter 7.
Turn on your headlamps to make it easier for others to see you.
Driving too fast through large pud- dles can affect your brakes. If you
must go through puddles, try to
drive through them slowly.
If you believe your brakes may be wet, apply them lightly while driv-
ing until normal braking operation
returns.
Hydroplaning
If the road is wet enough and you are
going fast enough, your vehicle may
have little or no contact with the road
surface and actually ride on the
water. The best advice is SLOW
DOWN when the road is wet.
The risk of hydroplaning increases
as the depth of tire tread decreas-
es, refer to "Tire Tread" in chapter 7.
NOTICE
i
Page 366 of 524

5-105
05
The severe weather conditions of winter quickly wear out tires and cause
other problems. To minimize winter driving problems, you should take the fol-
lowing suggestions:
Snow or Icy Conditions
You need to keep sufficient distance between your vehicle and the vehicle in
front of you.
Apply the brakes gently. Speeding, rapid acceleration, sudden brake applica-
tions, and sharp turns are potentially very hazardous practices. During decel-
eration, use engine braking to the fullest extent. Sudden brake applications on
snowy or icy roads may cause the vehicle to skid.
To drive your vehicle in deep snow, it may be necessary to use snow tires or
to install tire chains on your tires.
Always carry emergency equipment. Some of the items you may want to carry
include tire chains, tow straps or chains, a flashlight, emergency flares, sand,
a shovel, jumper cables, a window scraper, gloves, ground cloth, coveralls, a
blanket, etc.
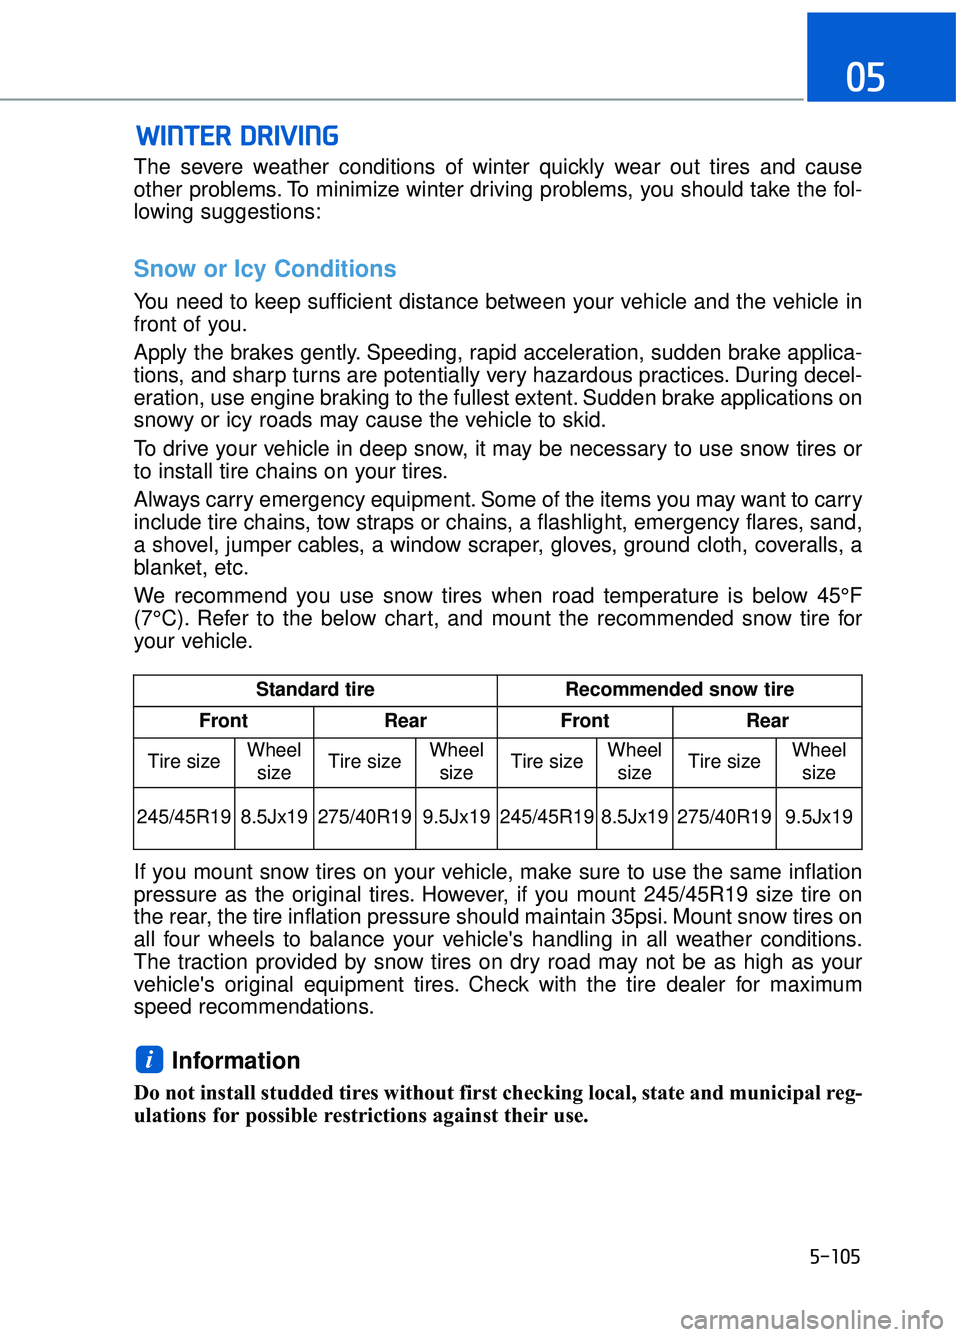
We recommend you use snow tires when road temperature is below 45°F
(7°C). Refer to the below chart, and mount the recommended snow tire for
your vehicle.
If you mount snow tires on your vehicle, make sure to use the same inflation
pressure as the original tires. However, if you mount 245/45R19 size tire on
the rear, the tire inflation pressure should maintain 35psi. Mount snow tires on
all four wheels to balance your vehicle's handling in all weather conditions.
The traction provided by snow tires on dry road may not be as high as your
vehicle's original equipment tires. Check with the tire dealer for maximum
speed recommendations.
Information
Do not install studded tires without first checking local, state and municipal reg-
ulations for possible restrictions against their use.
i
W WI
IN
N T
TE
ER
R
D
D R
RI
IV
V I
IN
N G
G
Standard tire Recommended snow tire
Front Rear Front Rear
Tire size Wheel
size Tire size Wheel
size Tire size
Wheel
size Tire size Wheel
size
245/45R19 8.5Jx19 275/40R19 9.5Jx19 245/45R19
8.5Jx19 275/40R19 9.5Jx19
Page 381 of 524

Information
An inappropriately disposedbattery can be harmful to the
environment and human
health. Dispose the battery
according to your local law(s)
or regulations.
To prevent damage to your vehi-
cle:
Only use a 12-volt power supply (battery or jumper system) to
jump start your vehicle.
Do not attempt to jump start your vehicle by push-starting.
Jump starting procedure
Information
Your vehicle has a battery in the trunk
compartment, but when you jump
start your vehicle, use the jumper ter-
minal in the engine compartment.
1. Position the vehicles close enough that the jumper cables will reach,
but do not allow the vehicles to
touch.
2. Avoid fans or any moving parts in the engine compartment at all
times, even when the vehicles are
turned off.
3. Turn off all electrical devices such as radios, lights, air conditioning,
etc. Put the vehicles in P (Park)
and set the parking brakes. Turn
both vehicles OFF.
4. Open the engine hood. 5. Open the small service cover with
a screwdriver.
6. Remove the engine room fuse box cover.
7. Connect the jumper cables in the exact sequence shown in the illus-
tration. First connect one jumper
cable to the red, positive (+)
jumper terminal of your vehicle (1).
8. Connect the other end of the jumper cable to the red, positive
(+) battery/jumper terminal of the
assisting vehicle (2).
i
NOTICE
i
6-6
What to do in an emergency
OHI066005
OHI066006N
Page 389 of 524

6-14
What to do in an emergency
Changing a Tire with TPMS
If you have a flat tire, the Low Tire
Pressure and LCD position indicator
will come on. Have the flat tire
repaired by an authorized Dealer of
Genesis Brand Products as soon as
possible or replace the flat tire with
the spare tire.
Never use a puncture-repairing
agent not approved by Dealer of
Genesis Brand Products to repair
and/or inflate a low pressure tire.
Tire sealant not approved by
Dealer of Genesis Brand Products
may damage the tire pressure
sensor.
The spare tire does not come with a
tire pressure monitoring sensor.
When the low pressure tire or the flat
tire is replaced with the spare tire,
the Low Tire Pressure LCD position
indicator will remain on. Also, the
TPMS Malfunction Indicator will illu-
minate after blinking for one minute if
the vehicle is driven at speed above
15.5 mph (25 km/h) for approximate-
ly 20 minutes.
Once the original tire equipped with
a tire pressure monitoring sensor is
reinflated to the recommended pres-
sure and reinstalled on the vehicle,
the Low Tire Pressure LCD position
indicator and TPMS Malfunction
Indicator will go off within a few min-
utes of driving.
If the indicators do not disappear
after a few minutes, please visit an
authorized Dealer of Genesis Brand
Products.Each wheel is equipped with a tire
pressure sensor mounted inside the
tire behind the valve stem (except for
the spare tire). You must use TPMS
specific wheels. It is recommended
that you always have your tires serv-
iced by an authorized Dealer of
Genesis Brand Products.
A cold tire means the vehicle has
been sitting for 3 hours and driven for
less than 1 mile (1.6 km) in that 3
hour period.
Allow the tire to cool before measur-
ing the inflation pressure. Always be
sure the tire is cold before inflating to
the recommended pressure.
NOTICE
The TPMS cannot alert you to
severe and sudden tire dam-
age caused by external fac-
tors such as nails or road
debris.
If you feel any vehicle instabil- ity, immediately take your foot
off the accelerator, apply the
brakes gradually with light
force, and slowly move to a
safe position off the road.
CAUTION
Page 409 of 524

7-7
07
Owner Maintenance Schedule
When you stop for fuel:
• Check the engine oil level.
Check coolant level in the enginecoolant reservoir.
Check the windshield washer fluid level.
Check for low or under-inflated tires.
While operating your vehicle:
Note any changes in the sound ofthe exhaust or any smell of exhaust
fumes in the vehicle.
Check for vibrations in the steering wheel. Notice if there is any
increased steering effort or loose-
ness in the steering wheel, or
change in its straight-ahead posi-
tion.
Notice if your vehicle constantly turns slightly or "pulls" to one side
when traveling on smooth, level
road.
When stopping, listen and check for unusual sounds, pulling to one
side, increased brake pedal travel
or "hard-to-push" brake pedal.
If any slipping or changes in the operation of your transmission
occurs, check the transmission
fluid level.
Check the automatic transmission P (Park) function.
Check the parking brake.
Check for fluid leaks under your vehicle (water dripping from the air
conditioning system during or after
use is normal).
At least monthly:
Check coolant level in the enginecoolant reservoir.
Check the operation of all exterior lights, including the brake lights,
turn signals and hazard warning
flashers.
Check the inflation pressures of all tires including the spare for tires
that are worn, show uneven wear,
or are damaged.
Check for loose wheel lug nuts.
Be careful when checking your
engine coolant level when the
engine is hot. This may result in
coolant being blown out of the
opening and cause serious
burns and other injuries.
WARNING